Toluca Prison
Welcome to the ninth chapter of the complete walkthrough guide for Silent Hill 2 Remake (2024) covering Toluca Prison. Use the key summary below for short, spoiler-free directions and the complete walkthrough section for in-depth guidelines with extra explanations. This walkthrough also includes complete maps with all items and monsters marked for easy reference.
Legend
1 Auto Parts key – key items
2 Radio – equipment
Health Drink – supplies
Map of Silent Hill – maps
Save Point – save points
Flower Shop Message – collectibles: memos, strange photos and glimpses of the past
NG+ – New Game+ items, memos and actions
Contents
- Complete Maps
- Key Summary
- Complete Walkthrough
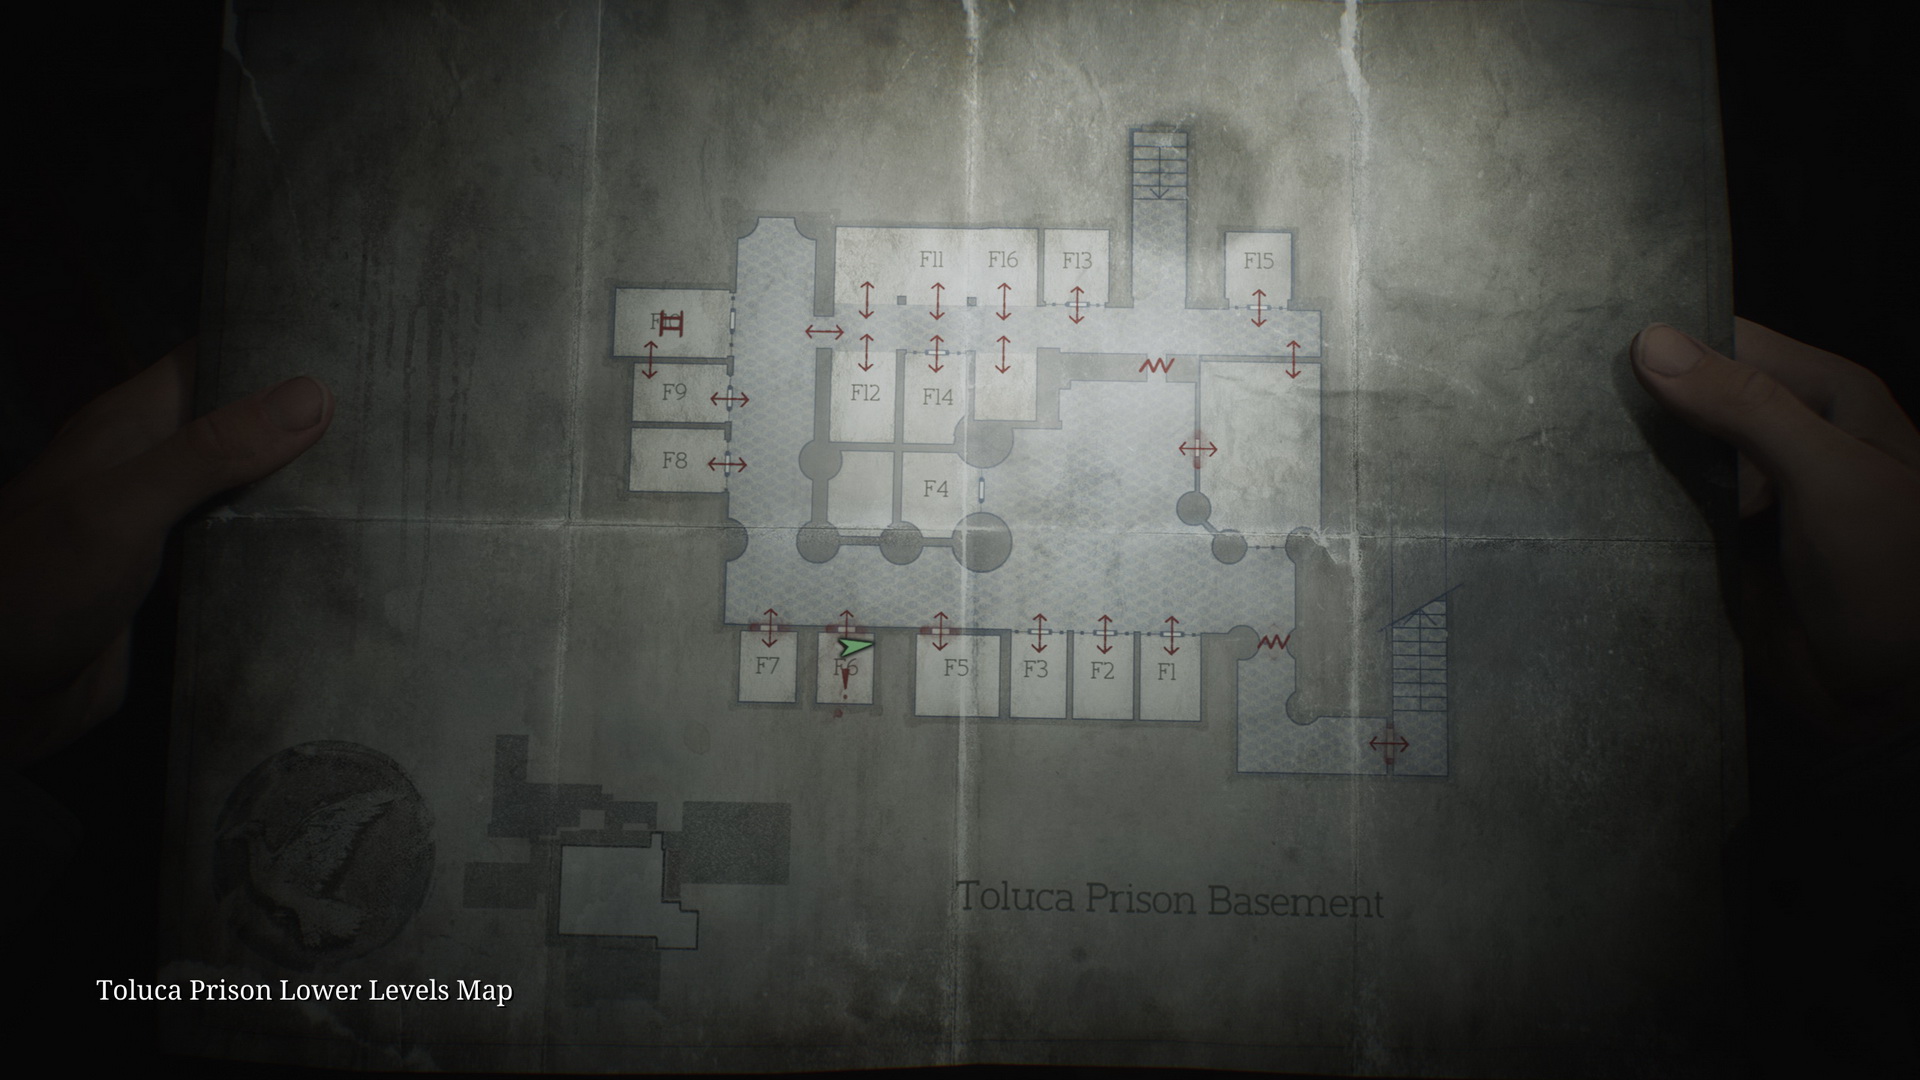
Complete Maps |
|
Collectibles count:
- 9 memos
- 2 strange photos
- 4 glimpses of the past
Key Summary
Main Section
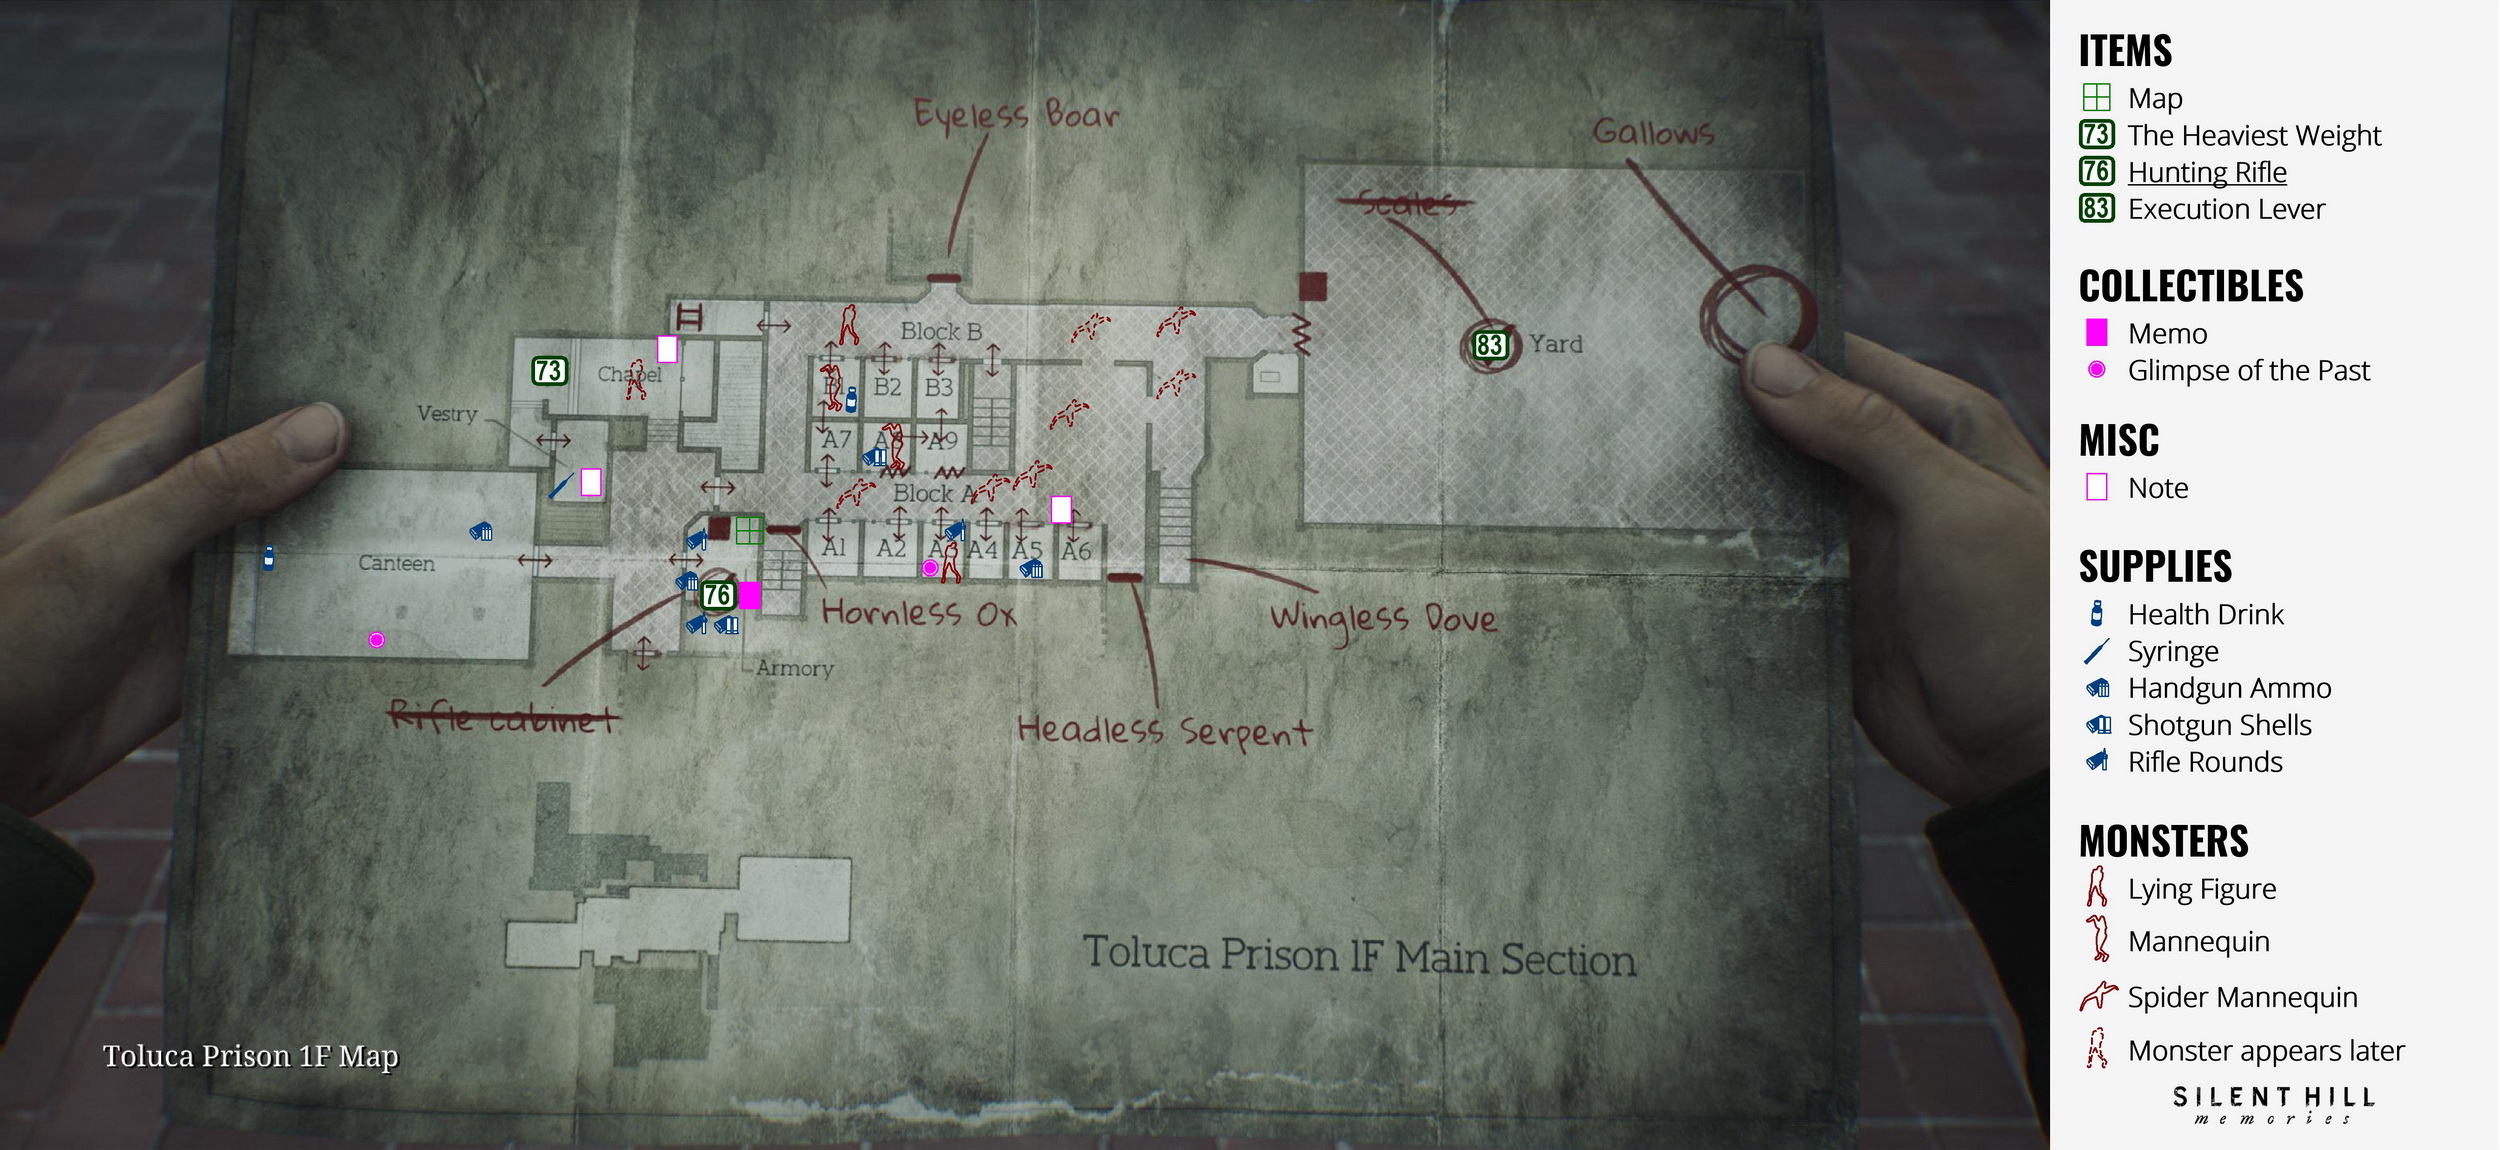
- Glimpse of the Past #18. As soon as you land in the prison, inspect a tablet to the right on the dining table in the Canteen.
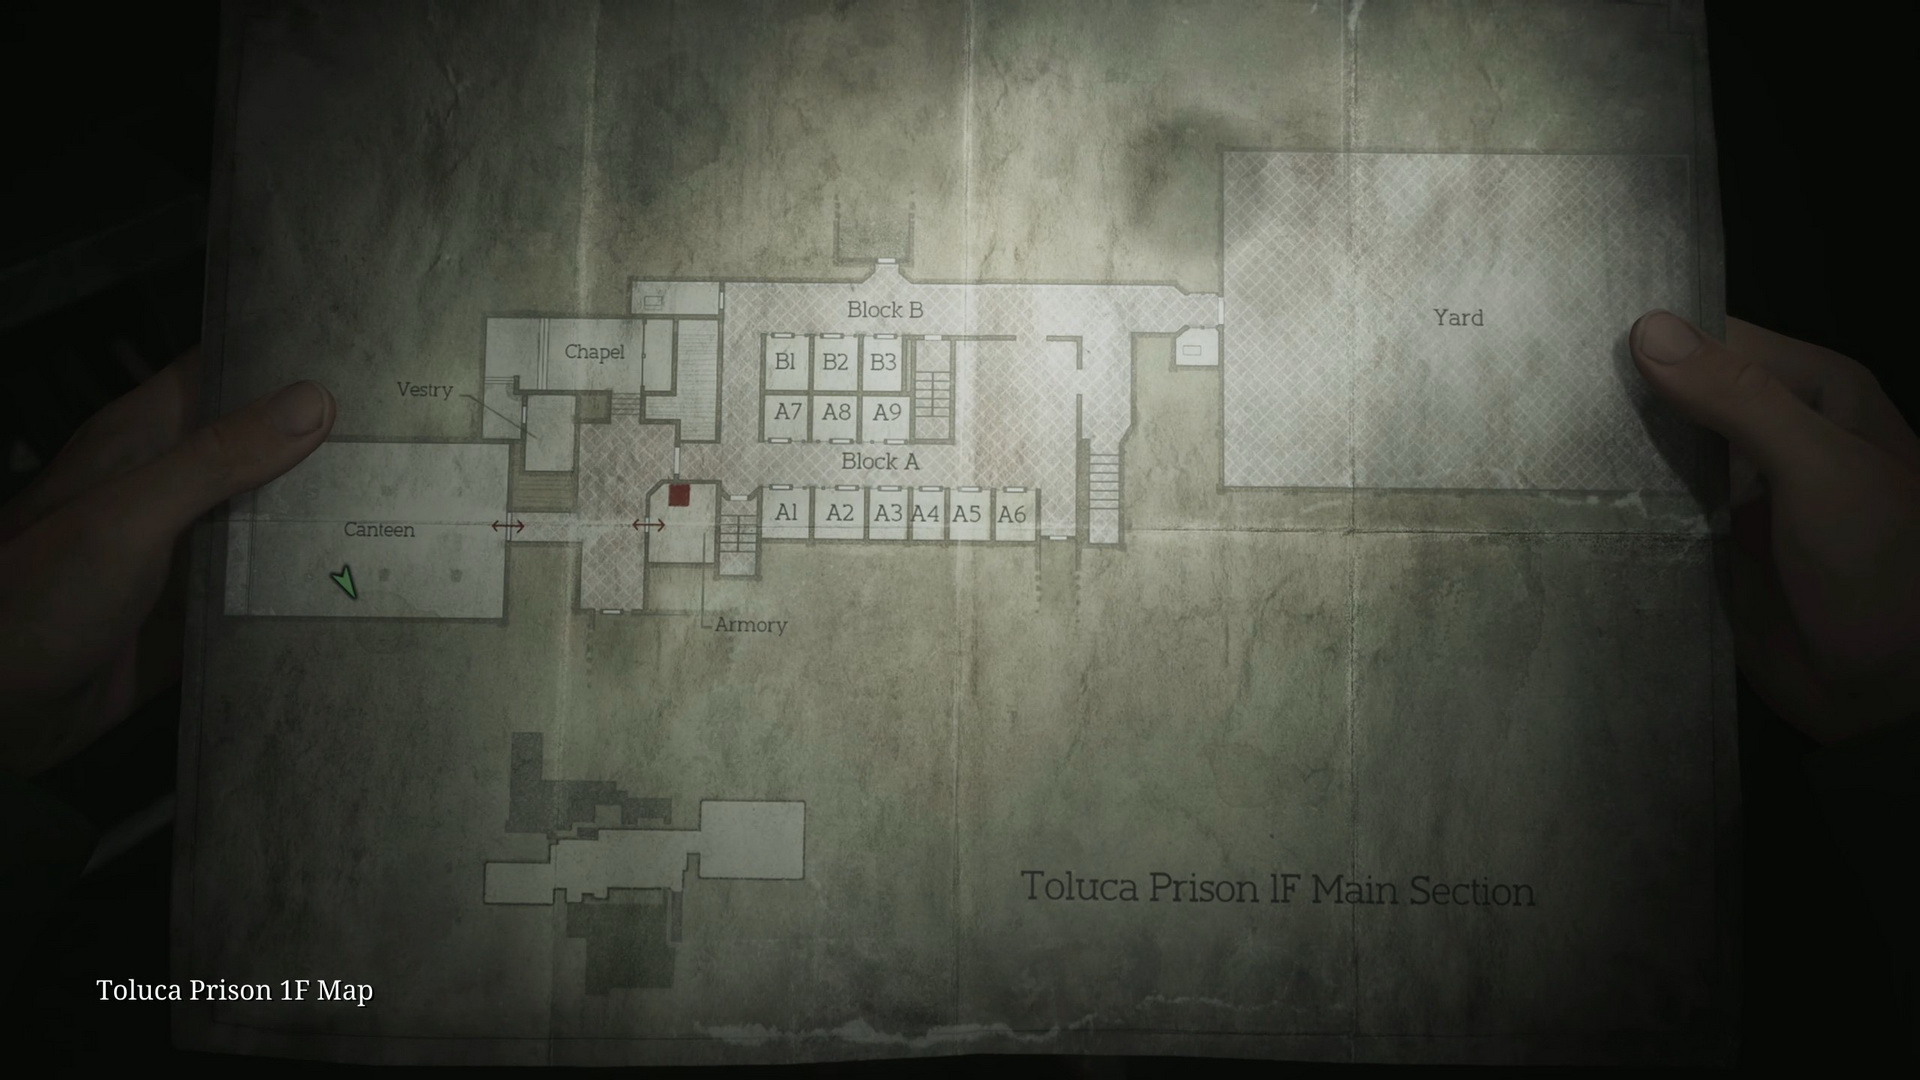
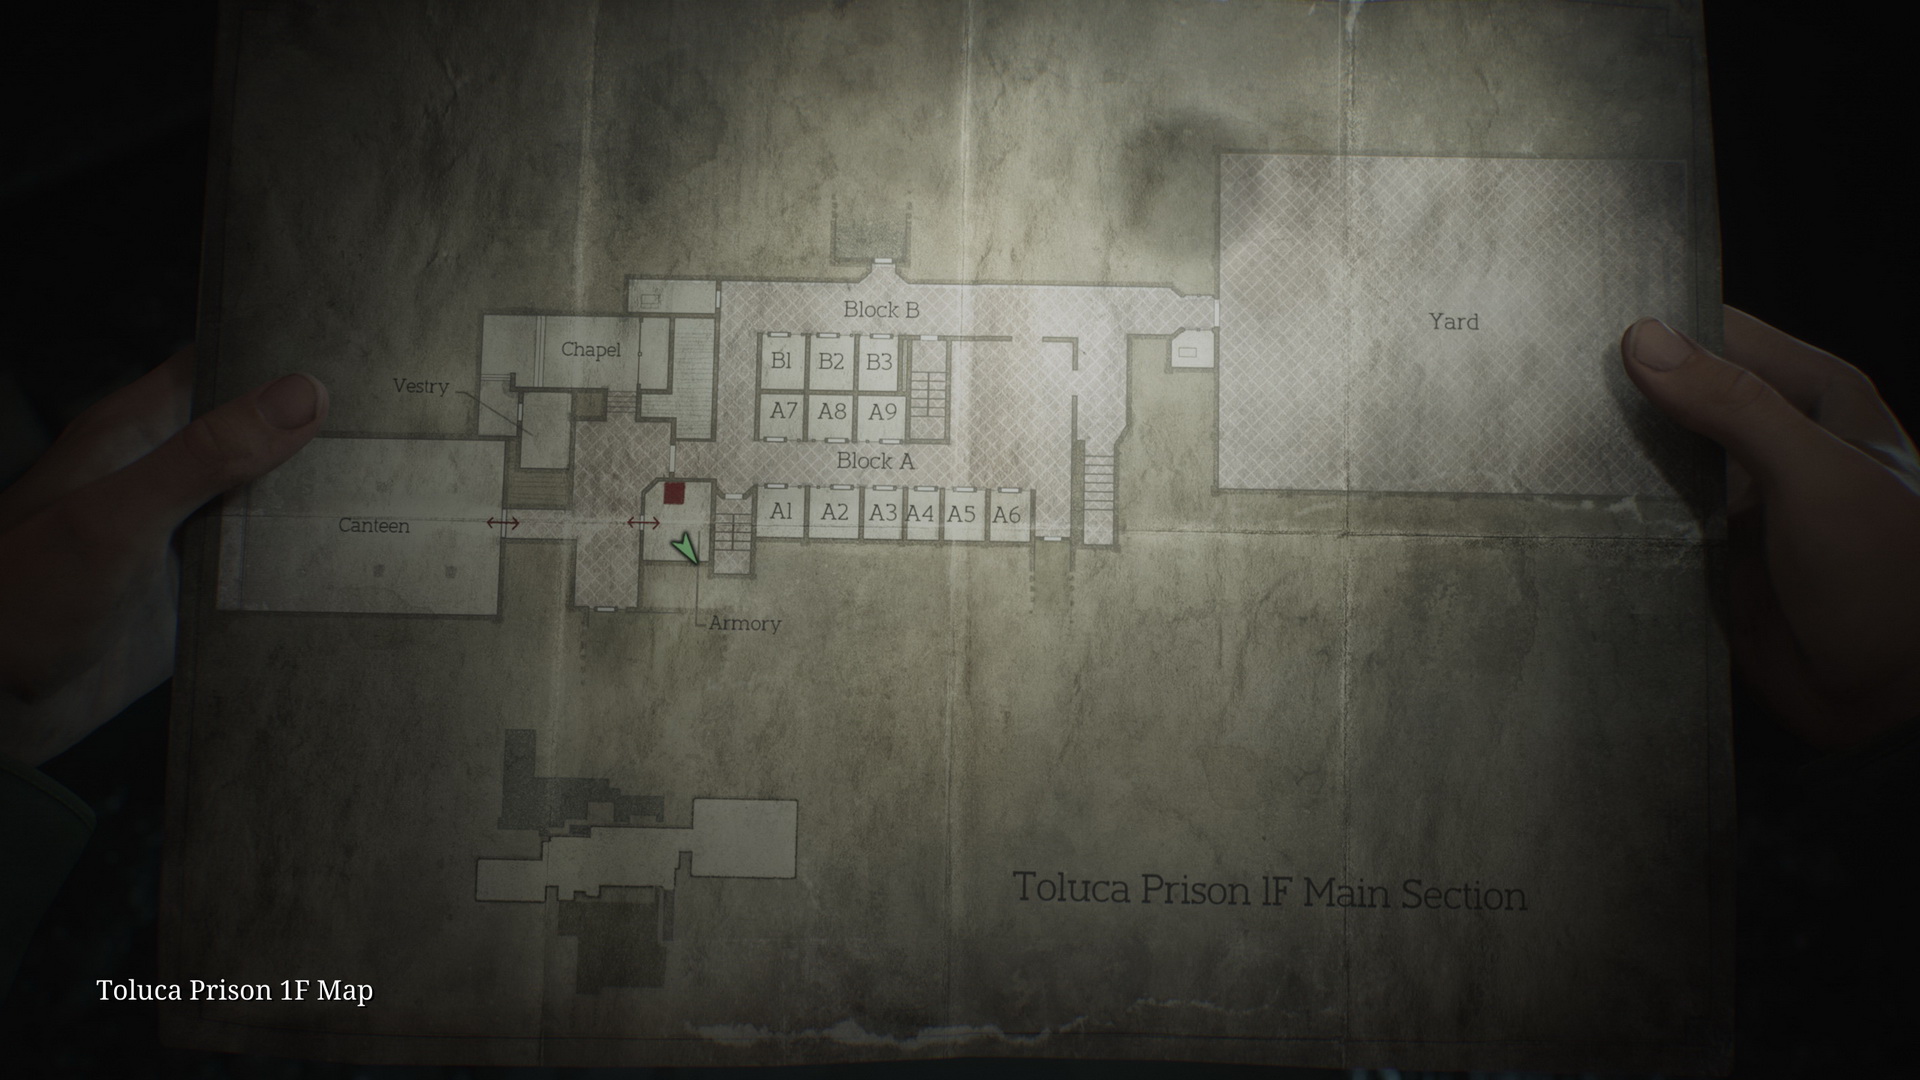
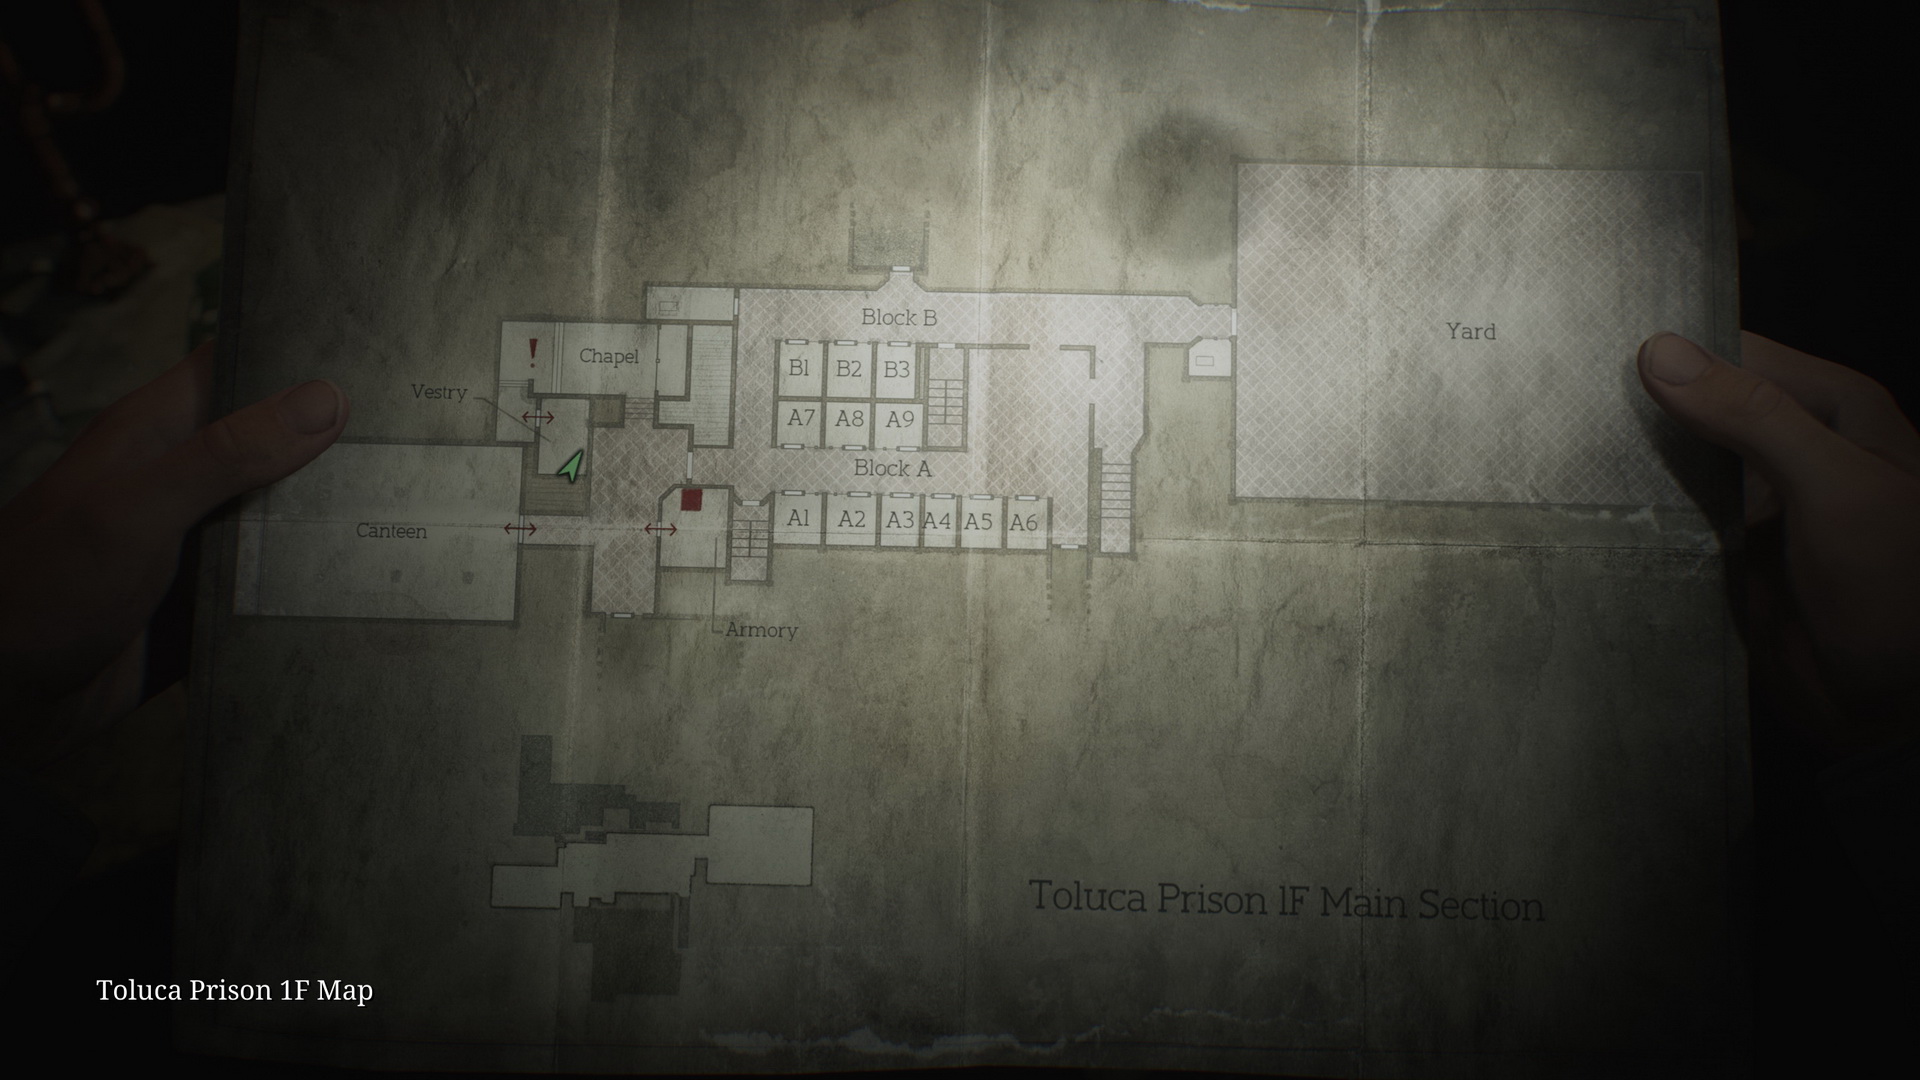
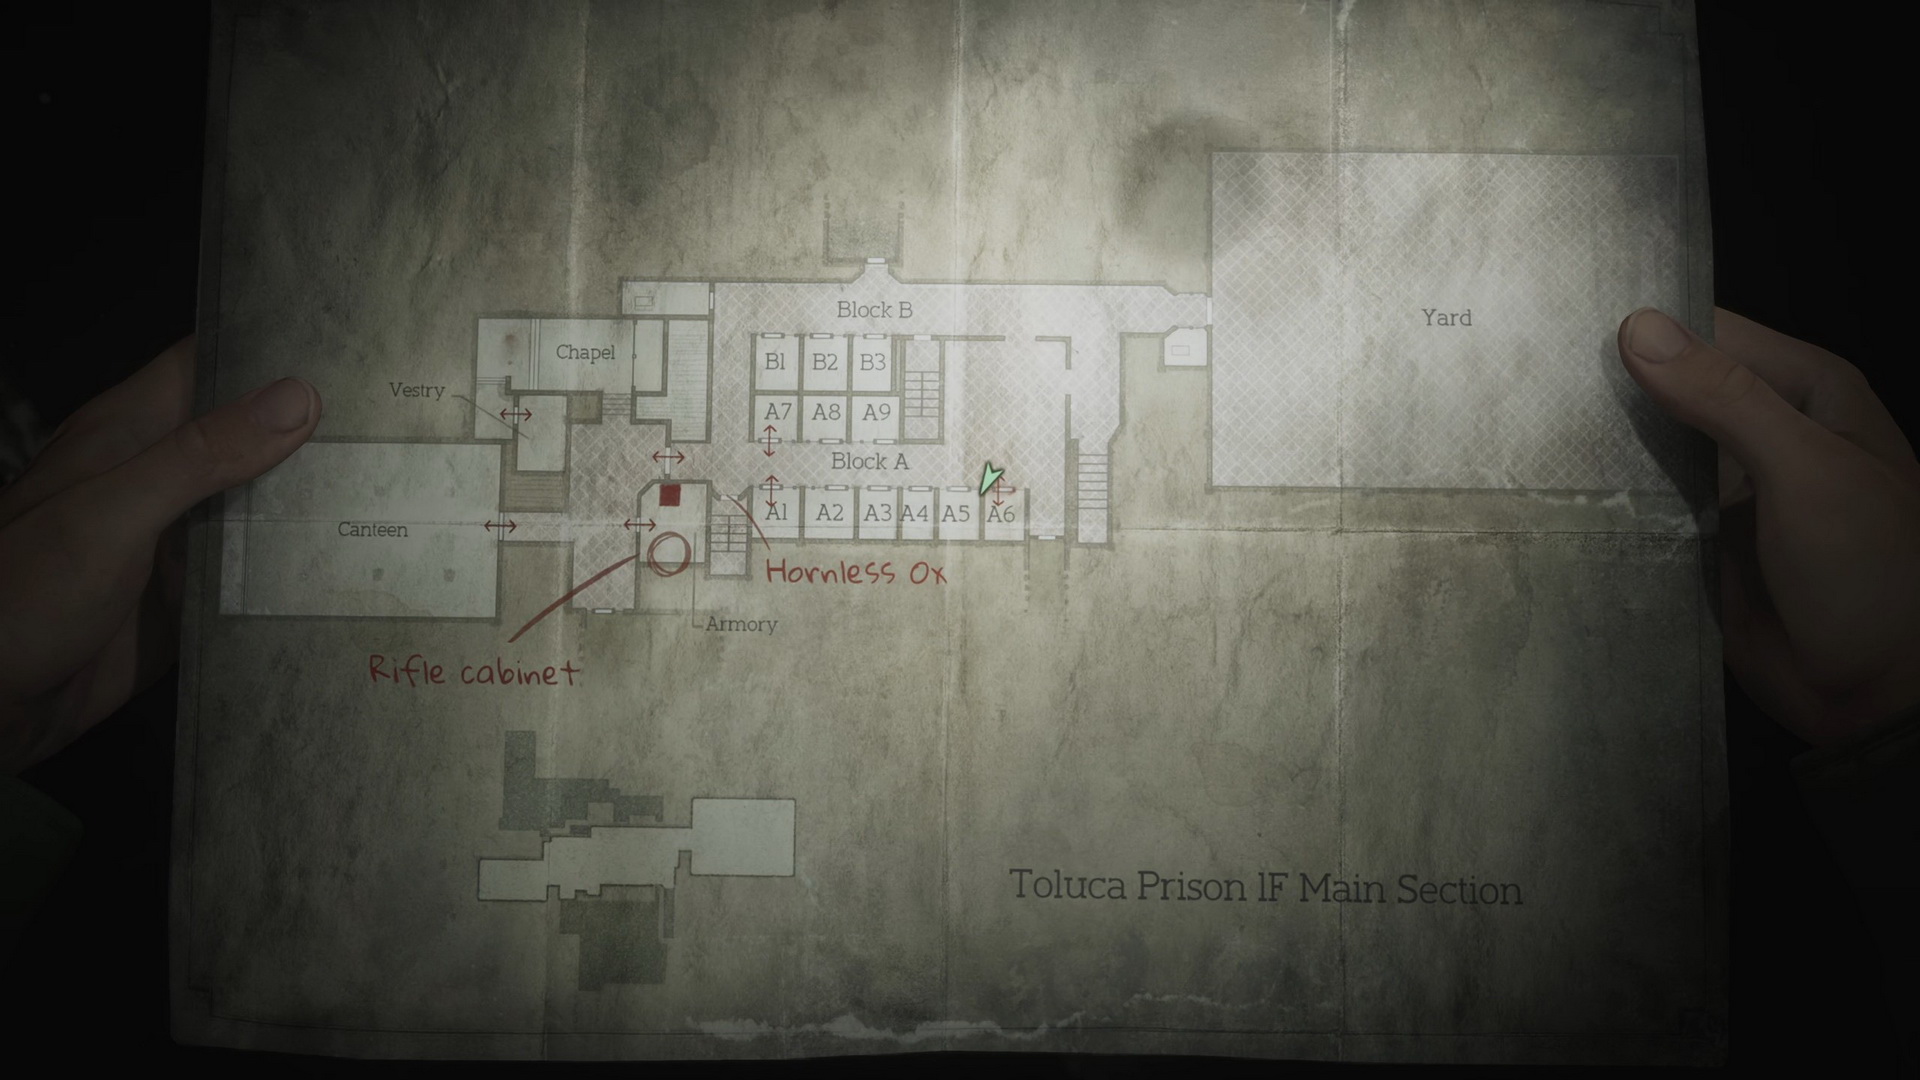
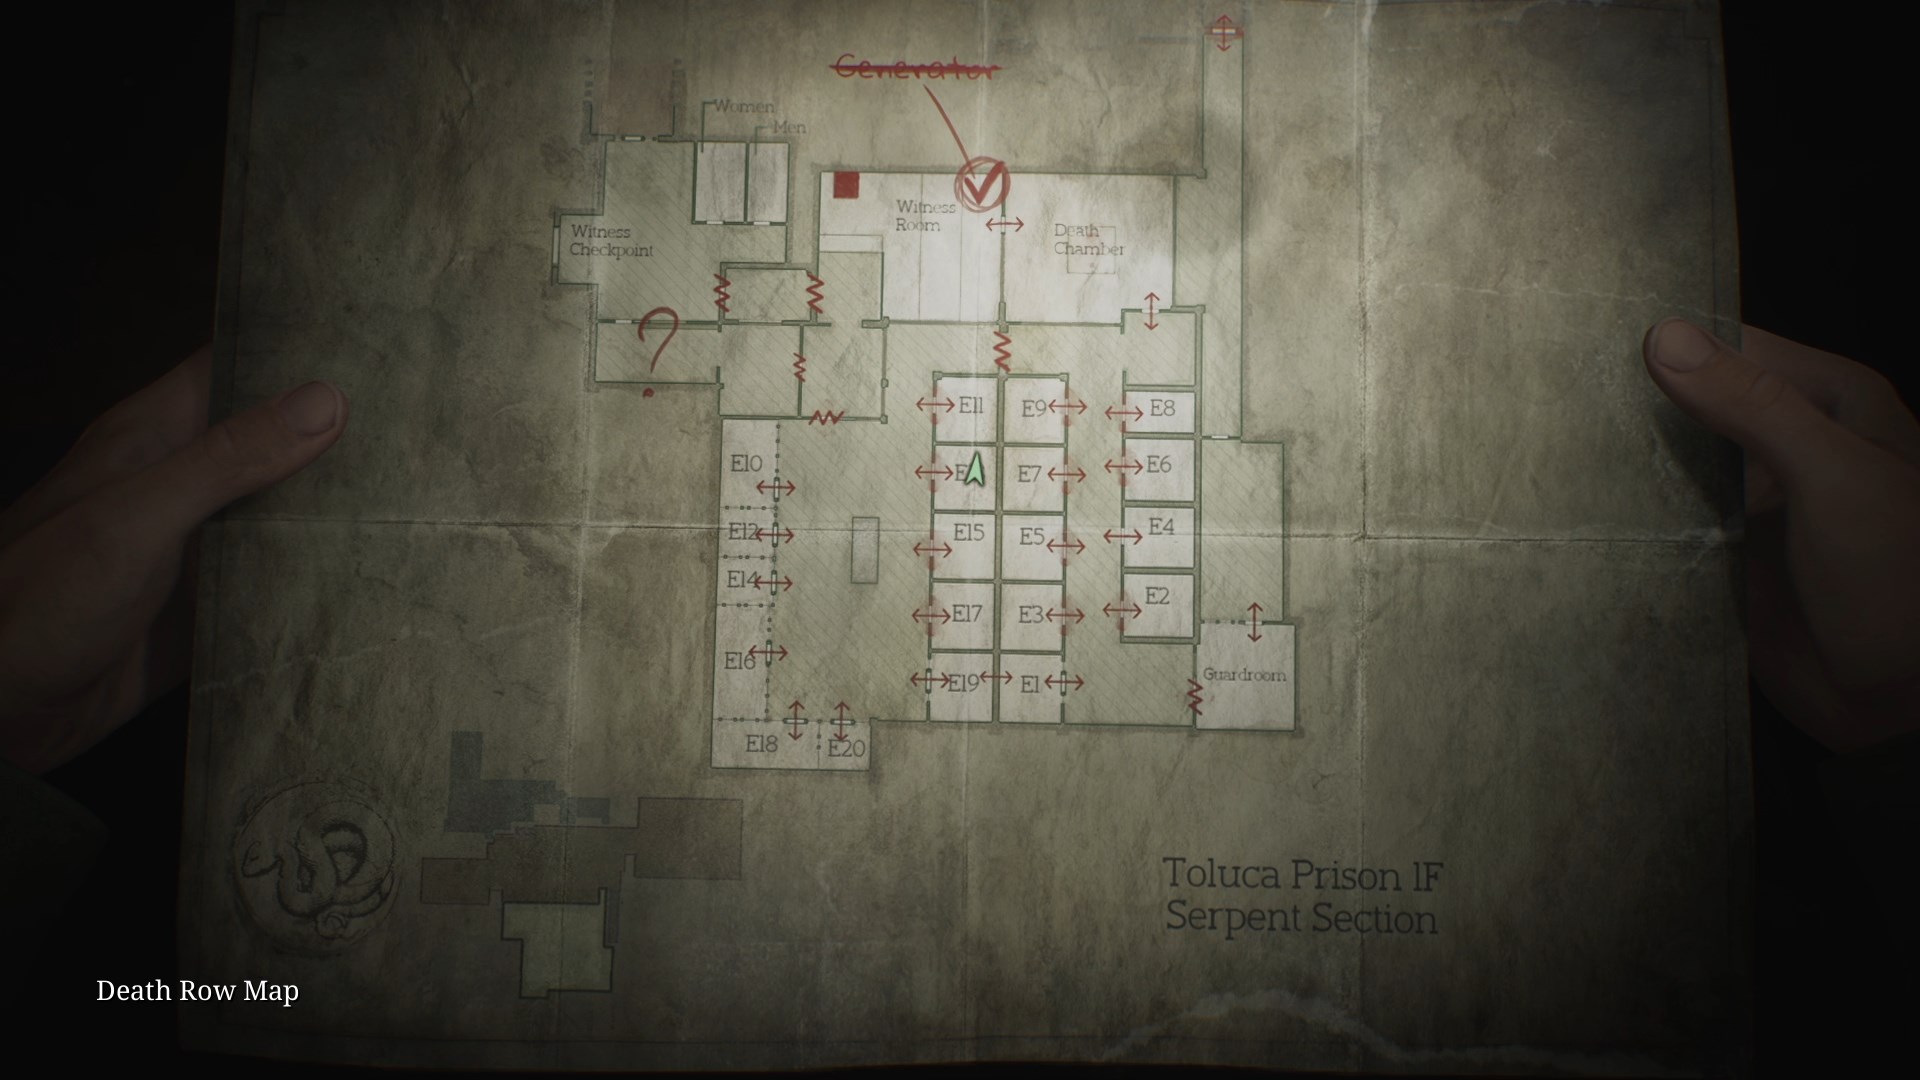
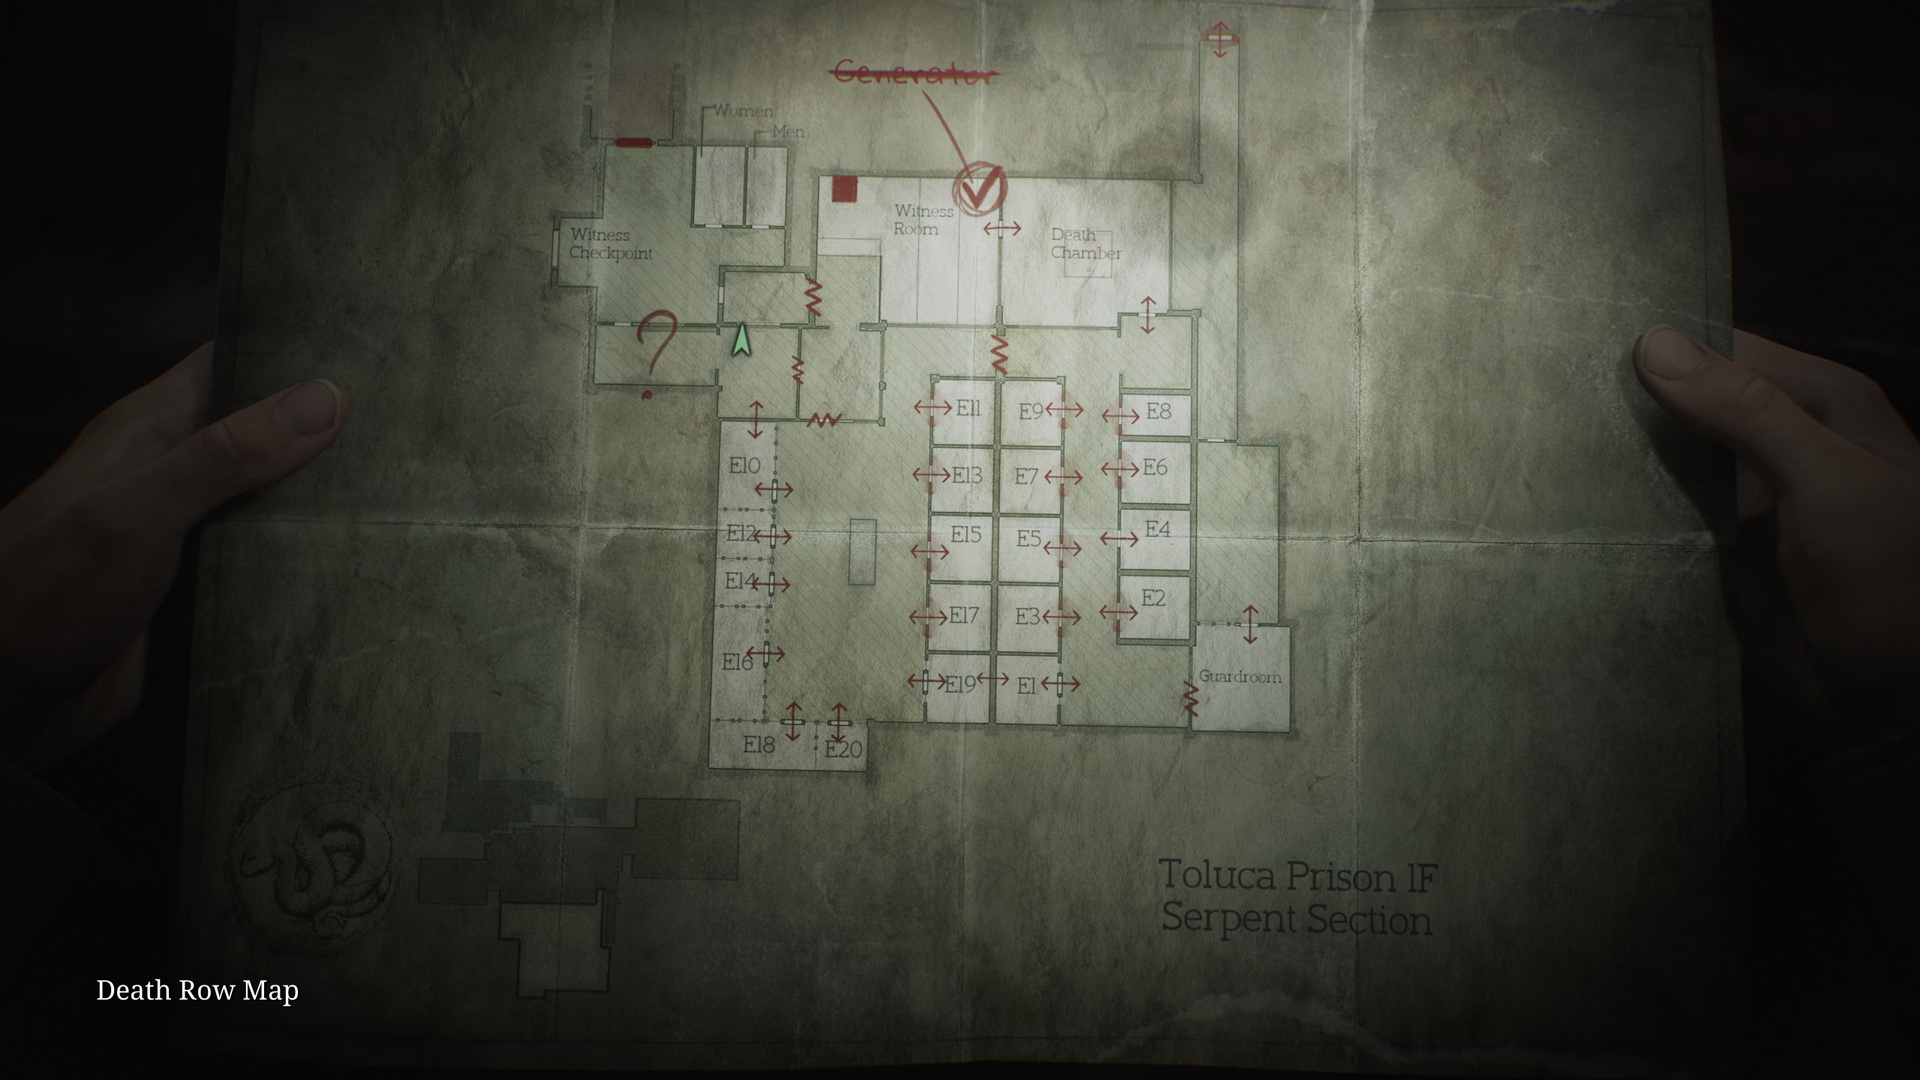
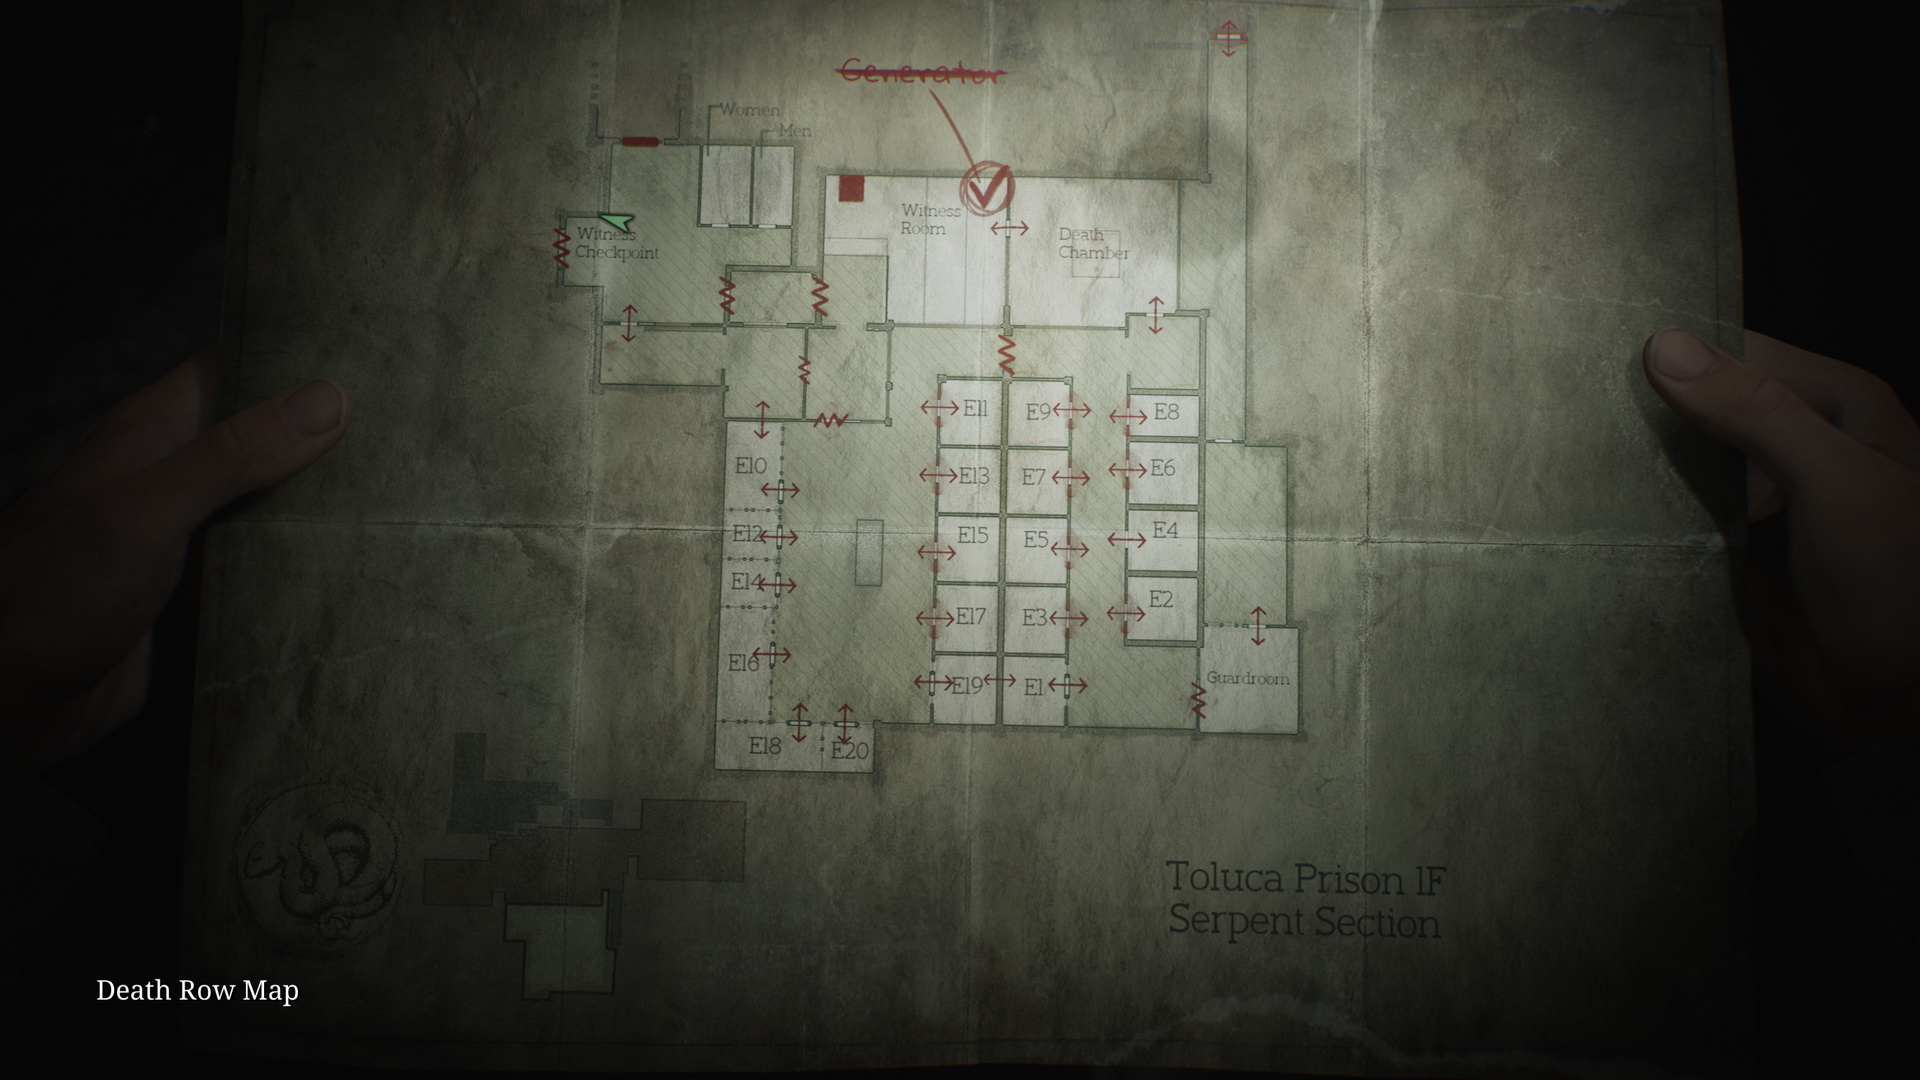
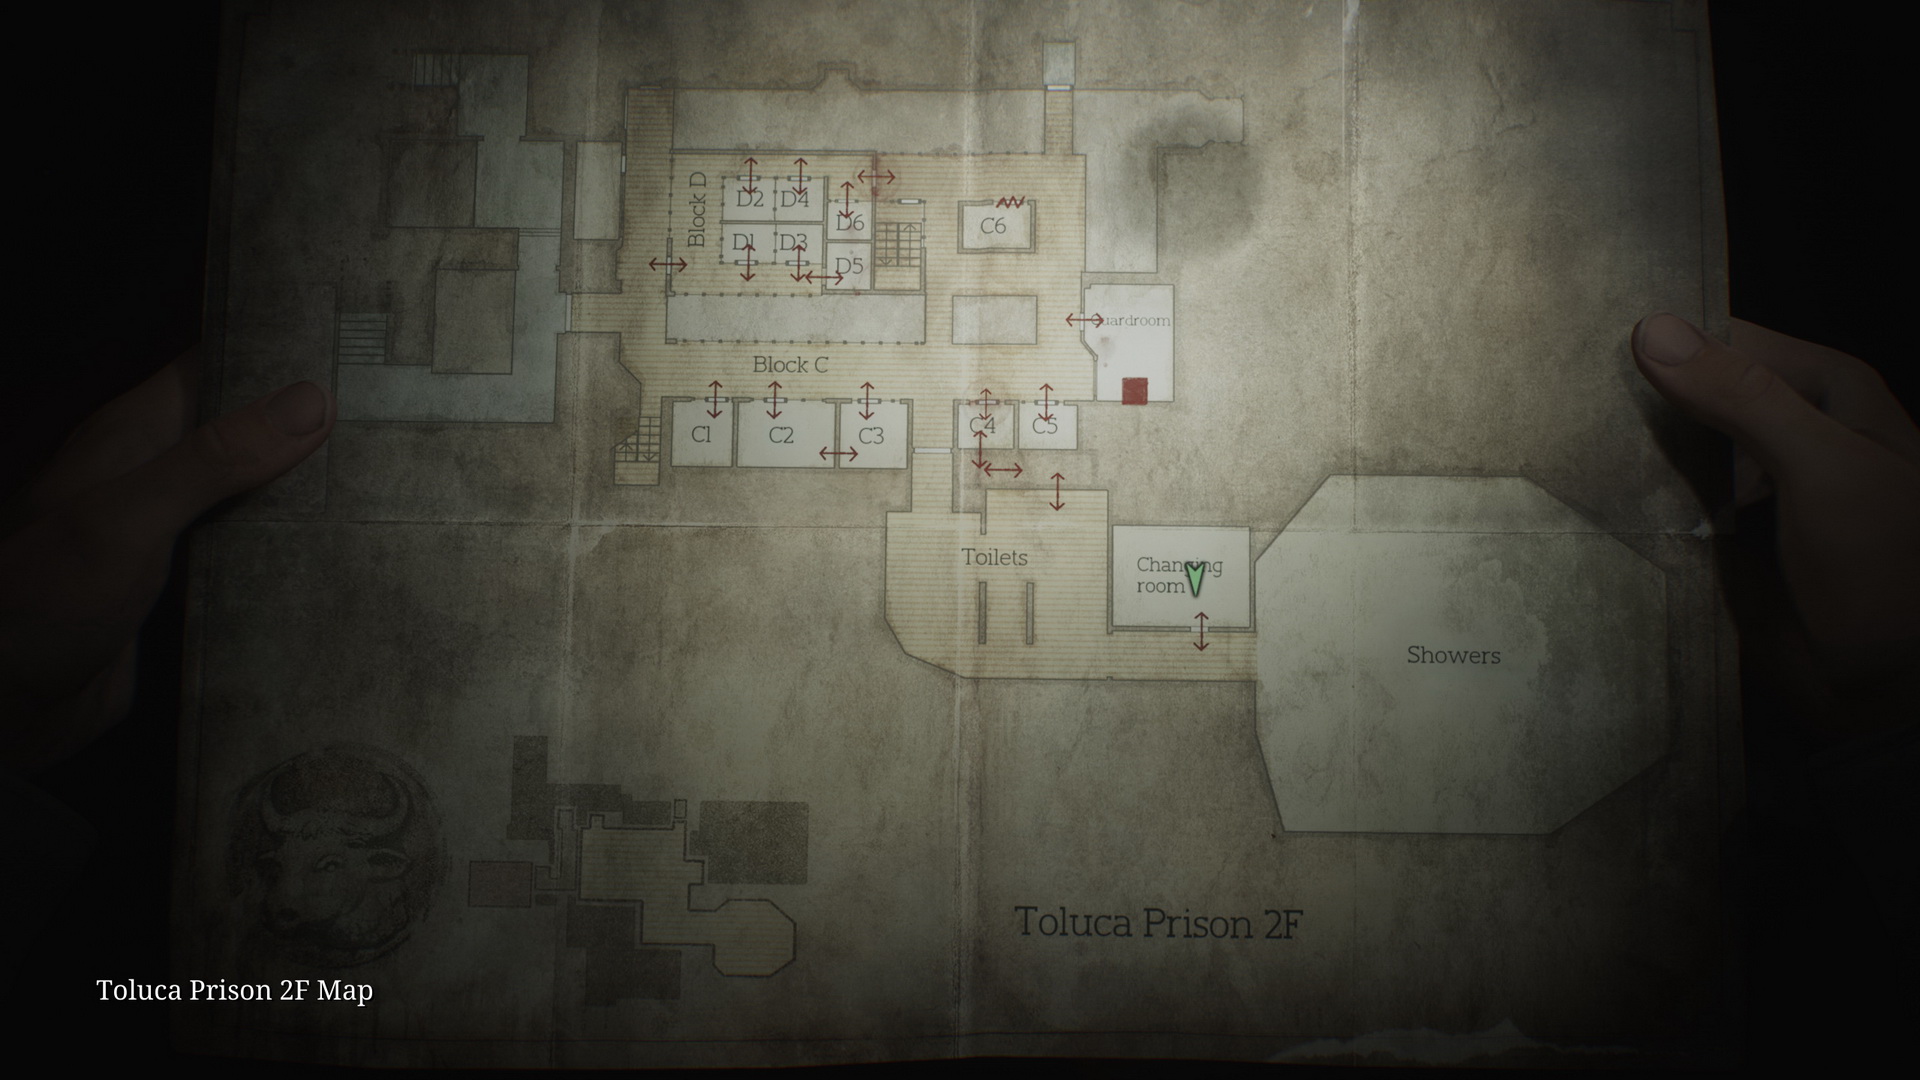
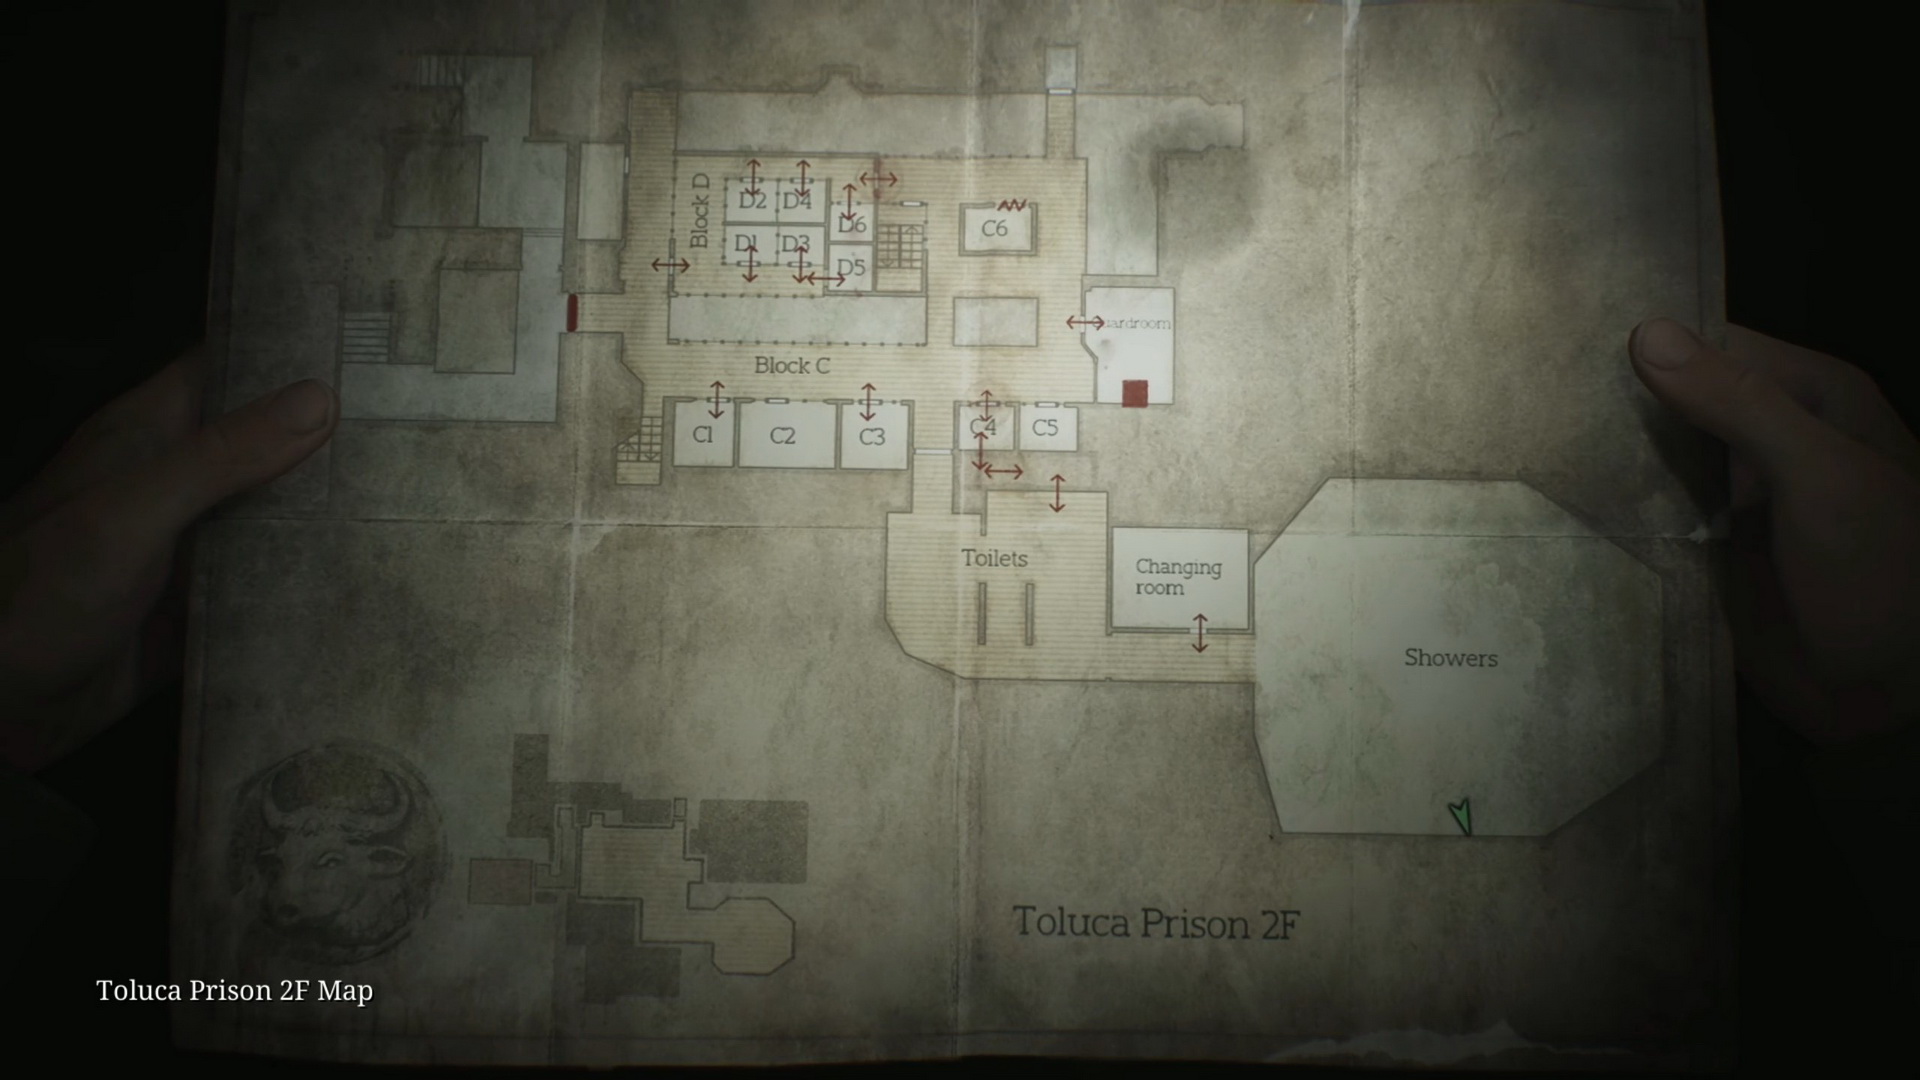
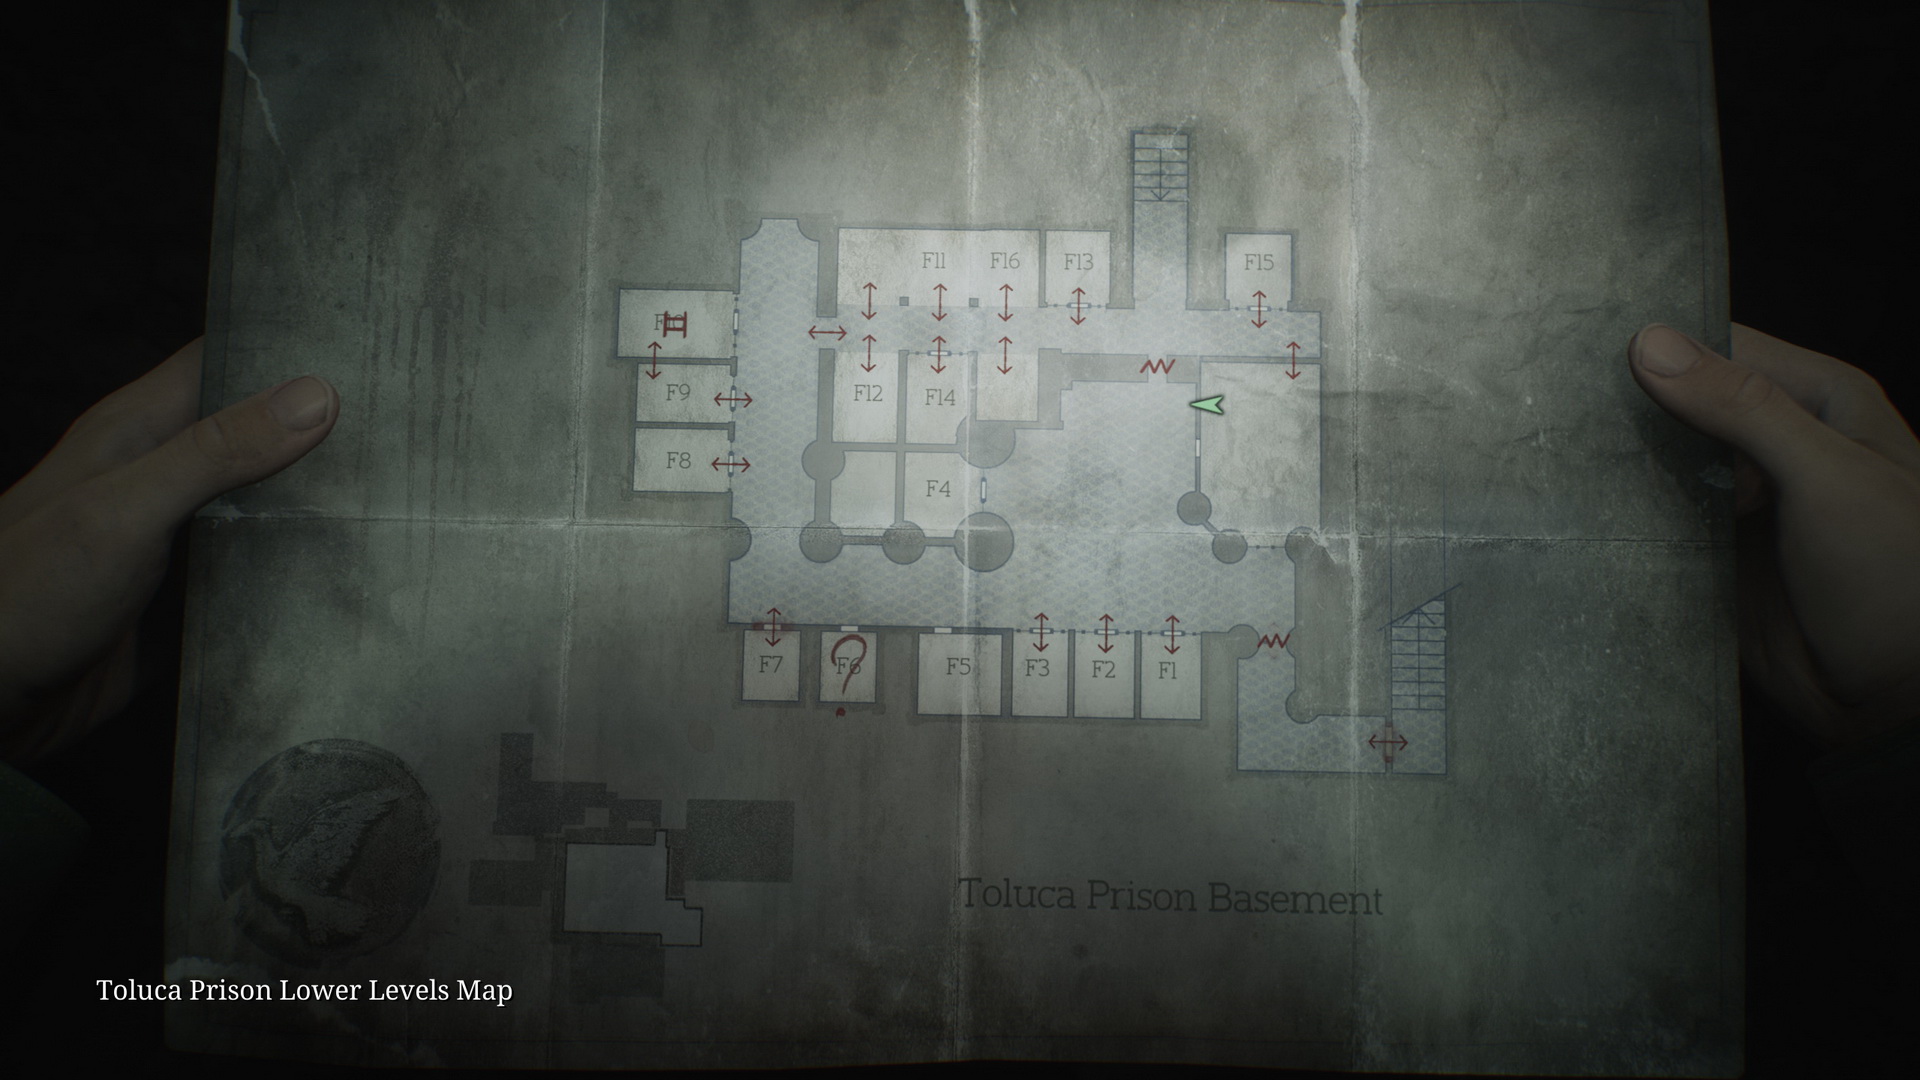
- Collect the Toluca Prison Maps from the Armory as you exit the canteen. There's also a Save Point.
- Memo #49: Gun Cabinet Notice. Armory, next to the gun cabinet.
- Proceed to the Chapel.
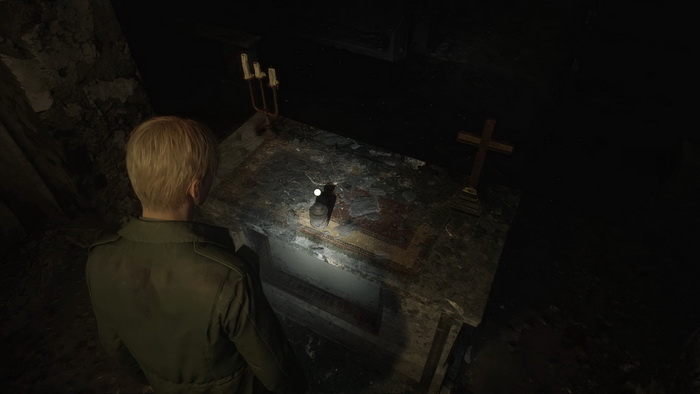
- 73 The Heaviest Weight is on the altar in the Chapel.
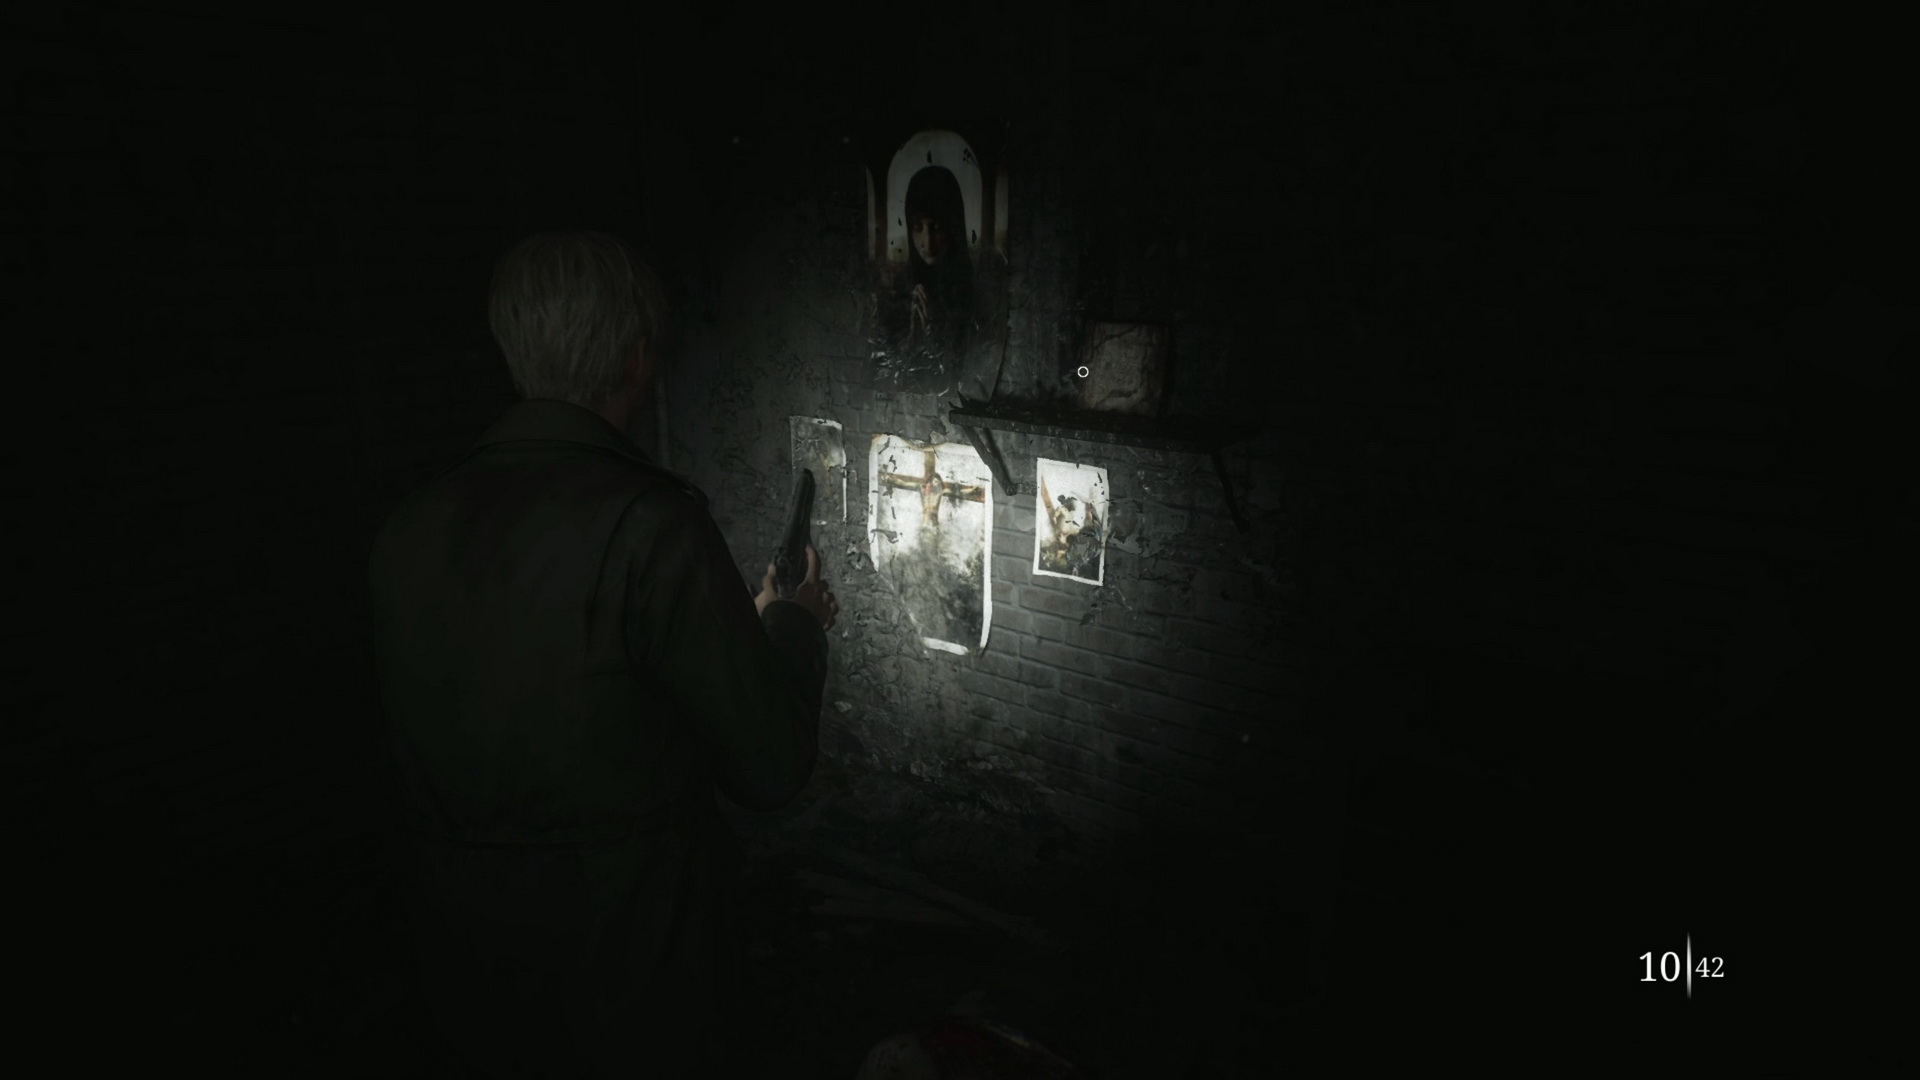
- Glimpse of the Past #19. Cell A3, examine the shrine on the wall.
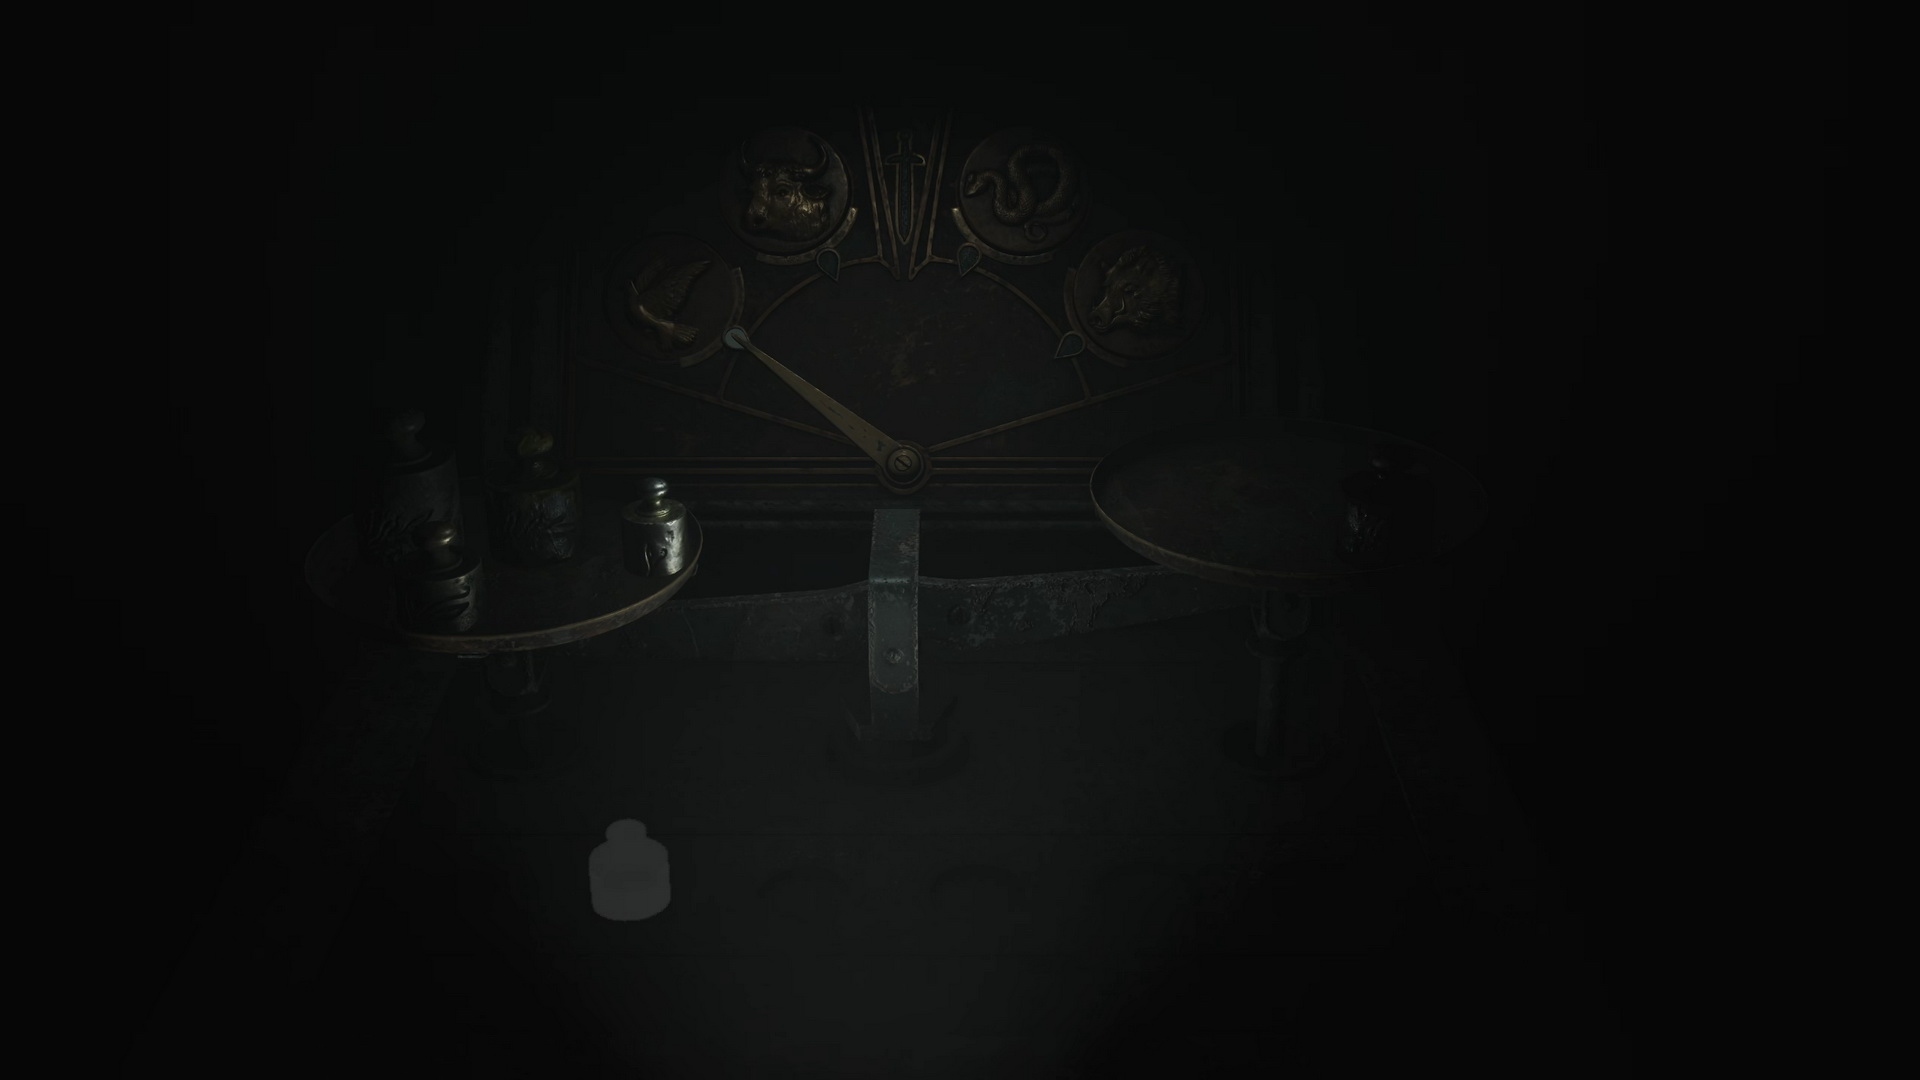
- Go to the Yard to find the scales puzzle. There's also a Save Point on the wall here.
- Put the Small Weight (1) on the left scale and the Heaviest Weight (6) on the right one to unlock the Headless Serpent door.
- Proceed through the unlocked door in the Main Section.
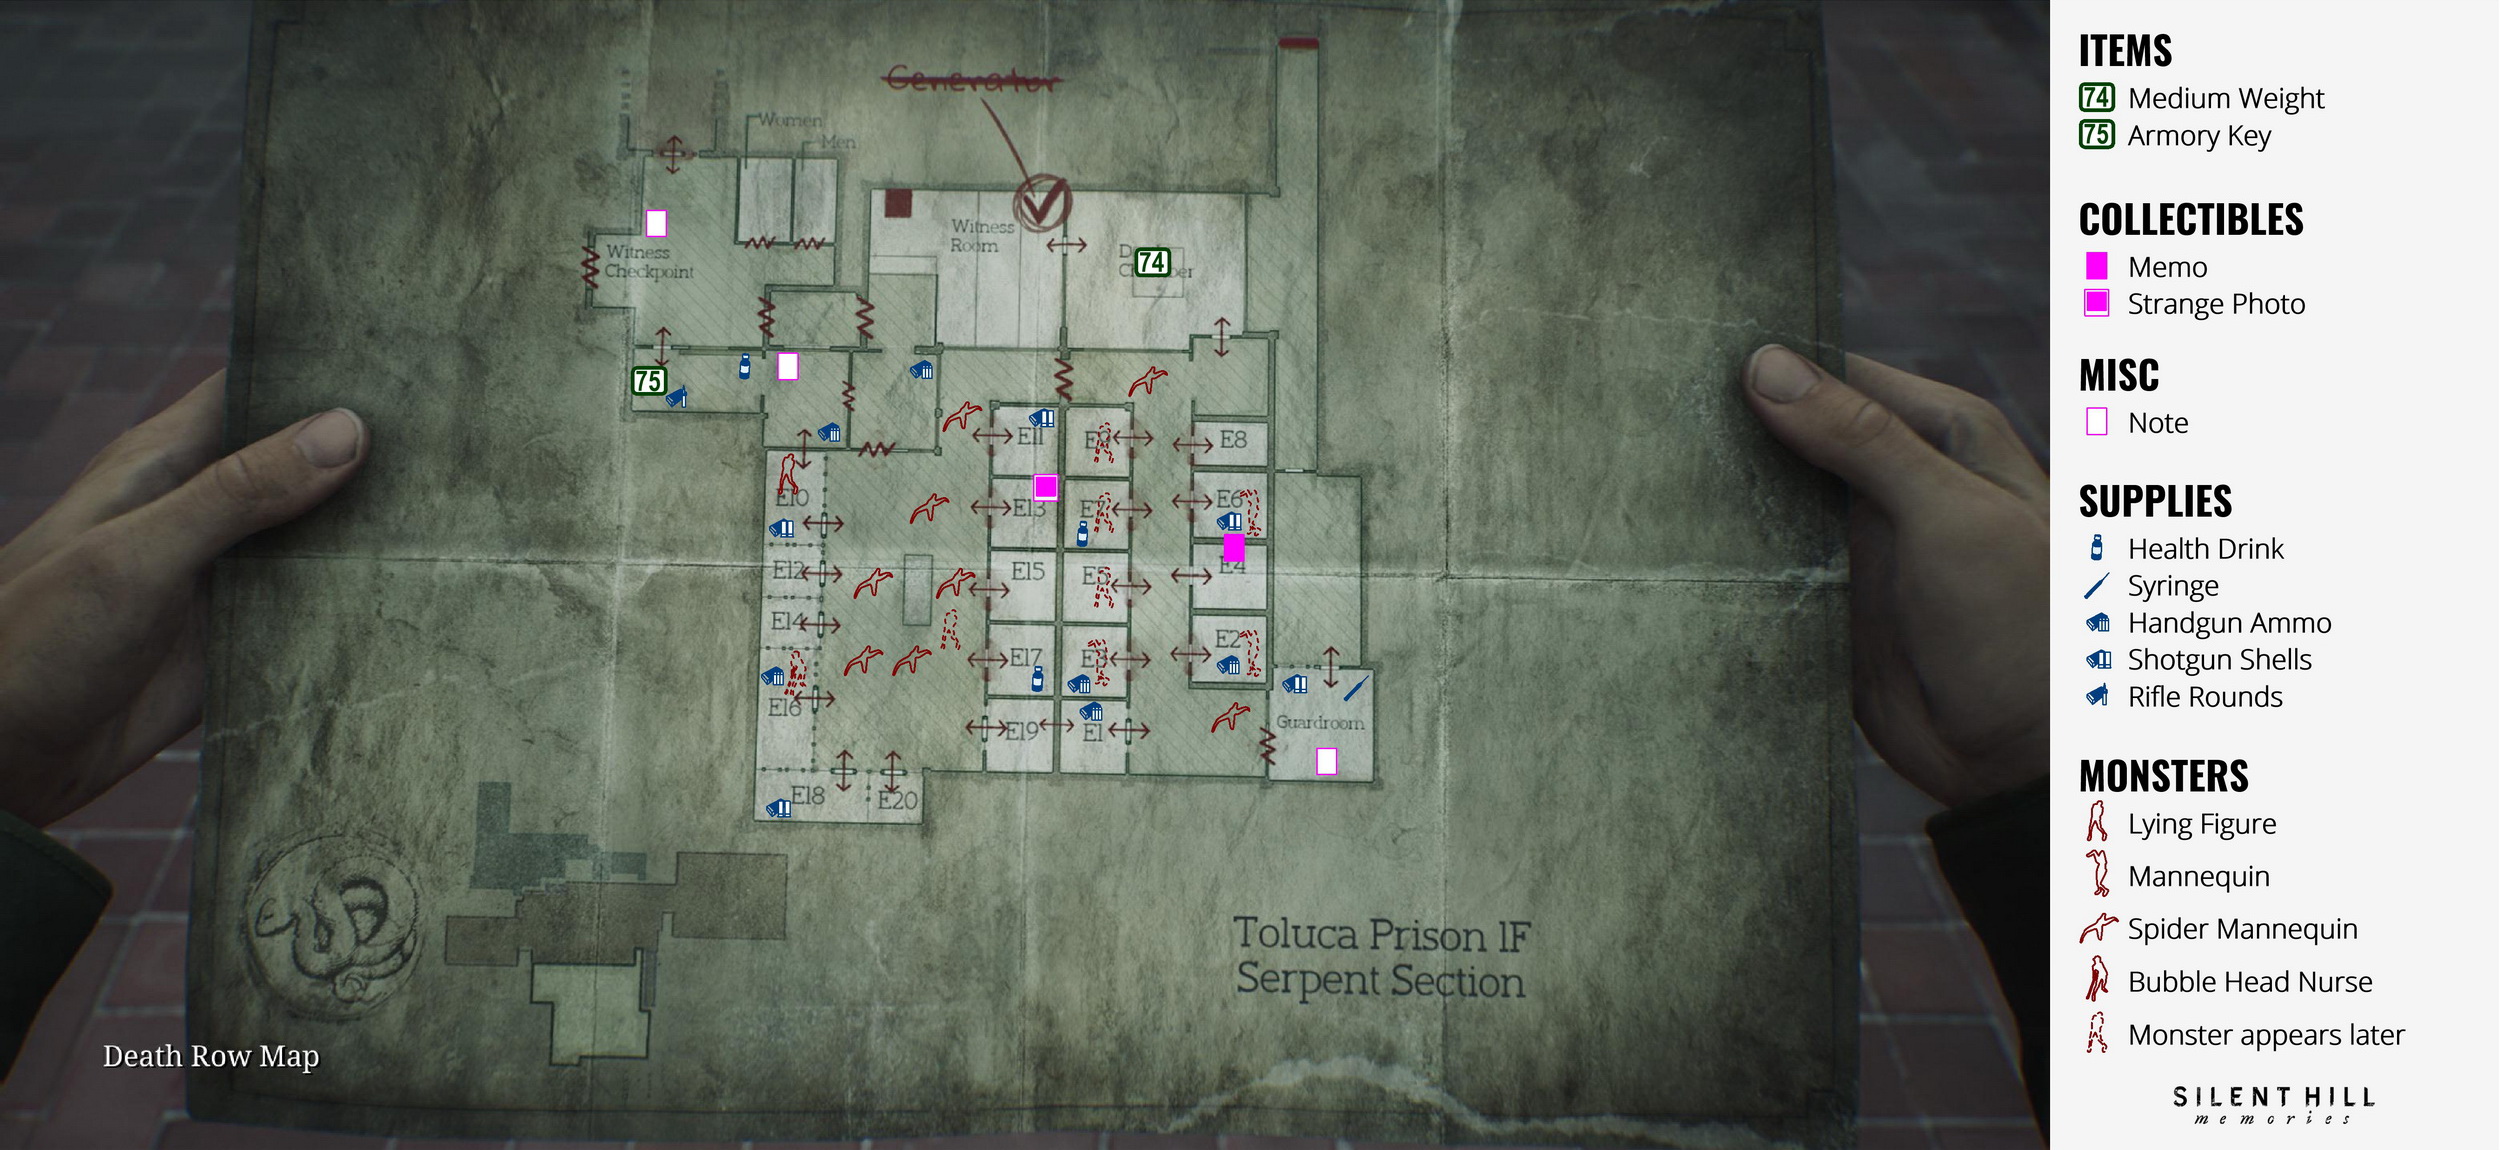
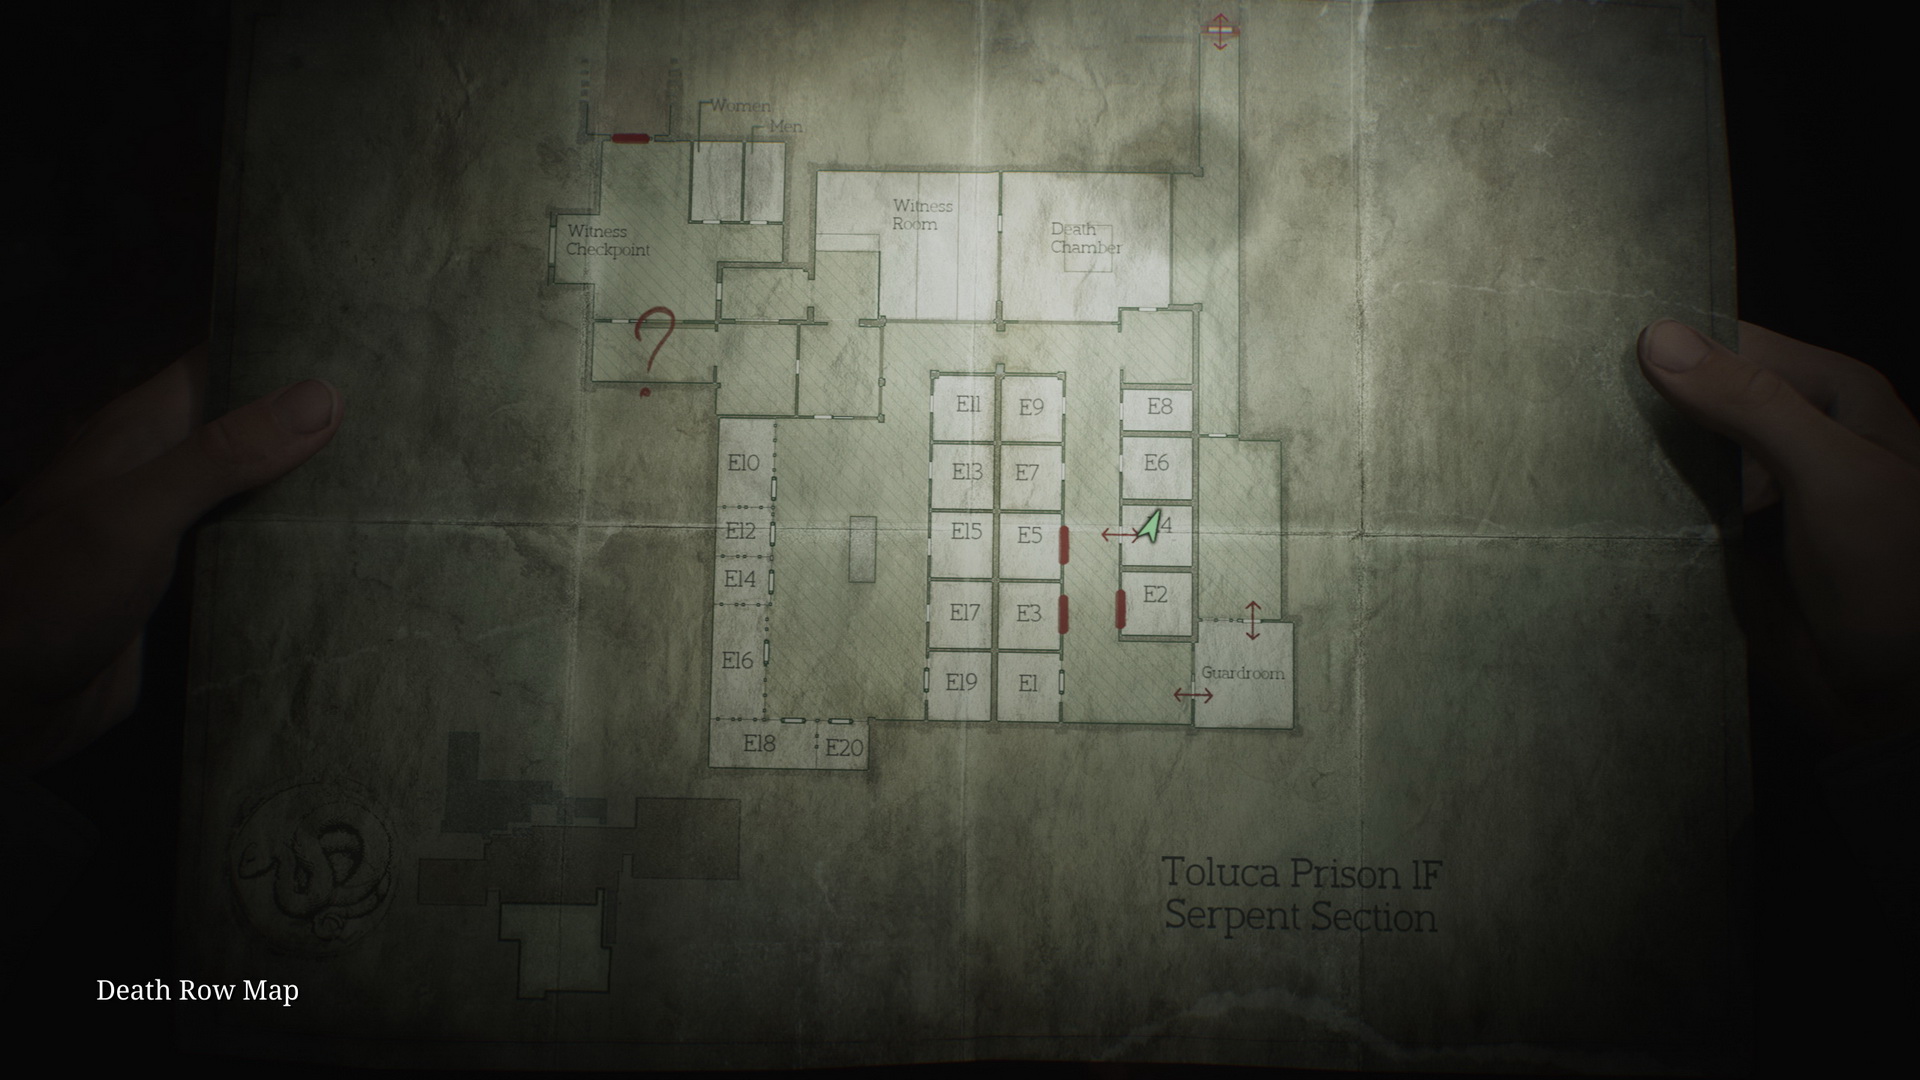
Serpent Section (Death Row)
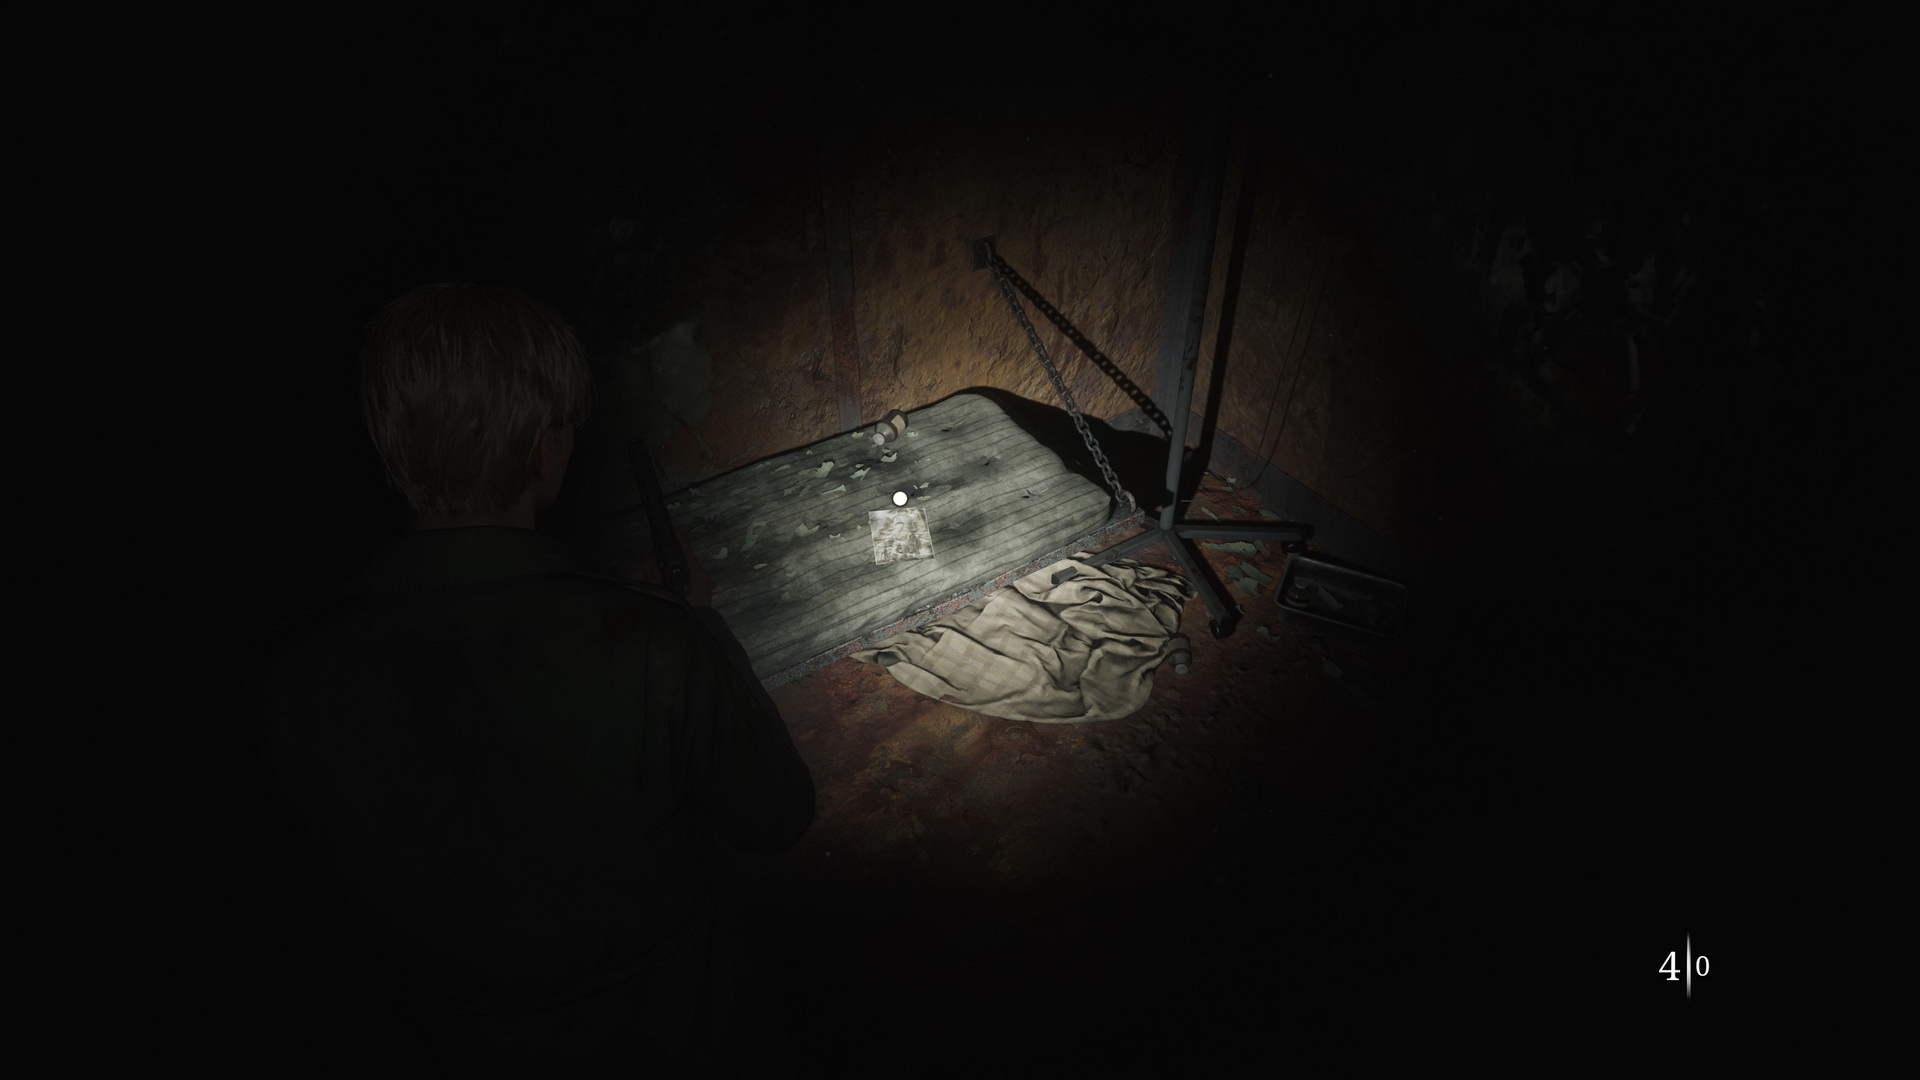
- Memo #50: Family Photo. Cell E4, on the bed.
- Go to the Witness Room. There's a Save Point in the room.
- Solve the generator puzzle to unlock the Death Chamber. Flip the switches in this order:
- Light: 4th - 5th - 2nd - 1st - 3rd
- Standard: 6th - 4th - 5th - 1st - 3rd - 2nd
- Hard: 4th - 5th - 2nd - 1st - 3rd - 6th - 7th
- When all switches are up, and the dial is in the red zone, flip the breaker lever.
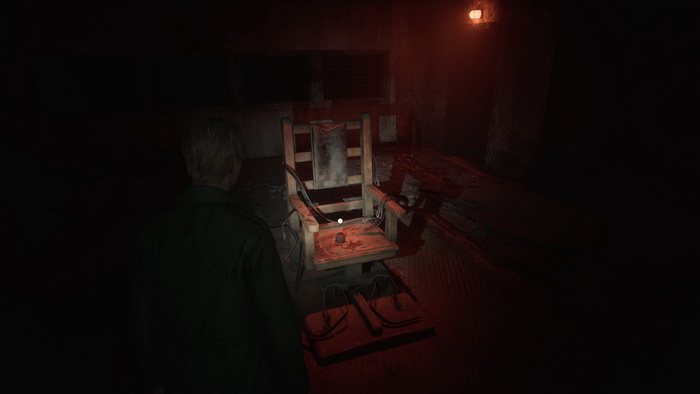
- 74 Medium Weight is on the chair in the Death Chamber.
- Go to Cell E1 and break the wall to the other side.
- Strange Photo #18: "Four months to go". Cell E13, on a shelf.
- Proceed to the Witness Checkpoint office through a broken wall in Cell E10.
- 75 Armory Key is in a key cabinet next to the Witness Checkpoint.
- Return to the Main Section through the north door.
Main Section
- 76 Hunting Rifle. Use the key to get the rifle in the Armory.
- Return to the Yard and proceed with the scales puzzle.
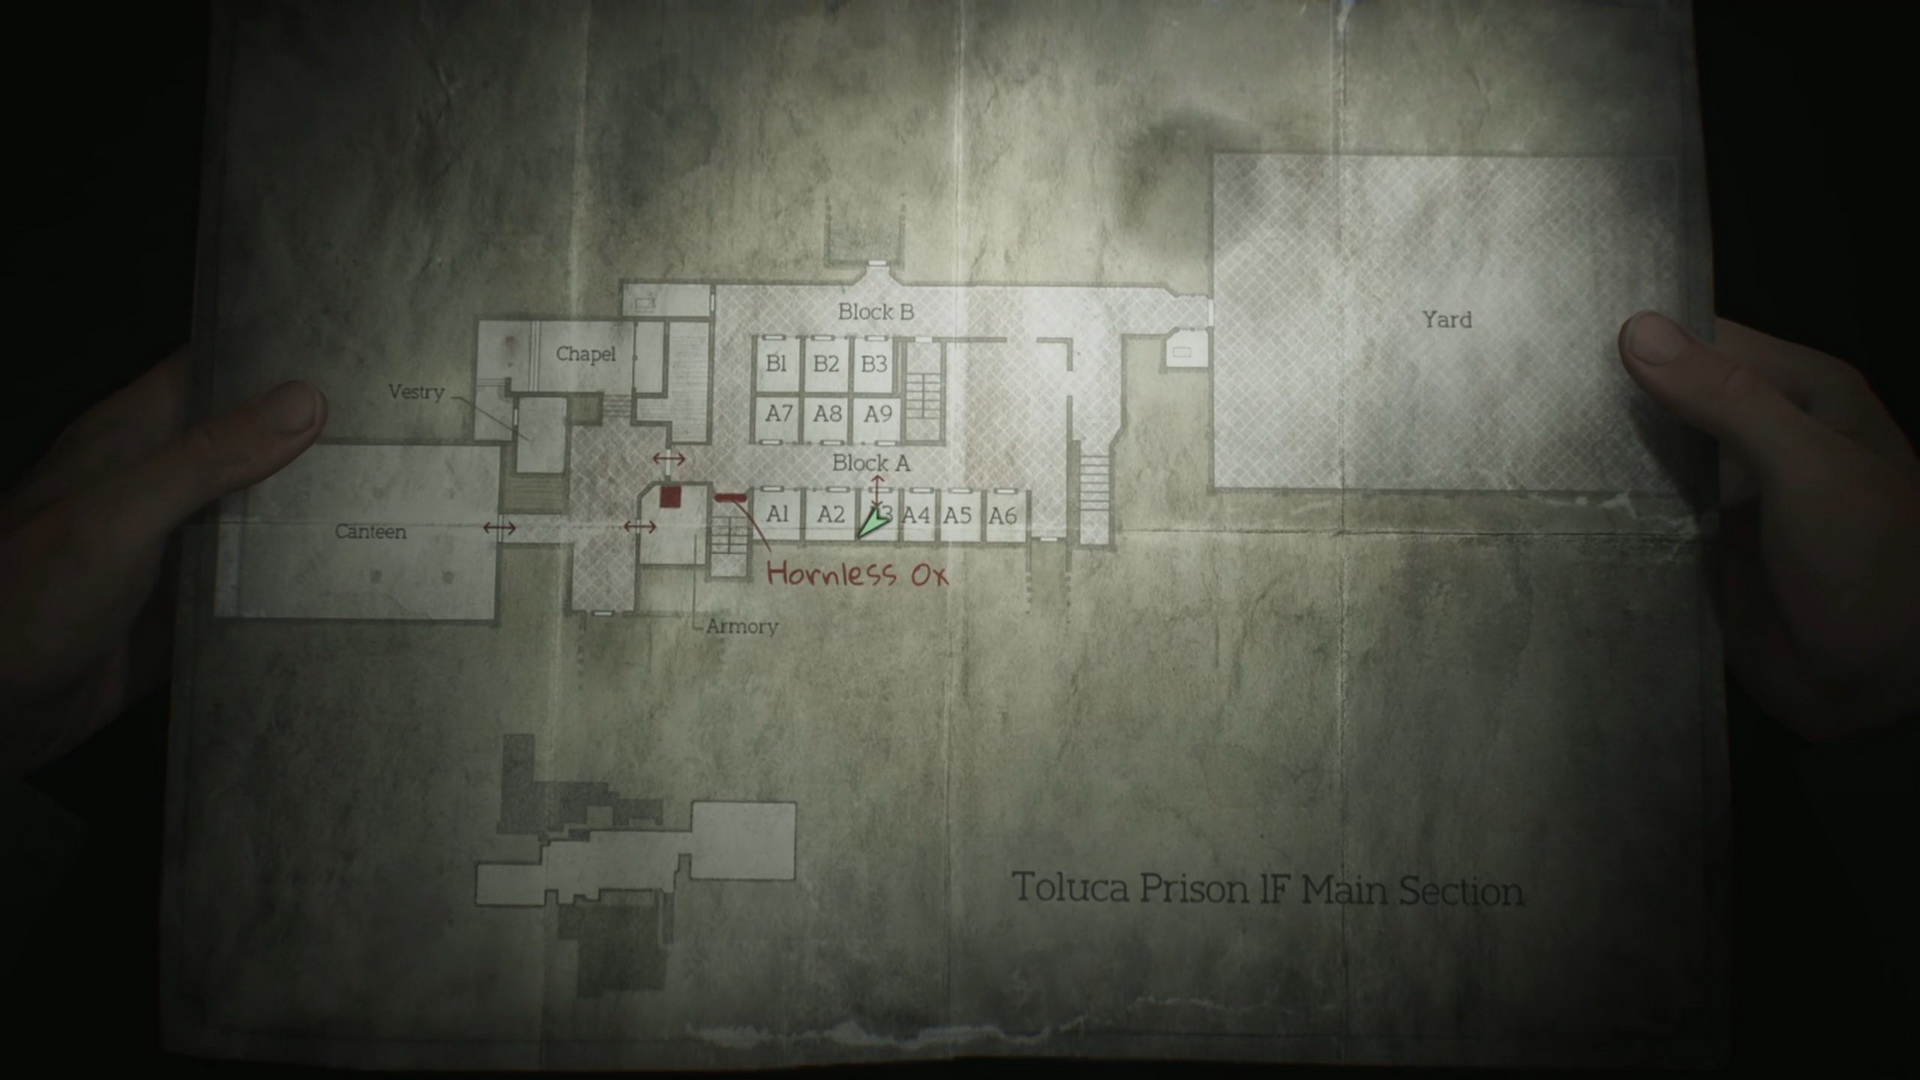
- Put the Small (1) and The Heaviest Weights (6) on the left scale and the Medium Weight (4) on the right one to unlock the Hornless Ox door.
- Proceed through the unlocked door in the Main Section.
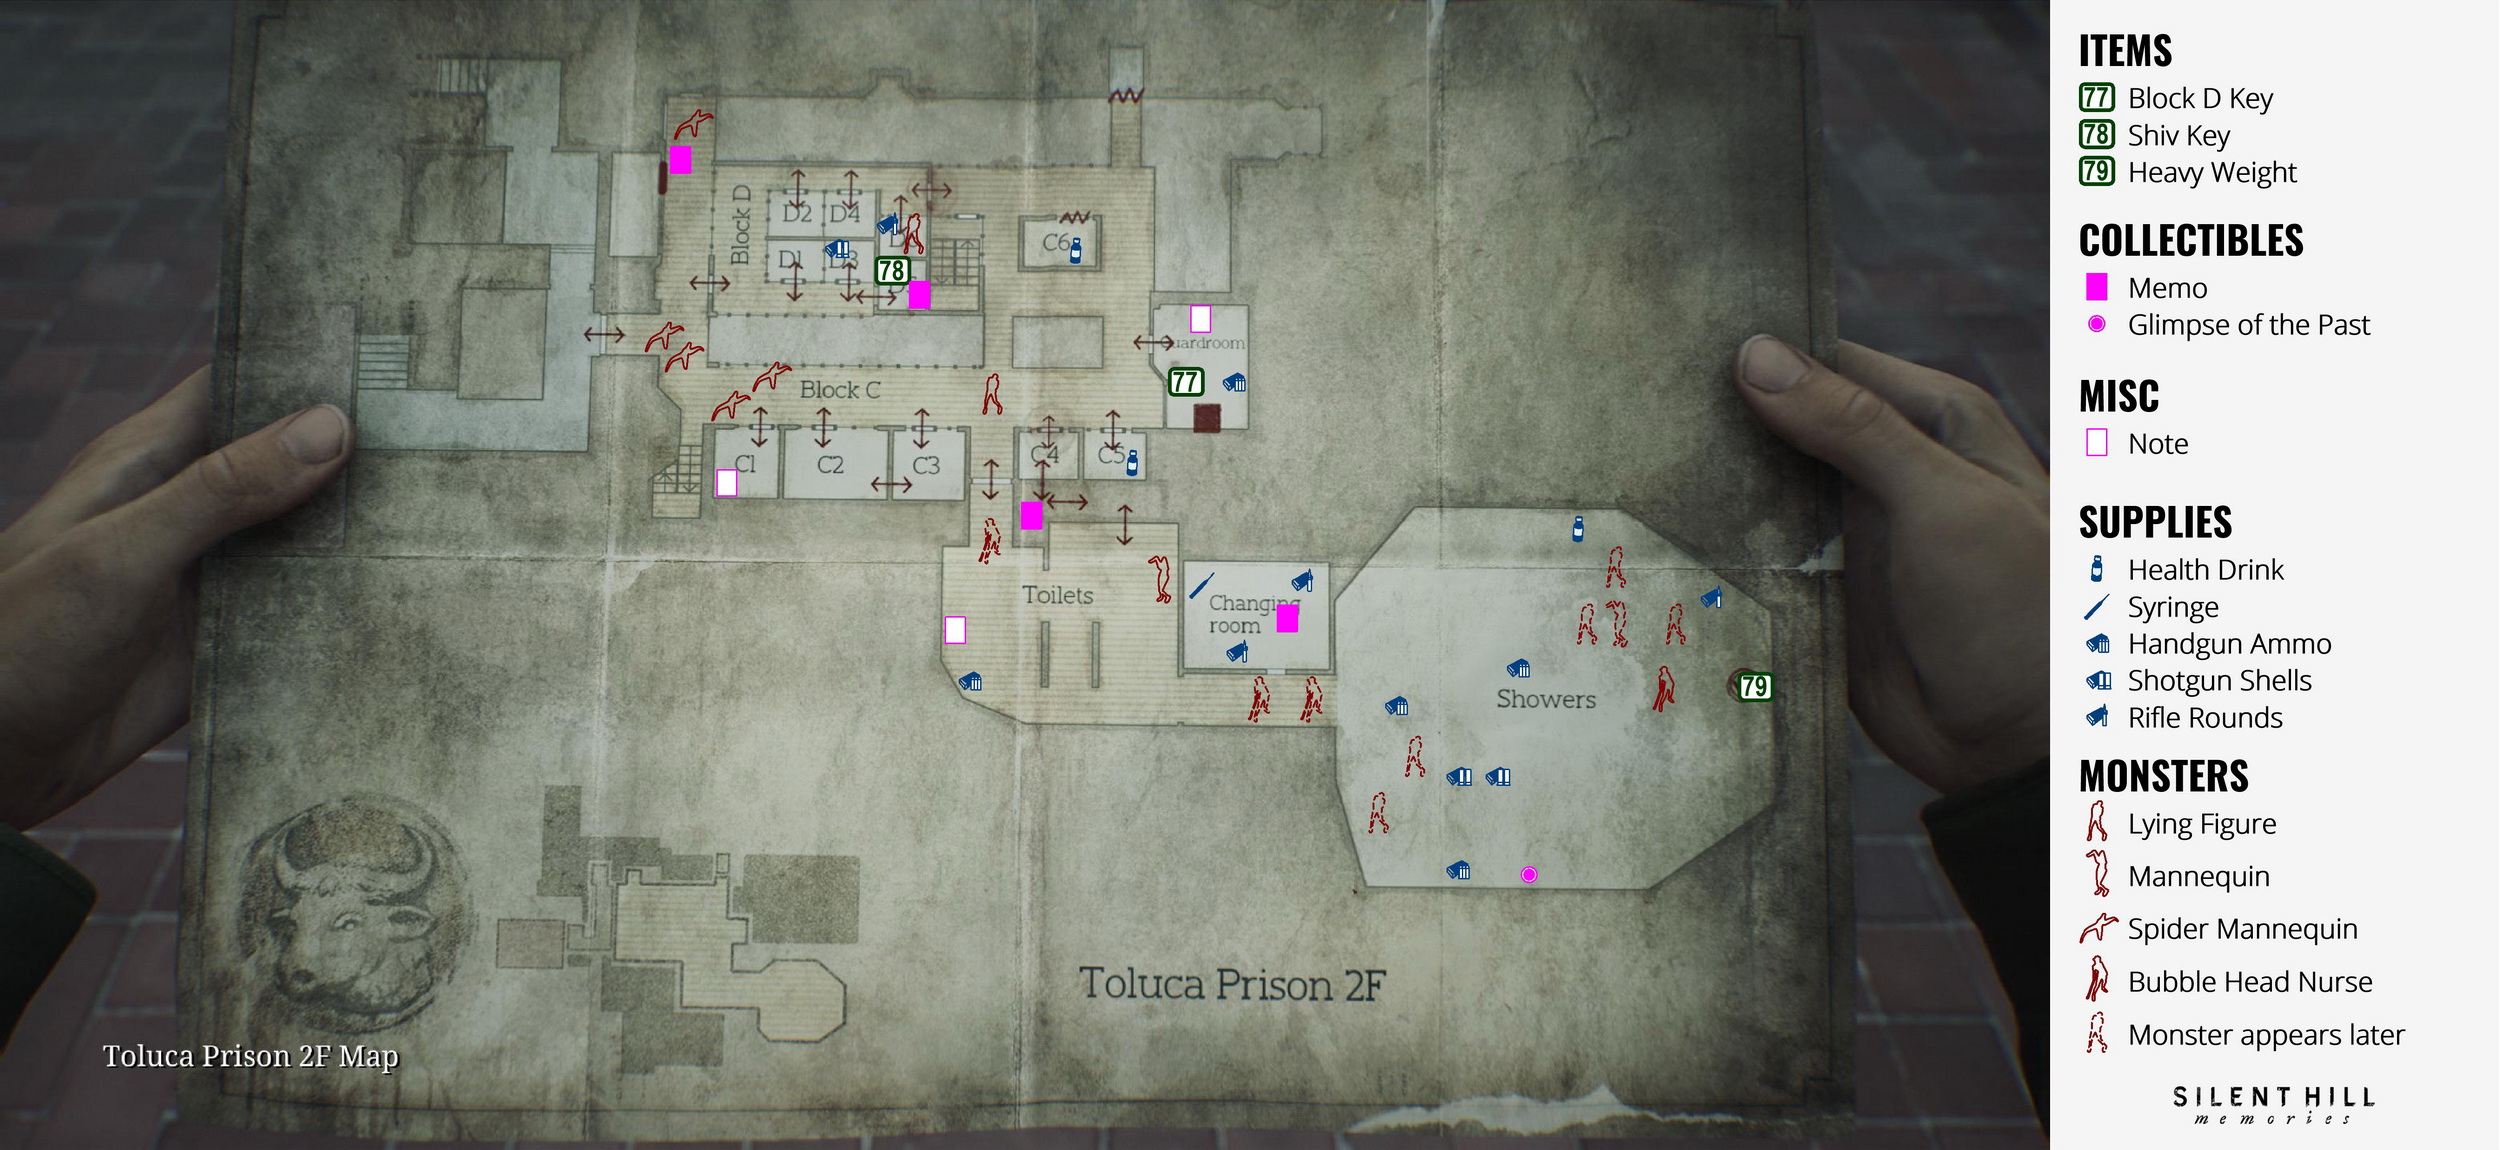
Ox Section (2F)
- Memo #51: Guard’s Letter. Pinned to the wall beside a locked door in the left-most corridor.
- Proceed to the Guardroom at the end of Block C. There's a Save Point.
- 77 Block D Key is in the desk drawer in the Guardroom.
- Proceed to Block D.
- 78 Shiv Key is inside the medical box in Cell D5.
- Memo #52: Threatening Note. Cell D5, stuck to the blood-covered wall.
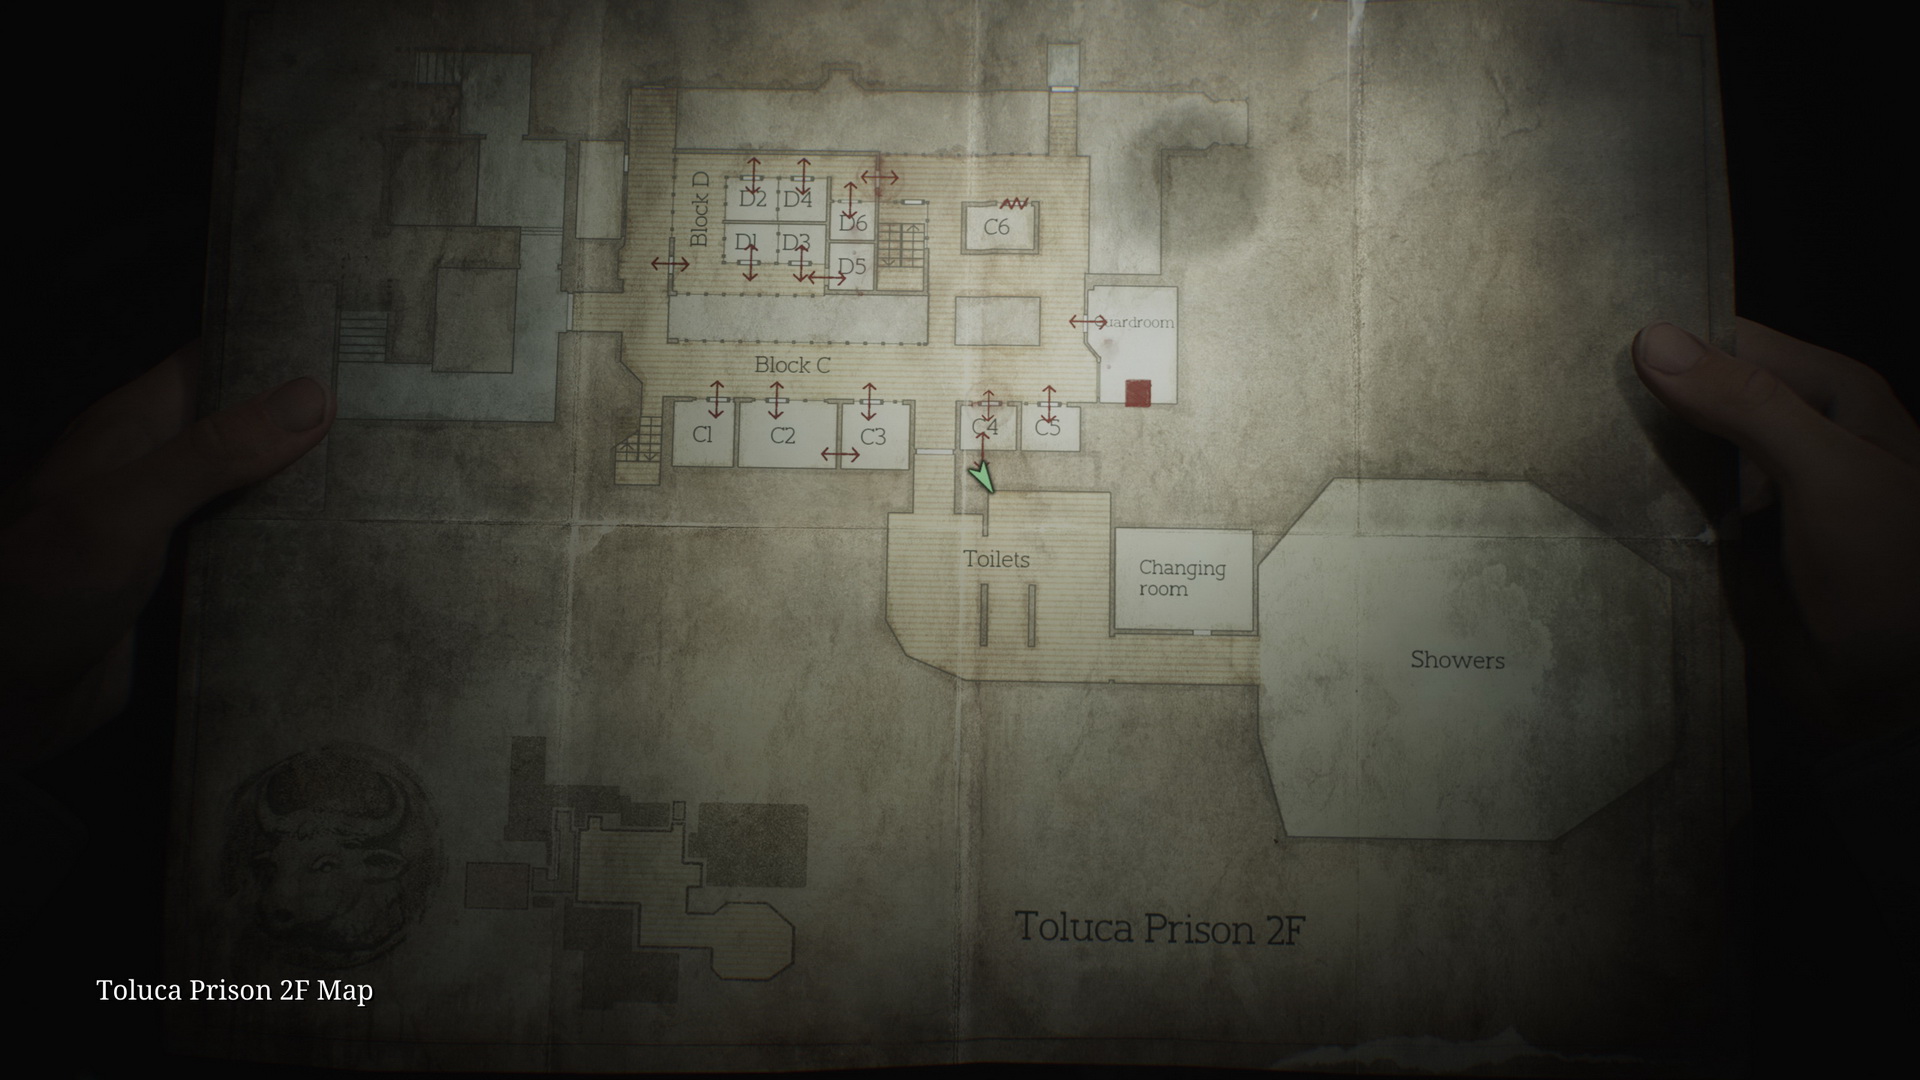
- Unlock Cell C4 with the Shiv Key and crawl through the hole in the wall.
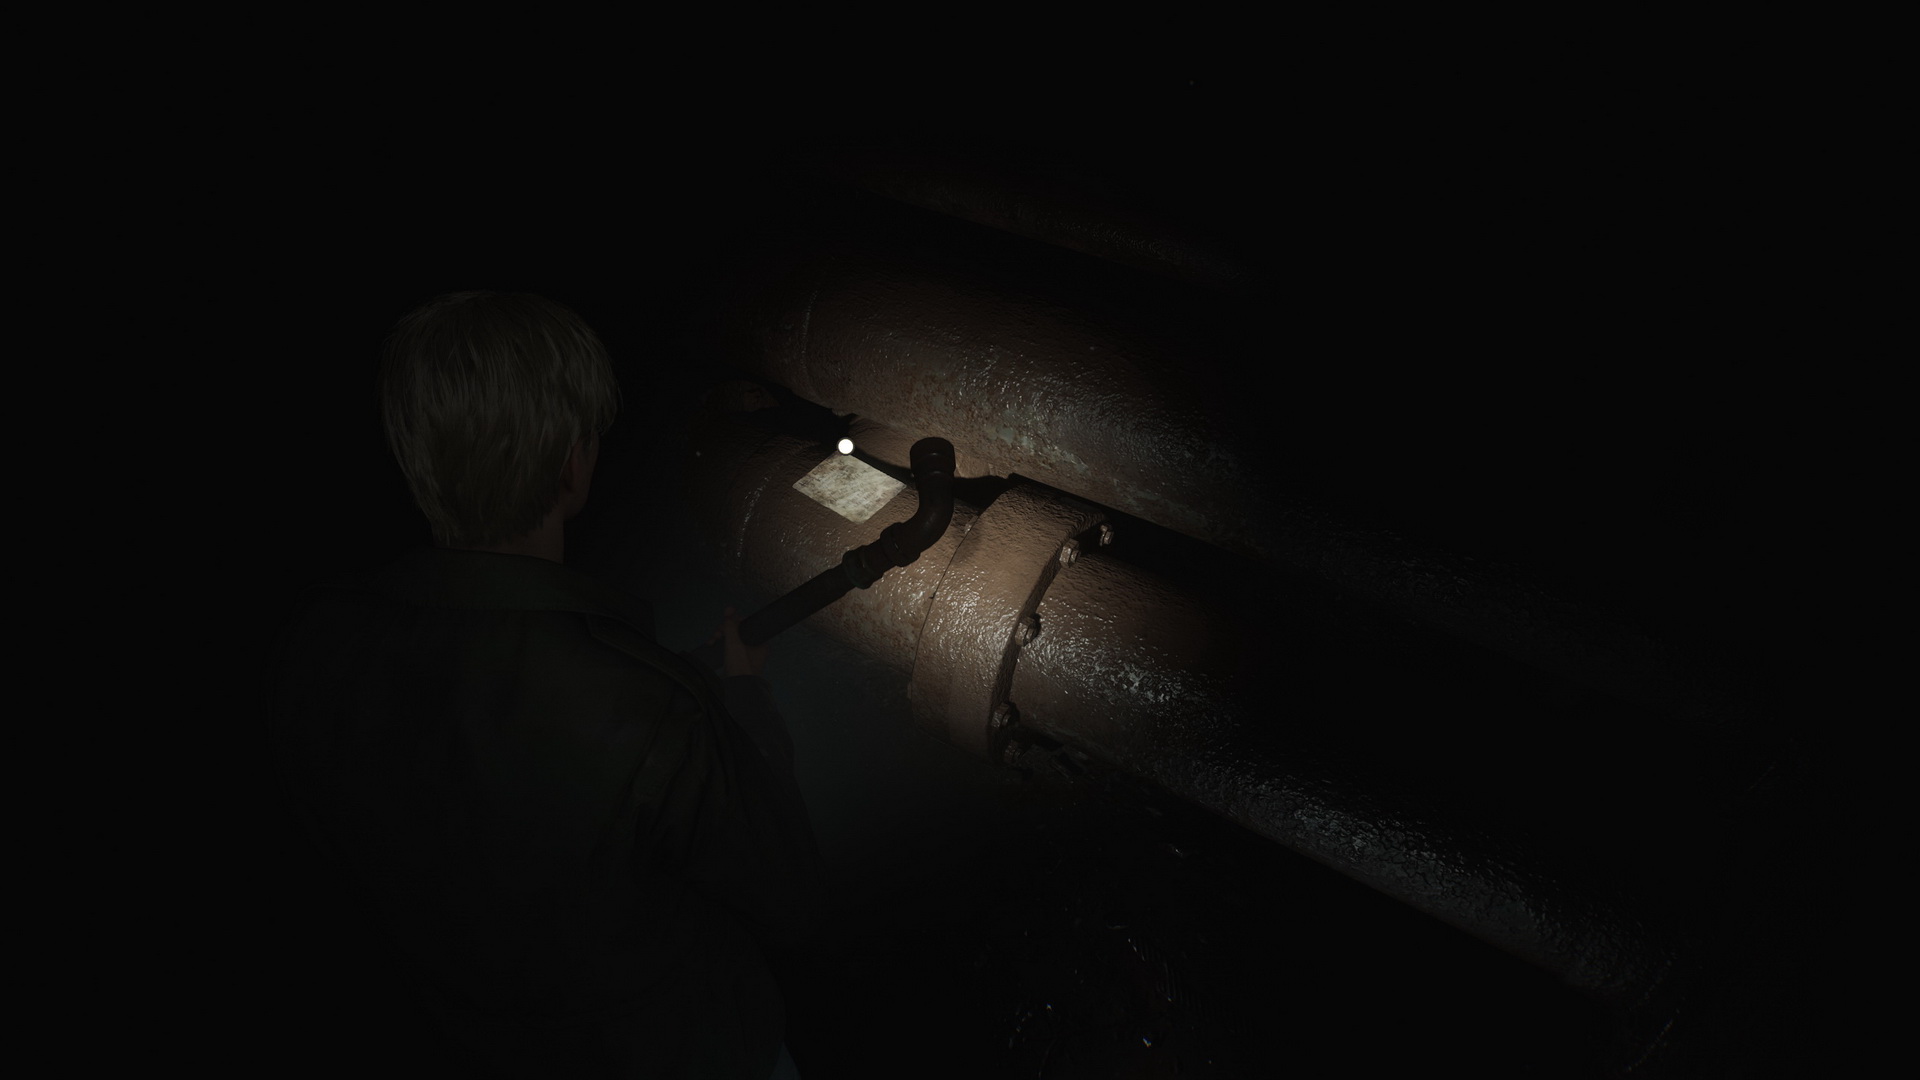
- Memo #53: Paranoid Note. Behind Cell C4 on a pipe.
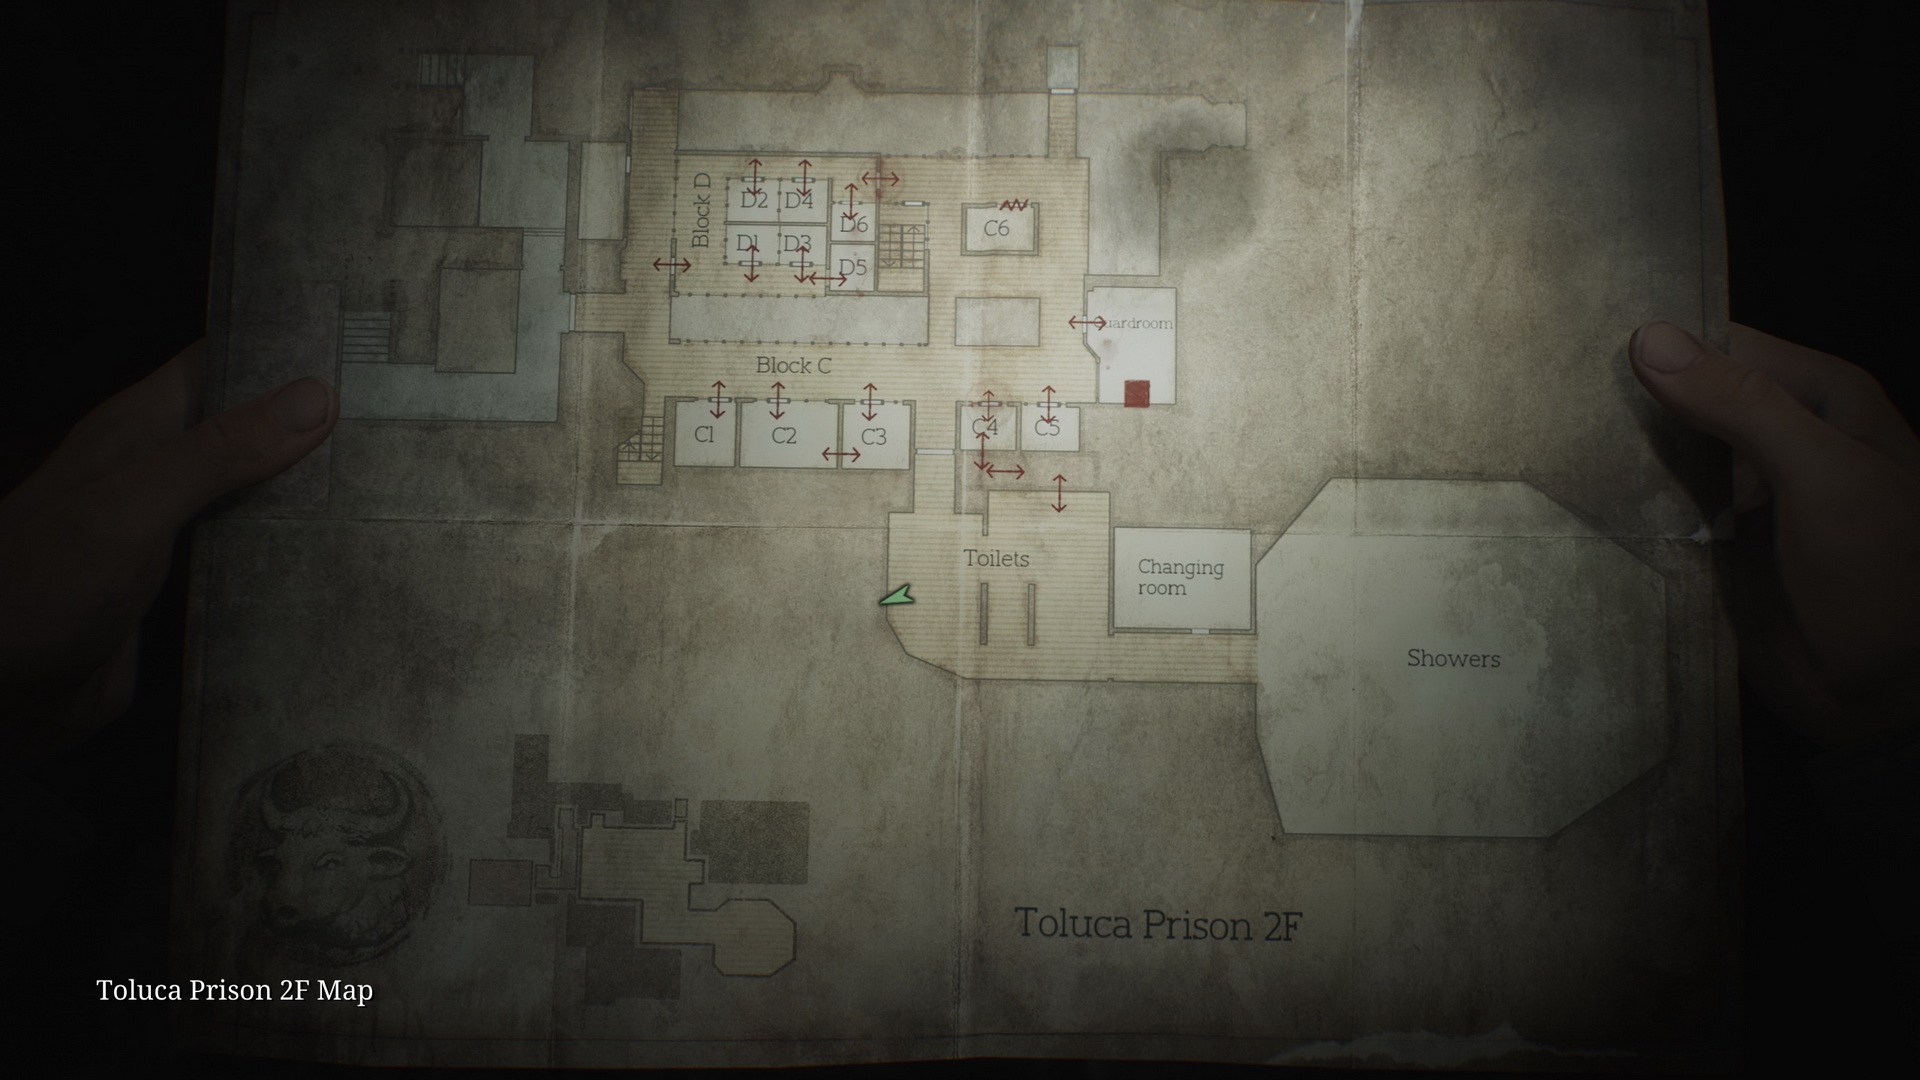
- Proceed into the toilet area.
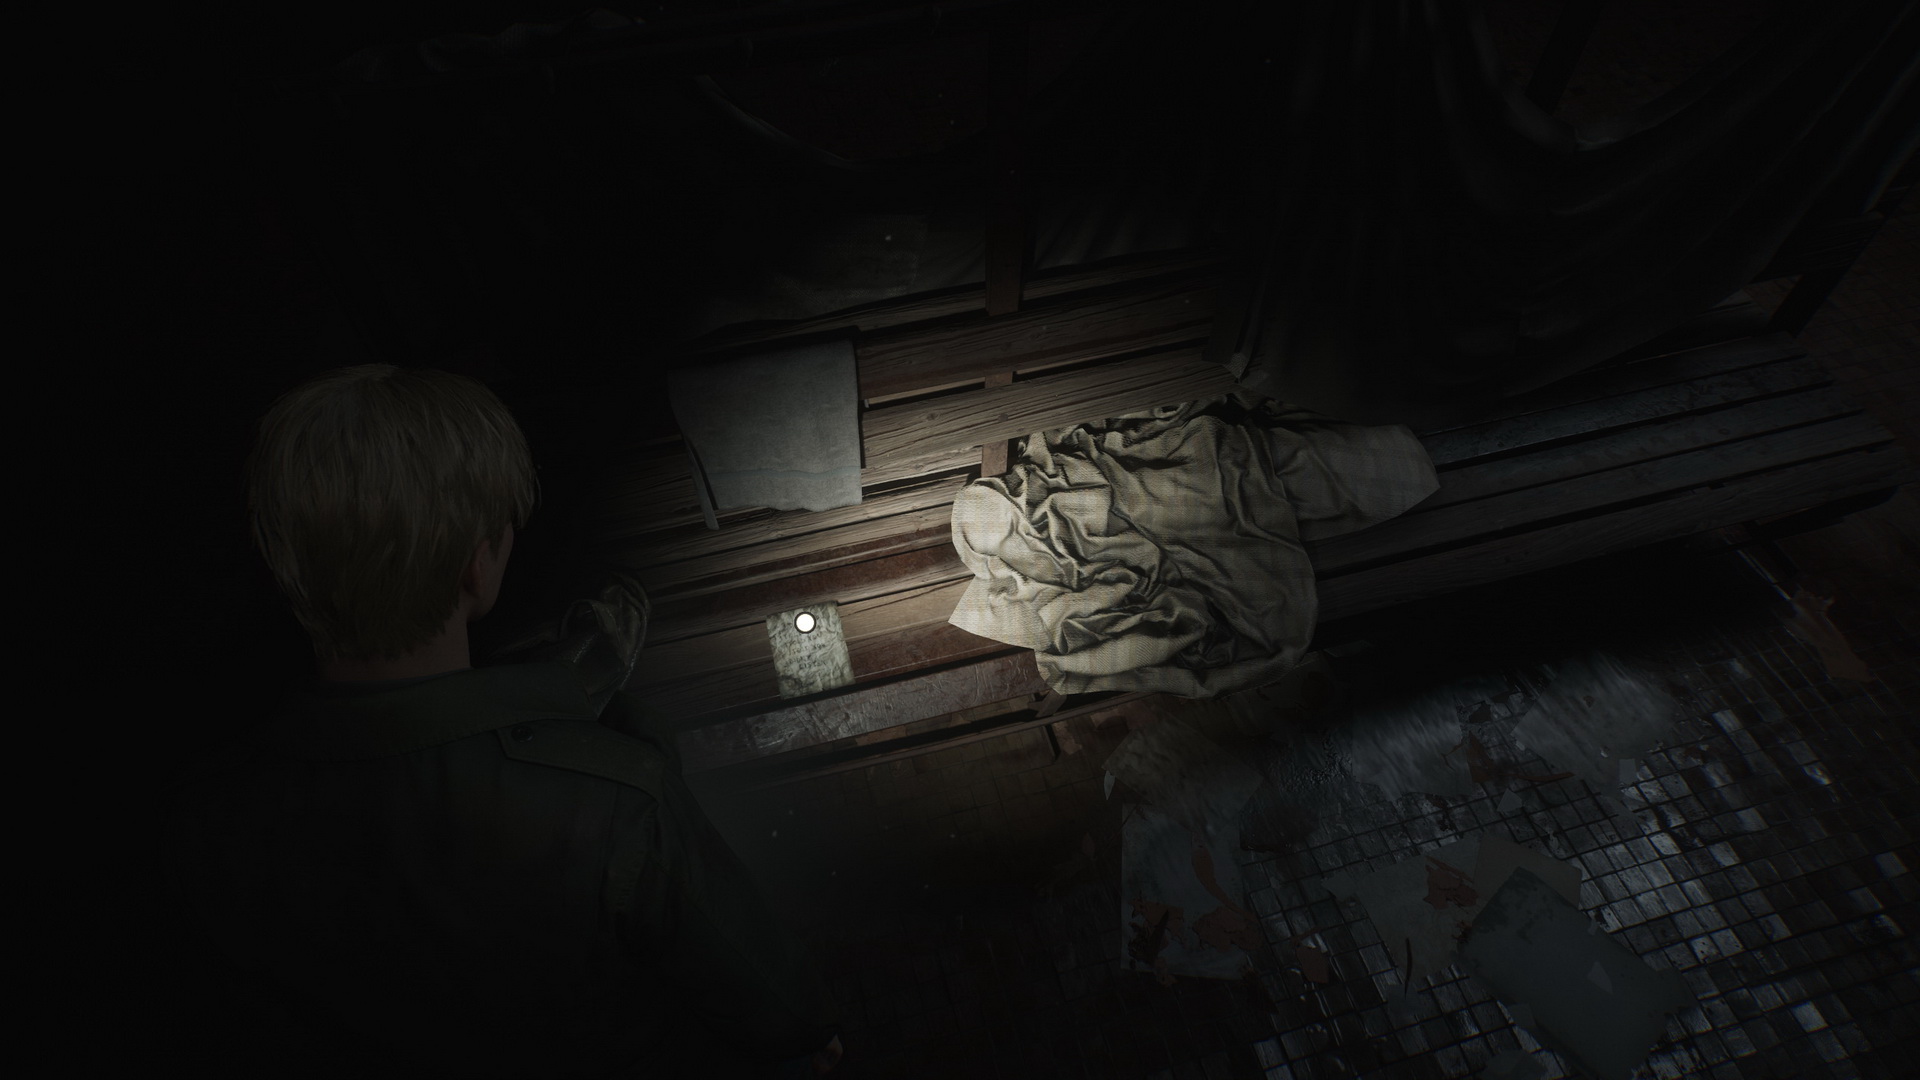
- Memo #54: Crumpled Note. On a bench in the Changing Room.
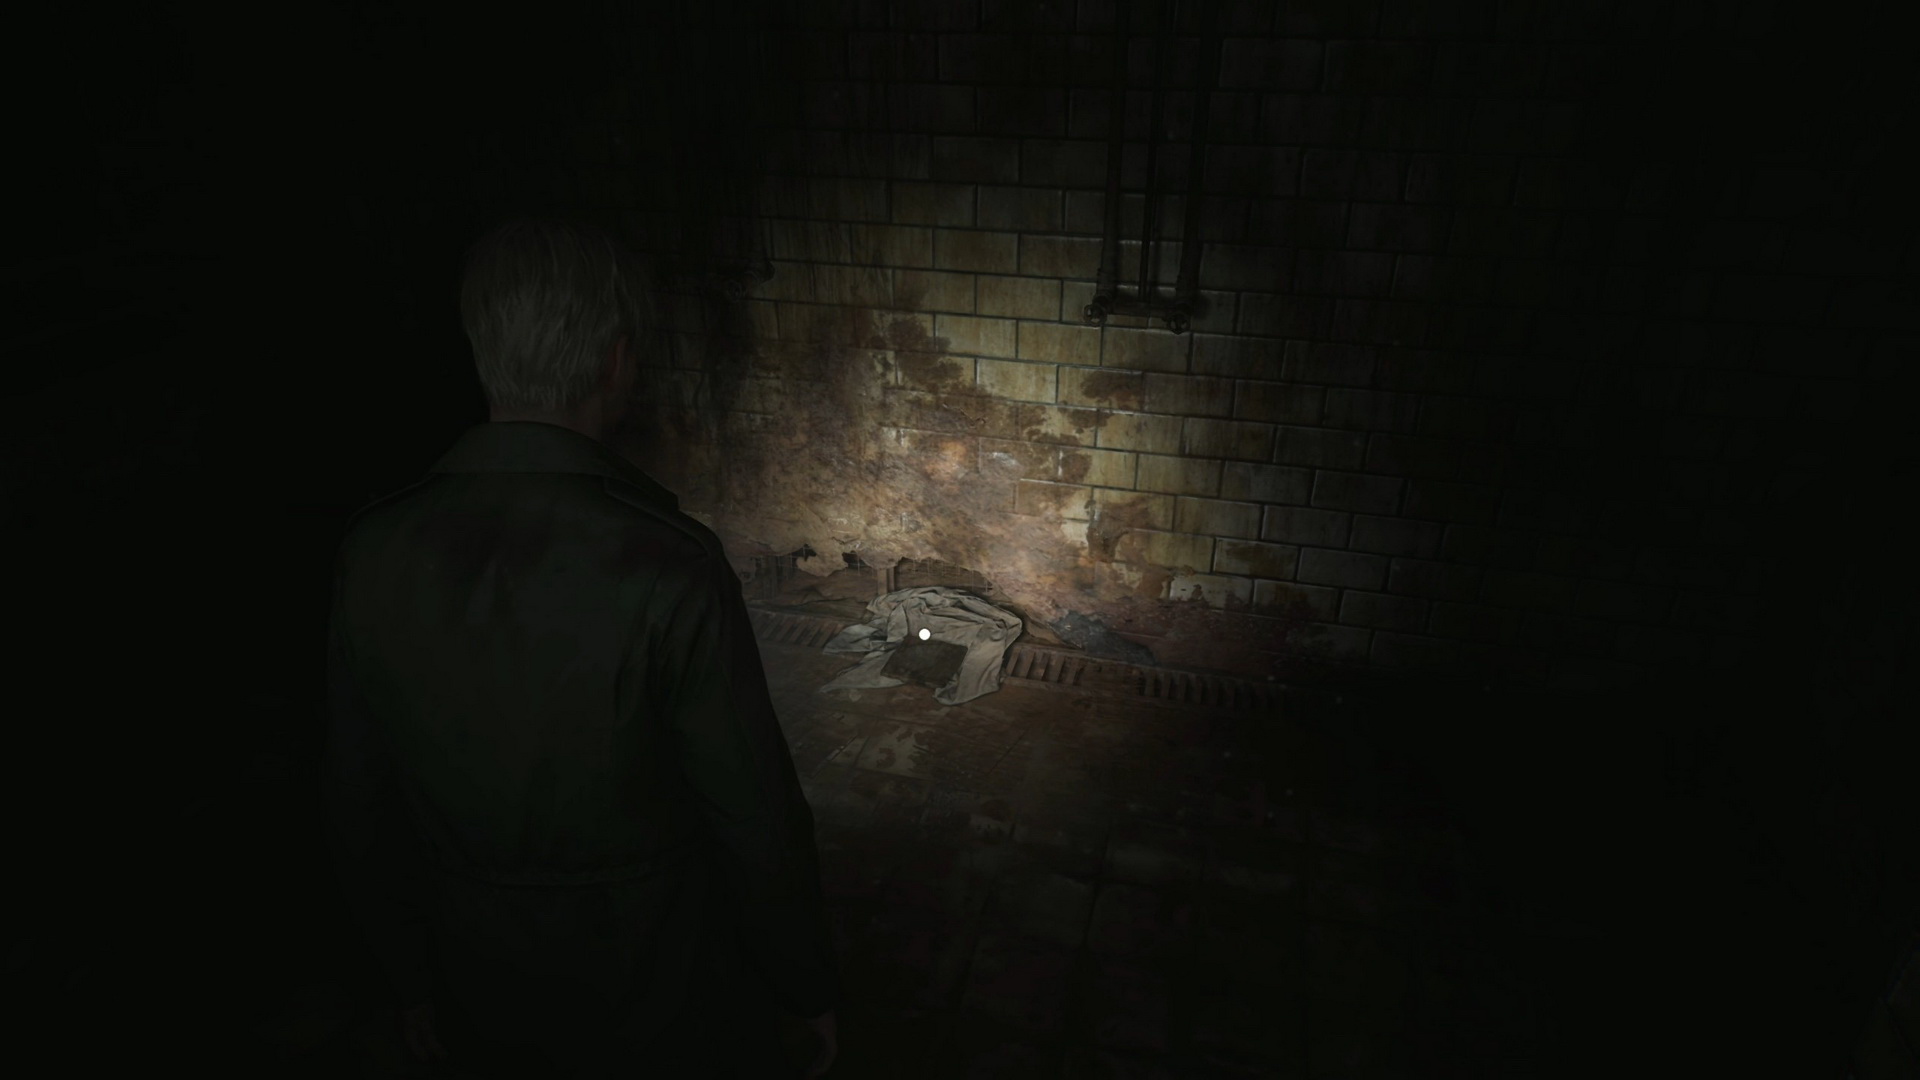
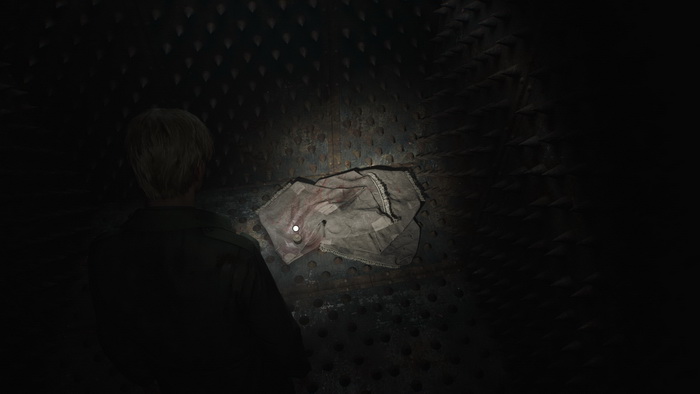
- Glimpse of the Past #20. Inspect a tablet on the cloth along the wall to the right in the Showers.
- 79 Heavy Weight is inside the hole in the back of the Showers.
- Return to the Main Section.
Main Section
- Return to the Yard and proceed with the scales puzzle.
- Put the Small Weight (1) on the left scale and the rest of the weights on the right one to unlock the Eyeless Boar door.
- Proceed through the unlocked door in the Main Section.
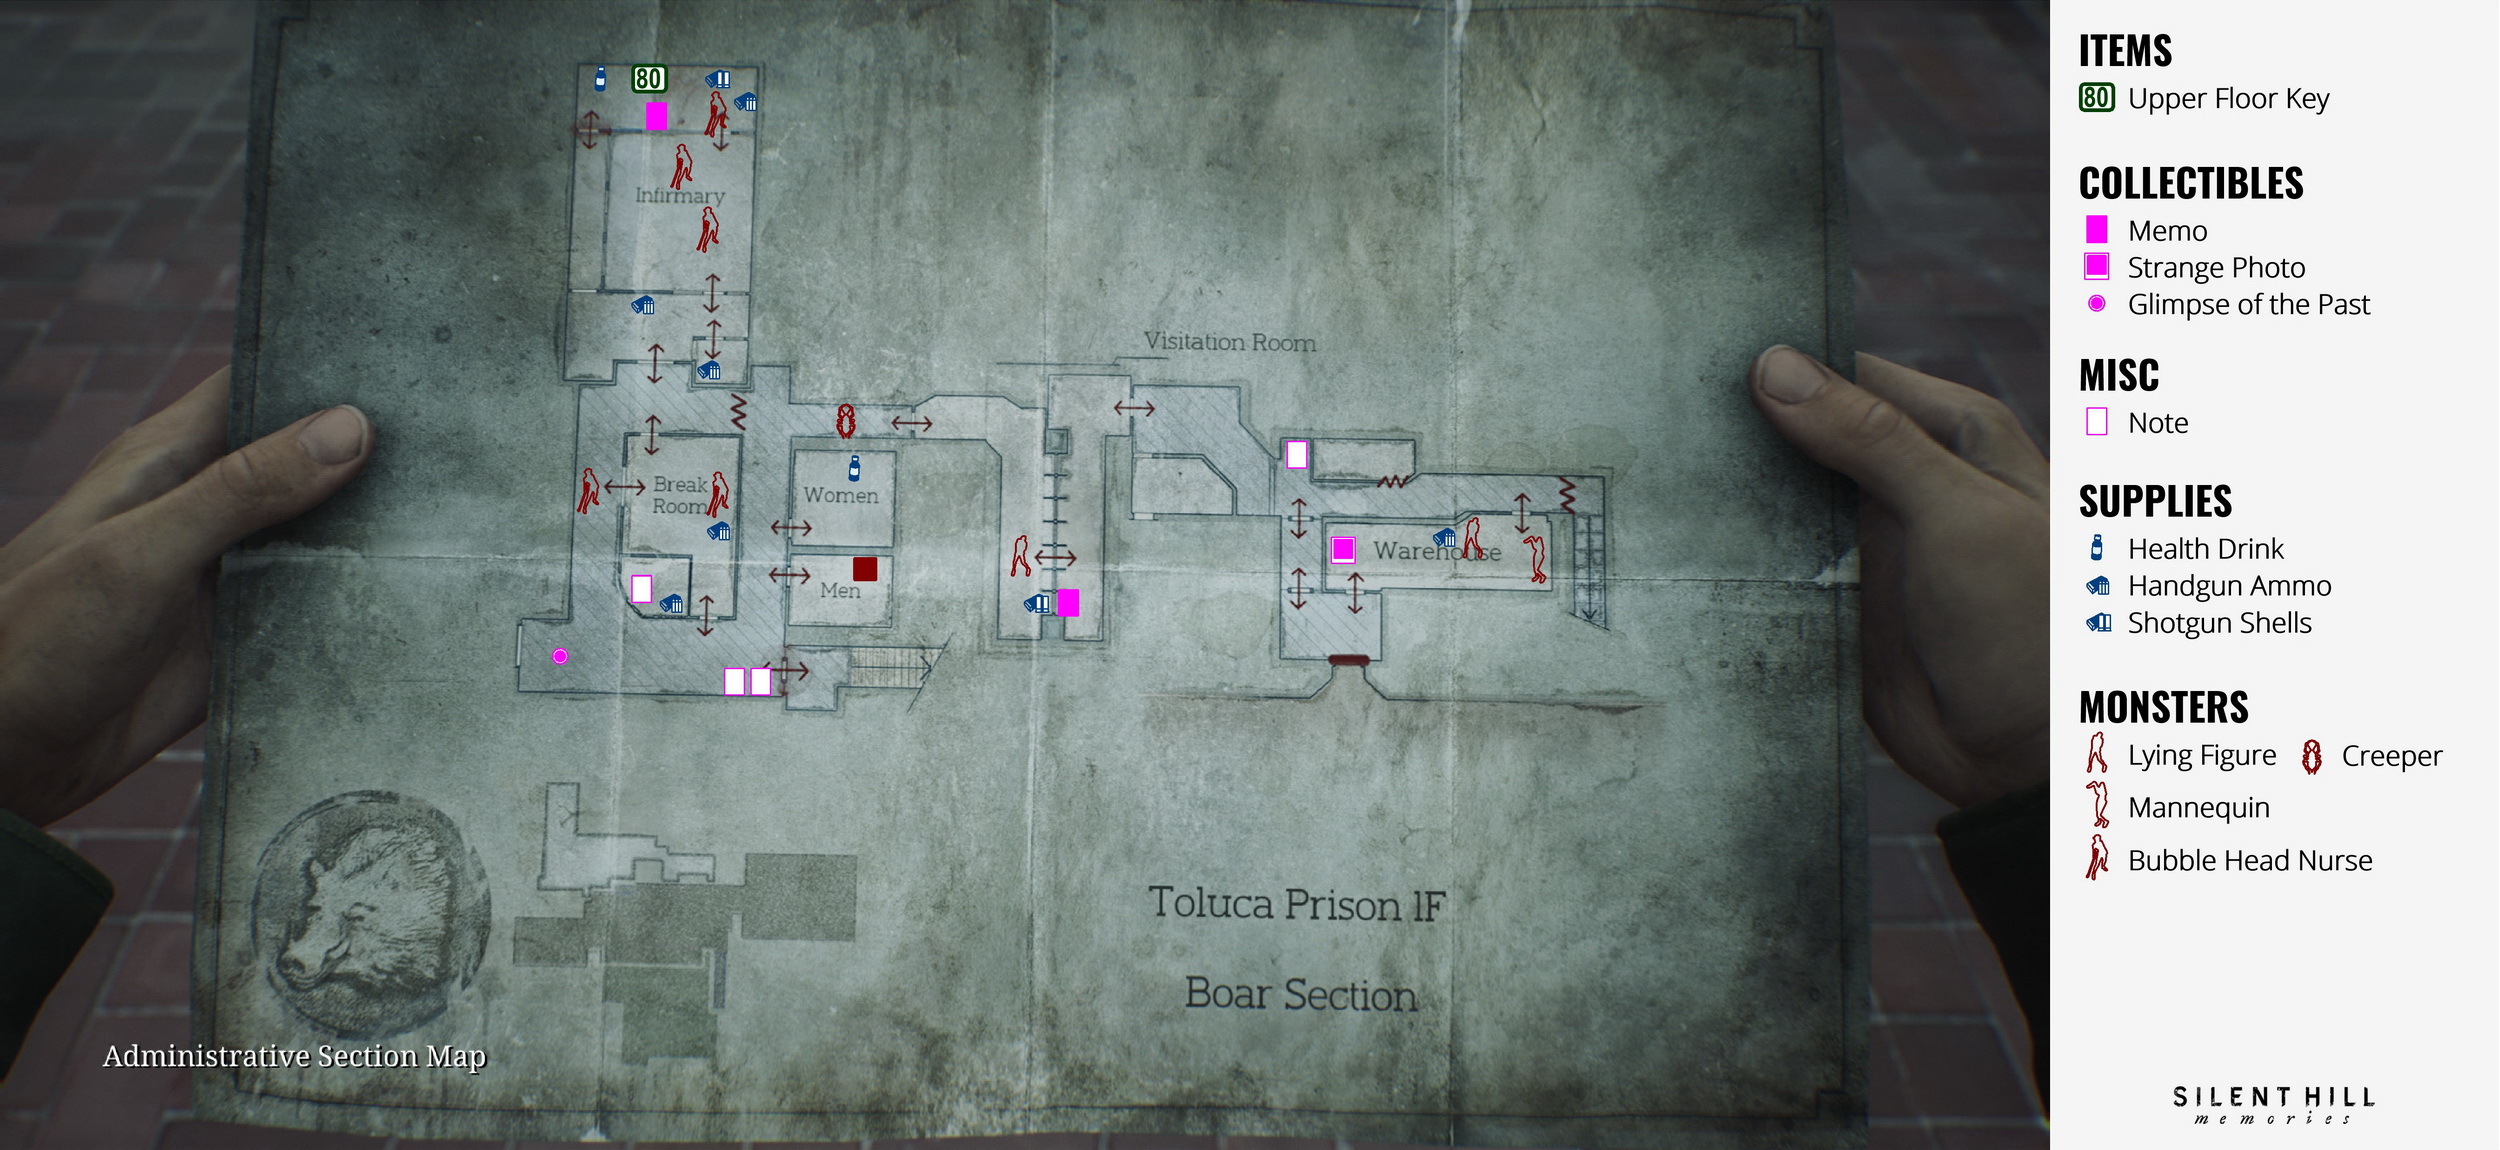
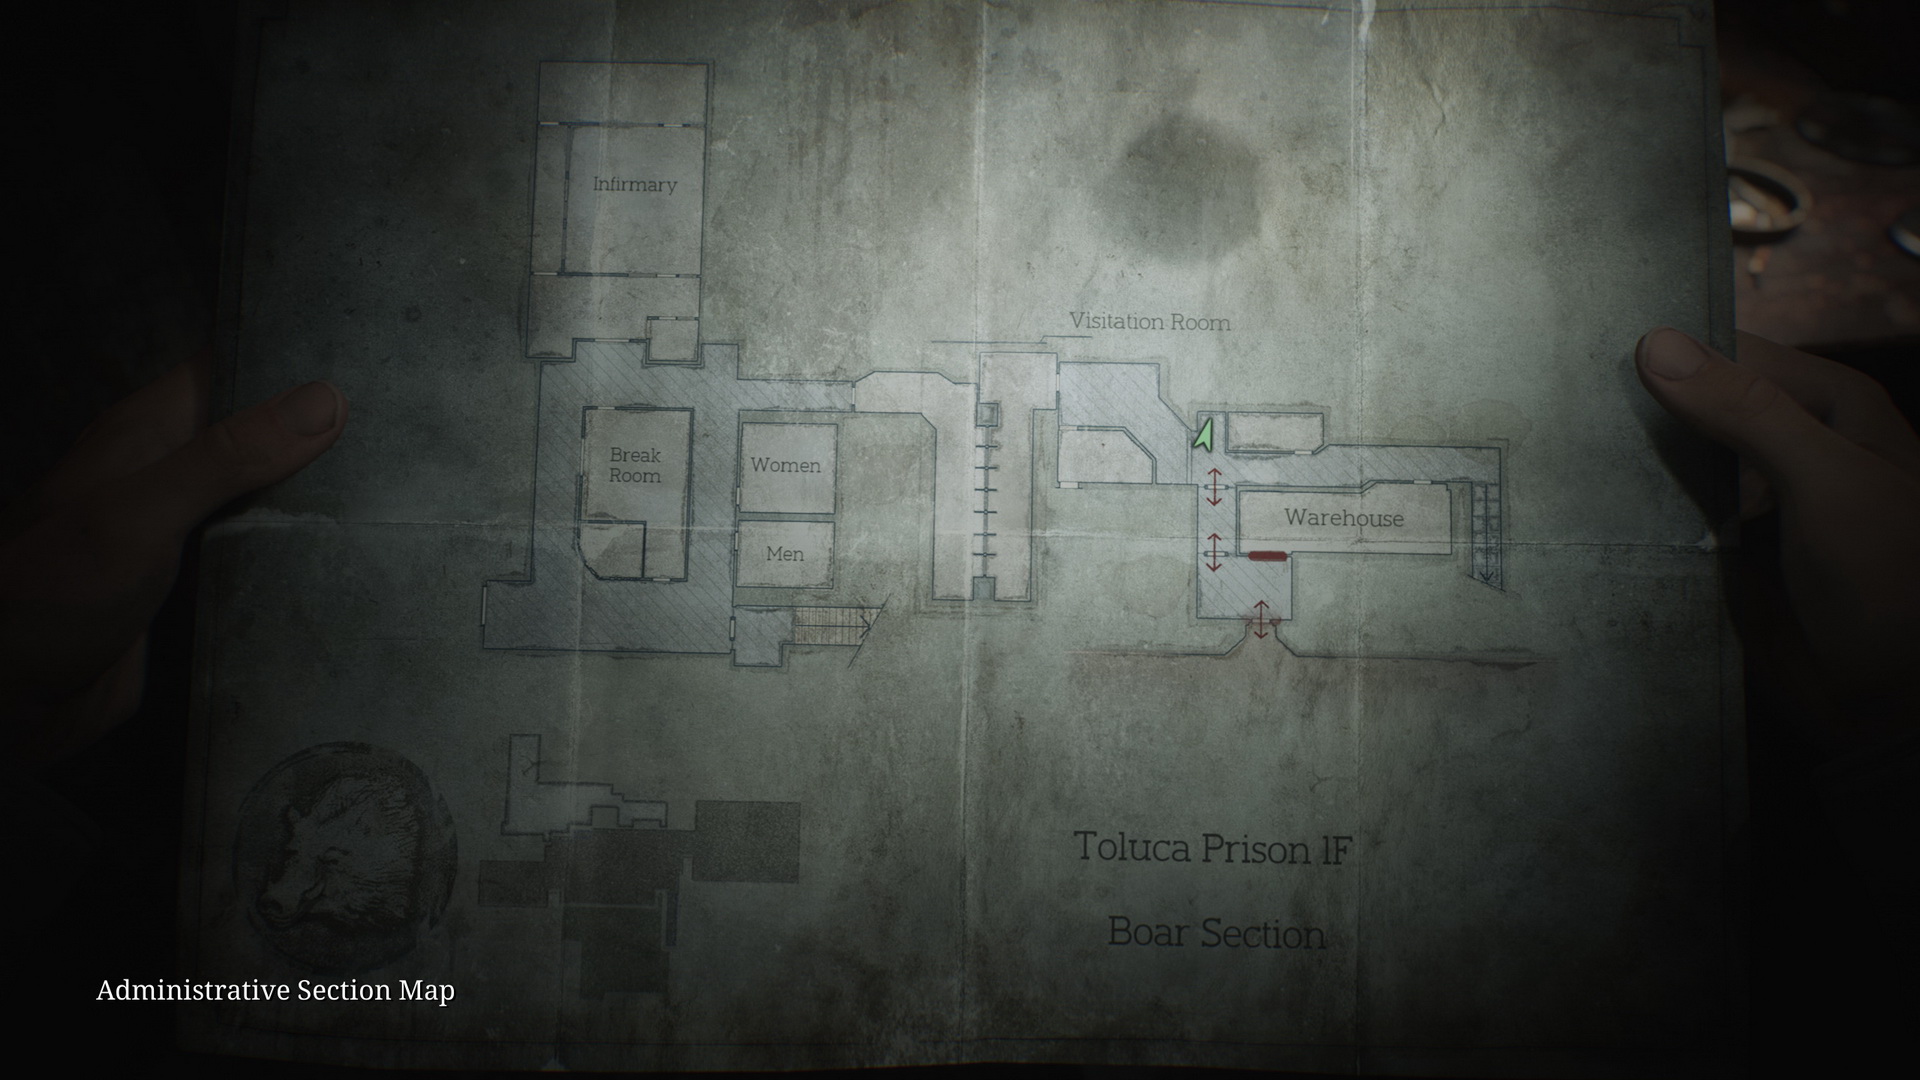
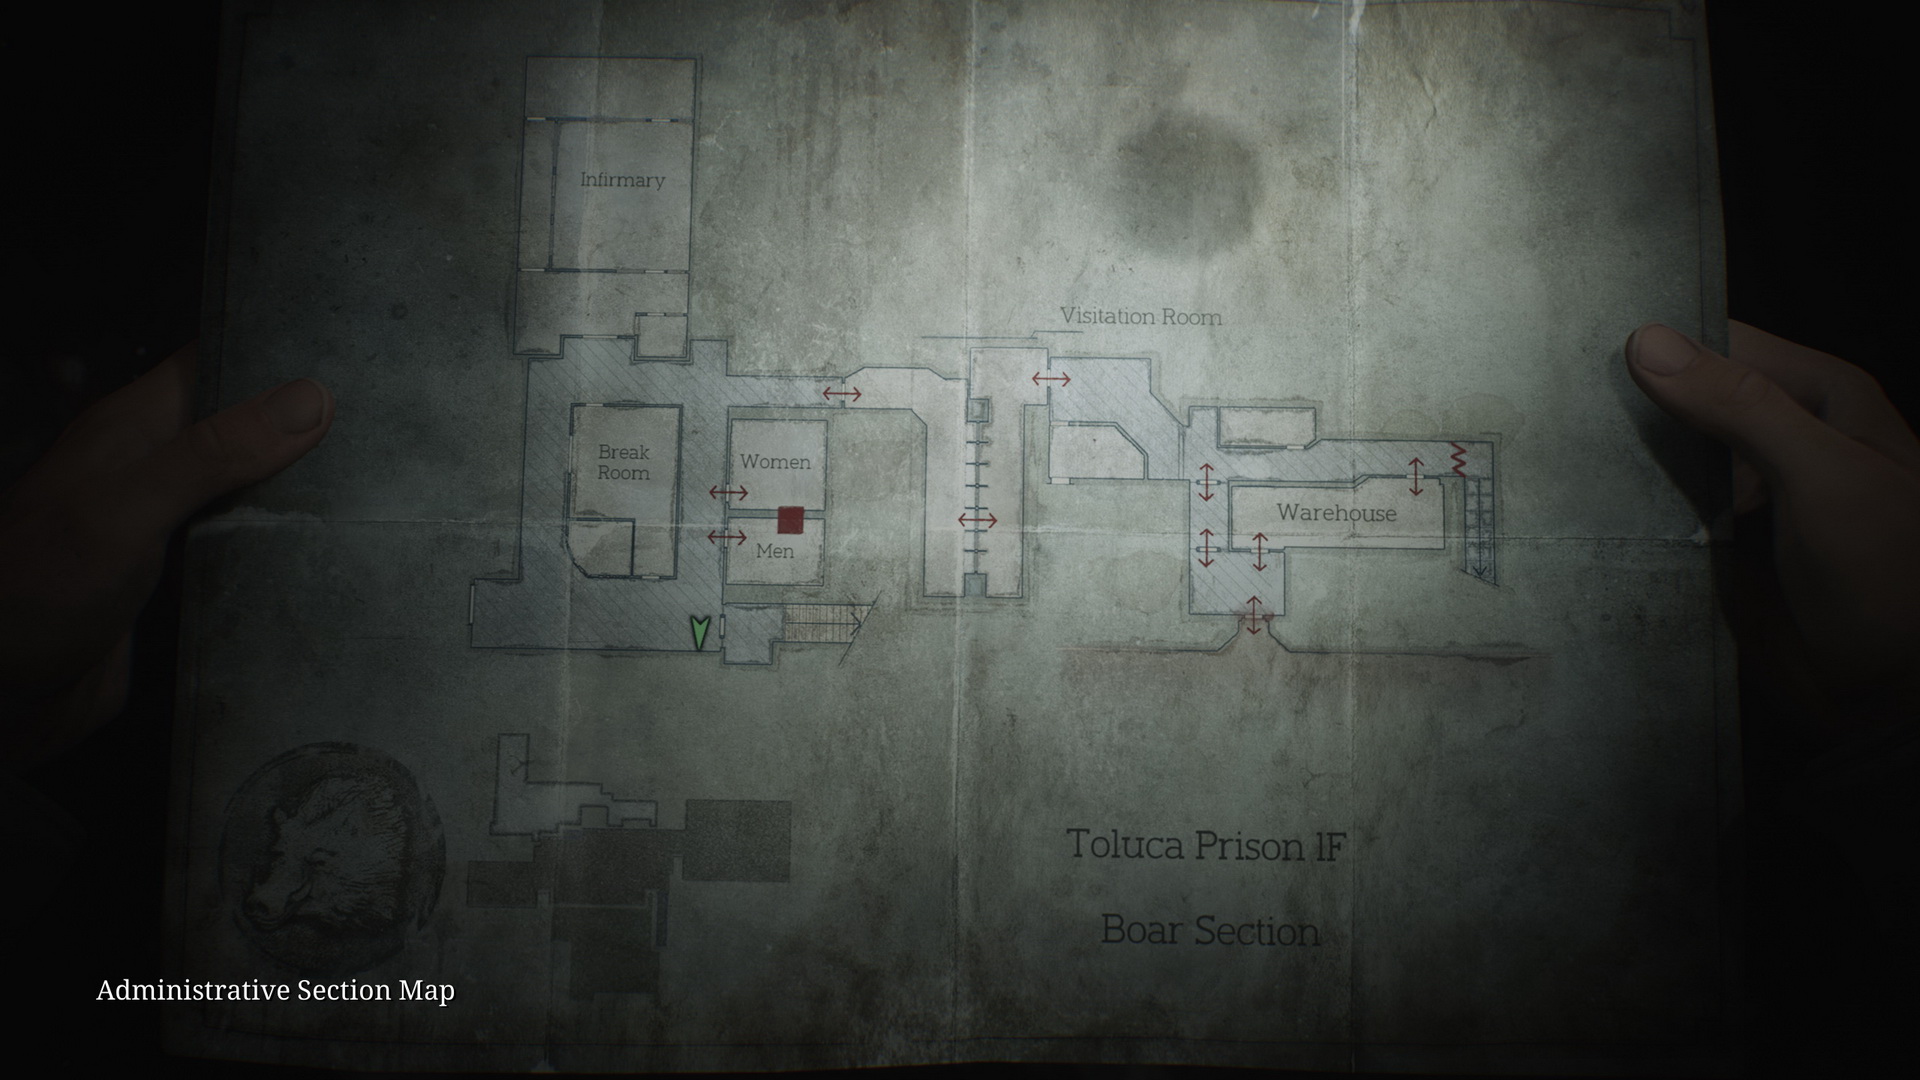
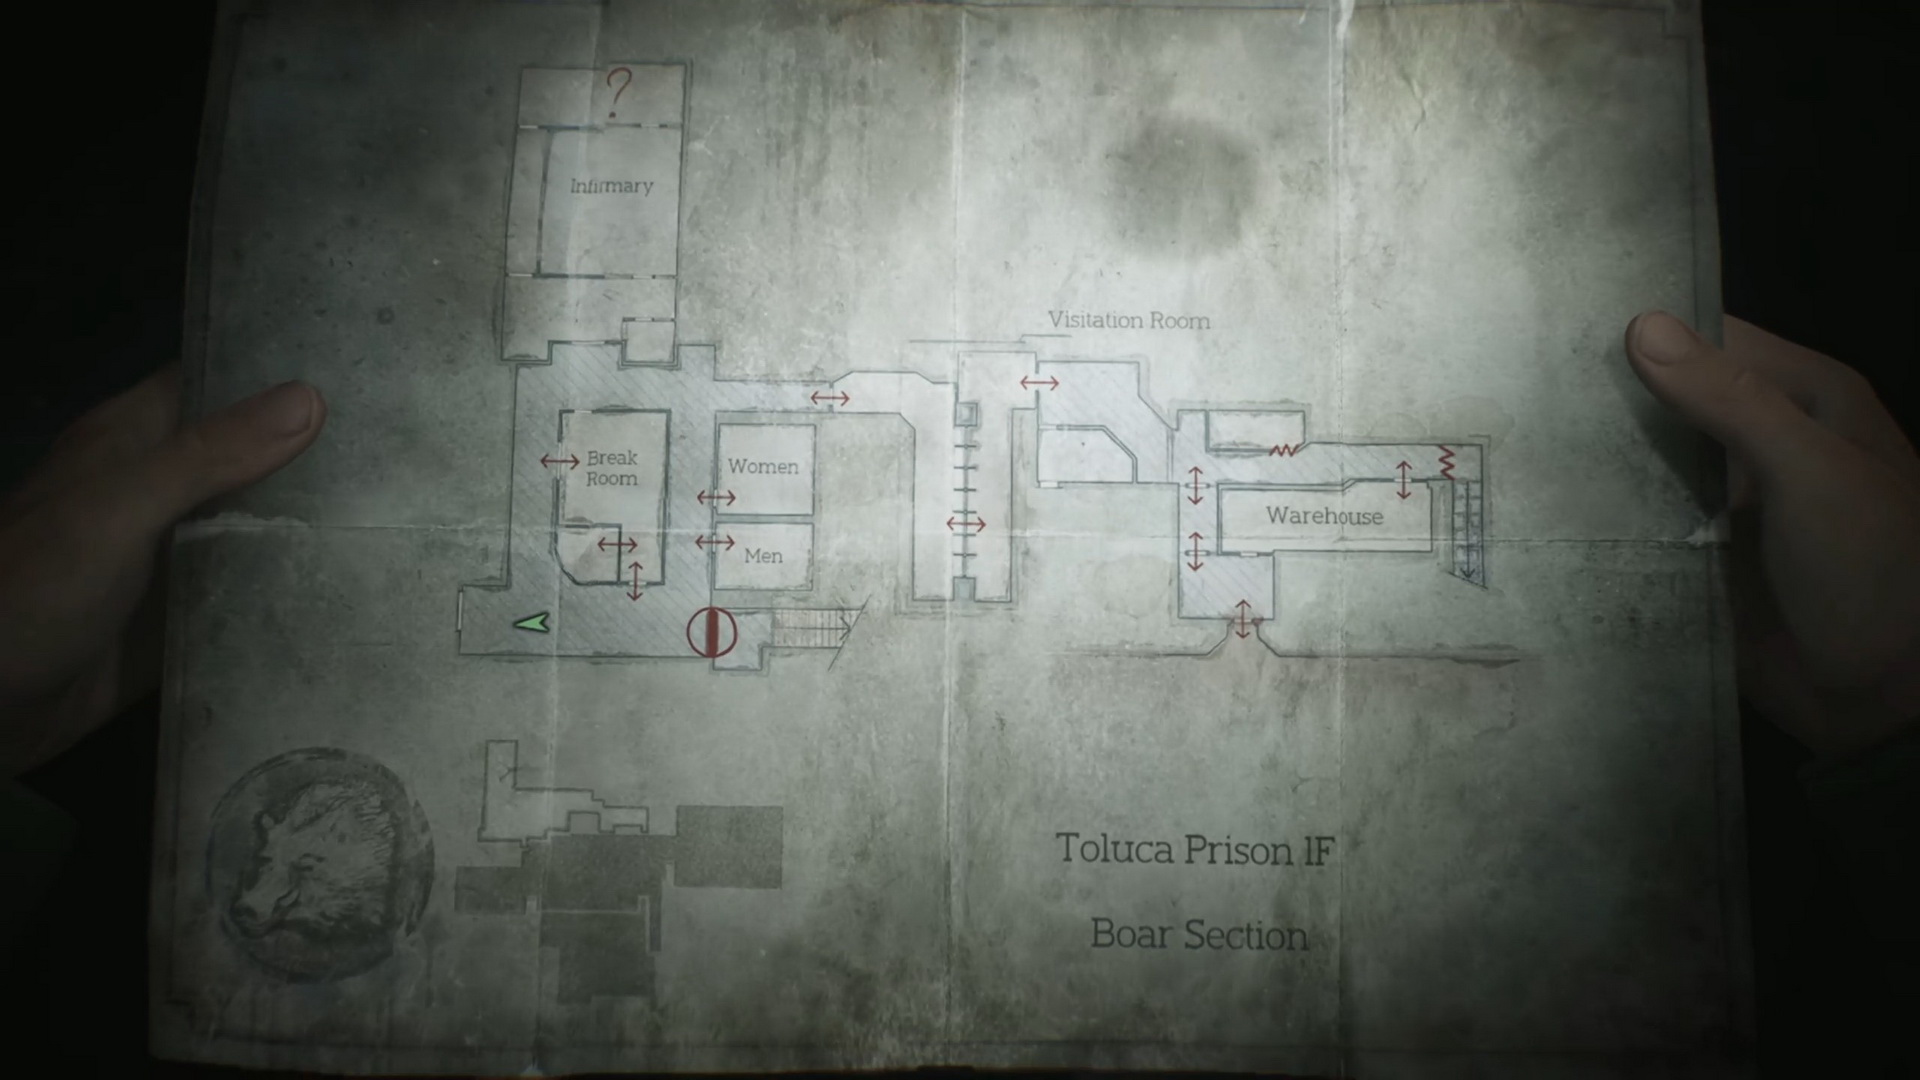
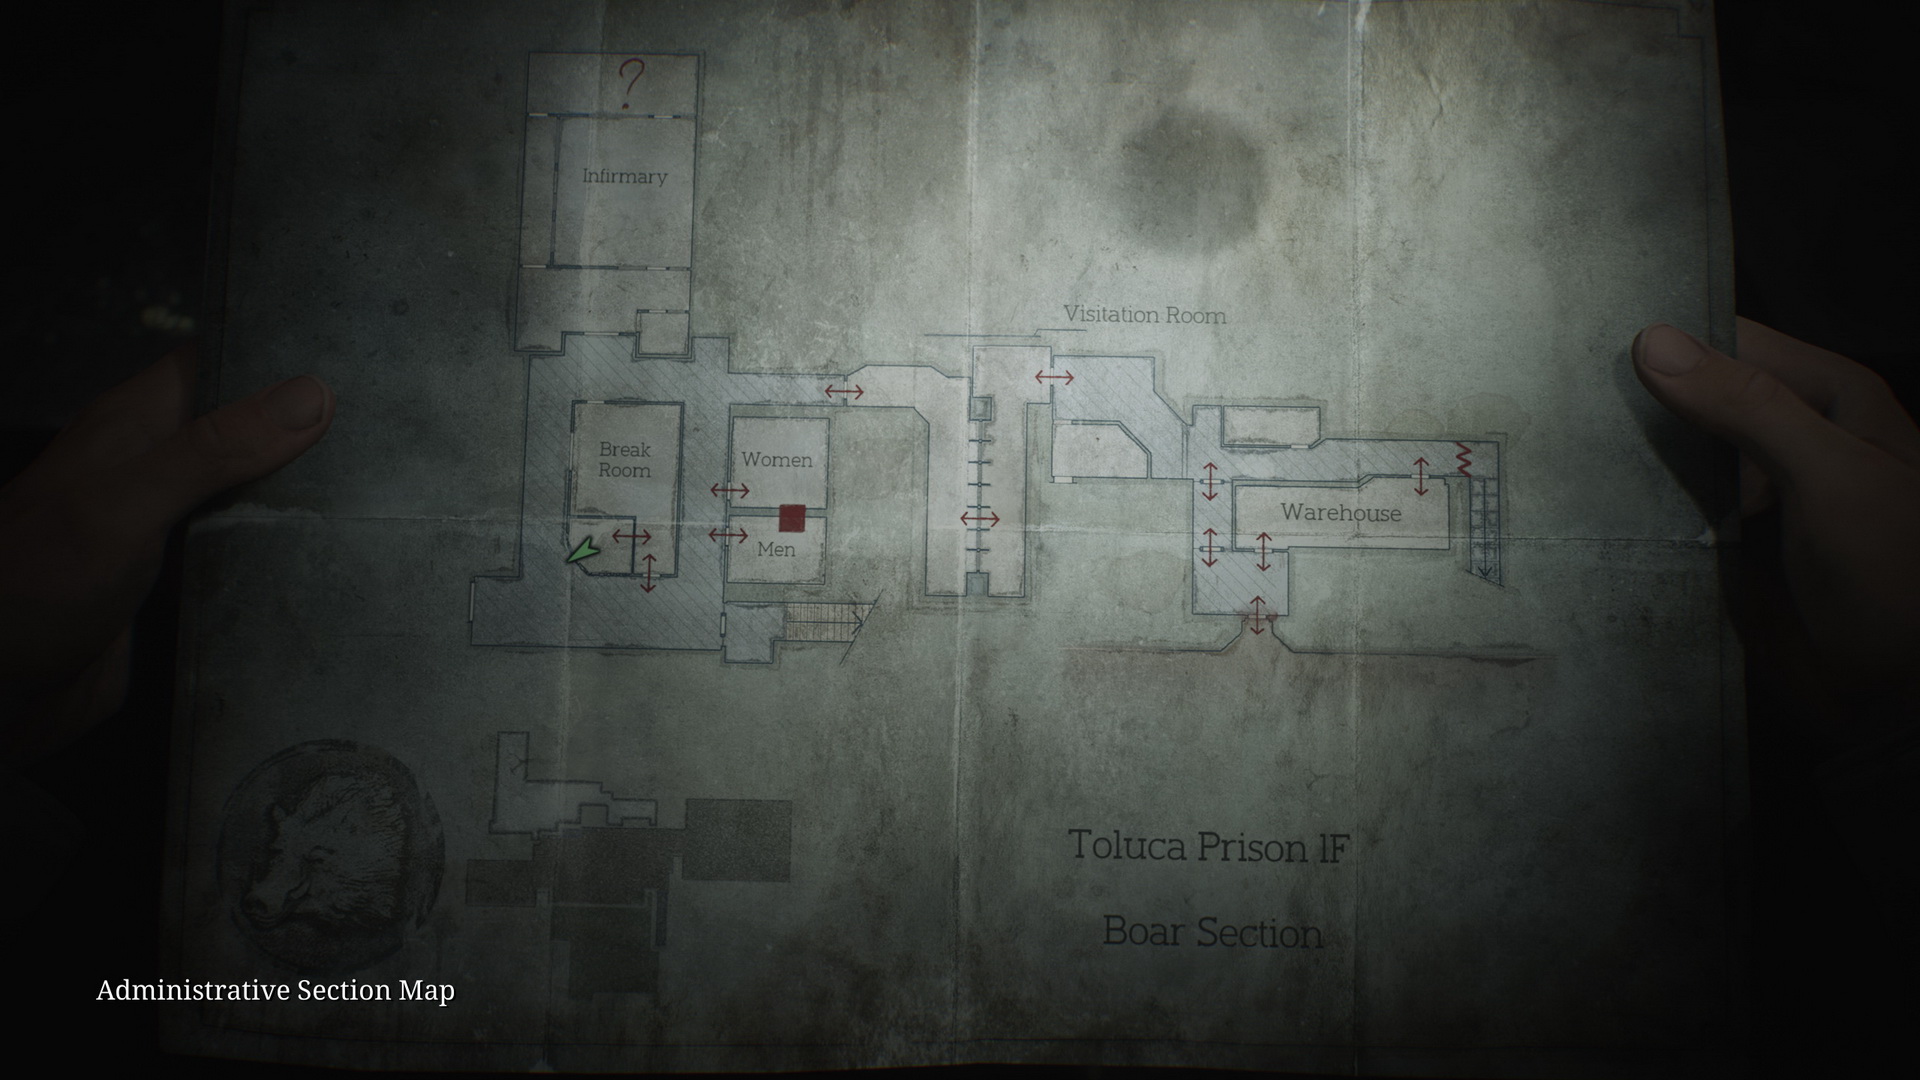
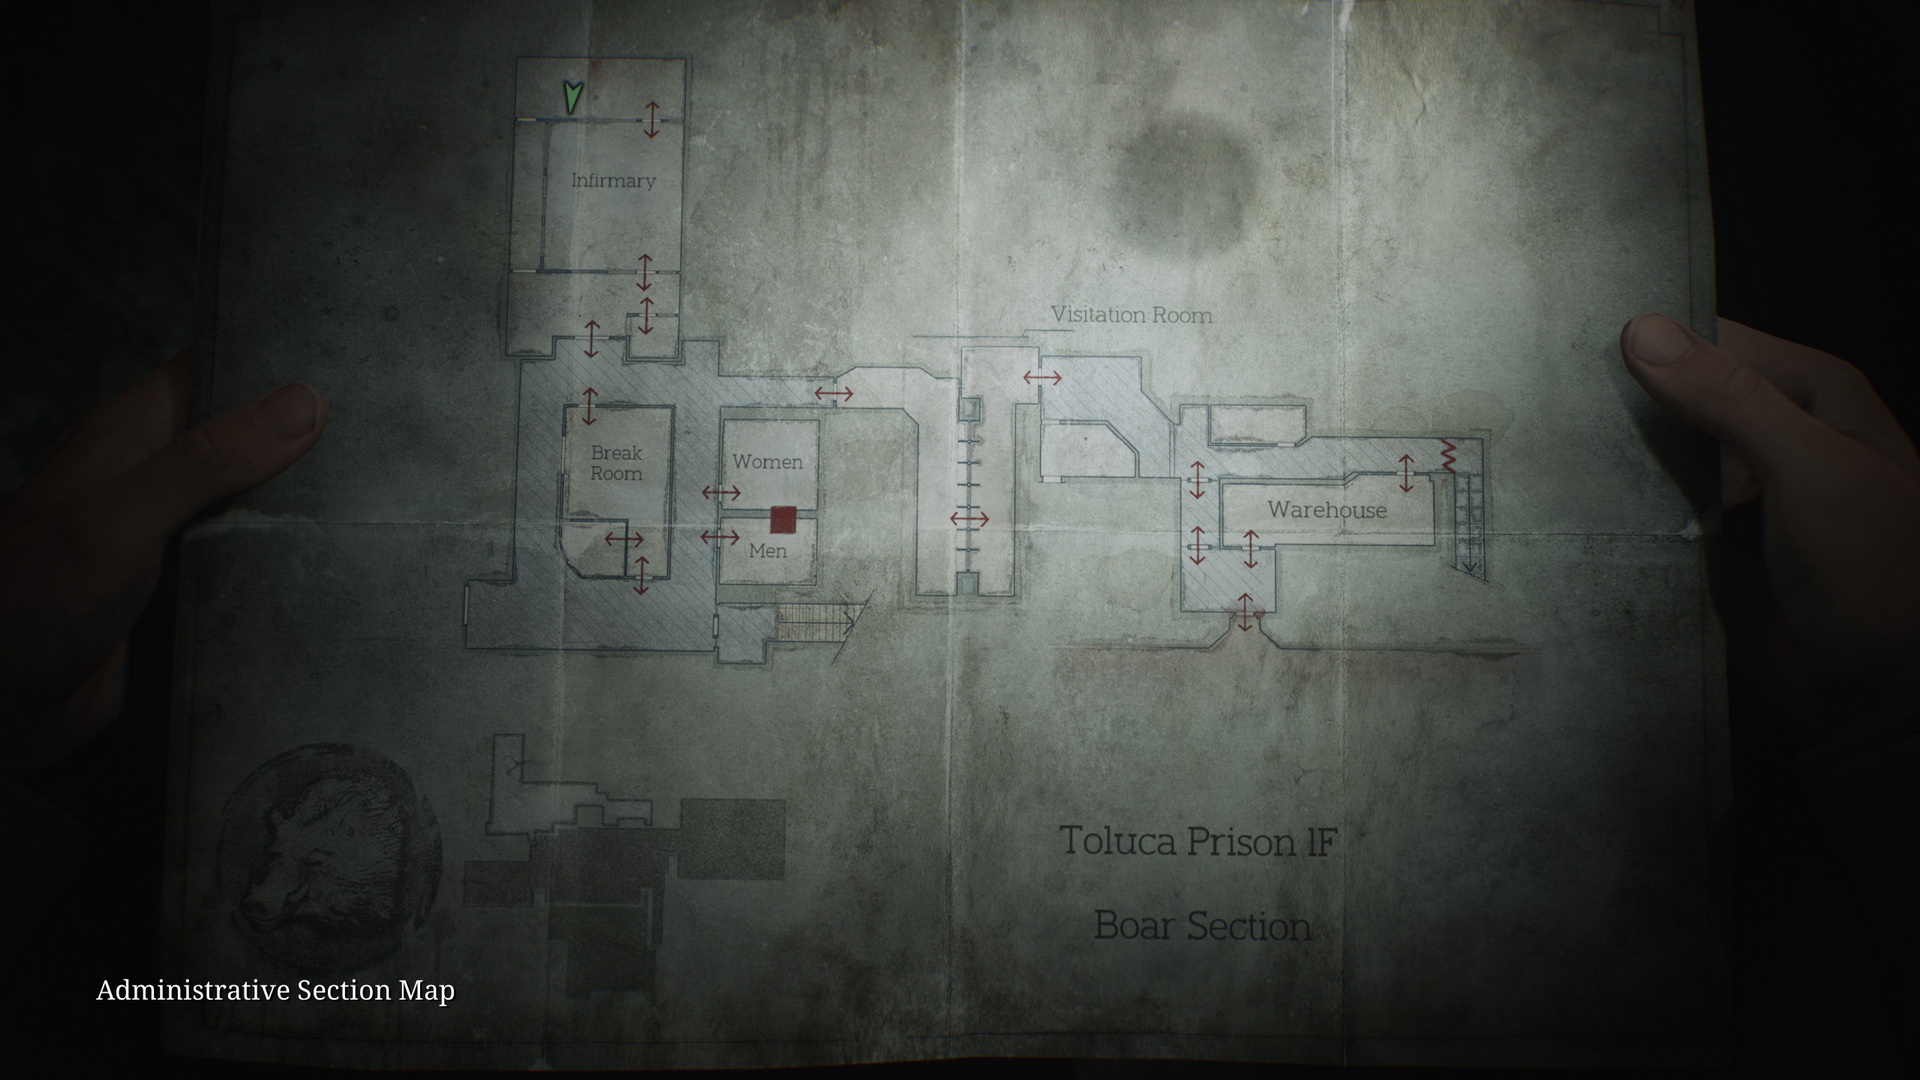
Boar Section (Administrative)
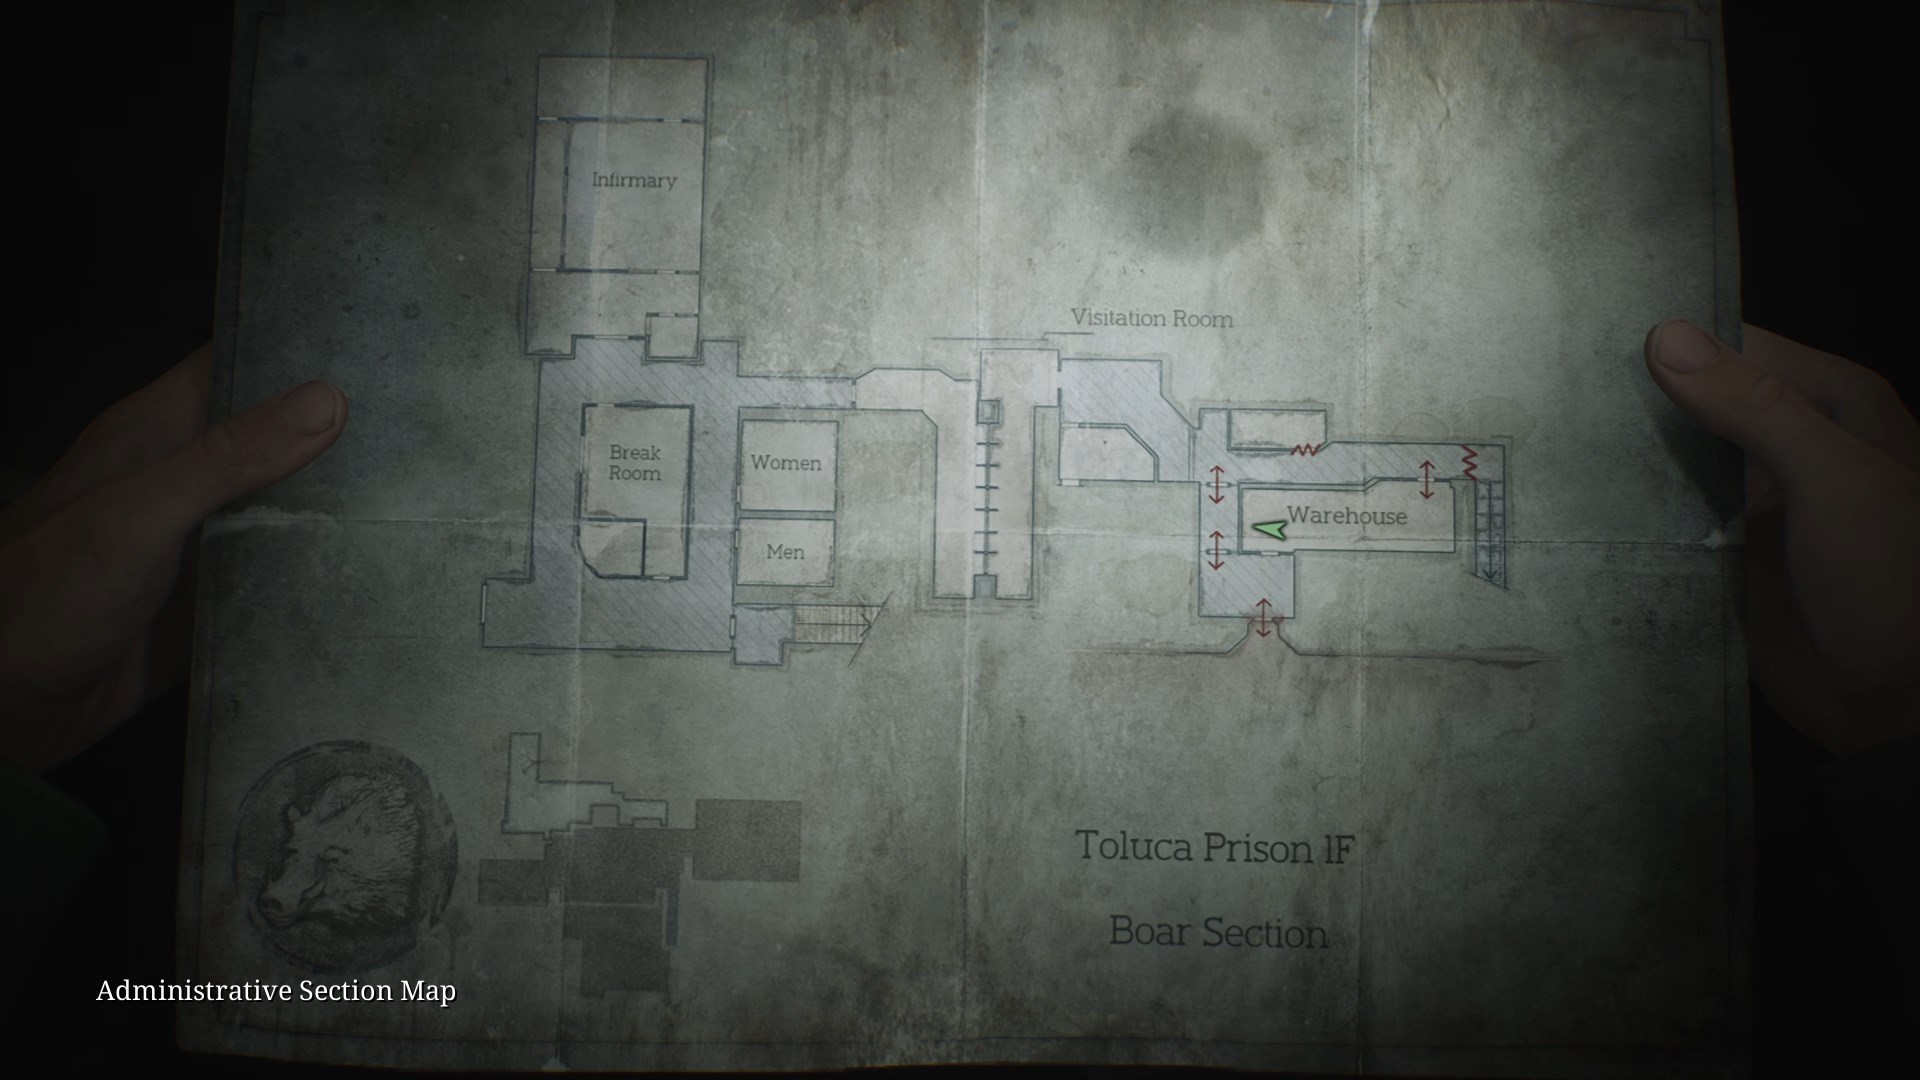
- Strange Photo #19: "Old man’s always prepared". On a desk in the back of the Warehouse.
- Proceed to the Visitation Room.
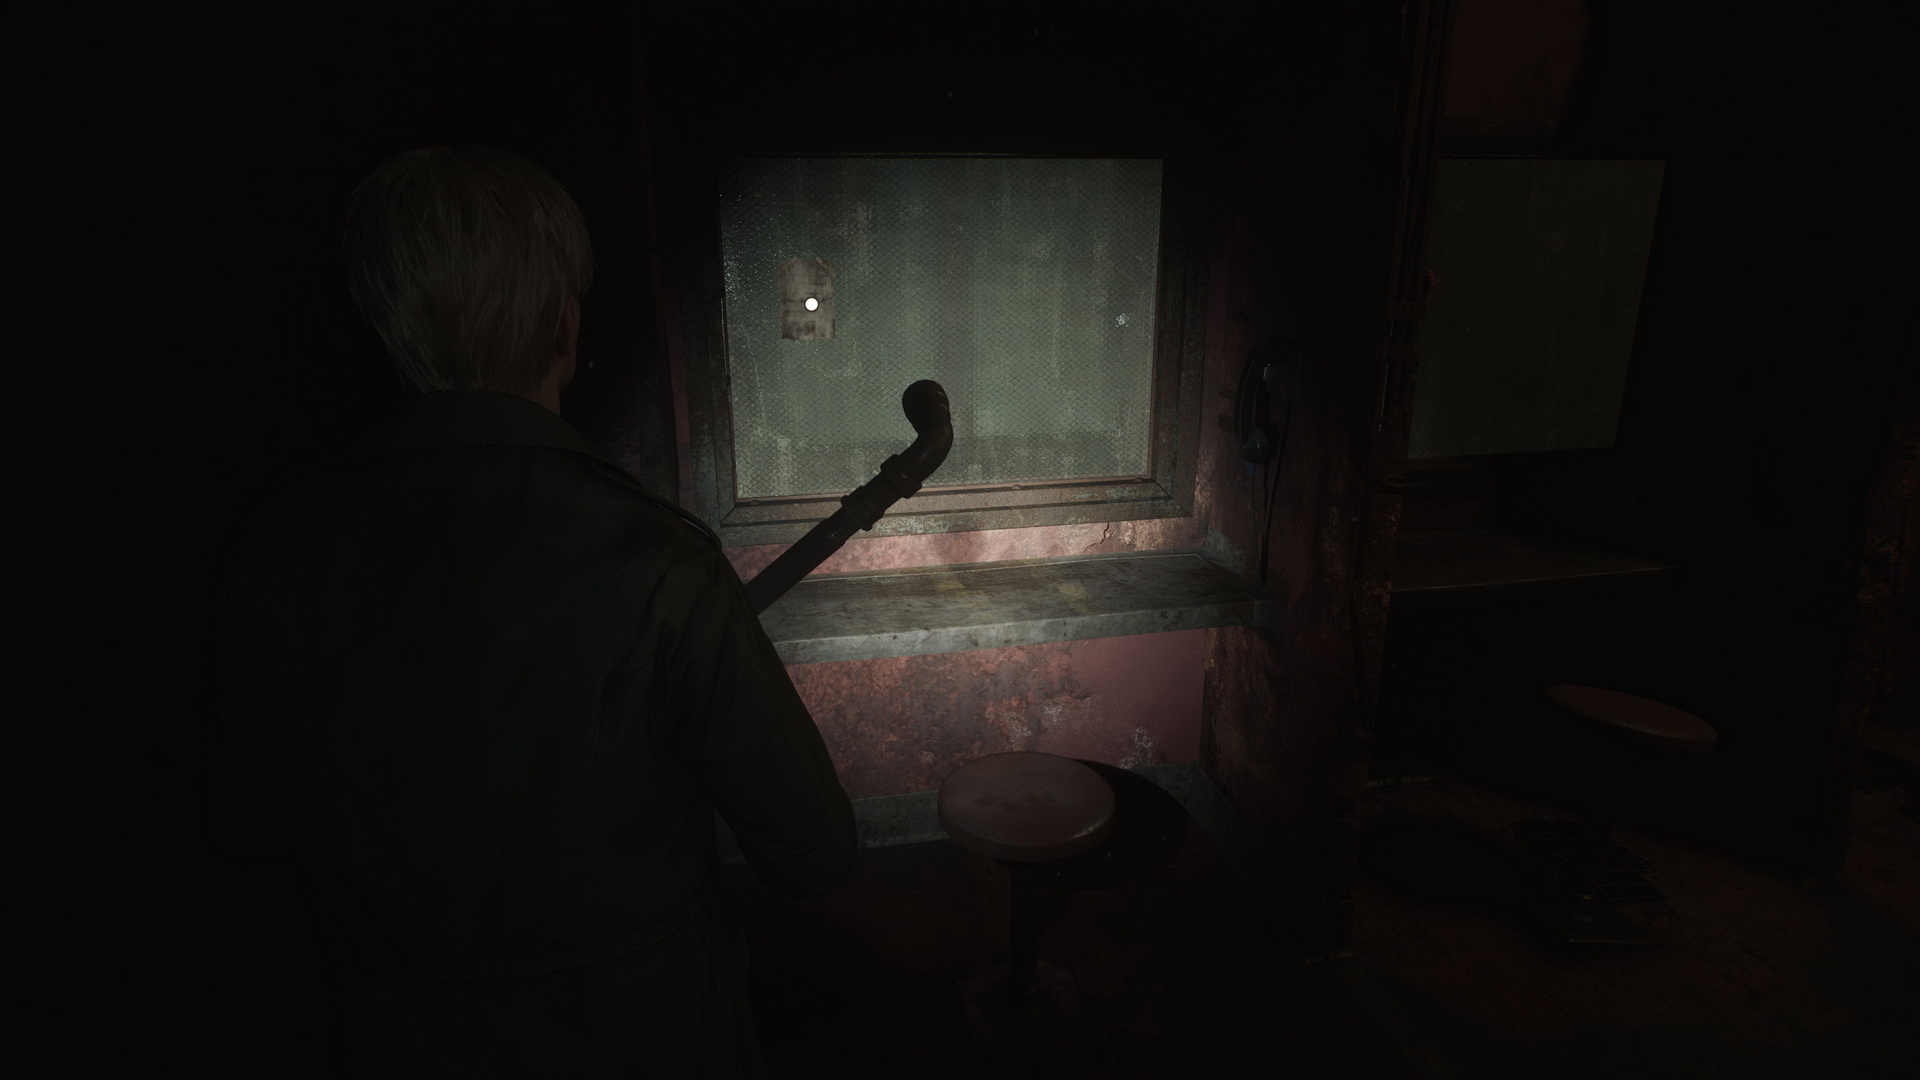
- Memo #55: Prisoner’s Letter. Visitation Room, taped to the glass of cubicle 7.
- Cross to the other side through the window in the cubicle 5.
- There's a Save Point in the Men's restroom.
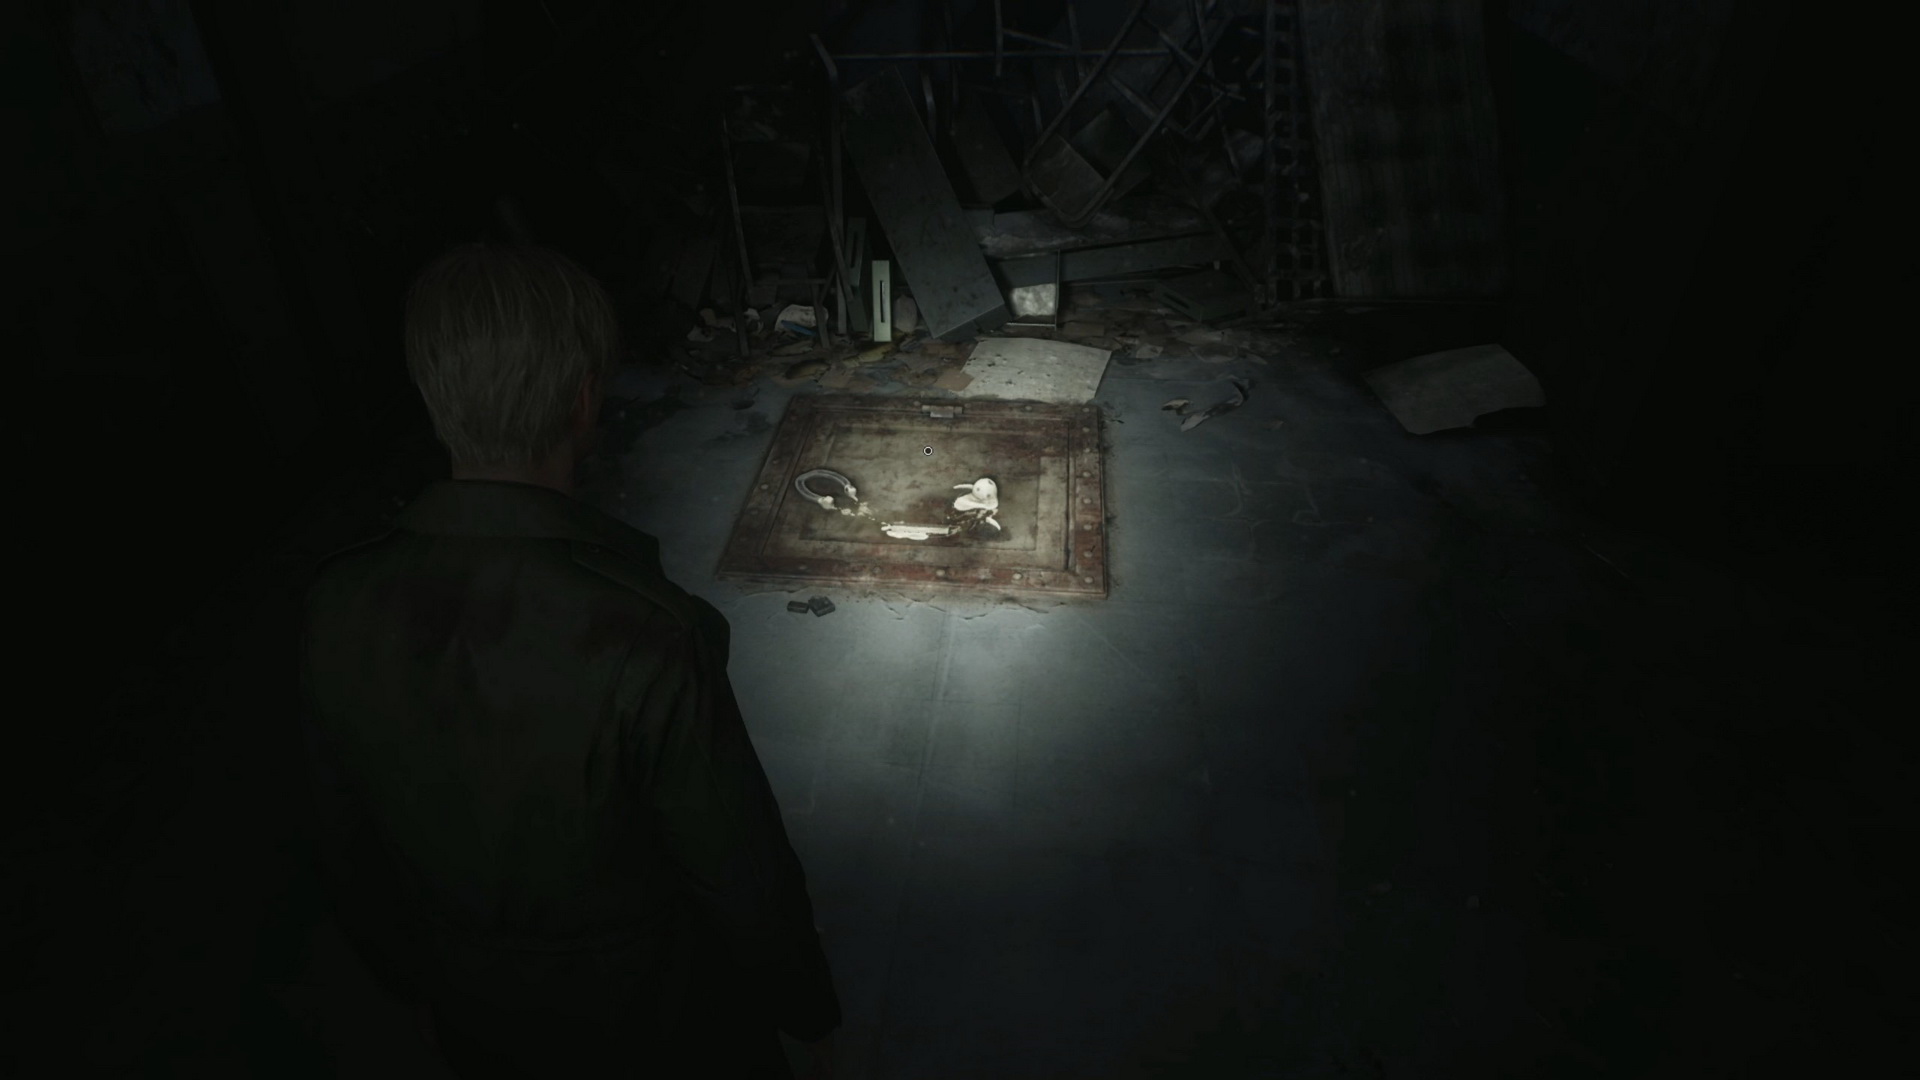
- Glimpse of the Past #21. Inspect a hatch door in the floor in the southwest corner next to the Break Room.
- Proceed through the Infirmary.
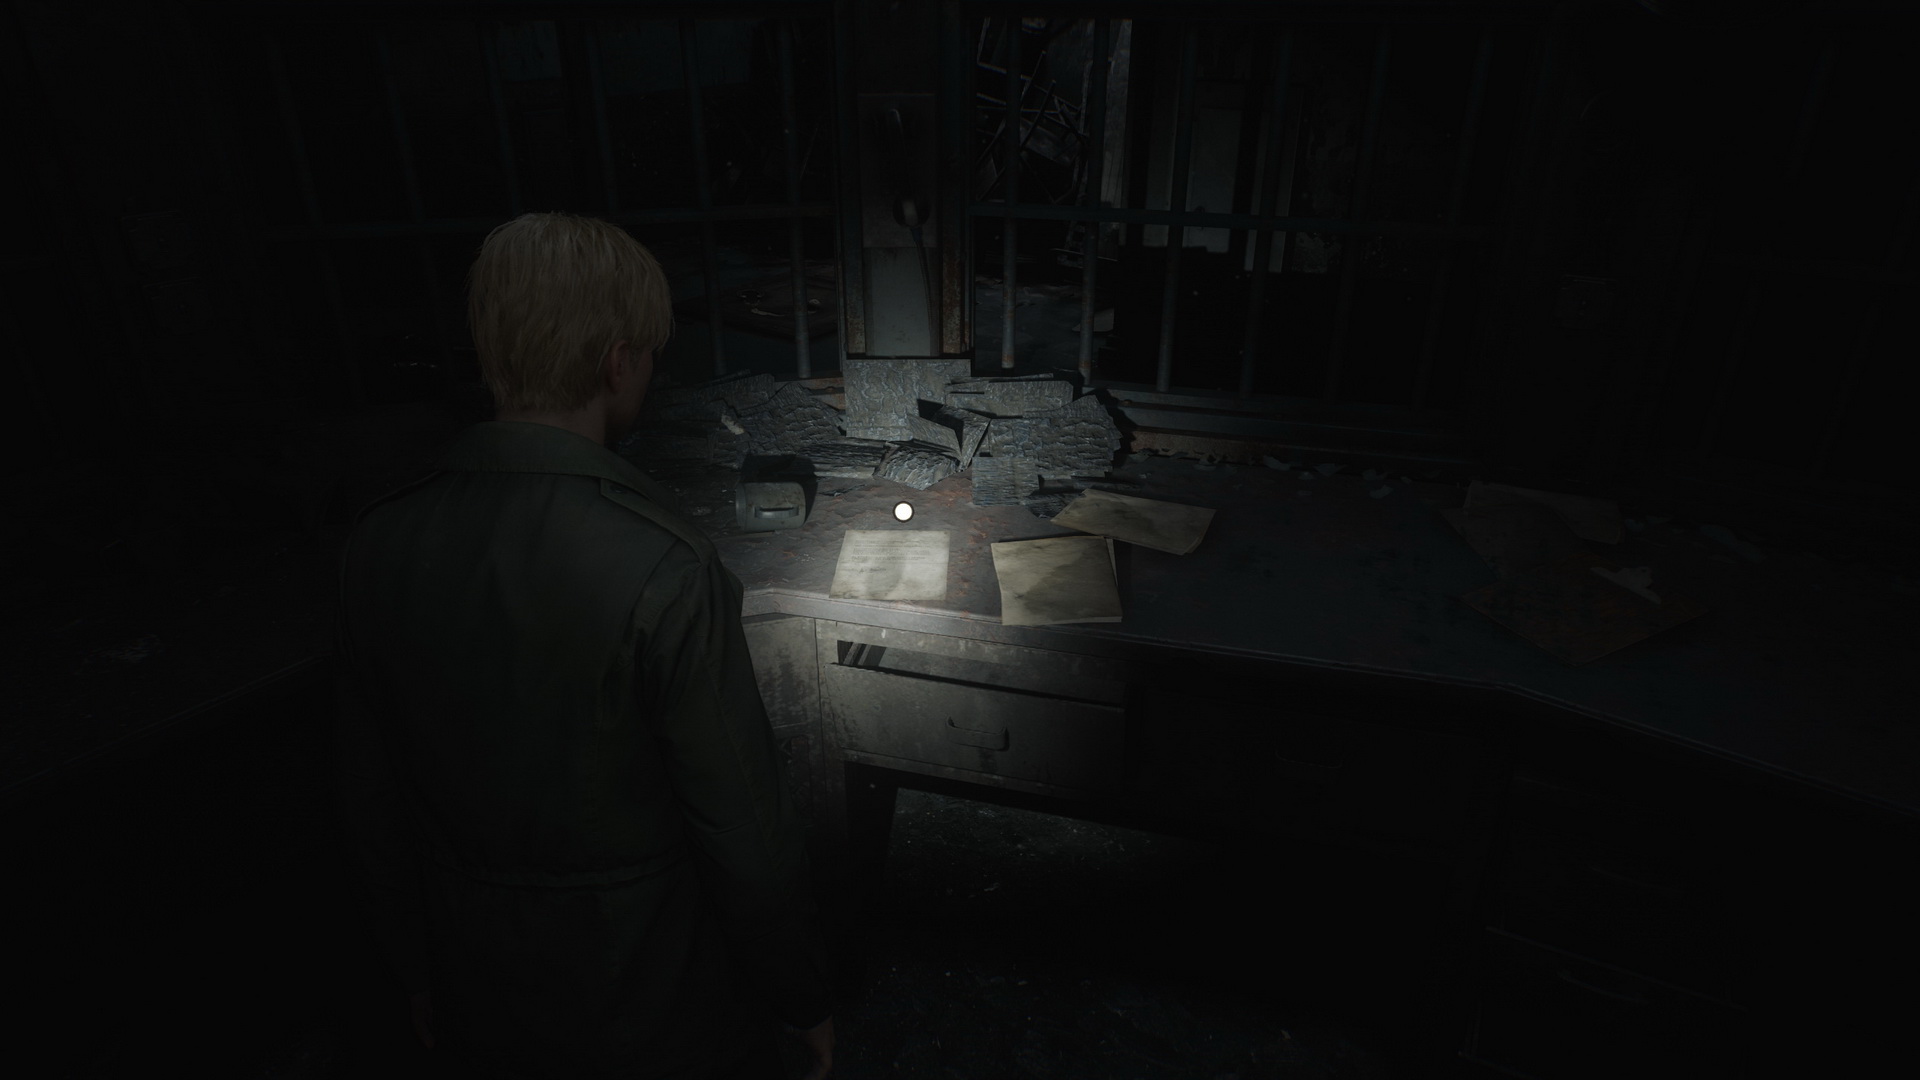
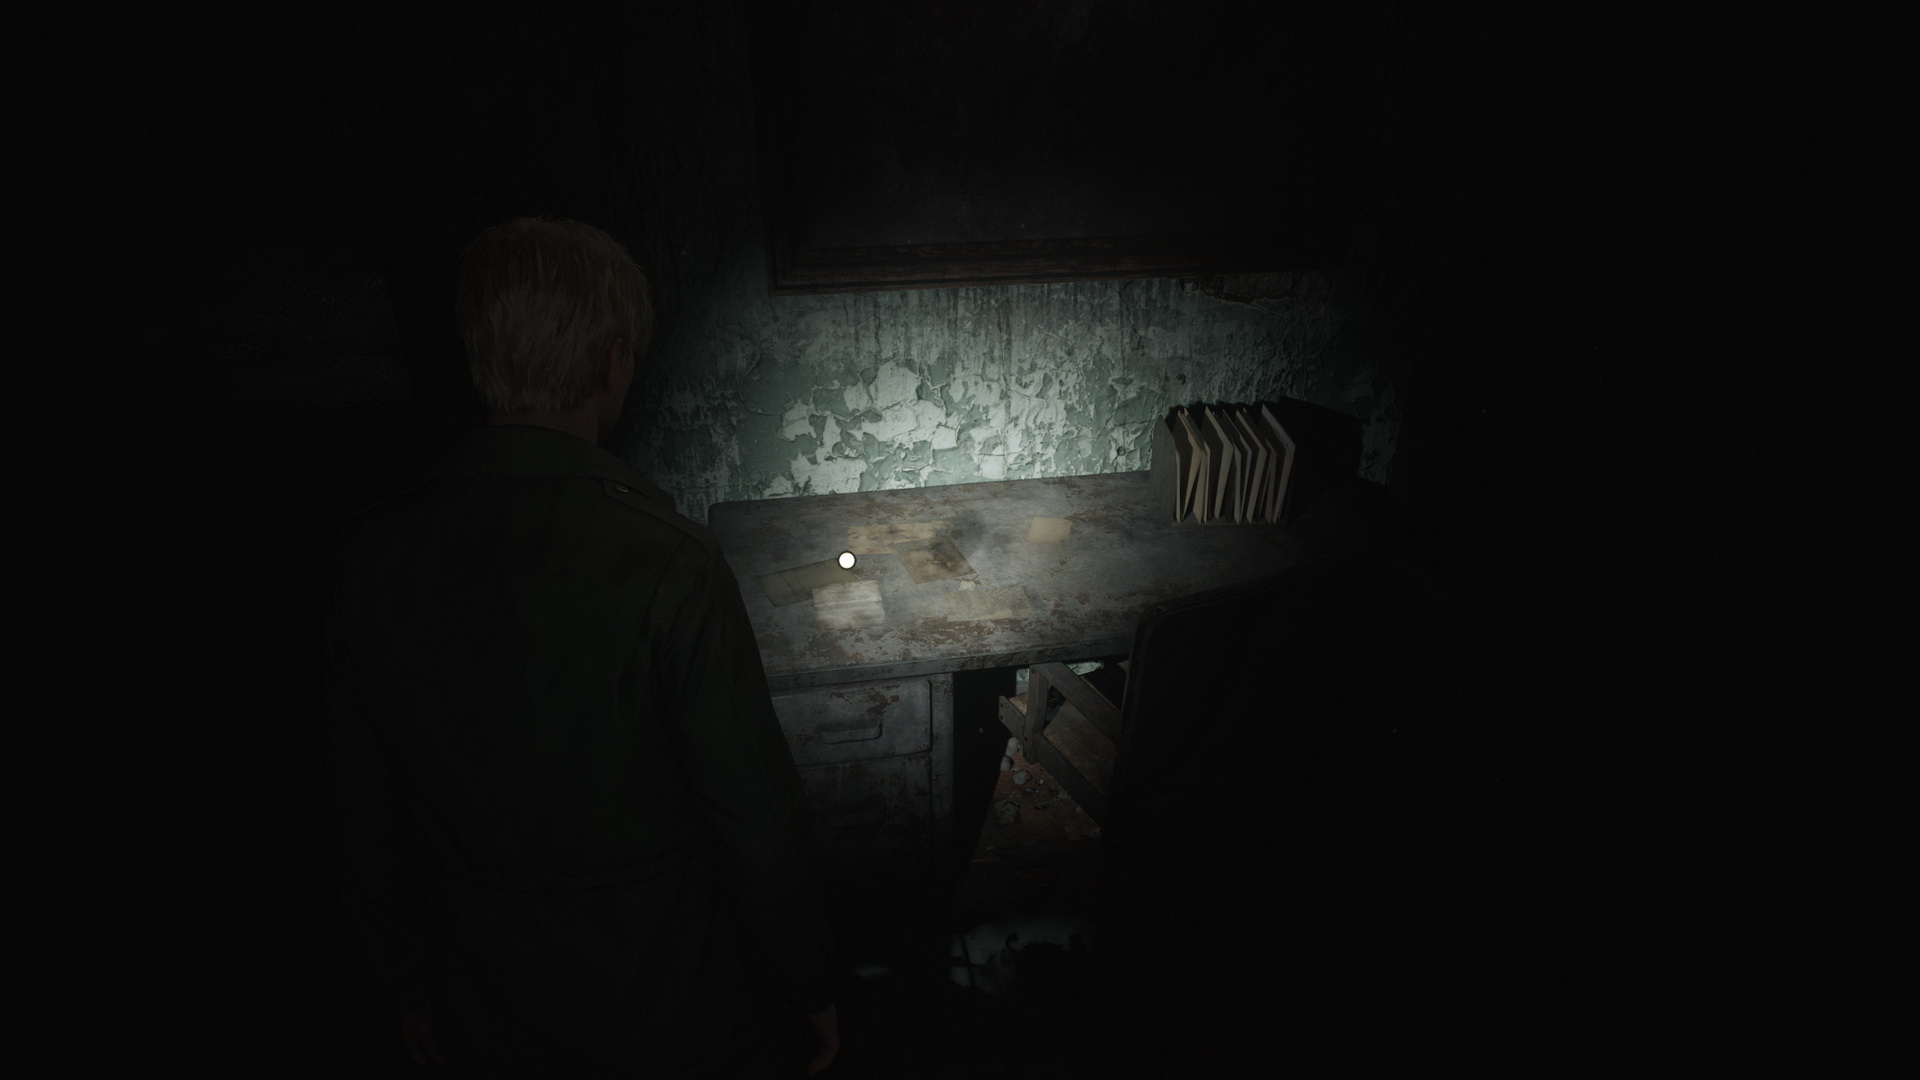
- 80 Upper Floor Key is on a desk in the back room.
- Memo #56: Unfinished Report. On another desk in the same room.
- Use the stairs in the southeastern corner of the area to get to the Warden's Office on the third floor. There's a Save Point in the back room.
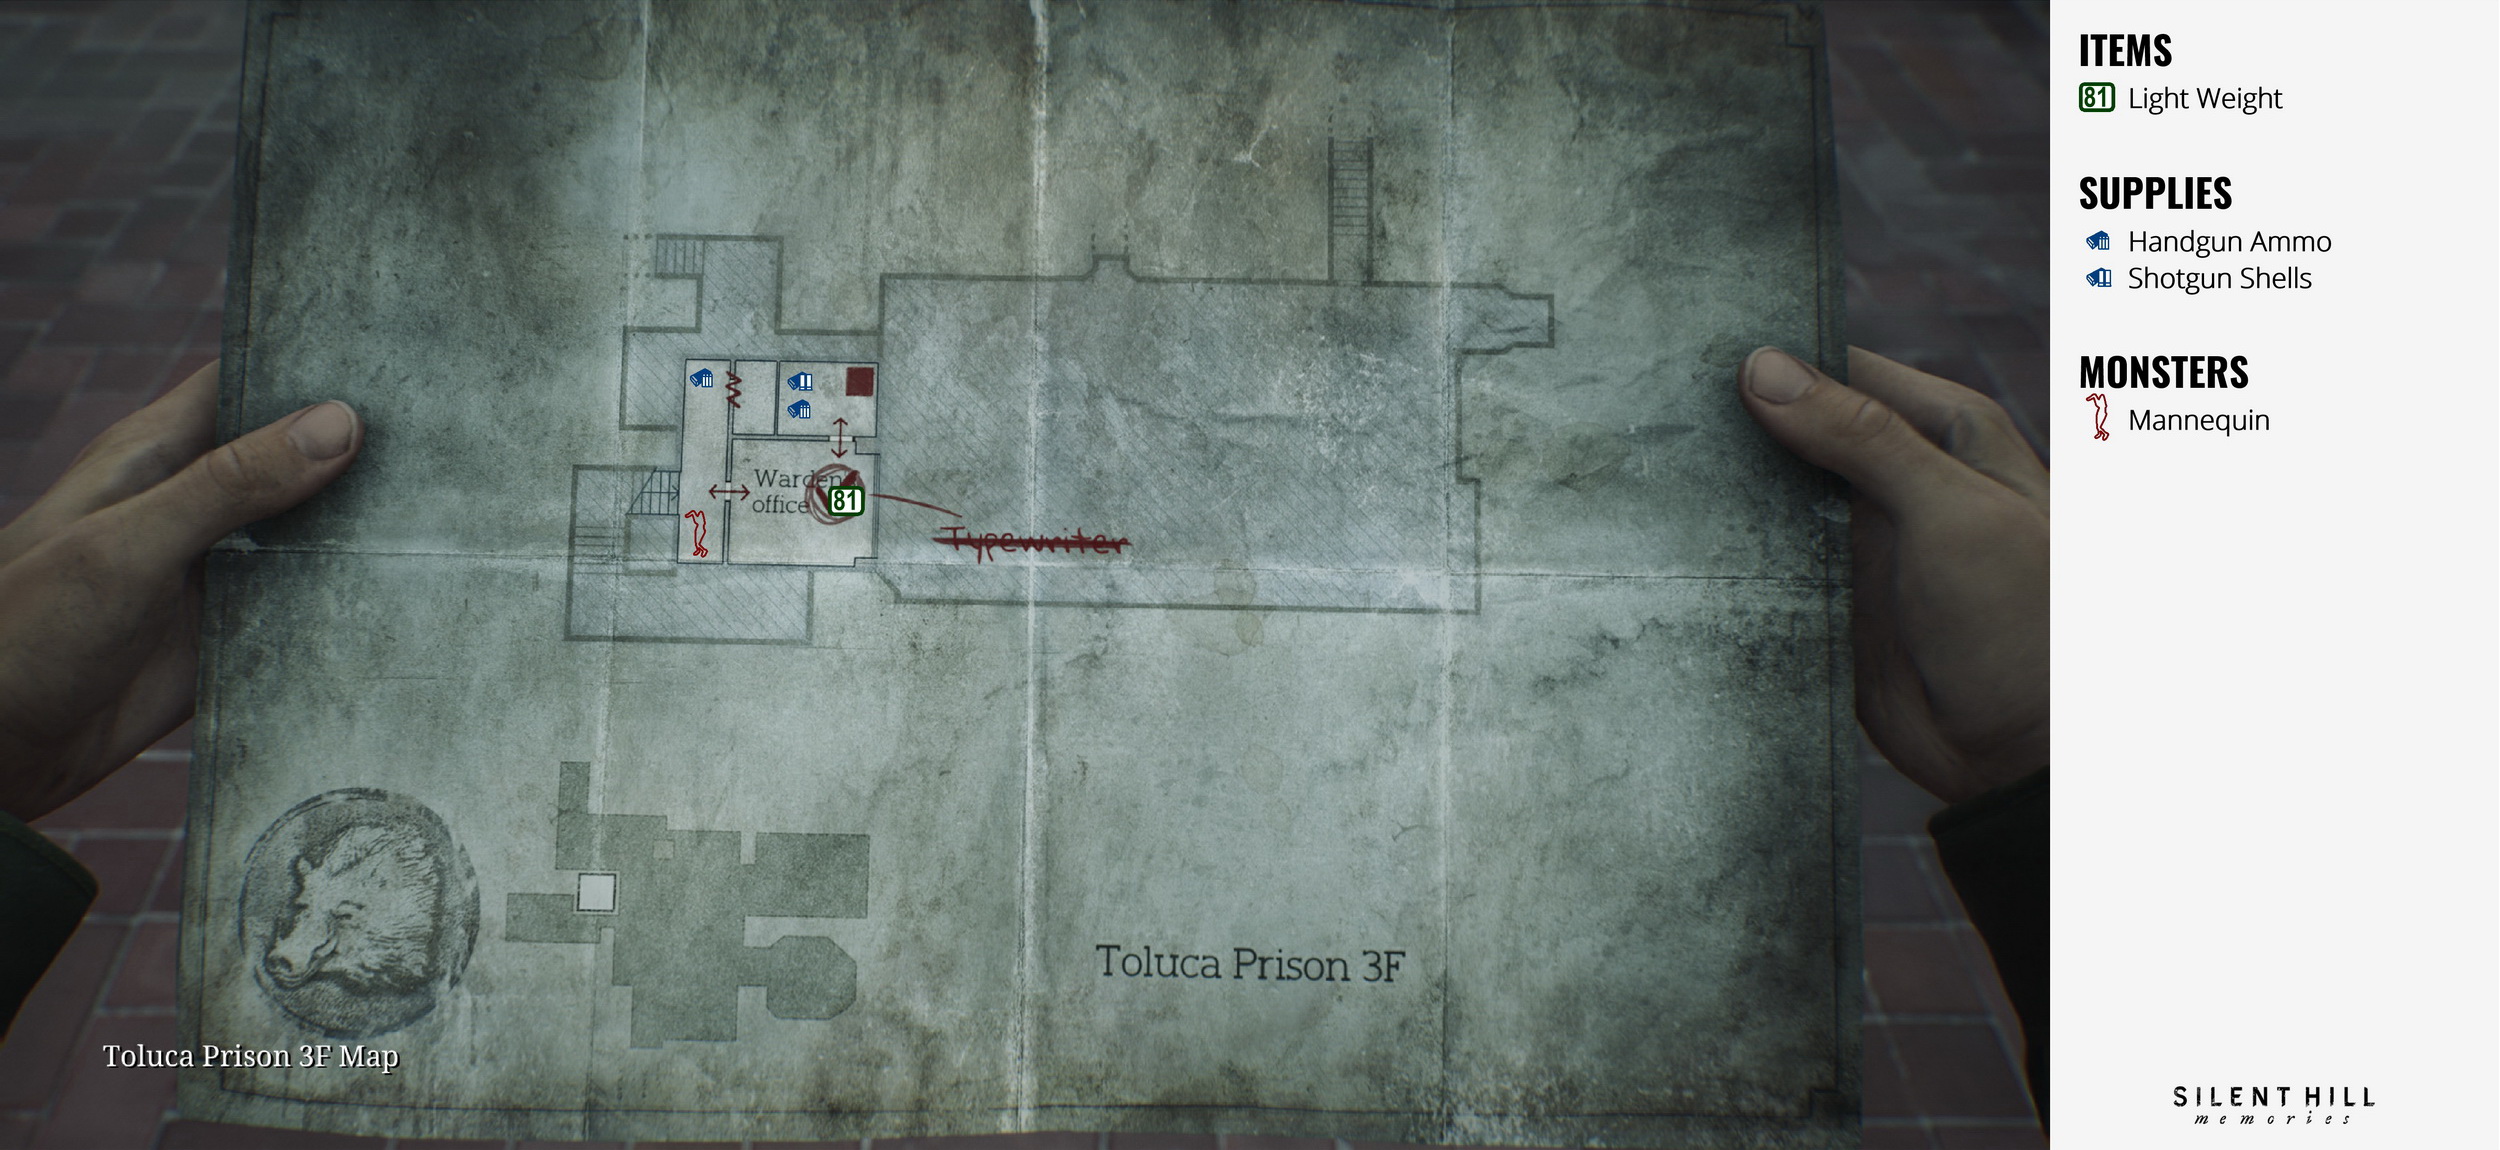
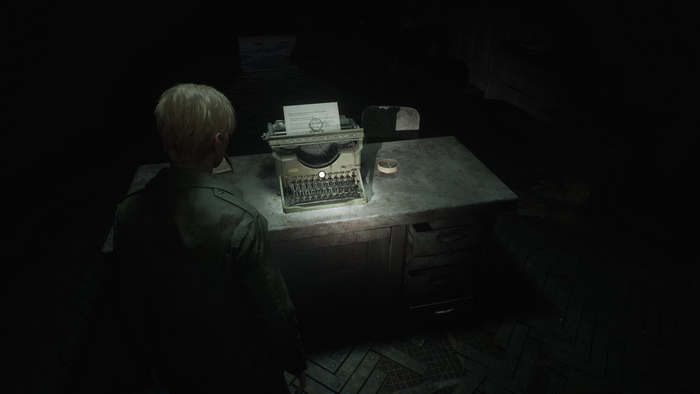
- 81 Light Weight. Interact with the typewriter and press the Tab button four times.
- Return to the Main Section.
Main Section
- Return to the Yard and proceed with the scales puzzle.
- Put the Medium Weight (4) on the right scale and the rest of the weights on another to unlock the Wingless Dove door.
- Proceed through the unlocked door in the Main Section.
Dove Section (Basement)
- Go around the block and crawl into a big room in the east. Use the button to unlock Cell F6.
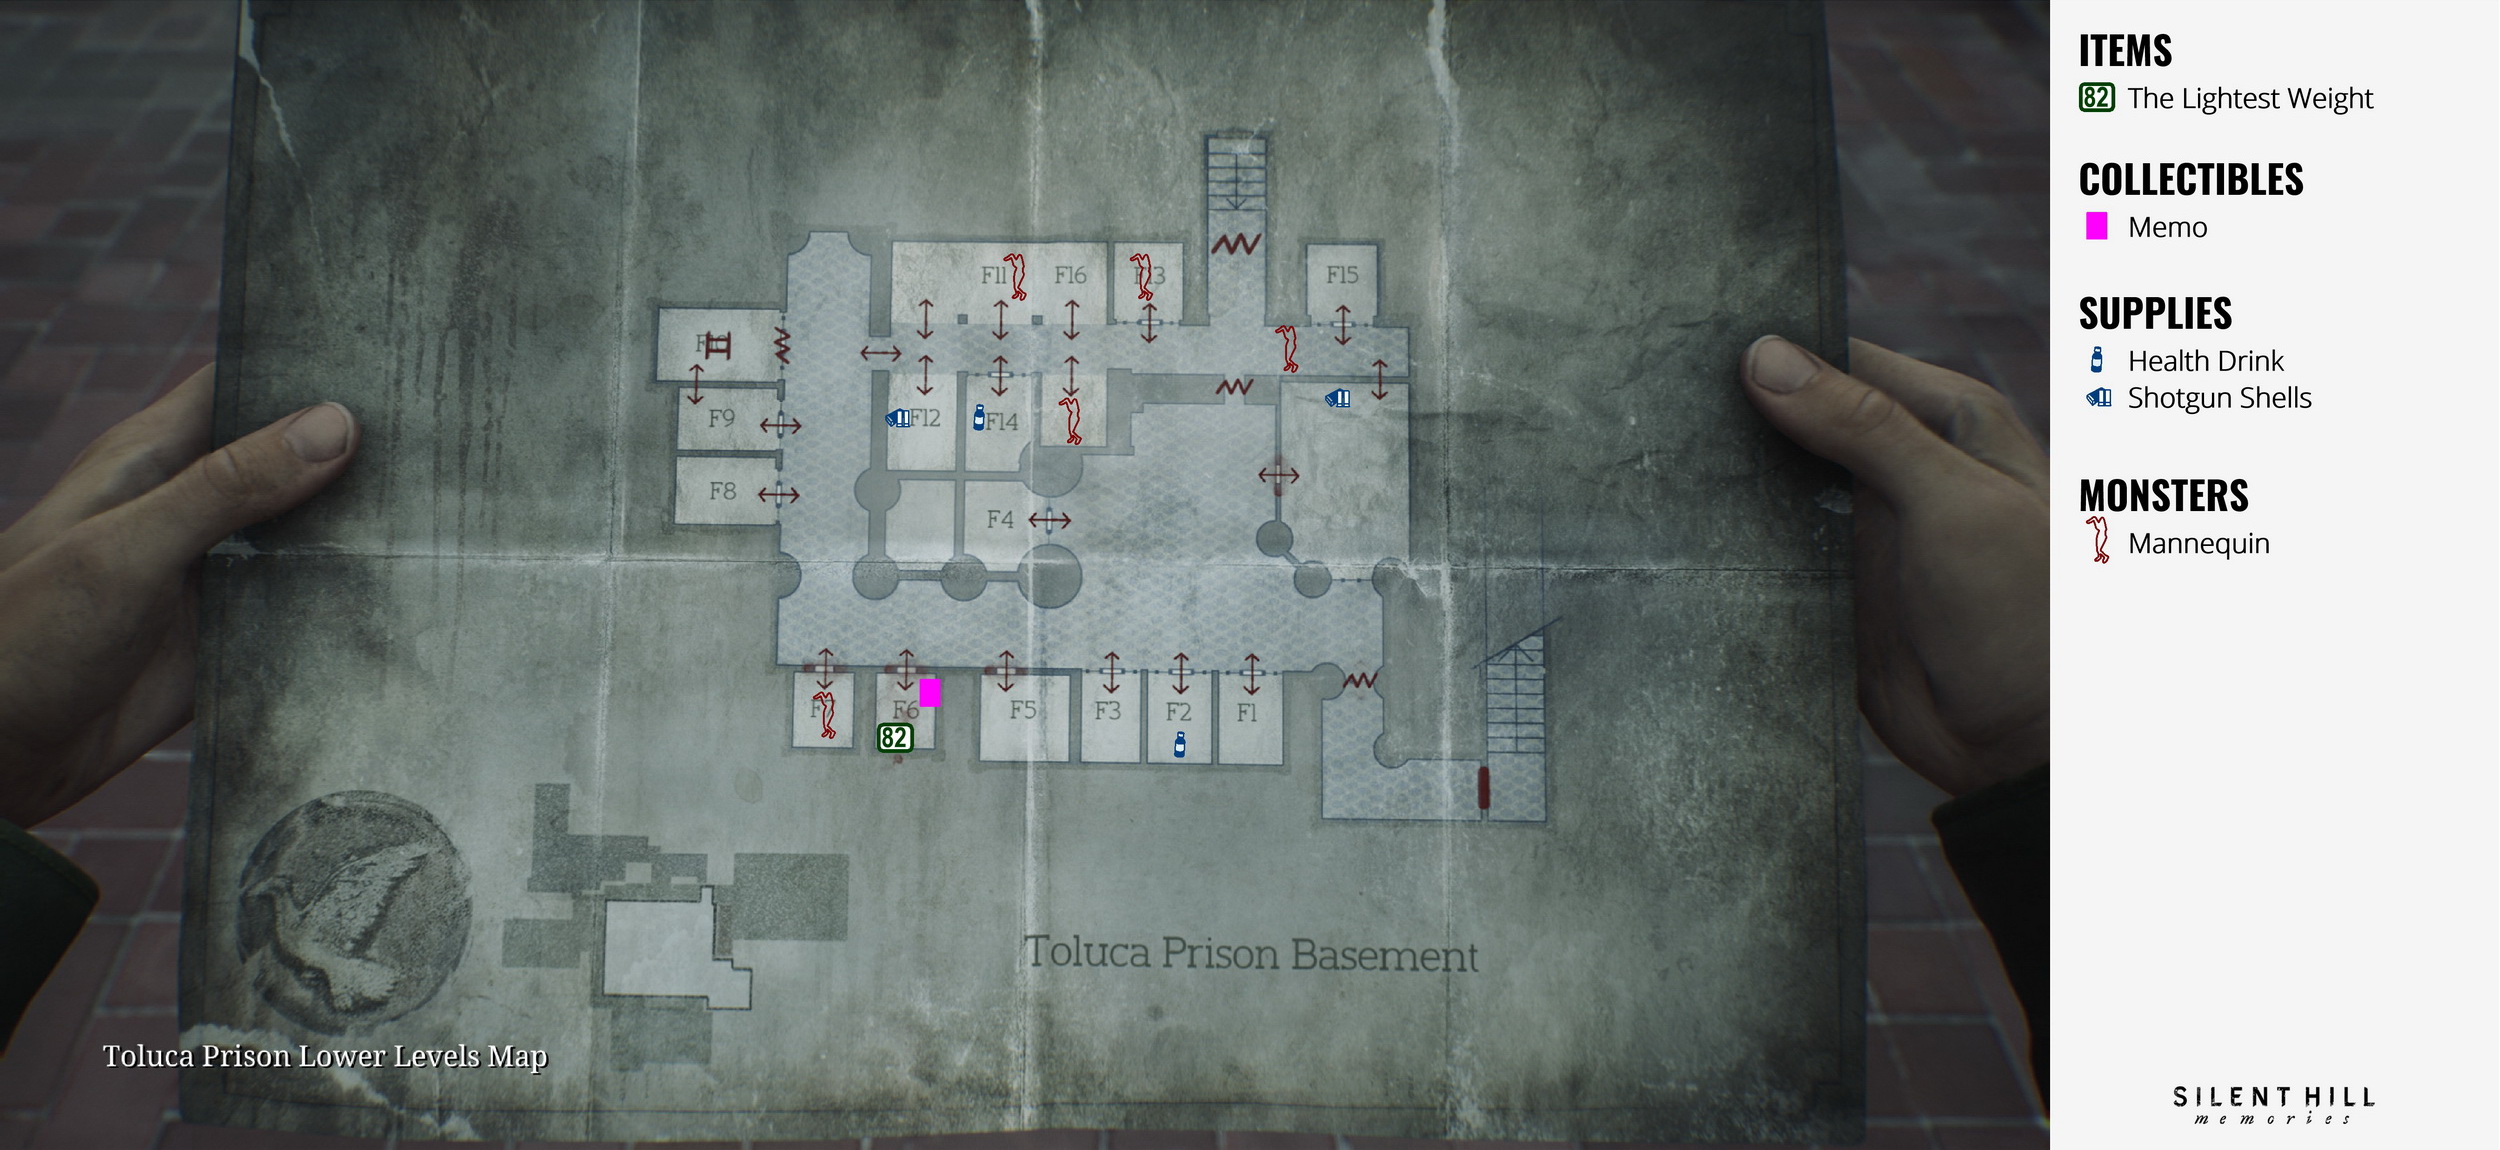
- 82 The Lightest Weight is on the floor in Cell F6.
- Memo #57: Confession. On the wall in the same cell.
- Proceed through Cell F9 and return to the Main Section via the ladder in Cell F10.
Main Section
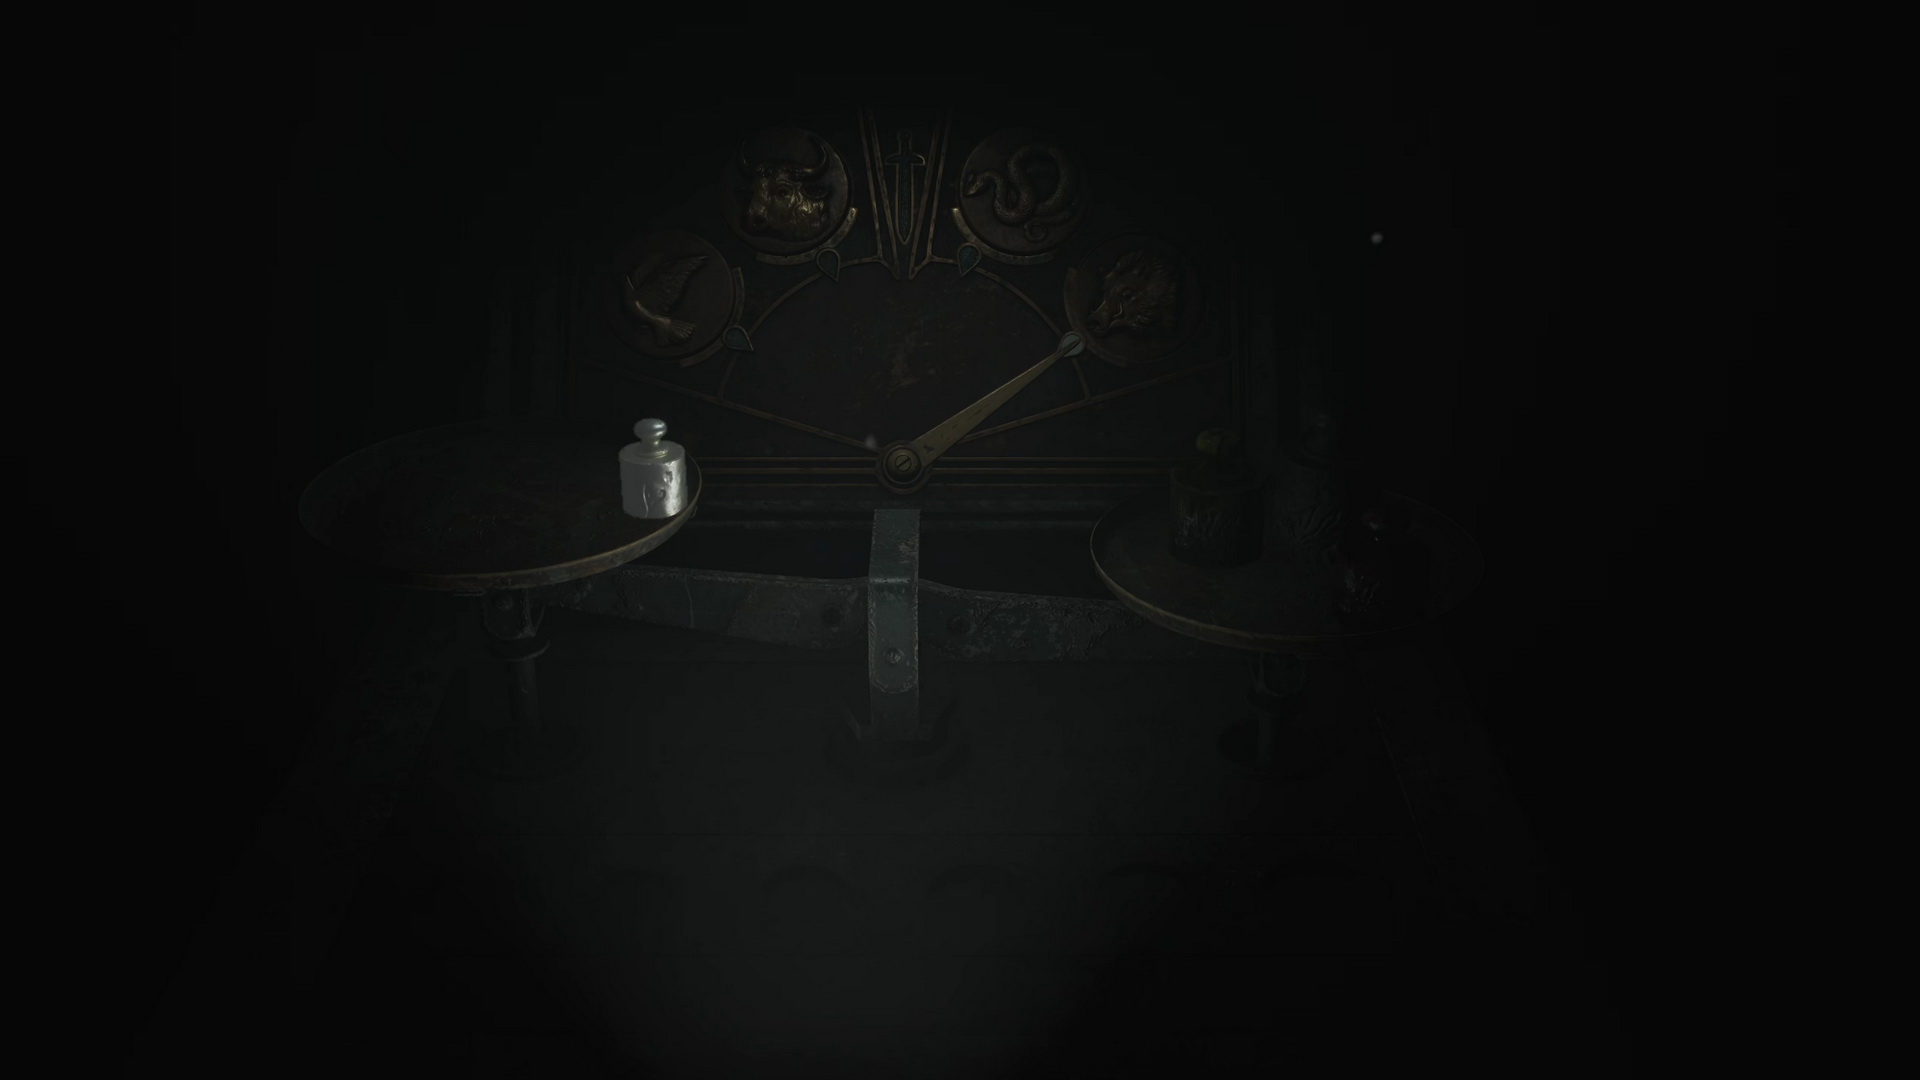
- Return to the Yard and proceed with the scales puzzle. Distribute the weights evenly to unlock the Gallows puzzle – see the image:
- The Lightest (2), Light (3), Heavy (5) on the left scale;
- Small (1), Medium (4) , The Heaviest (6) on the right one.
- 83 Execution Lever. You will receive the item after solving the puzzle.
- Go to the gallows in the same yard and insert the lever to unlock the puzzle.
- Match the two halves of the poems and determine an innocent person who committed their crime without malicious intent. After you do so, pull the corresponding rope with the same number. The answers are random and there are always two innocent person choices. Here are all possible combinations of the "innocent" persons:
- Light:
- I (Hallowed was the place / T'was the home of evil)
- II (This one took from others / Stealing to survive)
- III (This one, he did kidnap / Did it just to save her)
- IV (This one broke the lock / And steal he did a remedy)
- V (This one dared / A monster's life)
- VI (This one clenched his fist / Turned against his bully)
- Standard:
- I (For your grace I do not plead / Though the young ones deaths I mourn)
- II (The wealth of others I did take / The reason is, I have to say)
- III (I took the child, you are quite right / Forgive me, child, for I have failed)
- IV (Once the sun has ceased its reigh / So, my guilt is plain to see)
- V (Mommy dearest, Mommy sweet / You broke my legs, I couldn't walk)
- VI (I waited long, I bid my time / In truth, he was less man than beast)
- Hard:
- I (Under veil of nightfall, in the ink of dusk / Death of the blameless, a damnable sin)
- II (In twilight's grasp, a thief emerges sly / With hands atremble, he seizes what he must)
- III (In shroud of twilight, a tale doth unfold / A cruel twist of fate, an outcome unsought)
- IV (In clandestine steps, darkness as his guide / Amidst the moon's glow, a desperate truth)
- V (With her senses failing, she looks, mouth agape / 'Twas a twisted fate that forced the man's hand)
- VI (In shadows cast, the hunter lies in wait / Desperation's grip suffocates the air)
- Light:
- Jump through a square hole, then through another one and use the elevator.
Complete Walkthrough
Main Section
|
|
James lands in what looks like a canteen of the underground prison. Before you move on, turn around to collect a Health Drink on a counter behind. Proceed through the canteen. On the second row of dining tables to the right, you can find Glimpse of the Past #18.
 |
 |
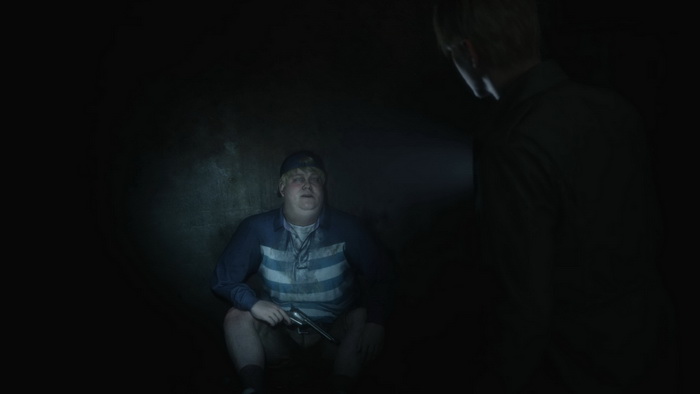
Move forward to start a cutscene with Eddie, who goes completely bonkers.
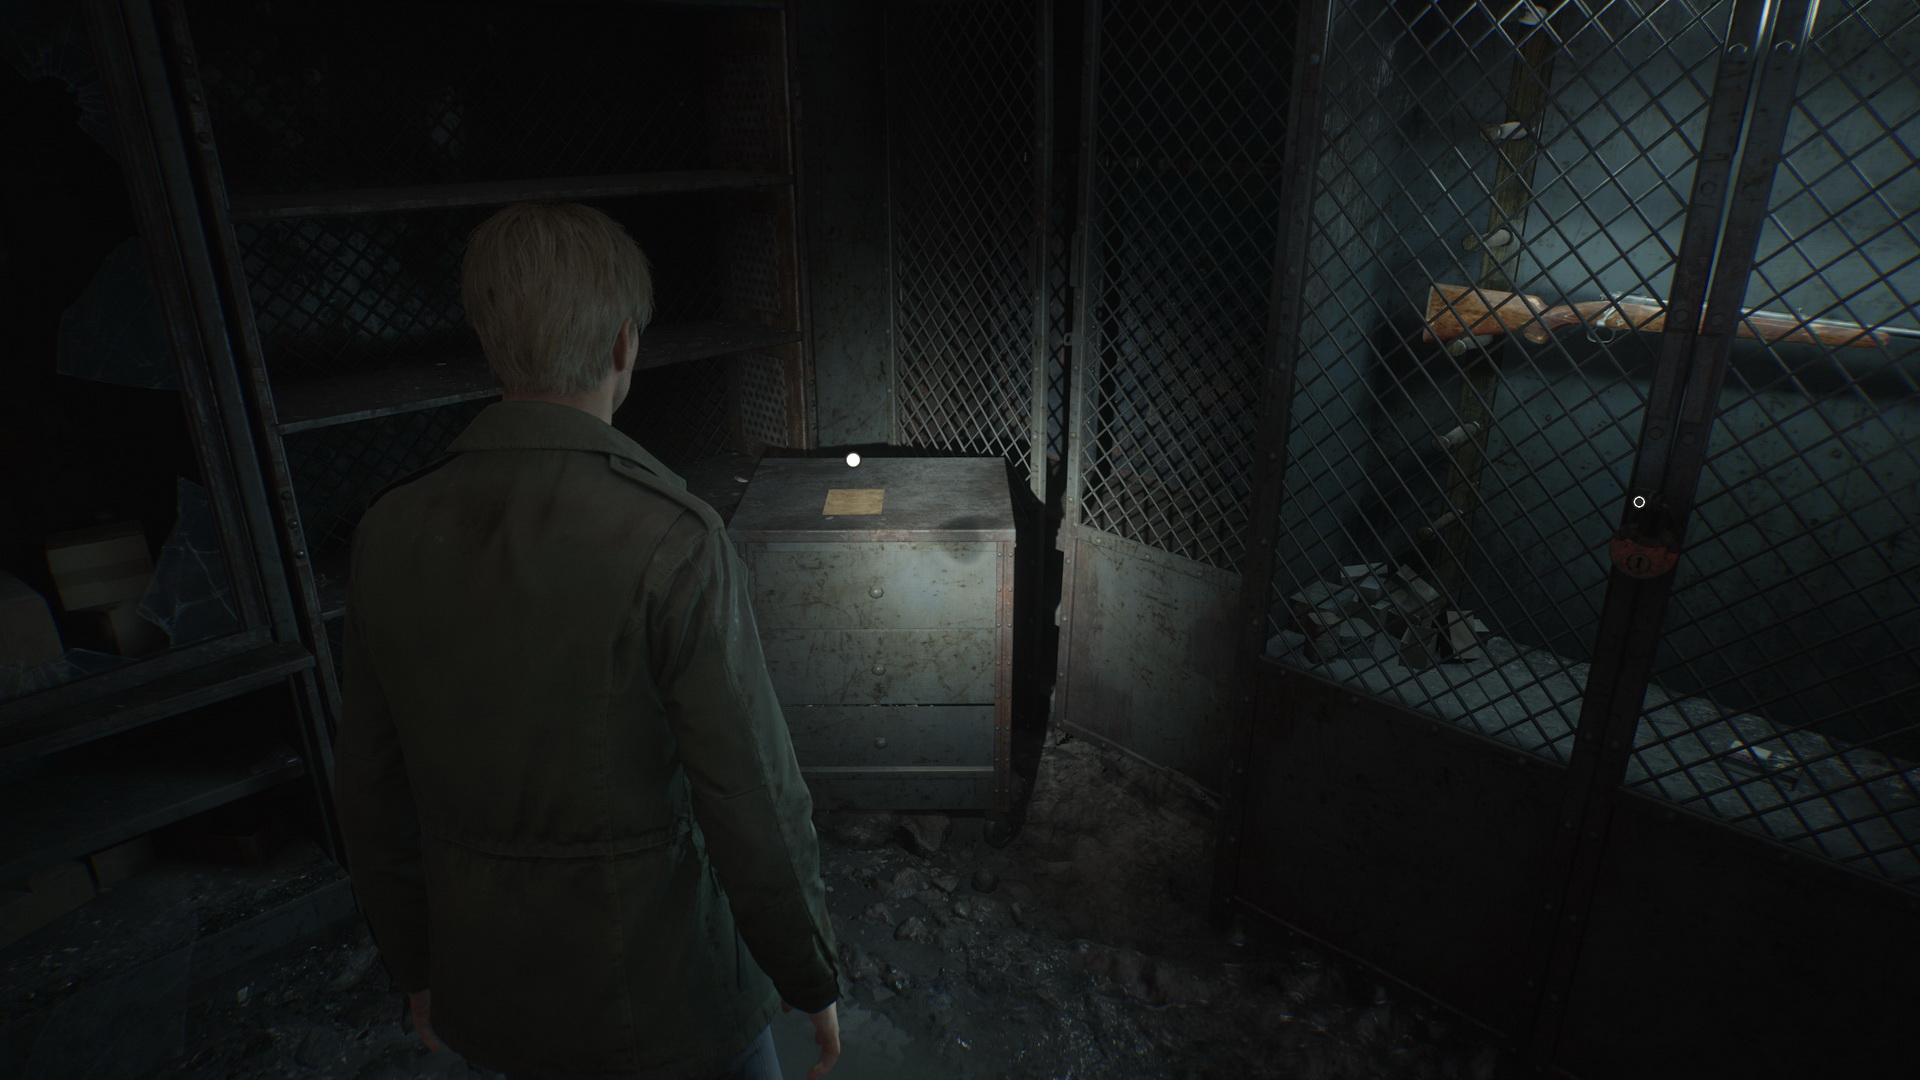
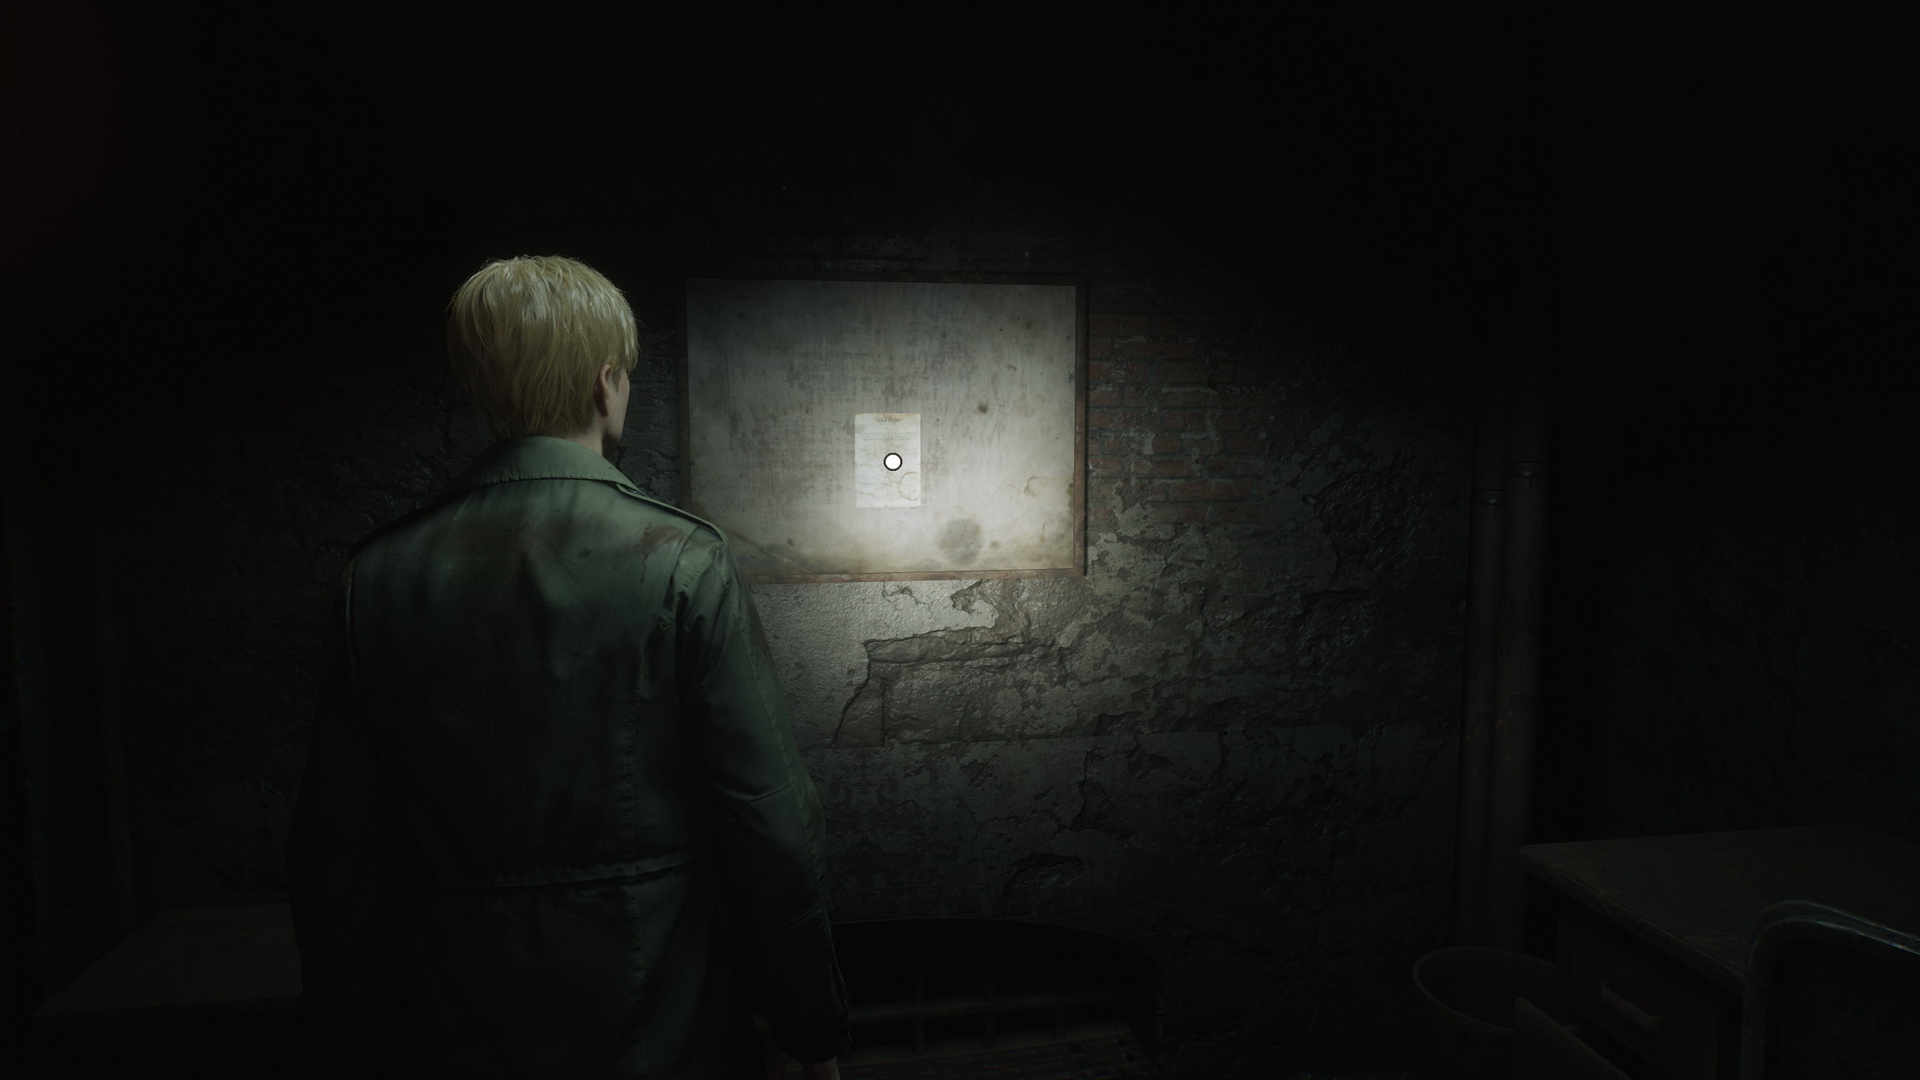
After the cutscene, you can collect Handgun Ammo from a bench next to a dead body. Exit the canteen and go directly to a room ahead that will be the Armory. Inside the room, you will find a Save Point and Toluca Prison Maps on the wall. Inspect the desk's drawer to the left of the save point to find Rifle Rounds. On the shelf to the left of the door, there's Handgun Ammo. Finally, there's a rifle in the locked gun cabinet, and Memo #49: Gun Cabinet Notice is next to it.
 |
 |
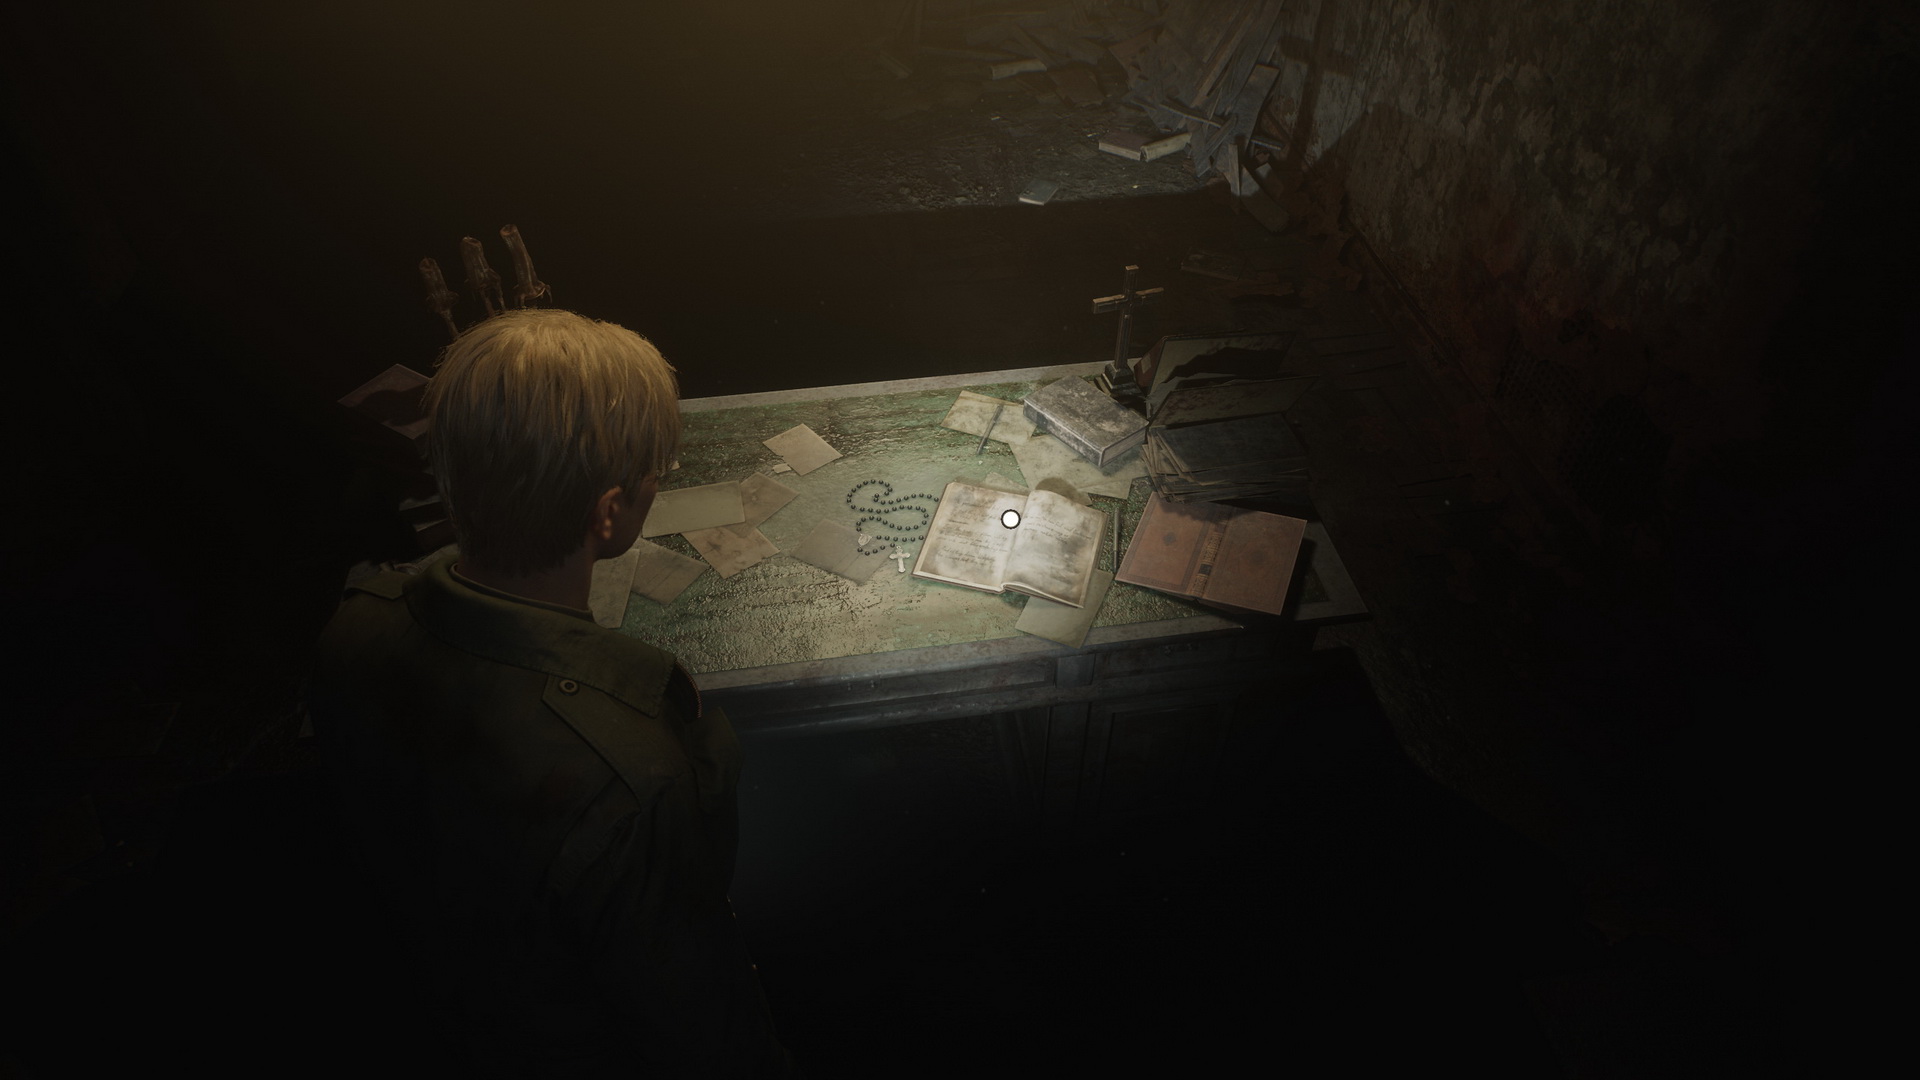
Go to the Chapel in the northern part of the level. You can inspect a painting on the wall. Go to the Vestry in the back to find a Syringe on a shelf and a diary on a desk.
 |
 |
Return to the chapel and collect 73 The Heaviest Weight from the altar.
Taking the weight will prompt a Lying Figure to enter the chapel. Get outside and enter the main area with the cells. You can use electrical switches on the wall to turn the lights on and light up the hallways. You will encounter a new monster type, a Spider Mannequin, that will run away for the moment. In Block B, there's a single Lying Figure. You can inspect various cells in the area to find some supplies and collectibles:
- Cell A3 has a Lying Figure, Rifle Rounds and Glimpse of the Past #19: examine the shrine on the wall.
 |
 |
- Cell A5 has Handgun Ammo.
- There's a note next to Cell A6.
 |
 |
- Cell B1 has a Health Drink and a hiding Mannequin.
- Cell A8 has a Health Drink and another Mannequin. You can access the cell by breaking the wall in cell B3.
Also, in the area, you can find multiple locked doors with symbols of different animals. We will get to them in a minute. Go to the yard at the end of the prison block. There's a Save Point on the wall here.
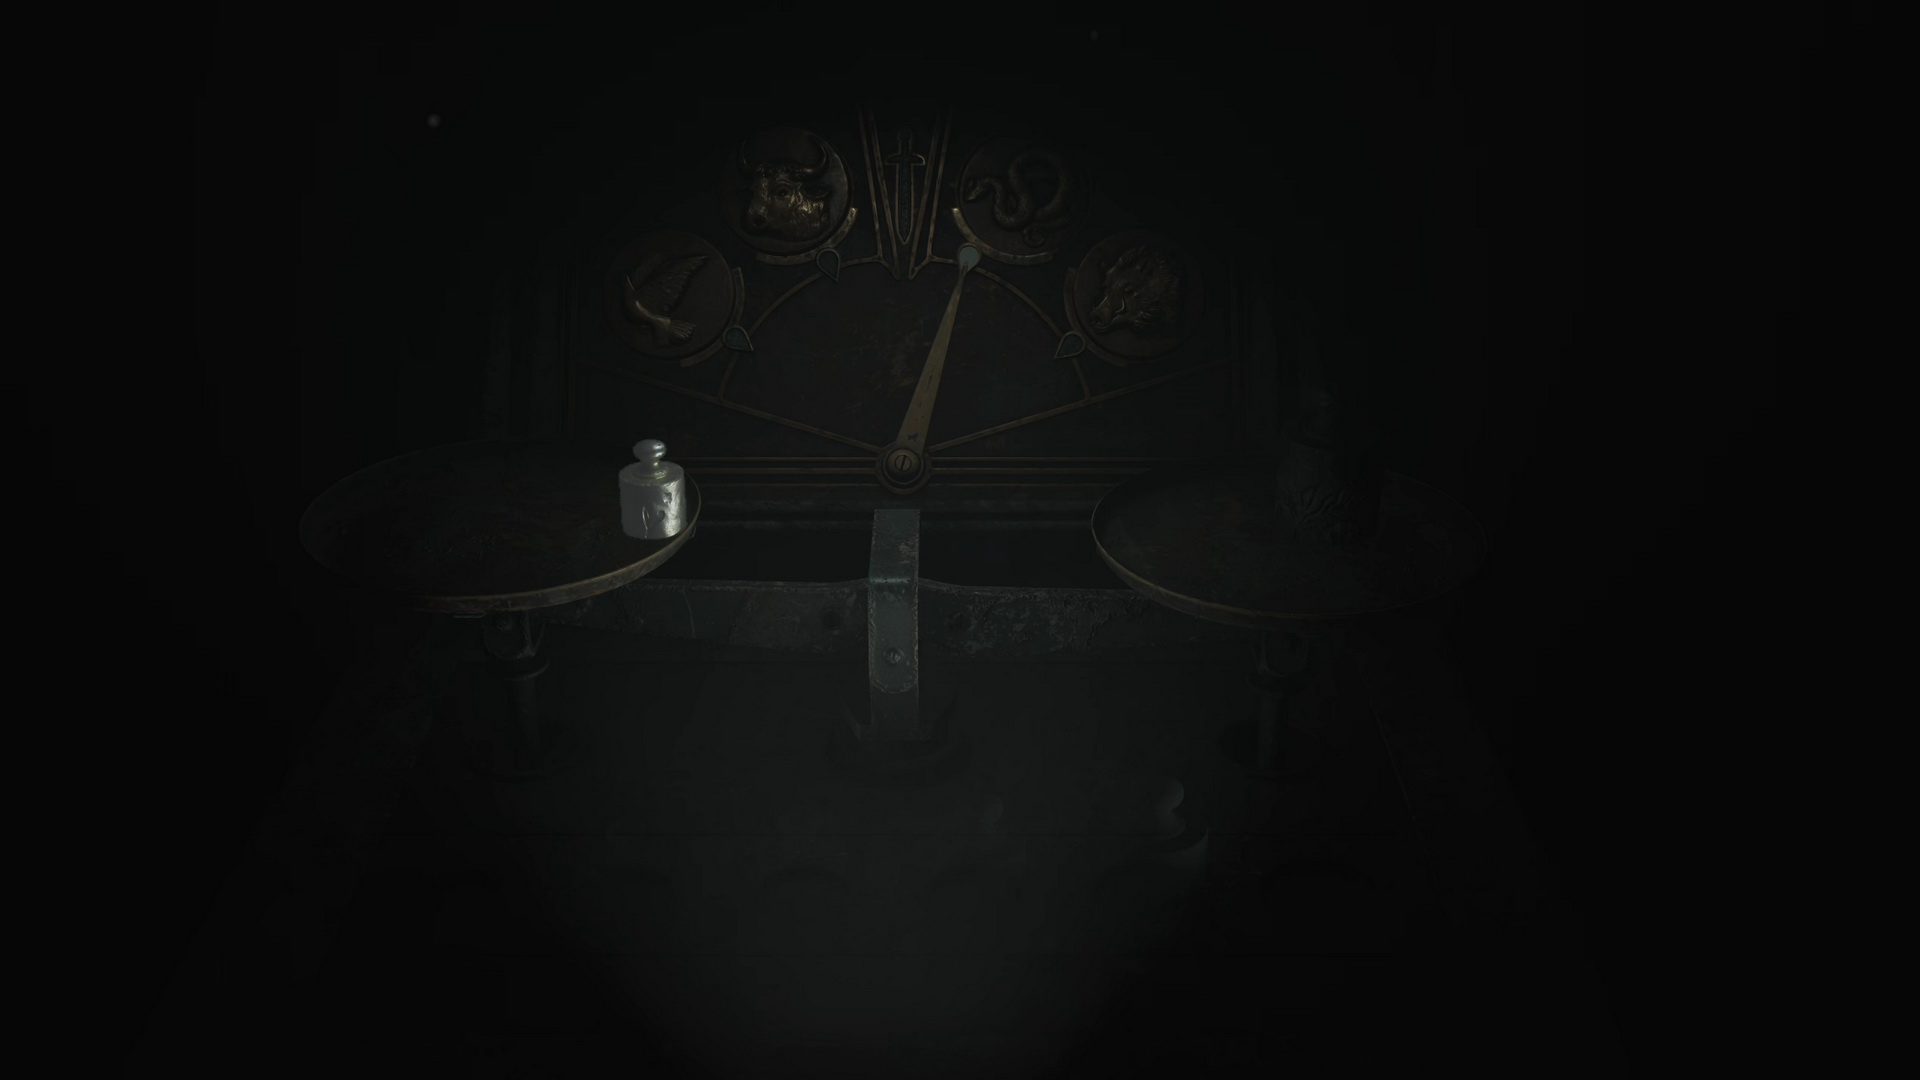
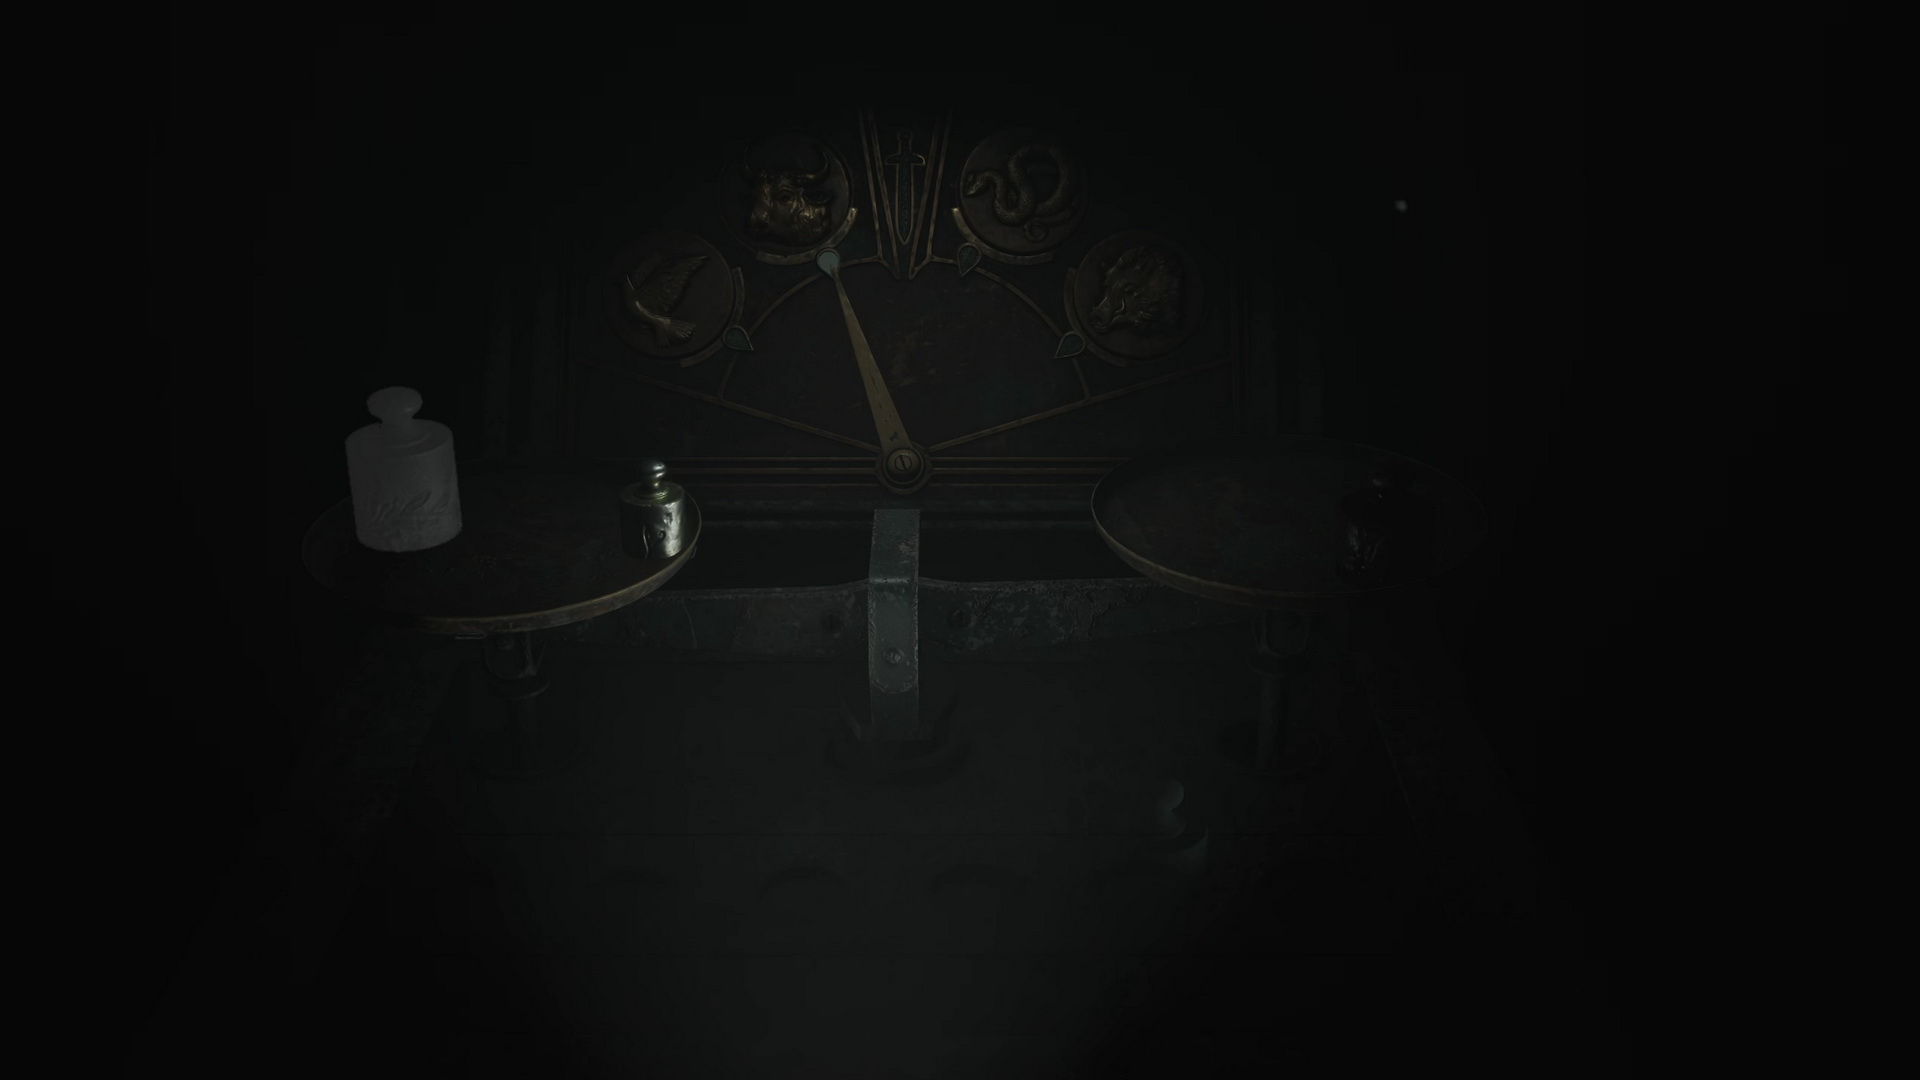
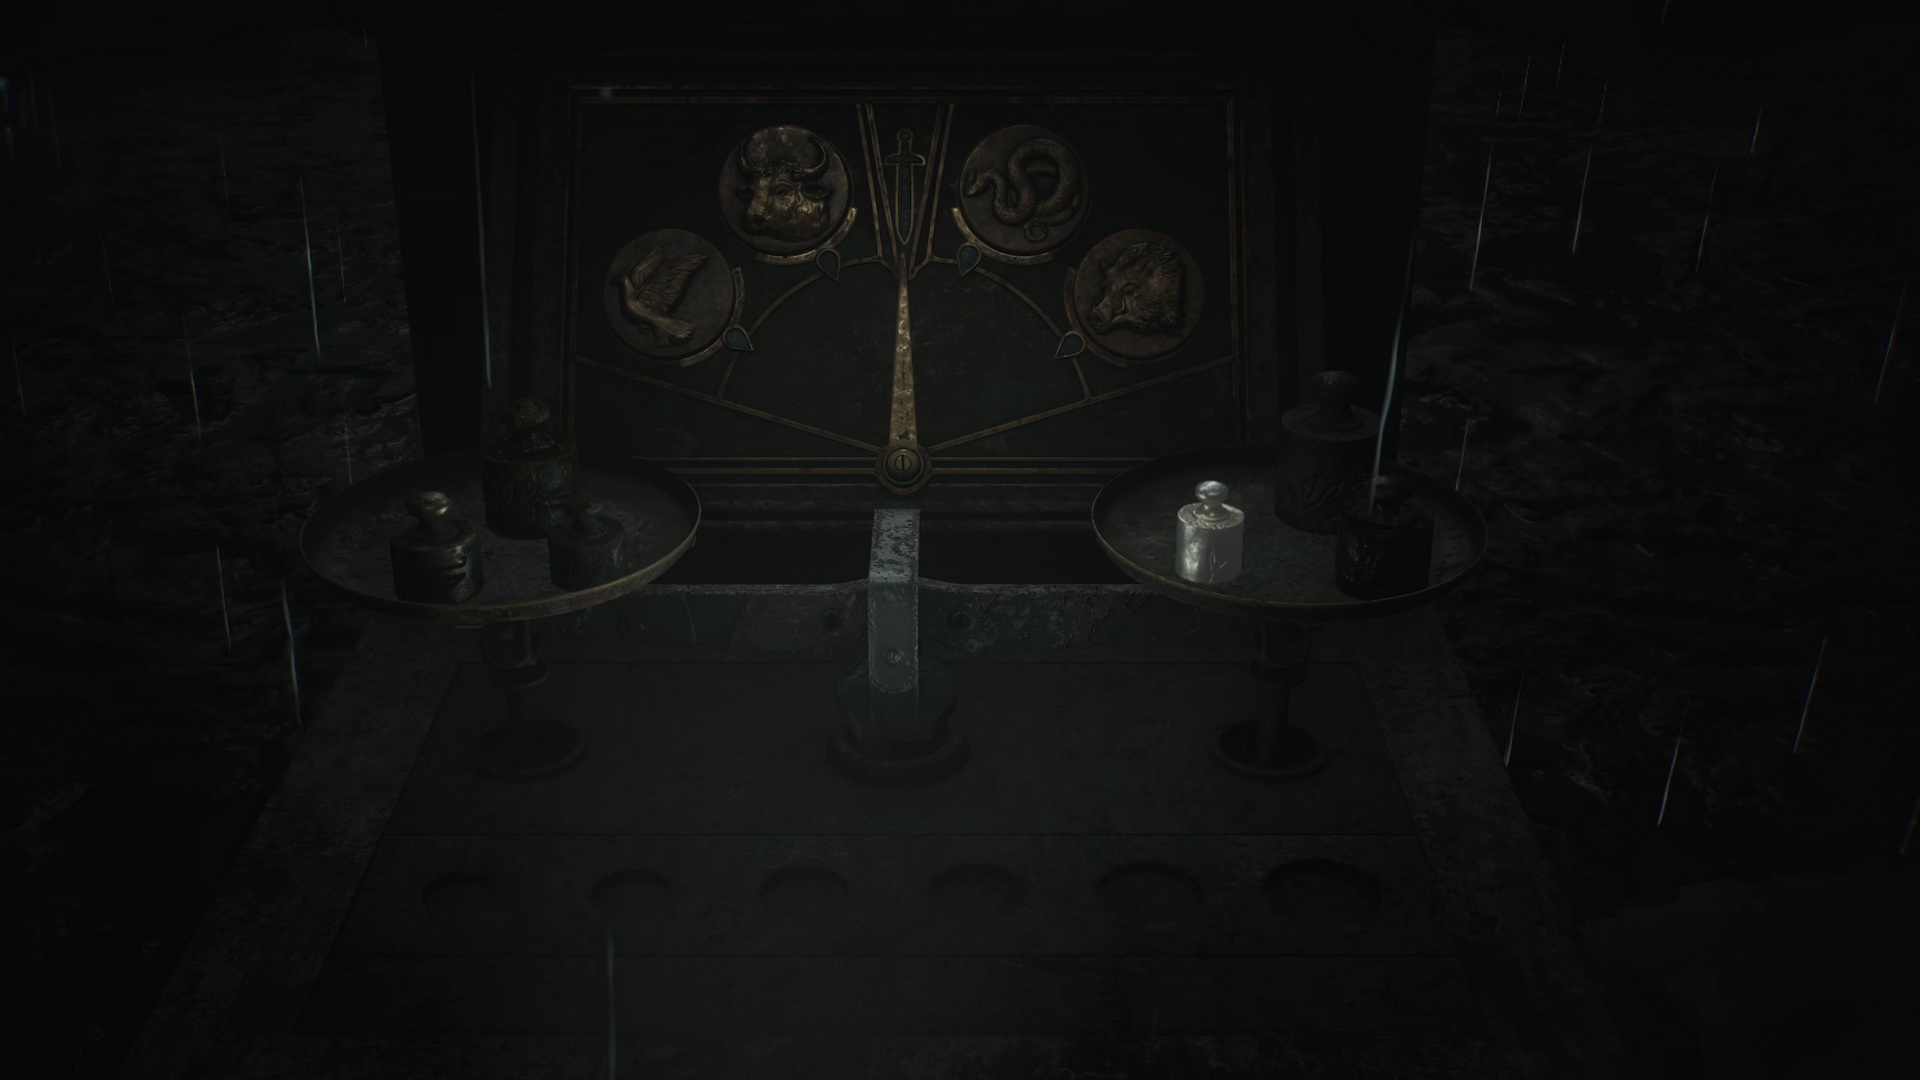
Approach the scales in the middle of the yard to start solving a puzzle.
Scales Puzzle: Unlocking the Headless Serpent door
You need to place the weights on the scales to unlock various areas of the prison. In the beginning only one weight is present – the Starter weight. The rest of the weights you will have to collect in different sections of the prison.
The six weights when all put into their starting positions from left to right are:
- Starter (1) - The Lightest (2) - Light (3) - Medium (4) - Heavy (5) - The Heaviest (6)

At the moment you have only two weights available. Add The Heaviest Weight from your inventory. Put the Starter Weight (1) on the left scale and The Heaviest Weight (6) on the right one to unlock the Headless Serpent door (Death Row).
Find the Headless Serpent door in the southern portion of the level and proceed through the now unlocked door.
Serpent Section (Death Row)
|
|
Proceed to the Guardroom ahead. In the Guardroom, you can find a Syringe in a first aid kit, Shotgun Shells in a drawer and a note on the notice board.
 |
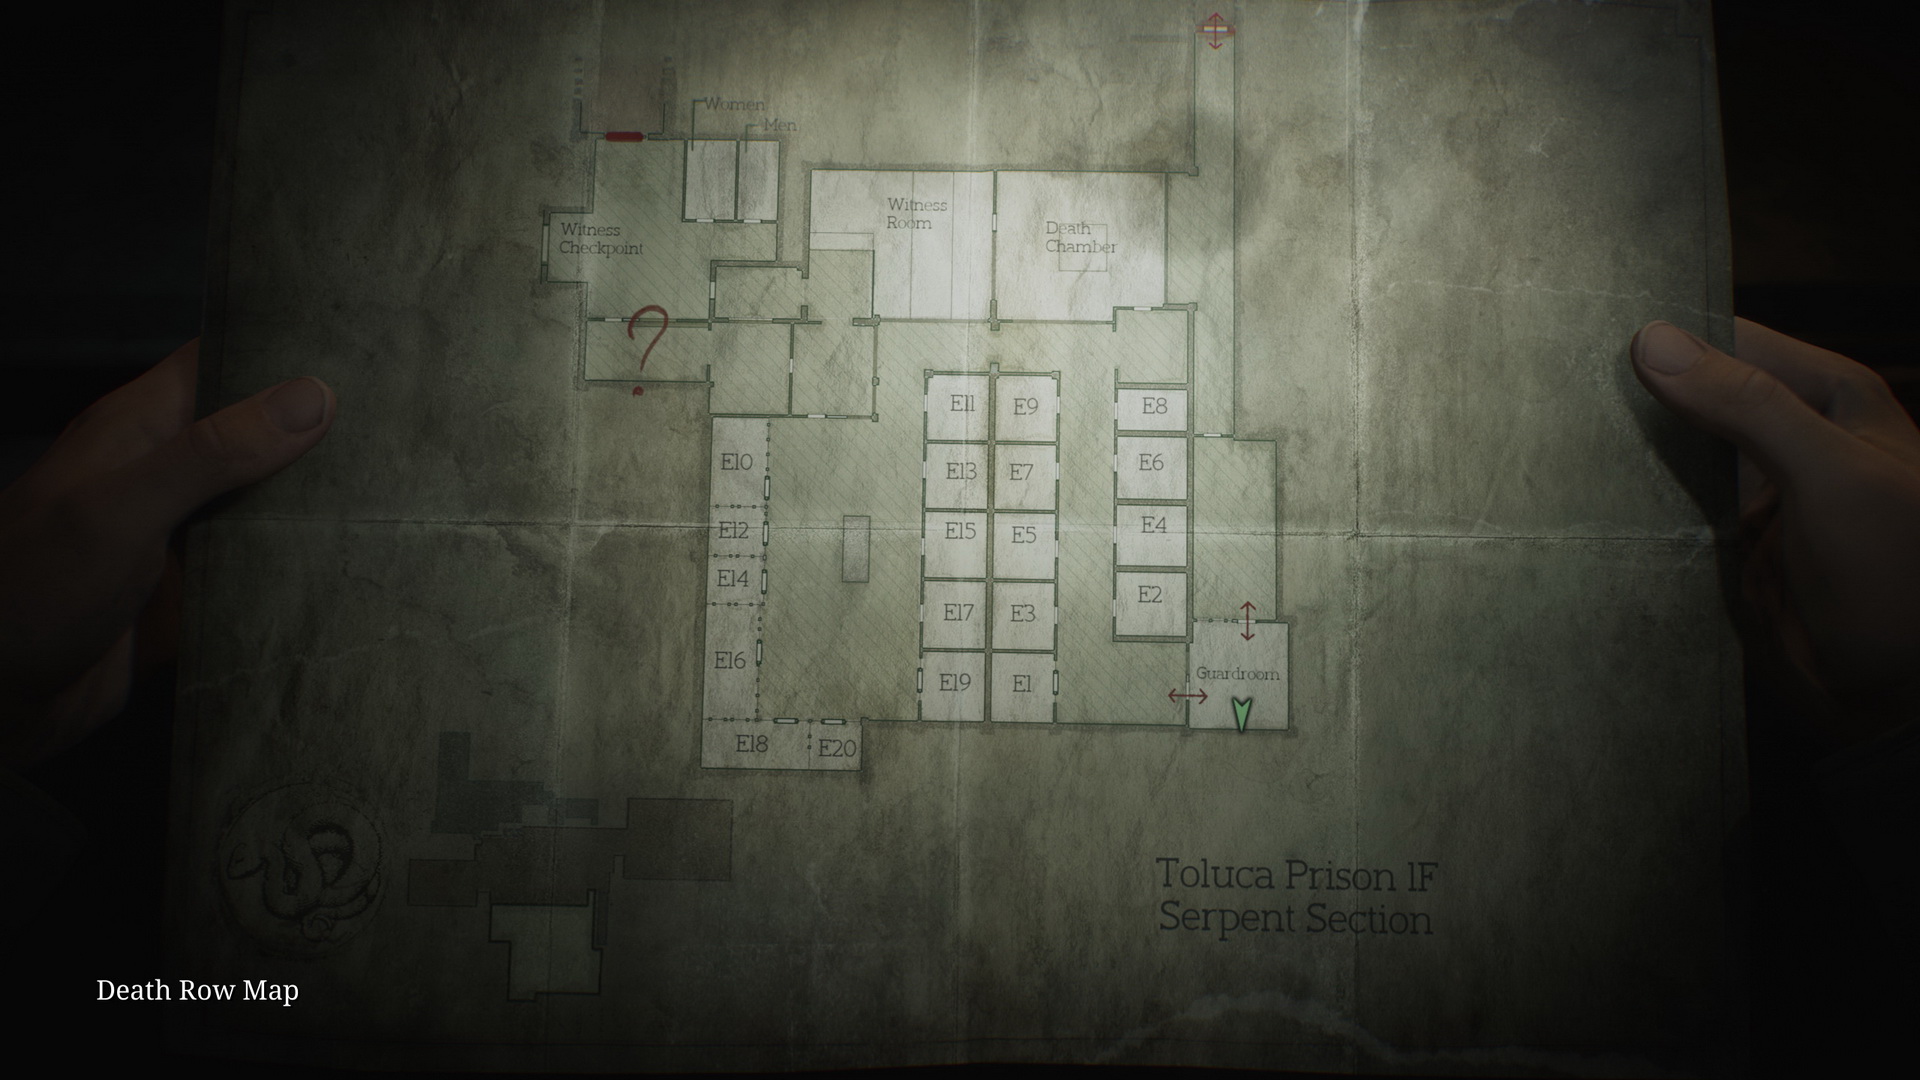 |
Step into the prison block and be aware of the Spider Mannequins here. You might want to clean up the area to make your life a little bit easier later in the game, but that will not be the most straightforward task as there are eight Spider Mannequins here, so try to eliminate only the ones that try to attack you. Most of the cells are currently locked. The open Cell E4 has Memo #50: Family Photo on a bed.
 |
 |
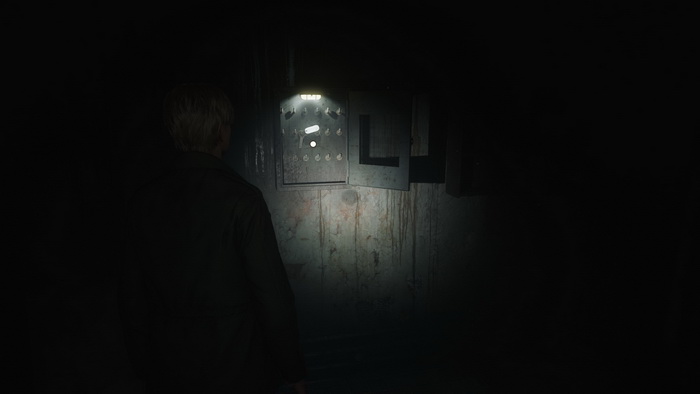
You can take care of a Lying Figure in cell E10 to save yourself some trouble later. Proceed to the Witness Room, taking Handgun Ammo in a drawer. You can use a Save Point in the room. Approach a panel to solve the puzzle.
Puzzle: Witness Room Generator
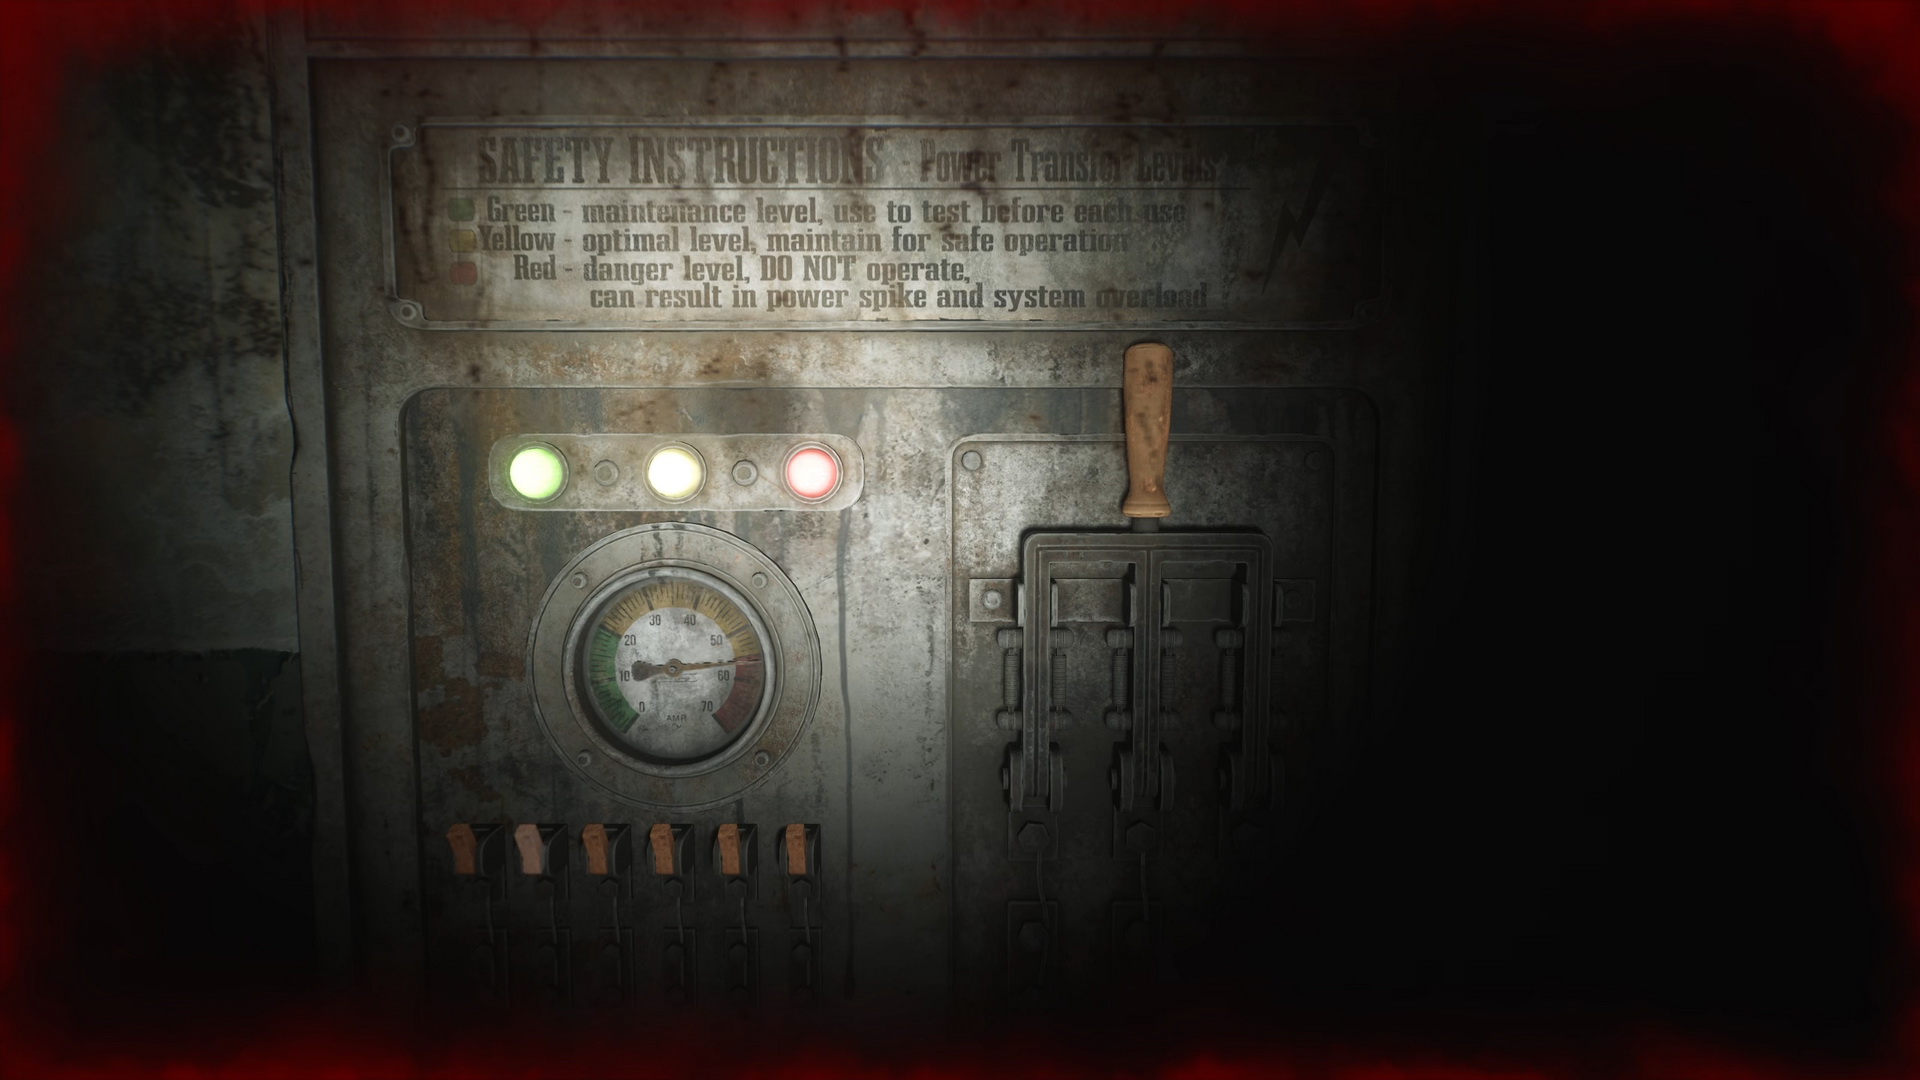
You need to flip all the switches up and push the dial into the red zone, causing an overload. To do so, flip the switches in this order:
Light: 4th - 5th - 2nd - 1st - 3rd
Standard: 6th - 4th - 5th - 1st - 3rd - 2nd
Hard: 4th - 5th - 2nd - 1st - 3rd - 6th - 7th
When all switches are up, and the dial is in the red zone, flip the breaker lever.
The Death Chamber and all the blocks' cells are now unlocked, and the monsters locked inside are free. Go into the Death Chamber and collect the 74 Medium Weight from the chair.
Proceed through the block with multiple Lying Figures and Mannequins released from the cells. You can choose to fight them or run past to the end of the block. You can find supplies in the following places:
- Health Drink in Cell E7
- Shotgun Shells in Cell E6
- Handgun Ammo in Cell E3
- Handgun Ammo in Cell E2
- Handgun Ammo in Cell E1
Run to Cell E1 and break the wall to the other side. A Nurse in Cell E16 comes alive in this section, joined by another Lying Figure. More supplies are here, and also one collectible:
- Health Drink in Cell E17
- Strange Photo #18: "Four months to go" is on a shelf in Cell E13.
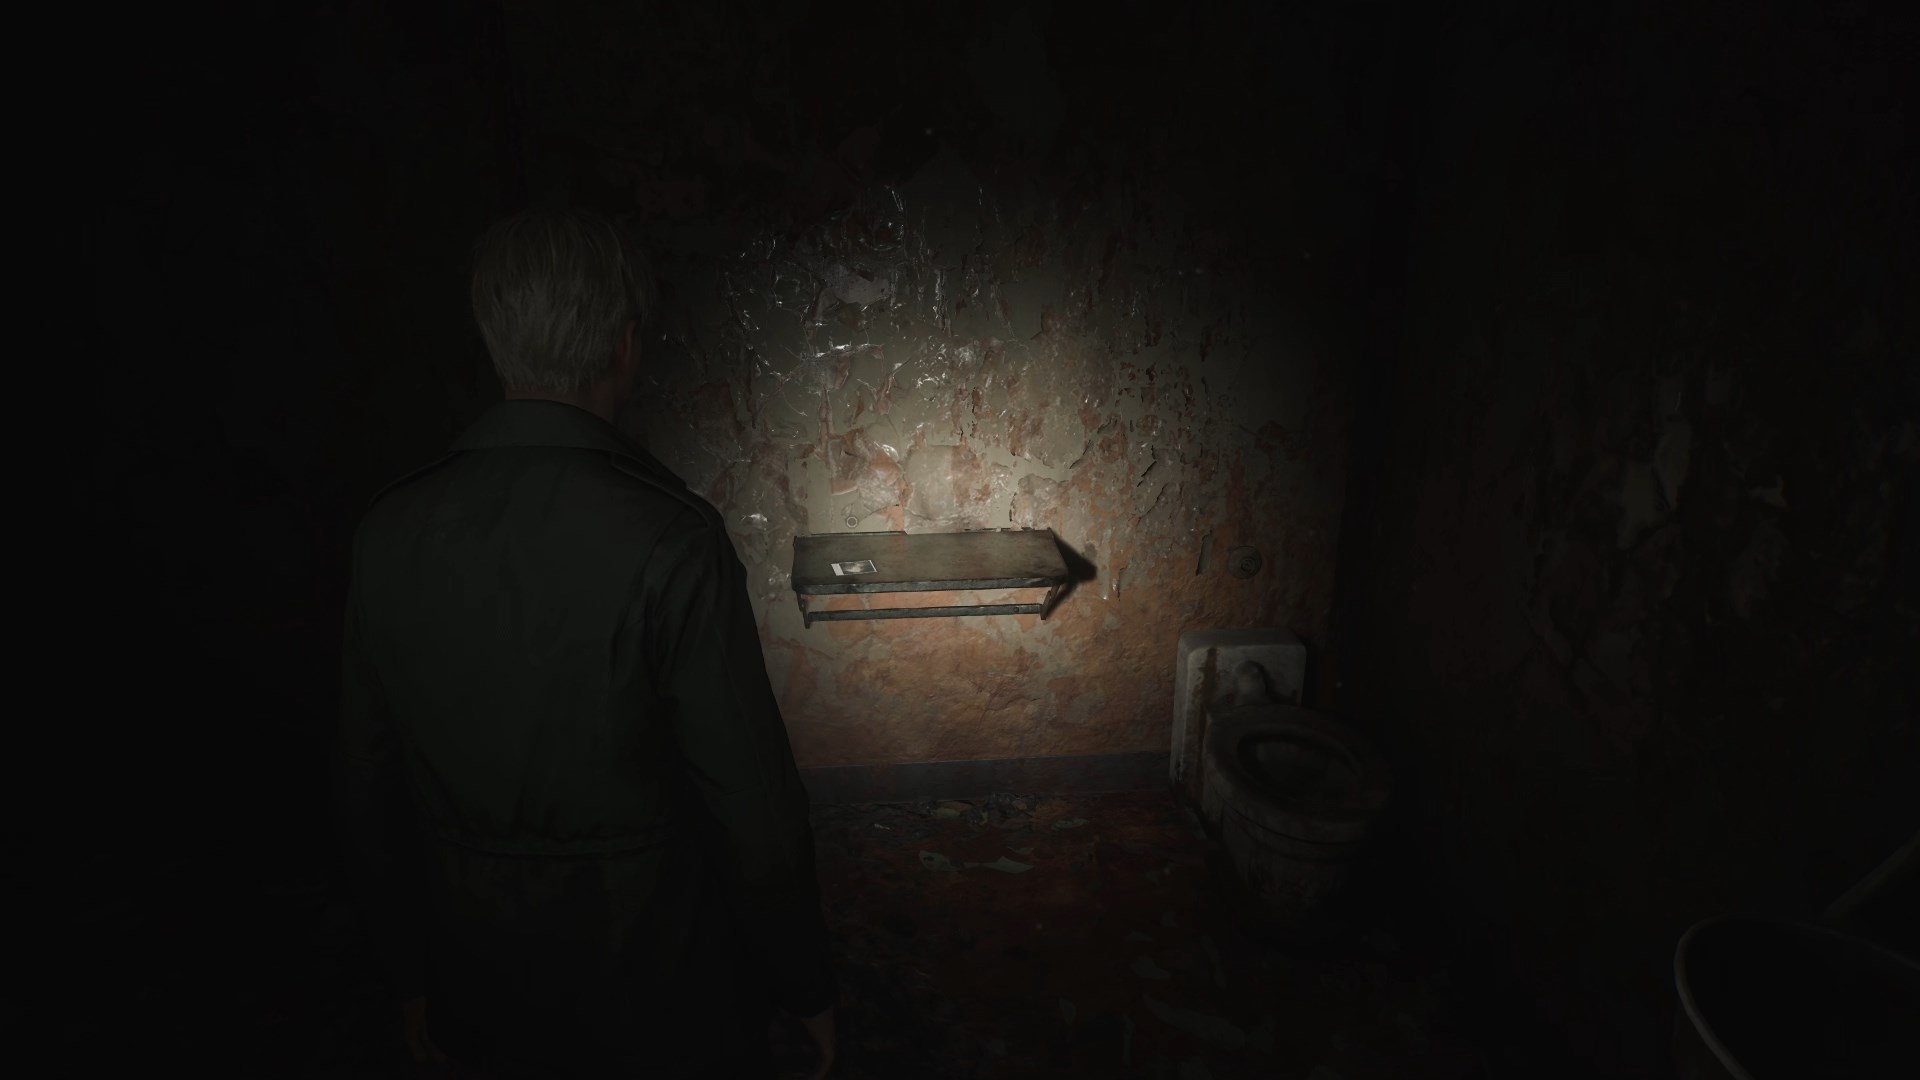 |
 |
- Shotgun Shells in Cell E11
- Shotgun Shells in Cell E18
- Handgun Ammo in Cell E16
- Shotgun Shells in Cell E10
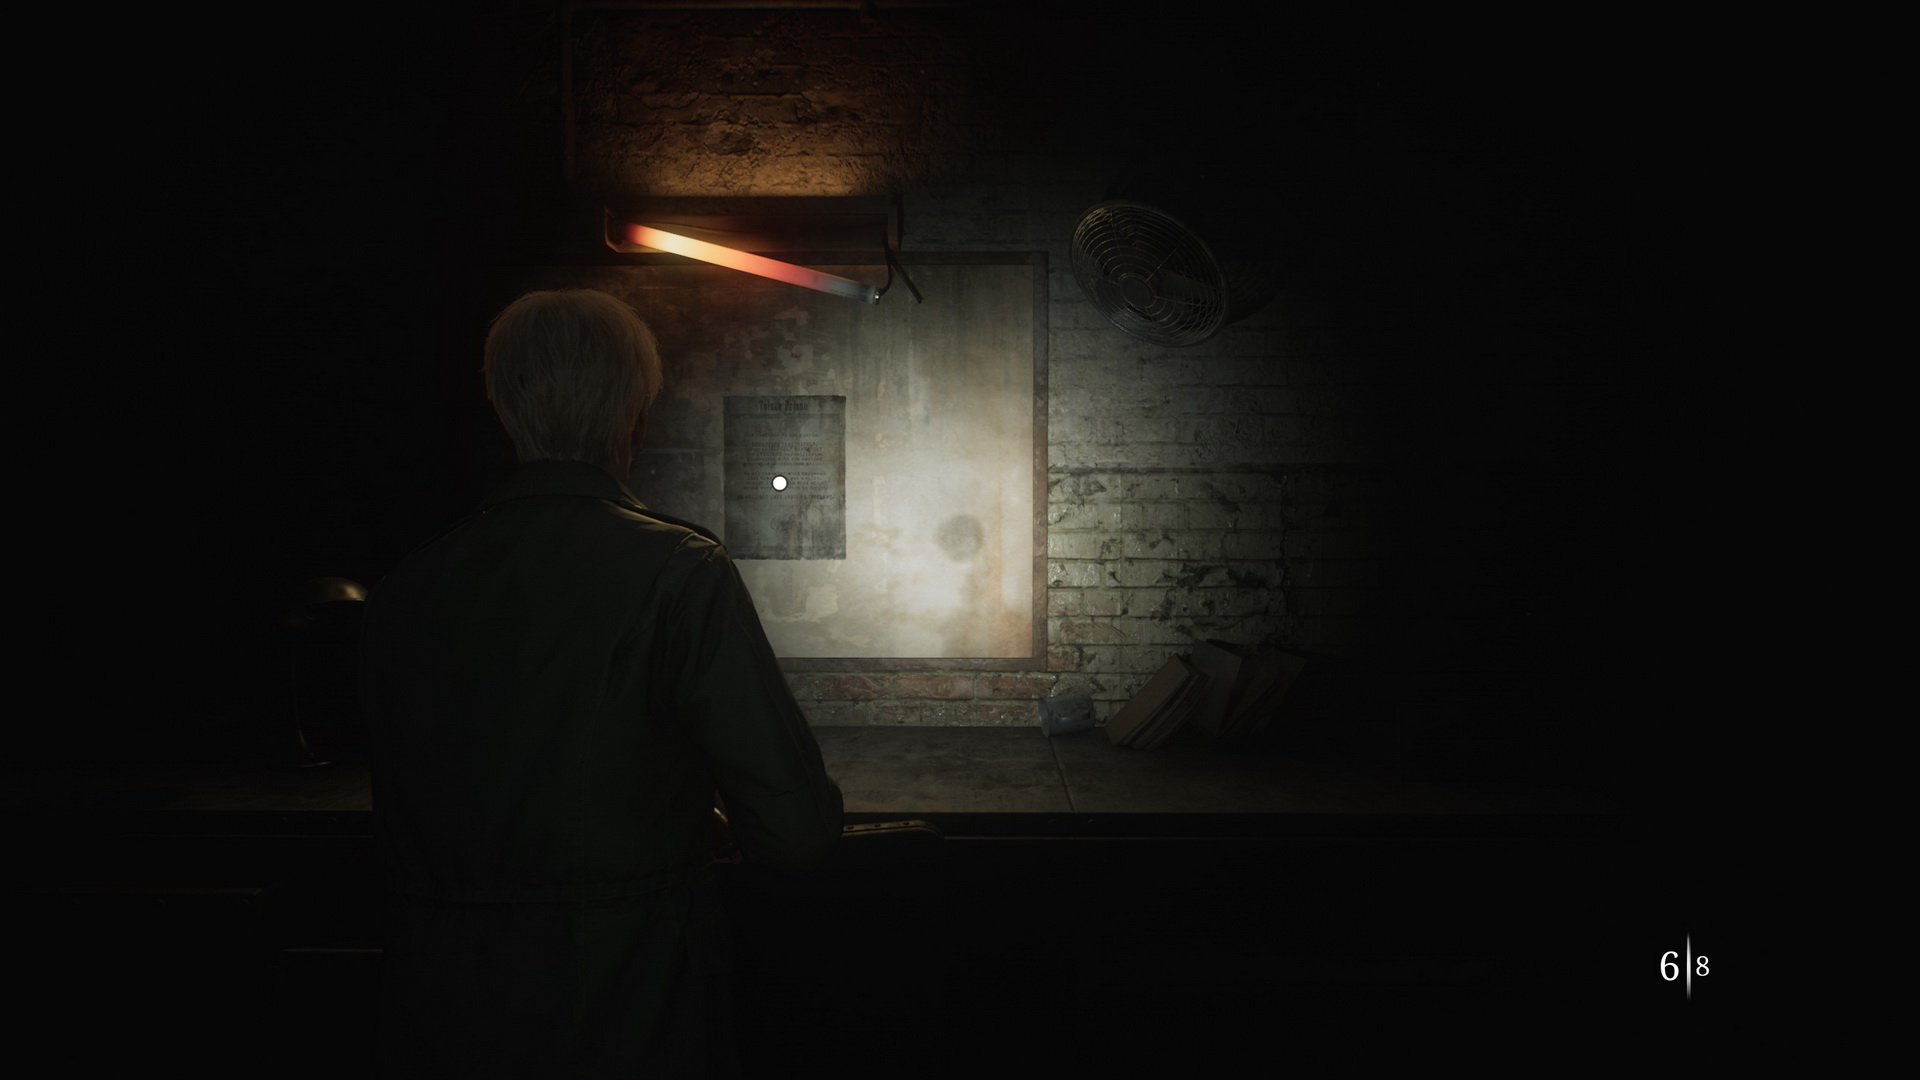
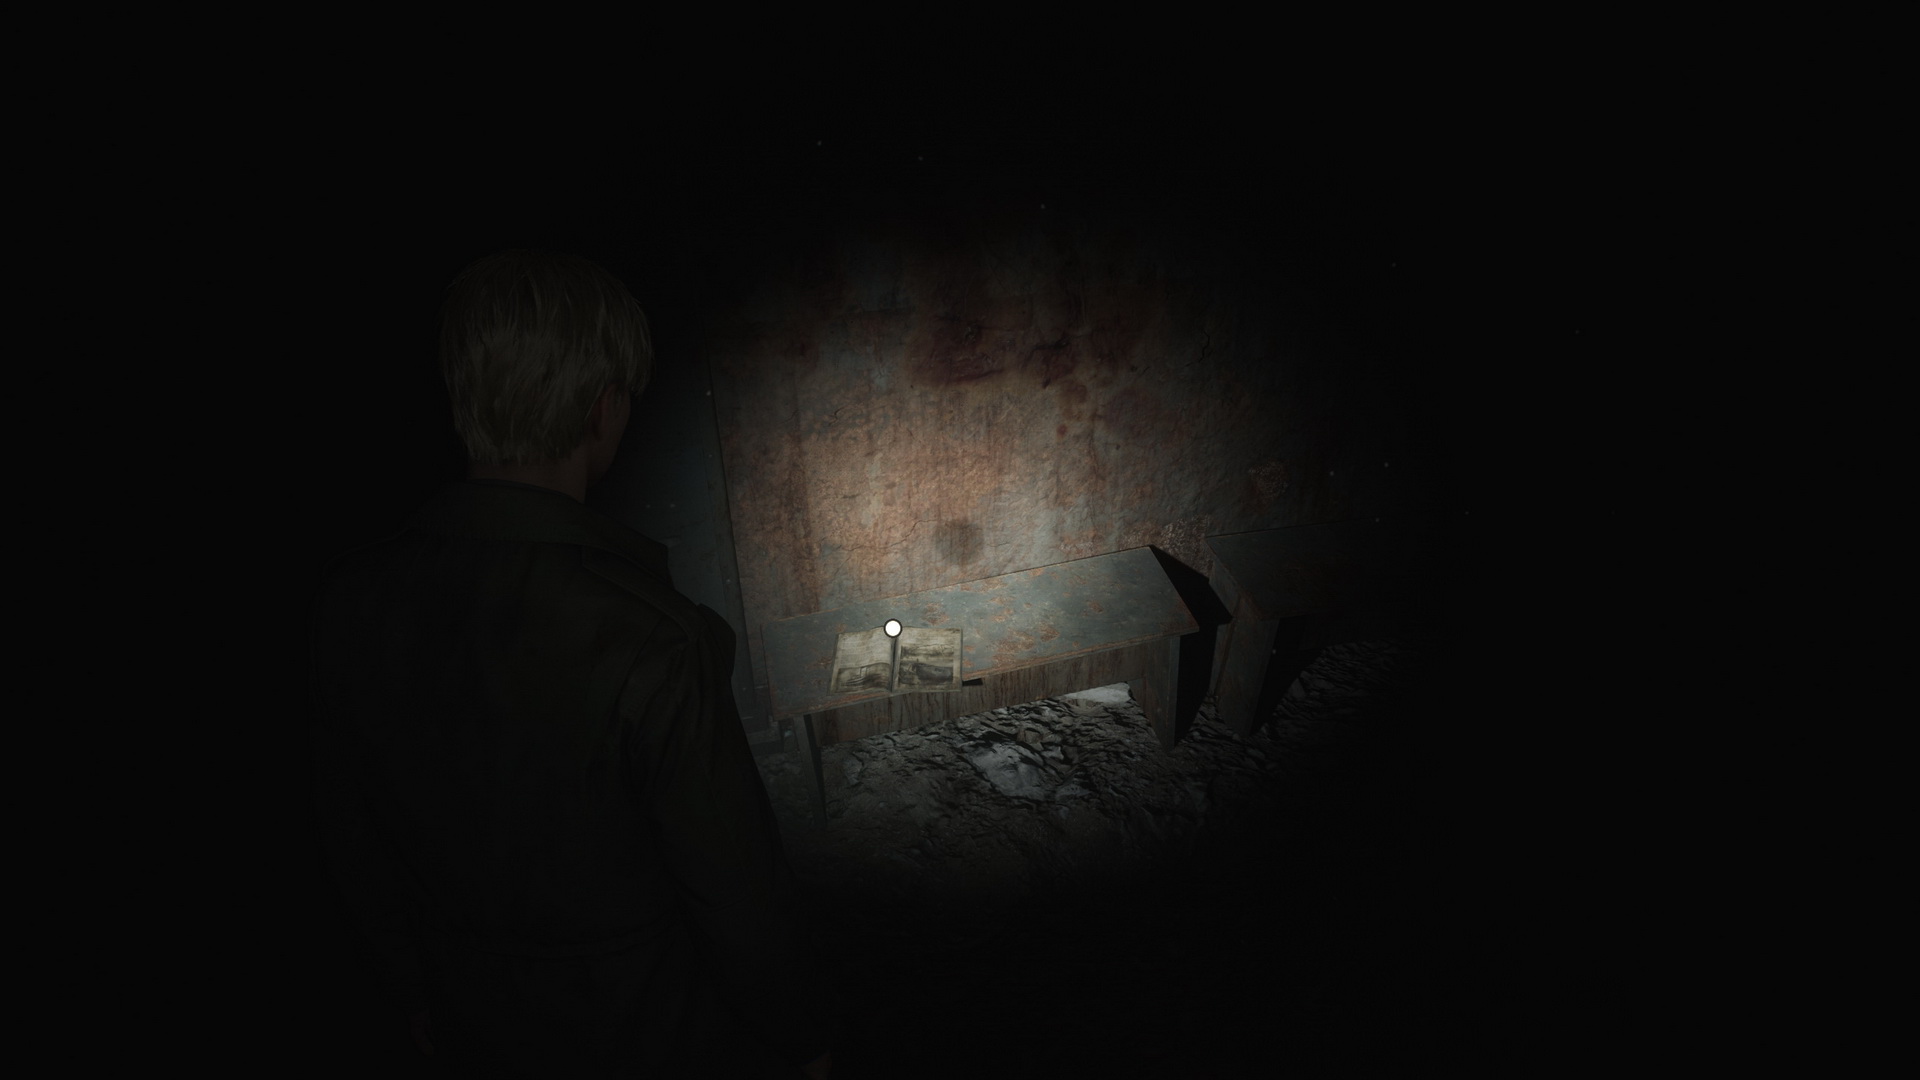
Proceed through a broken wall in Cell E10. Take more Handgun Ammo from a shelf in the room. On a desk, you can find the execution report.
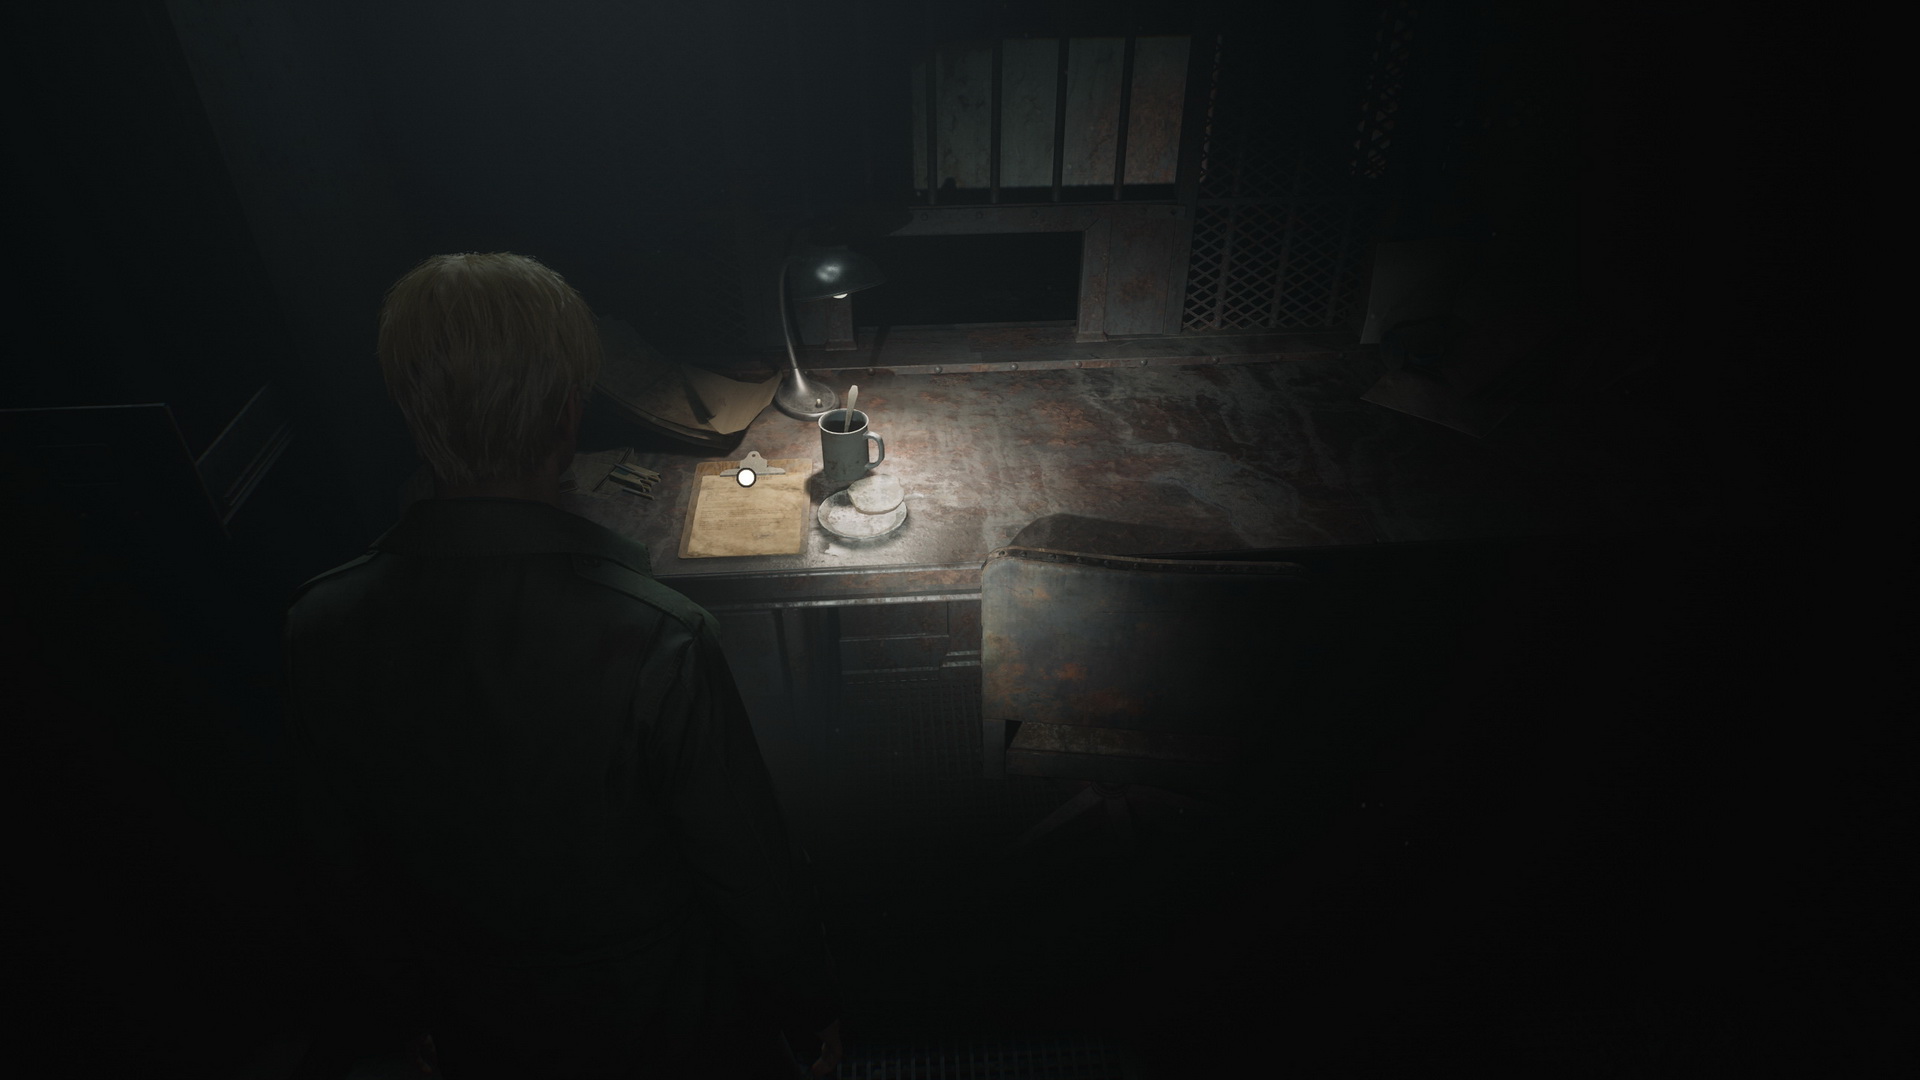 |
 |
A Health Drink is in the right drawer of the metal cabinet in the continuation of the room, while Rifle Rounds are in the cabinet on the opposite side. Take the 75 Armory Key from a key cabinet outside the Witness Checkpoint.
You can read a magazine article on a bench inside the Witness Checkpoint.
 |
 |
Return to the Main Section through the north door.
Main Section
Return to the Armory and use the key to get the 76 Hunting Rifle, Rifle Rounds and Shotgun Shells. Return to the Yard and proceed with the scales puzzle.
Note: Be aware of multiple Spider Mannequins respawning in the Main Section after progressing through the prison levels. The best you can do is to run past them rather than try to fight and kill them all.
Scales Puzzle: Unlocking the Hornless Ox Door
Put the Starter (1) and The Heaviest Weights (6) on the left scale and the Medium Weight (4) on the right one to unlock the Hornless Ox door (Second Floor).
Find the now unlocked Hornless Ox door next to the Armory in the Main Section and proceed to the second floor of the prison.
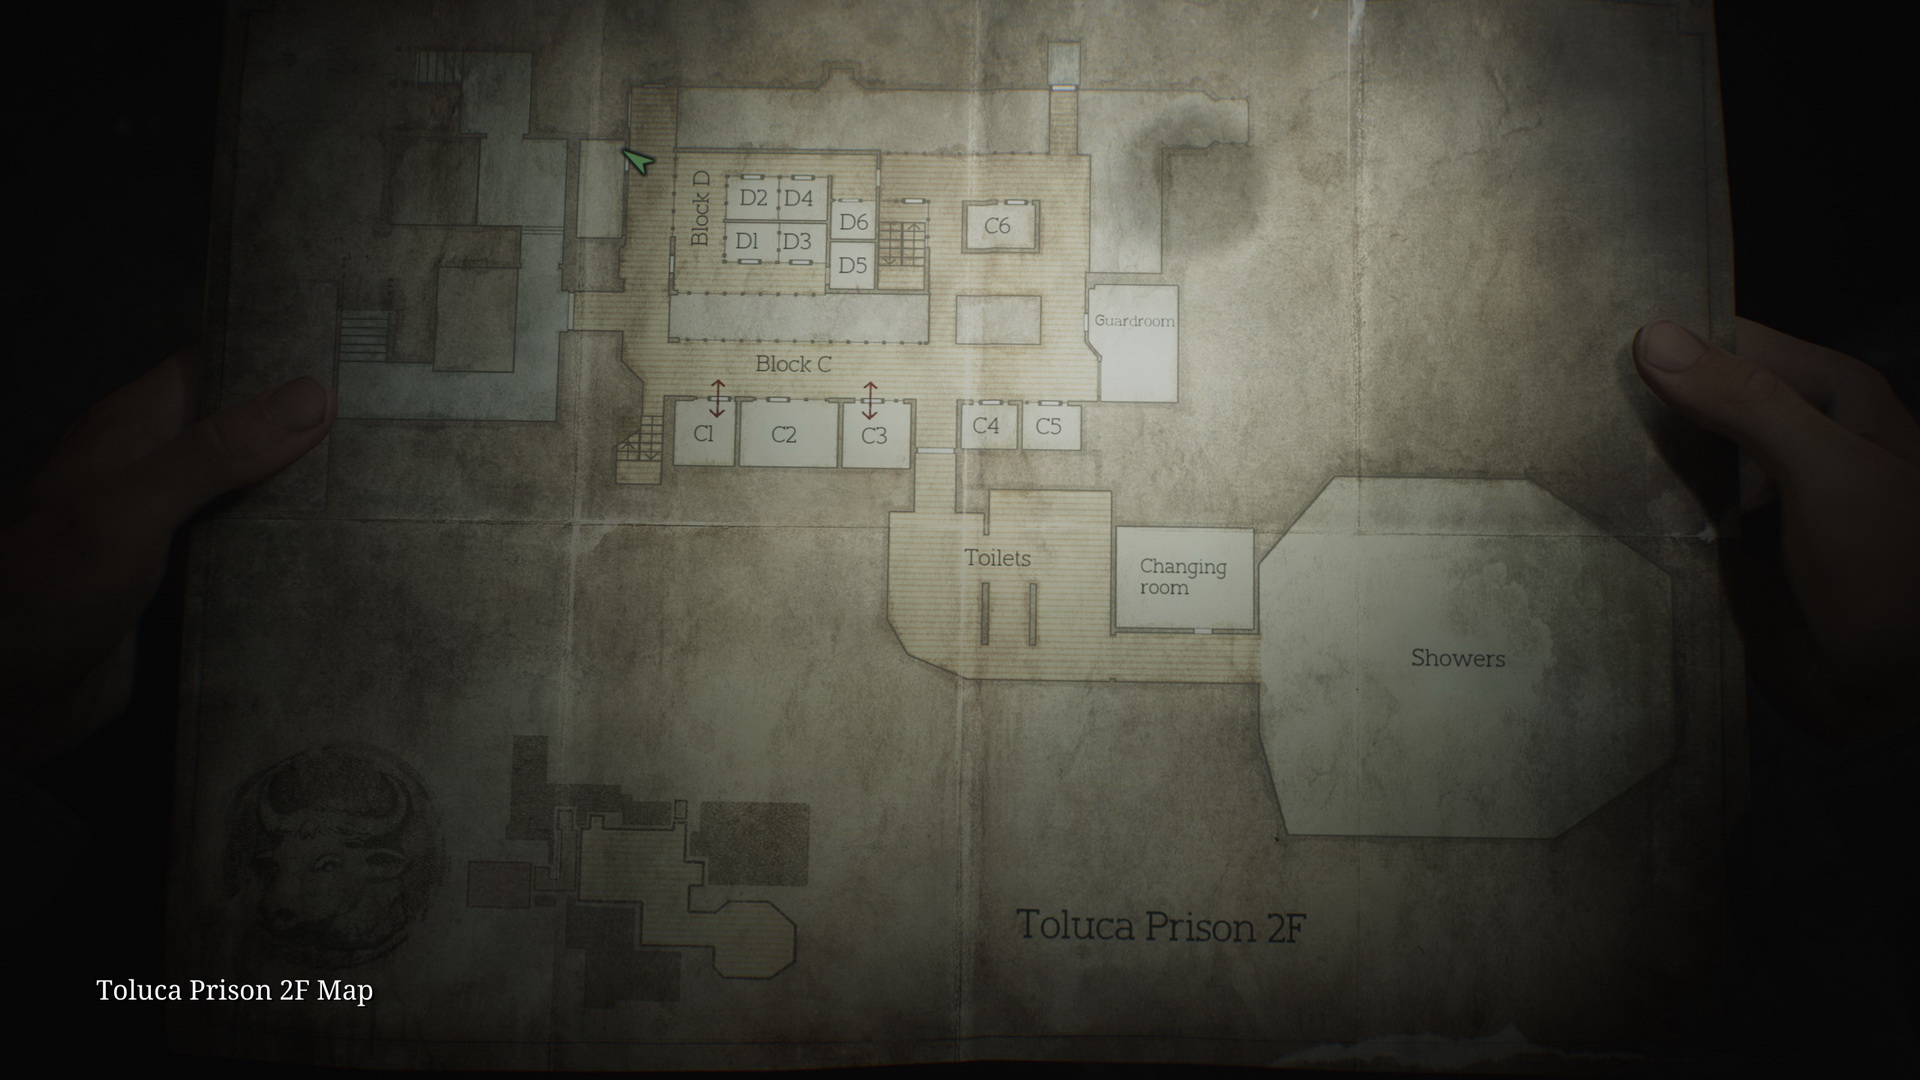
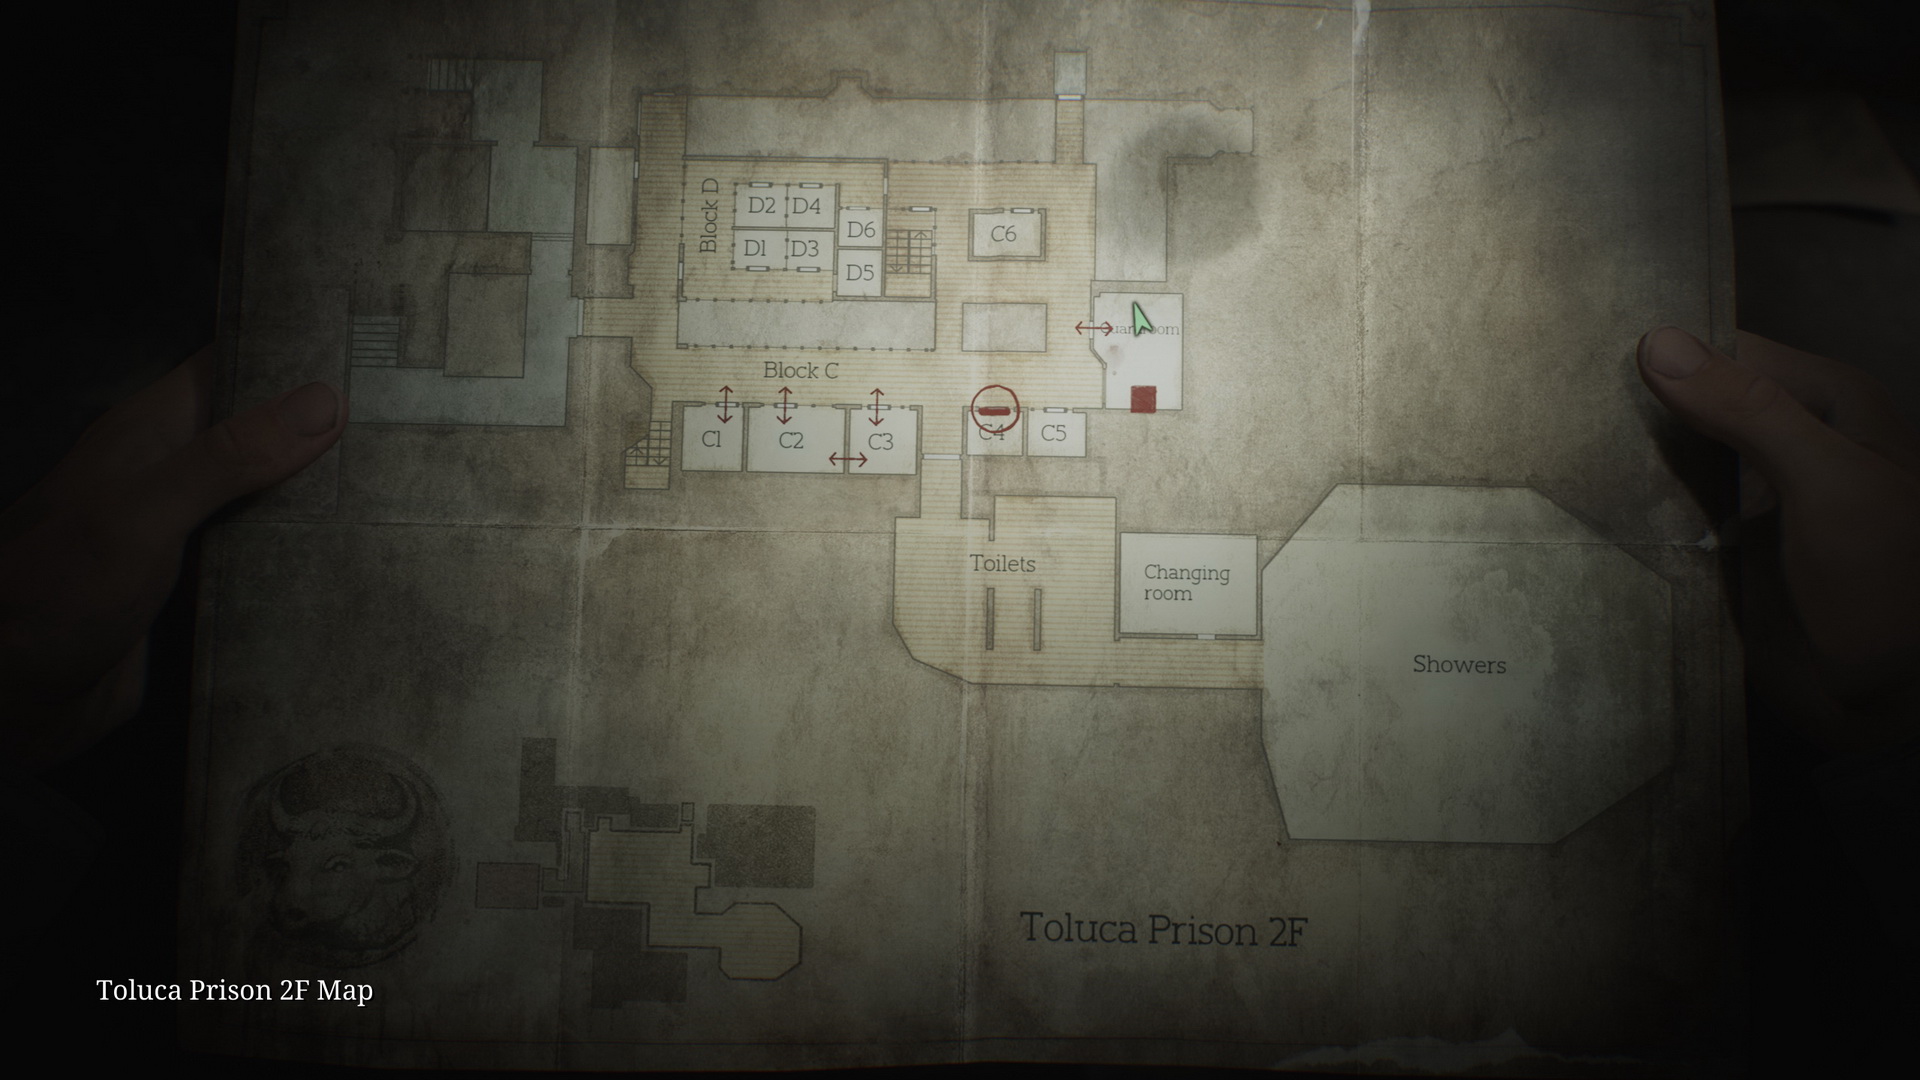
Ox Section (2F)
|
|
Block C
More Spider Mannequins will be waiting for you here (some of them crawling from the Main Section if you didn't take care of those), as well as a single Lying Figure in the hallway. In the left-most corridor, Memo #51: Guard’s Letter is pinned to a wall beside a locked door.
 |
 |
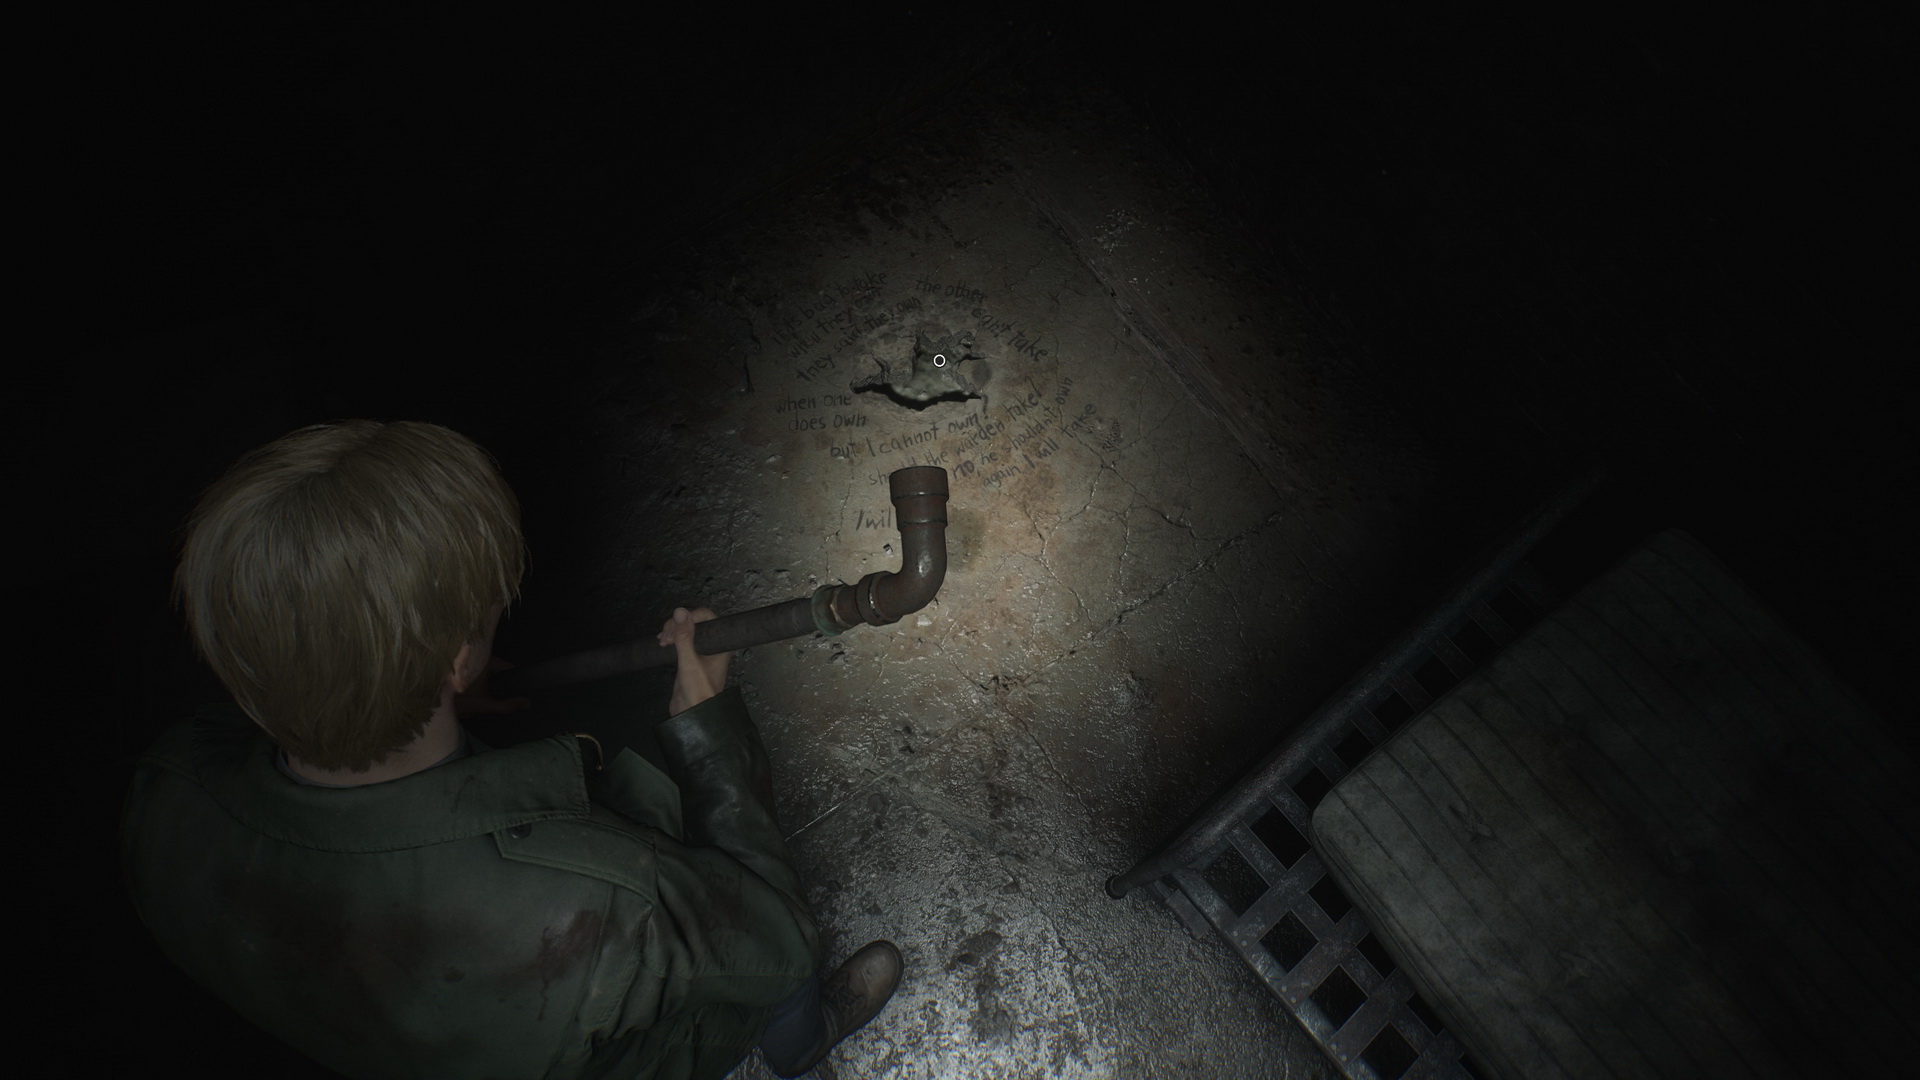
In Cell C1, there's a note around the hole in the ground.
 |
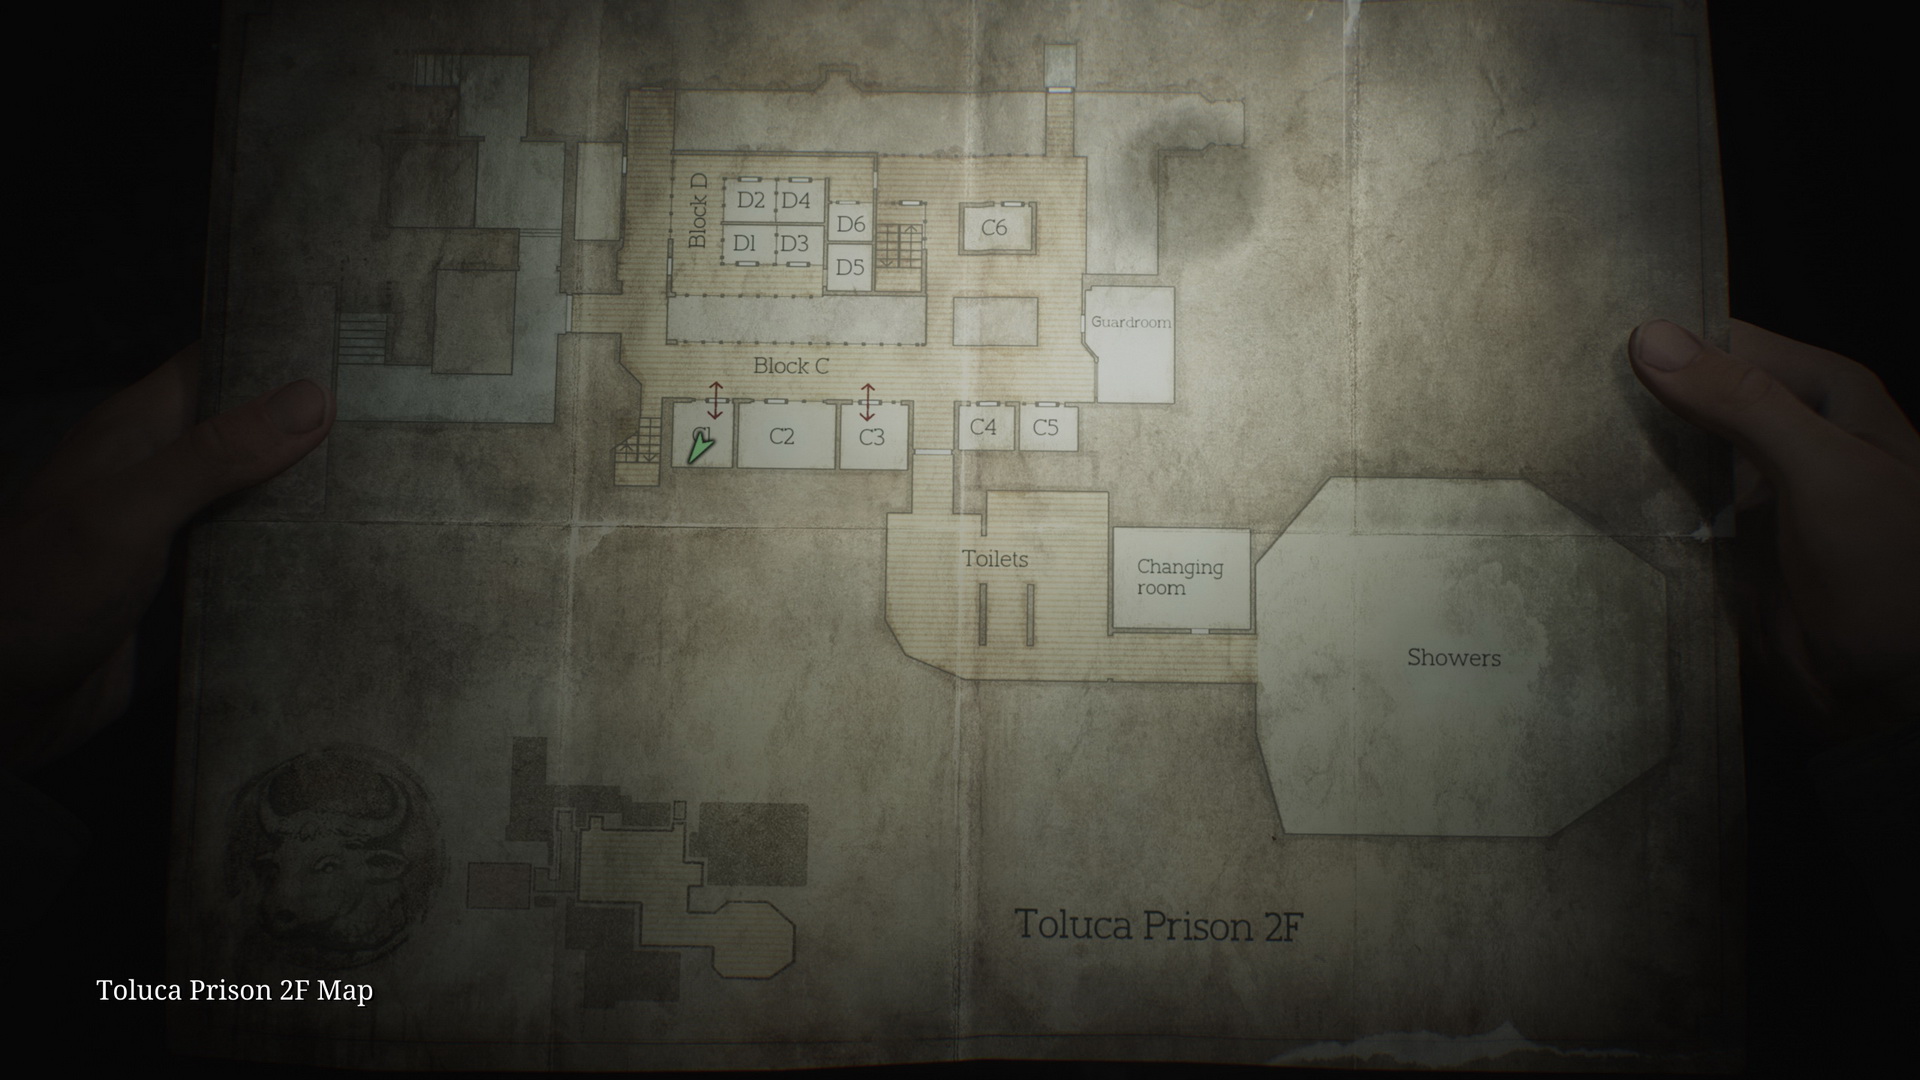 |
In Cell C5, there's a Health Drink on a nighstand. Proceed to the Guardroom at the end of Block C. There's a Save Point on the wall. Find the 77 Block D Key in the desk drawer and Handgun Ammo on a shelf.
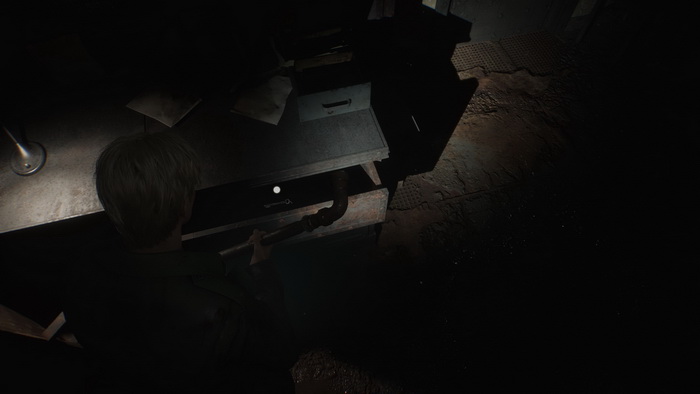
On another desk, you will find a diary that hints at how to inspect Cell C4.
 |
 |
You can break through a wall into Cell C6 to collect a Health Drink. Make your way to Block D and unlock the door with the key.
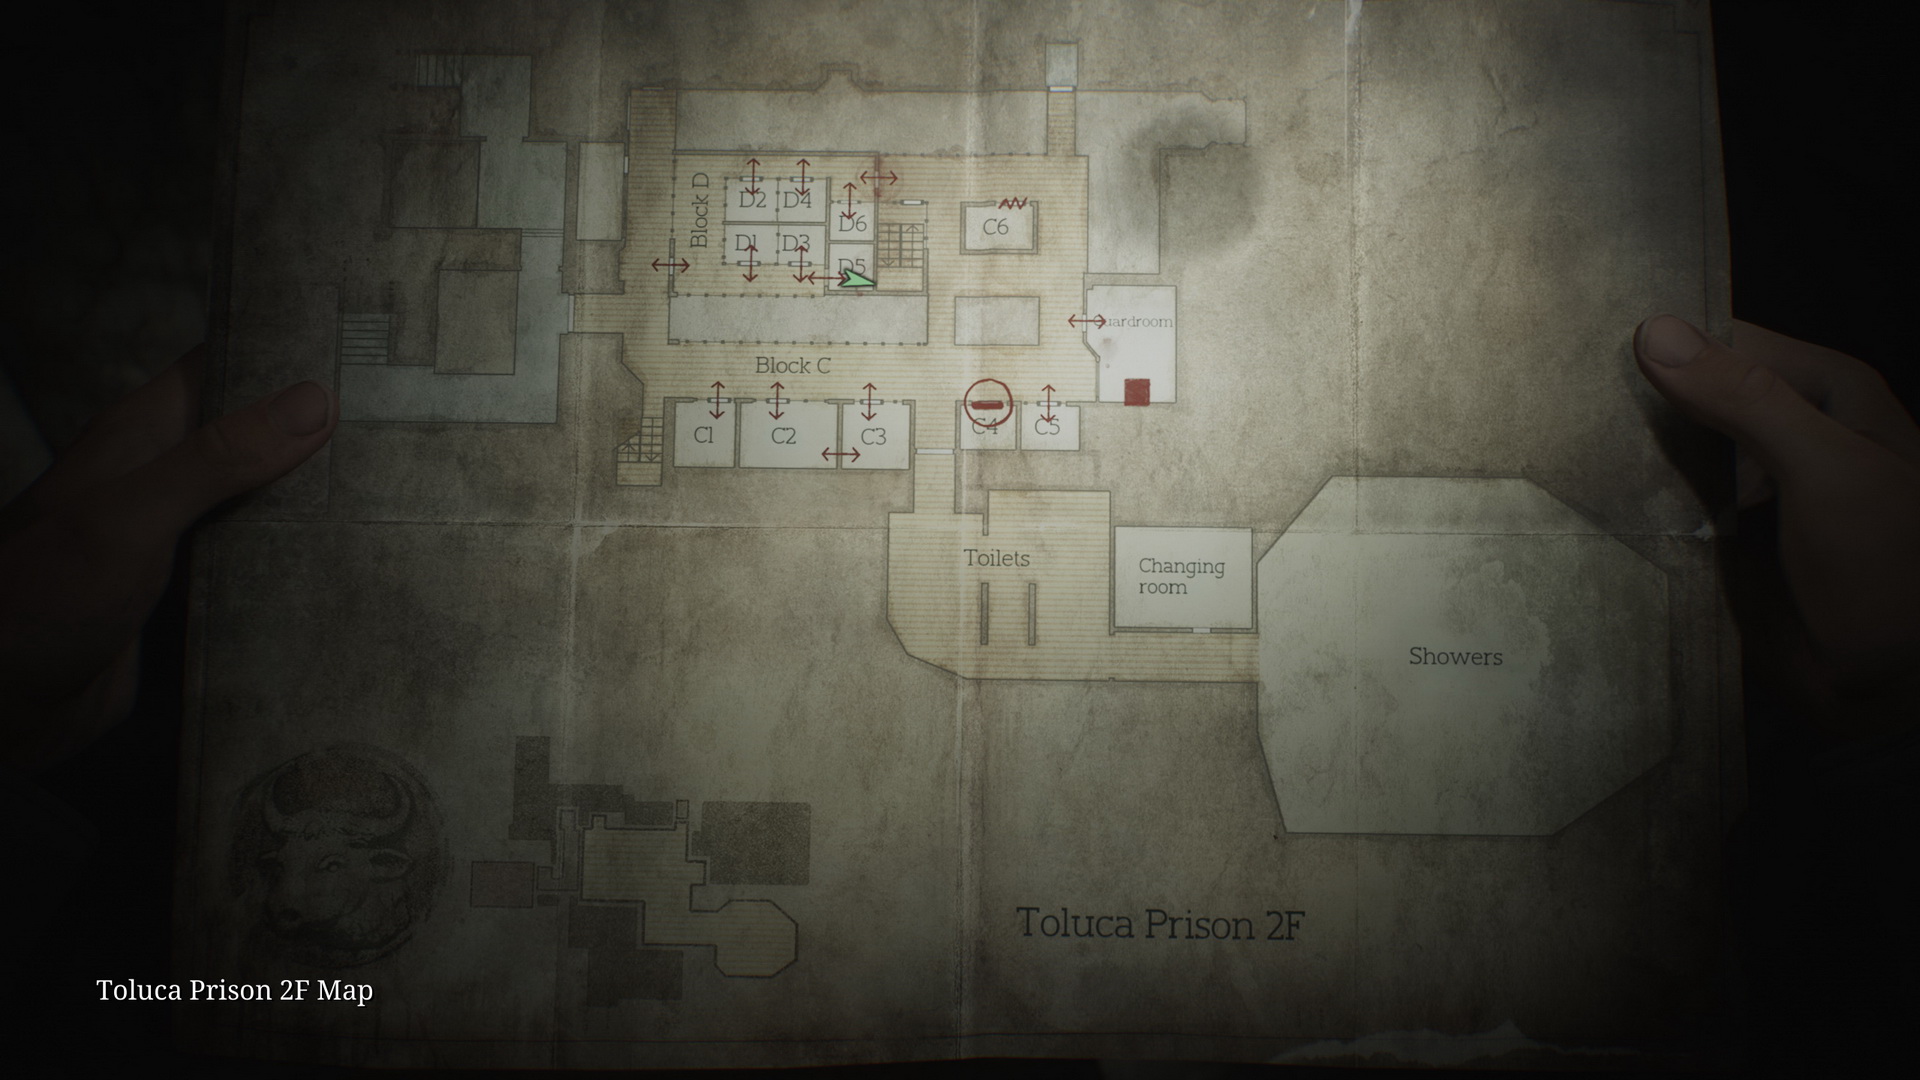
Block D
In Cell D6, there are Rifle Rounds, which a Lying Figure guards. You can unlock a door further down the corridor for a future shortcut. In Cell D3, you can find Shotgun Shells. Enter Cell D5 and take a 78 Shiv Key from a first aid kit.

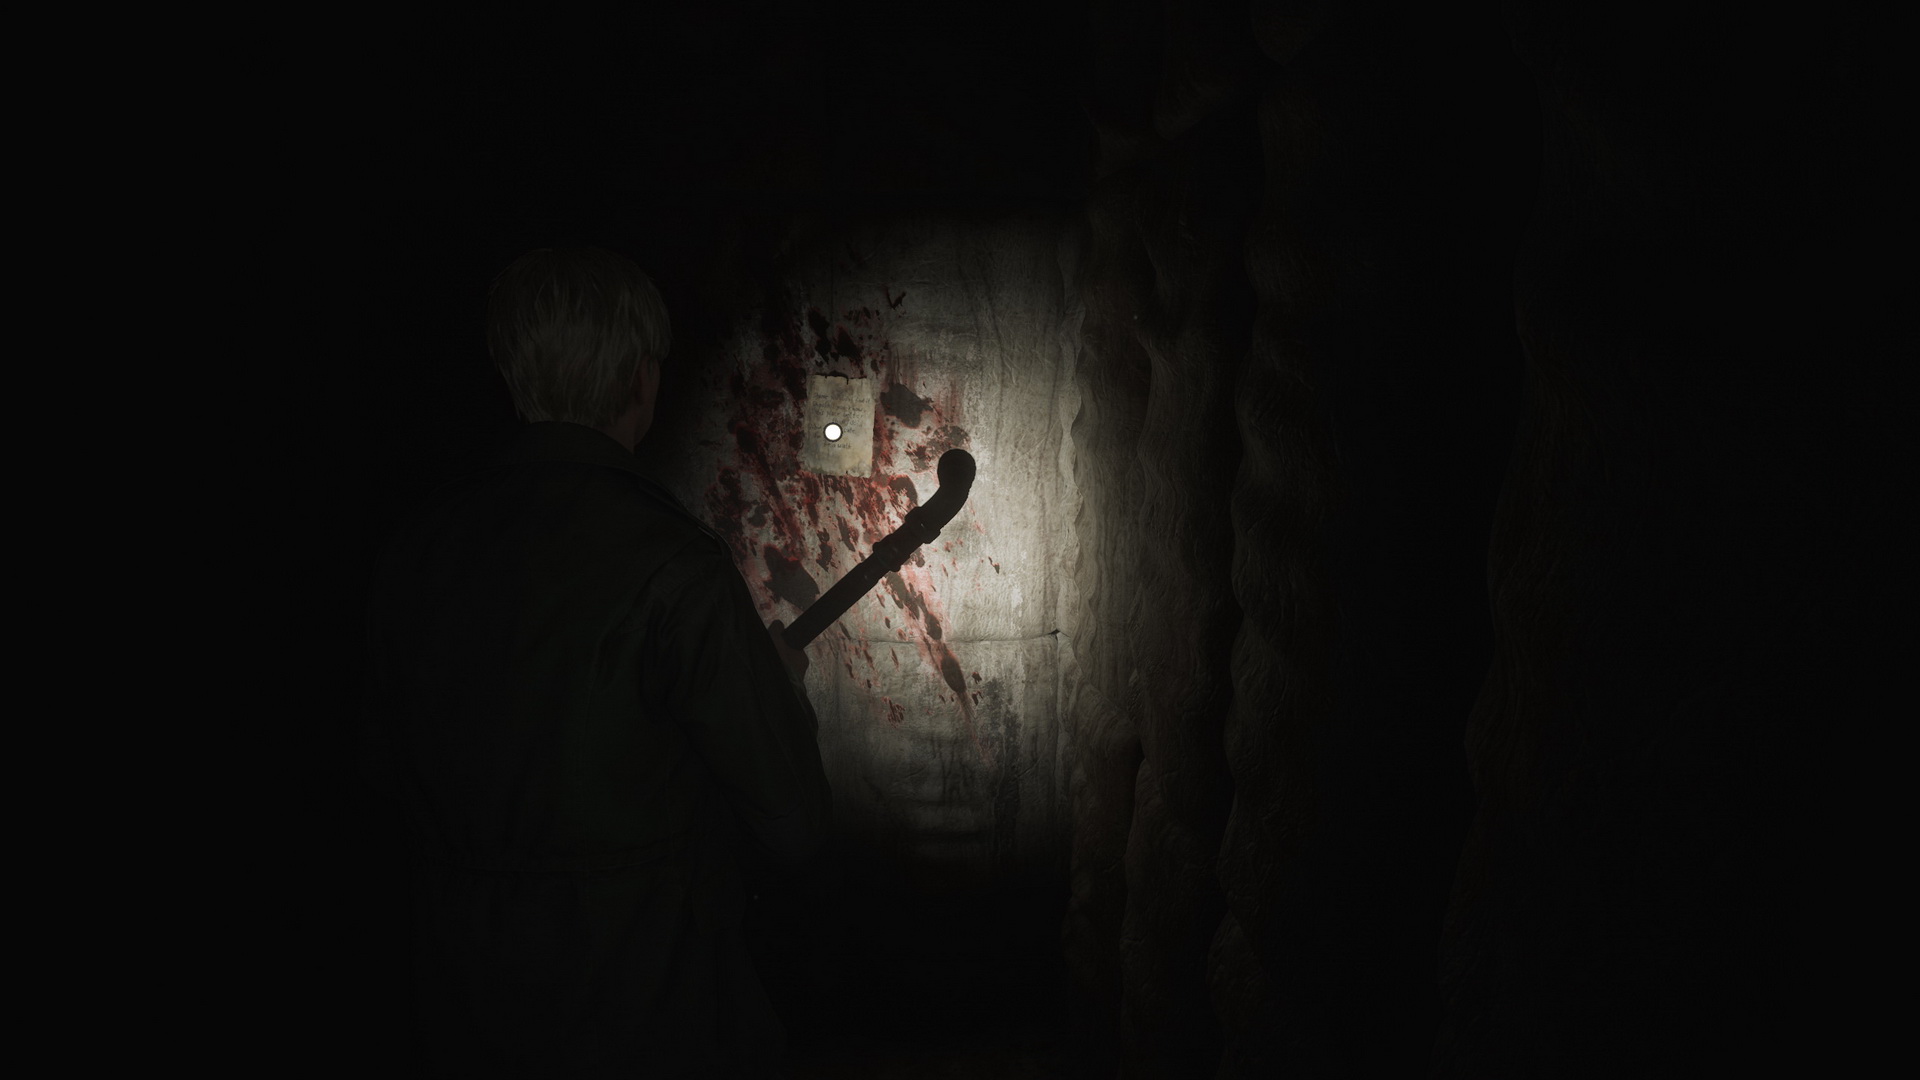
Also, on the wall in the same cell is Memo #52: Threatening Note.
 |
 |
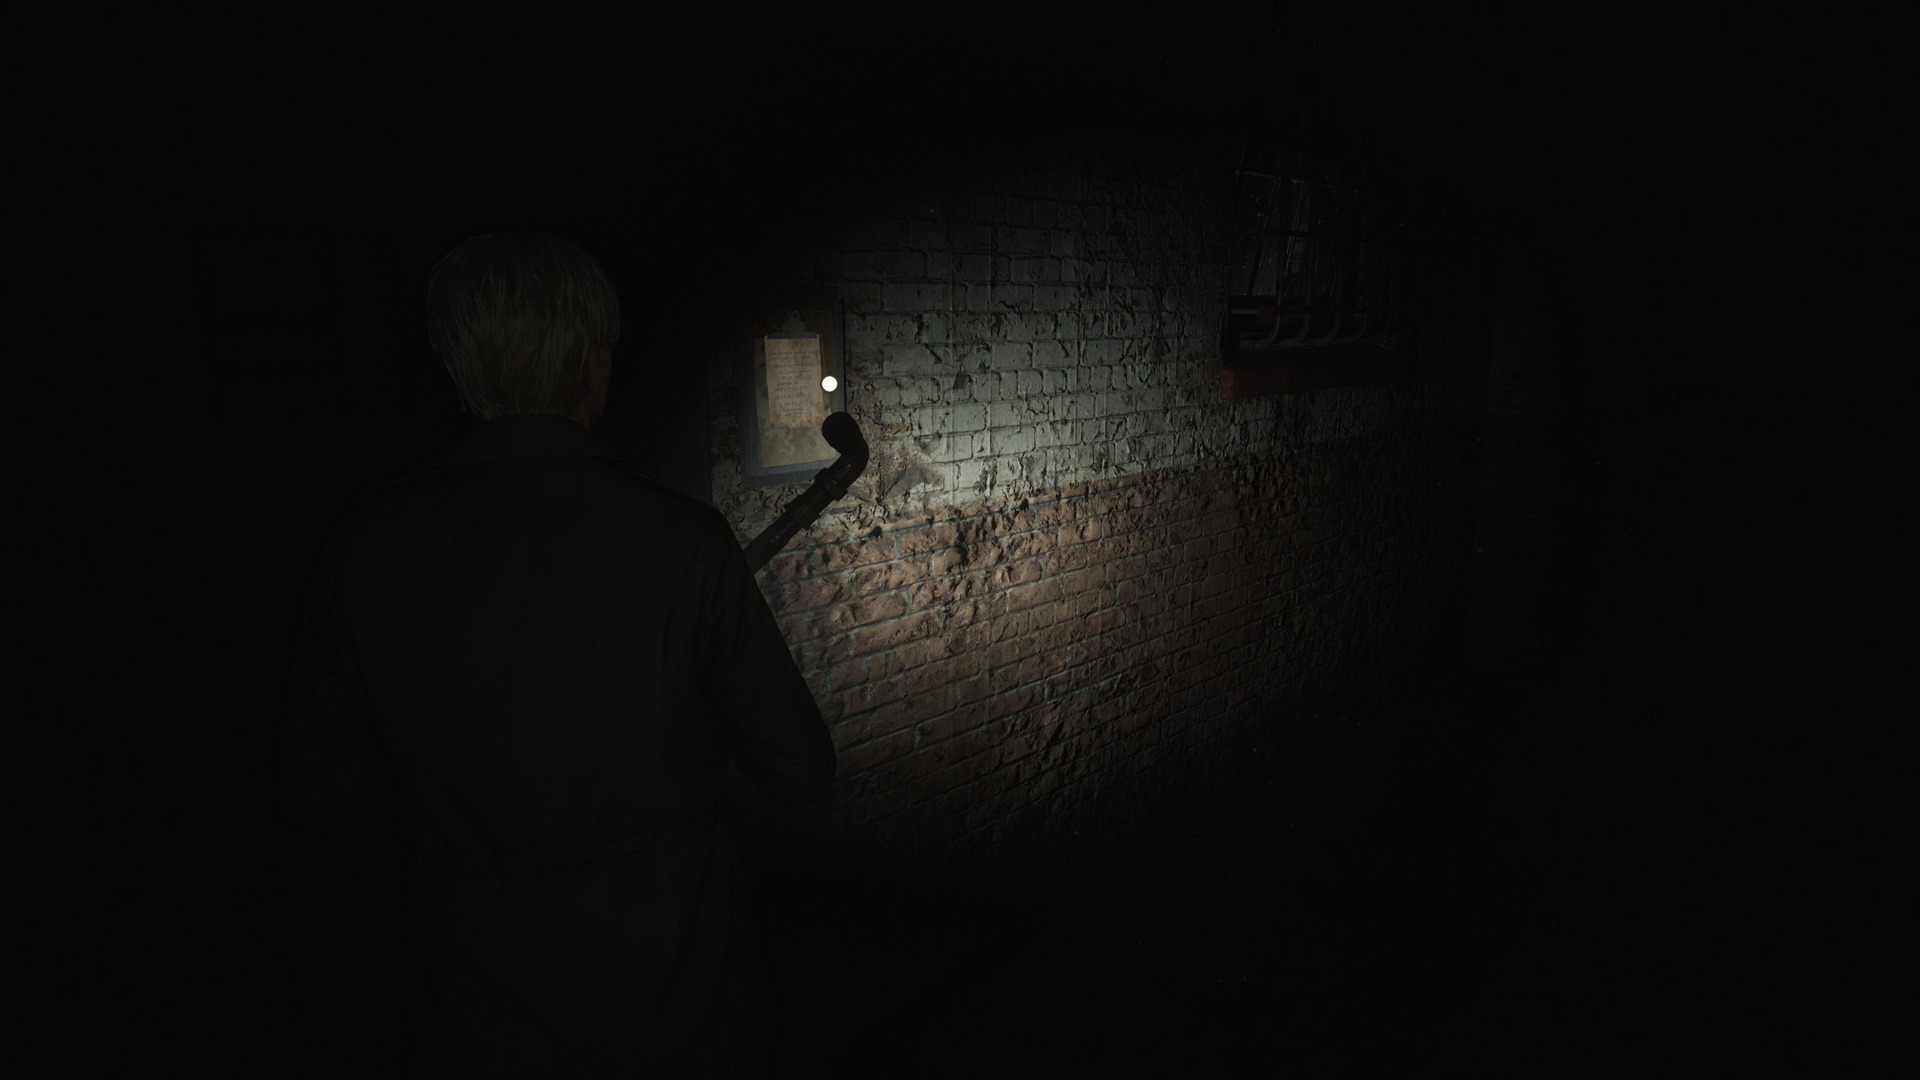
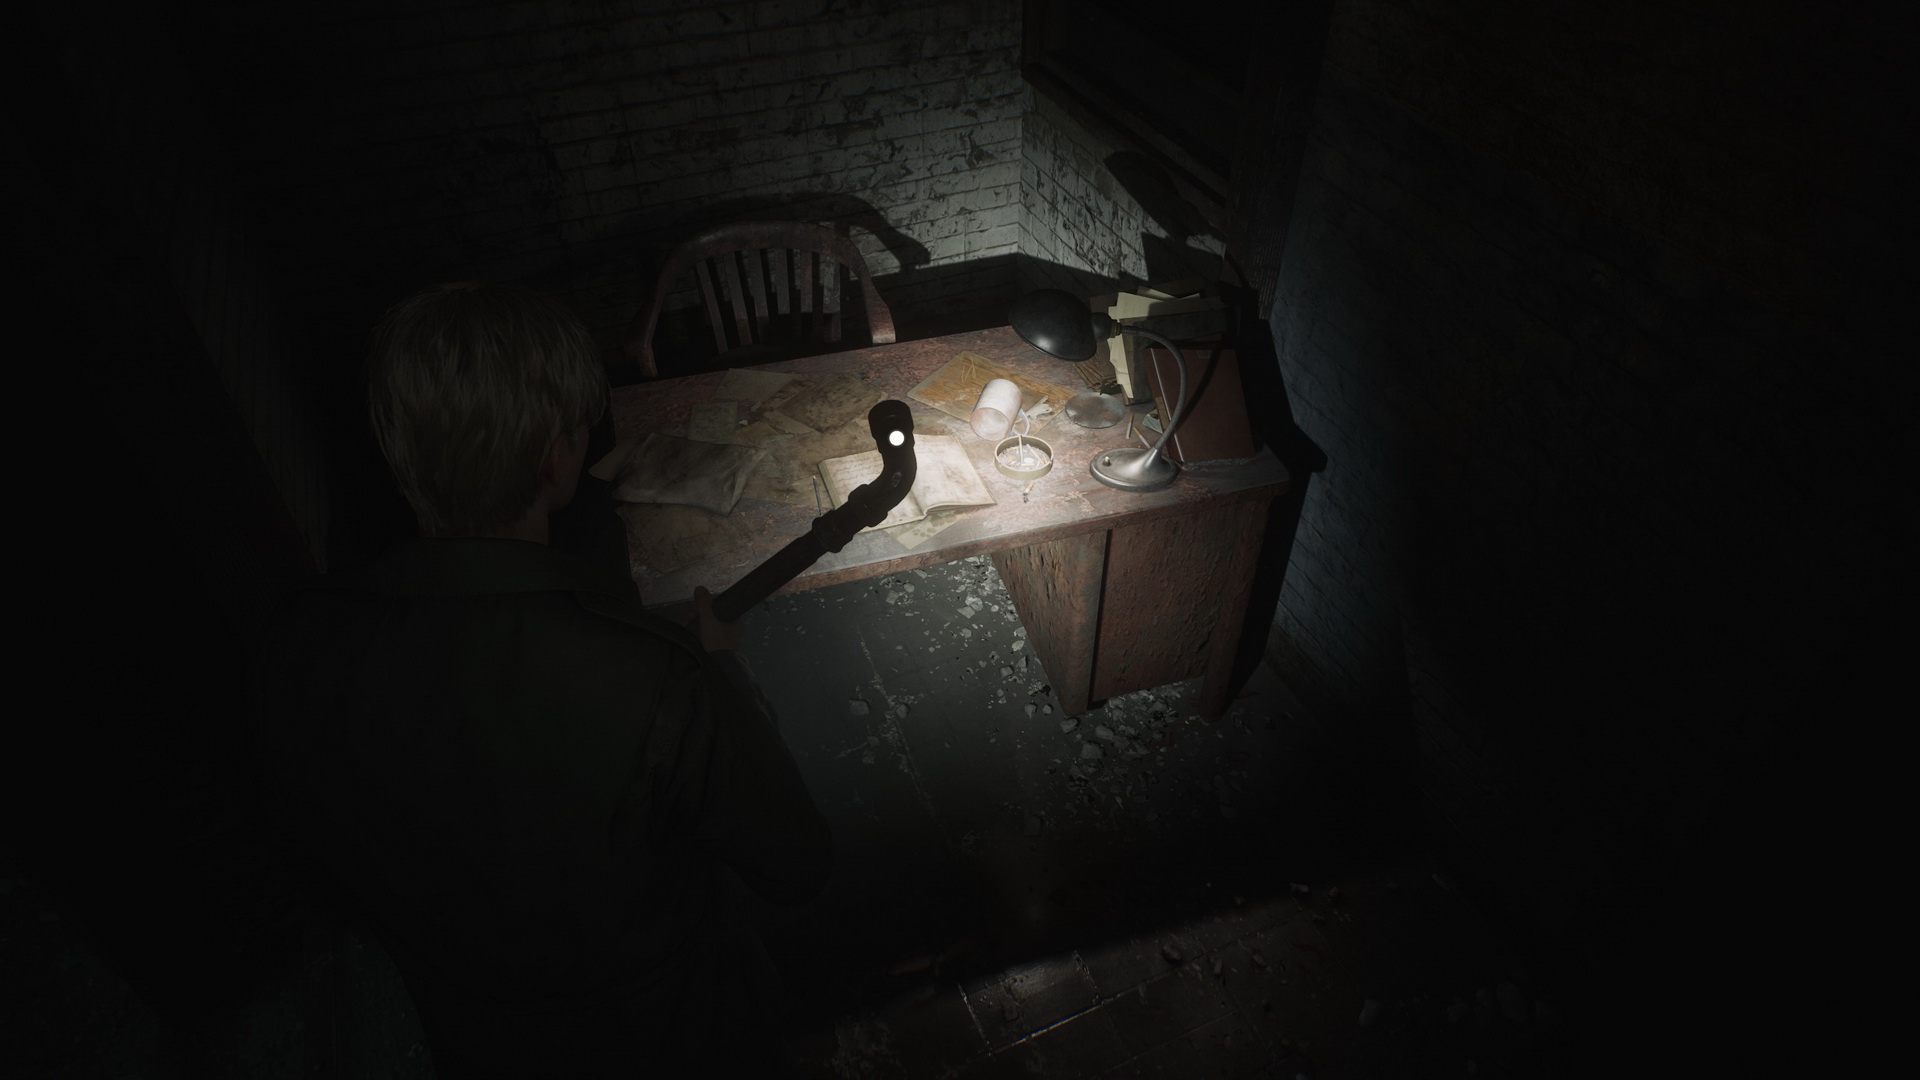
Return to Block C and unlock Cell C4 with the Shiv Key. Crawl through a hole in the wall towards the light. Next to the flashlight, find Memo #53: Paranoid Note sitting on a pipe.
 |
 |
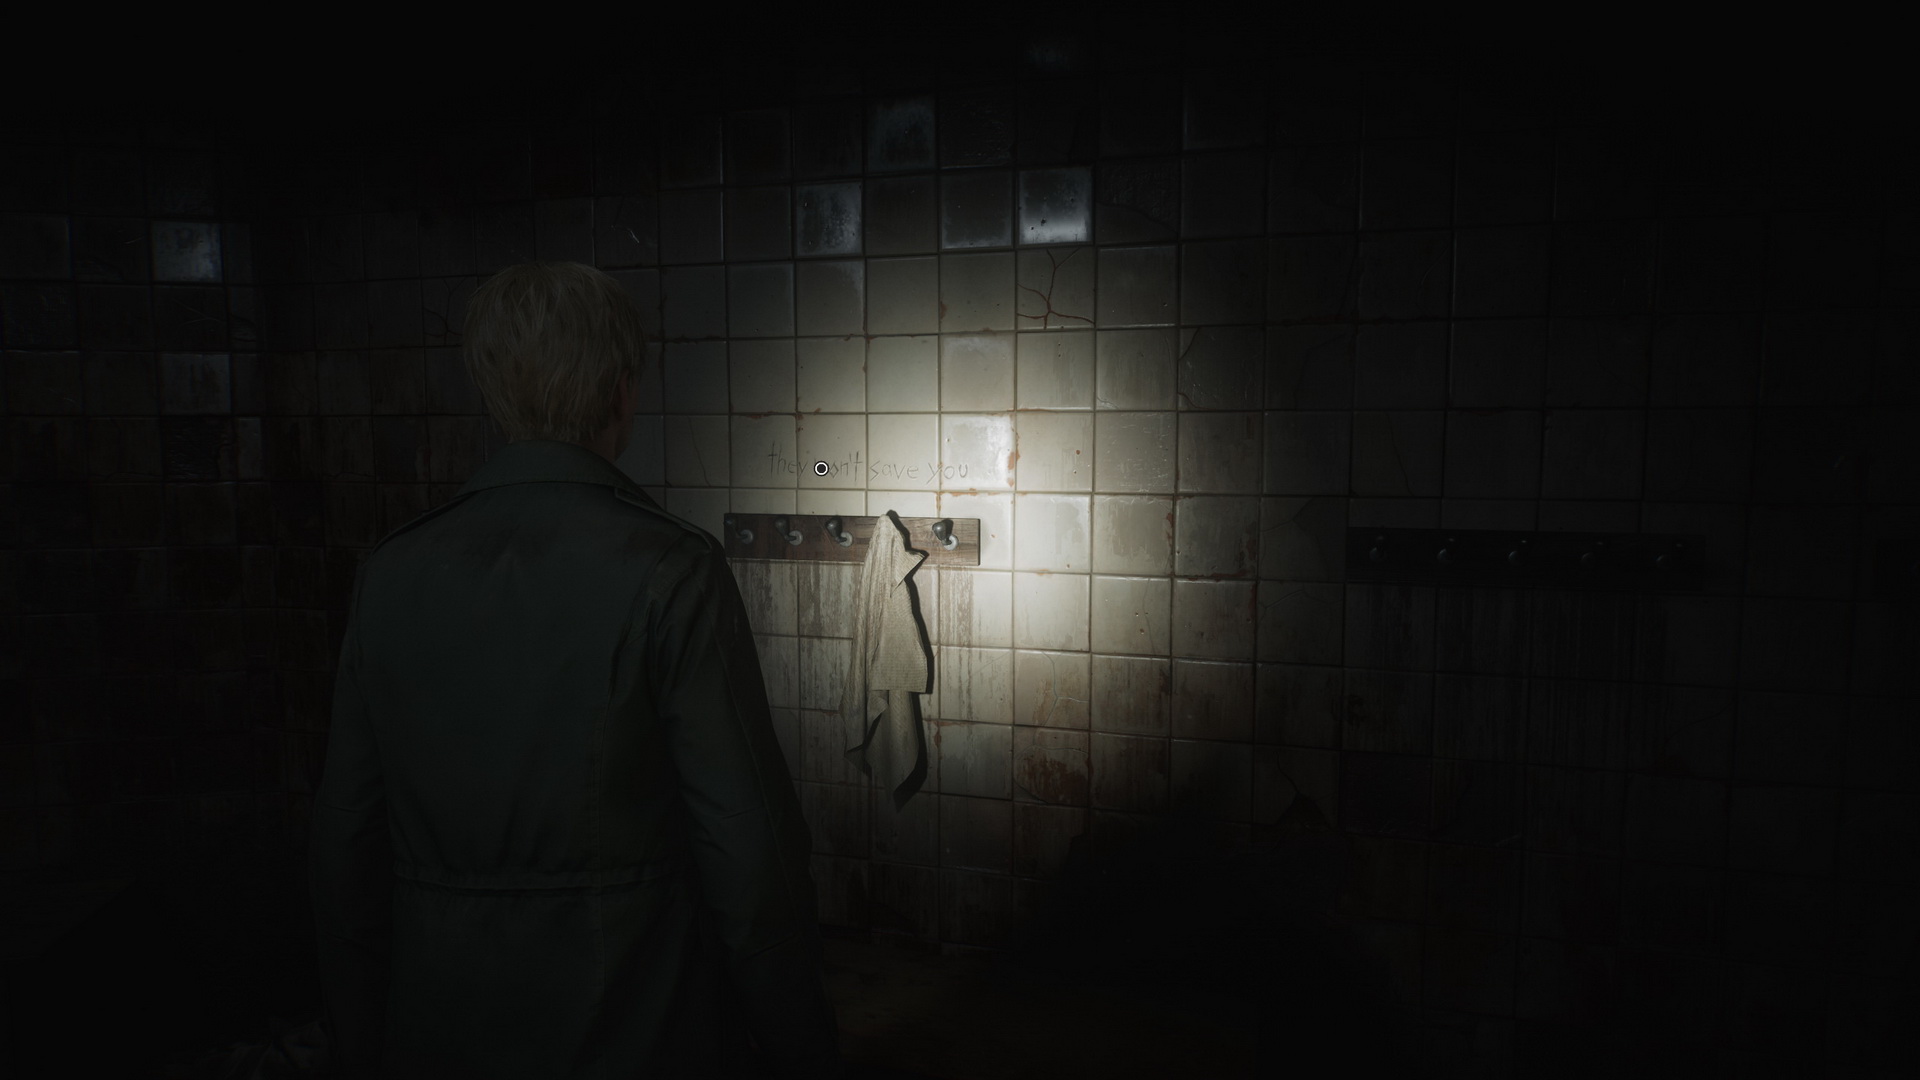
Squeeze between the pipes and crawl through another hole to find yourself in the toilet area. You can find a short note on the wall to the right and Handgun Ammo on a bench next to it.
 |
 |
There's a Mannequin in one of the toilet stalls, so don't bother checking them. In the Changing Room, you can find Rifle Rounds on a shelf, a Syringe in a first aid cabinet, another Rifle Rounds on a bench and Memo #54: Crumpled Note on a bench.
 |
 |
Proceed to the shower area. Only a single Nurse is active her for now. For Glimpse of the Past #20, inspect a tablet on the cloth along the wall to the right.
 |
 |
You are advised to collect multiple supplies in the room, sitting on various benches while the monsters are inactive. There are three boxes of Handgun Ammo, two boxes of Shotgun Shells, a Health Drink in the northern section and Rifle Rounds in the northeast. Approach the hole in the back of the Showers to collect the 79 Heavy Weight inside.

The monsters in the area will come alive, so the best you can do is run to the cell block exit, dodging their attacks as much as possible. Back in Block C, run straight and use the northern stairs to return to the Main Section.
Main Section
Return to the Yard and proceed with the scales puzzle.
Scales Puzzle: Unlocking the Eyeless Boar Door
Put the Starter Weight (1) on the left scale and the rest of the weights (4-5-6) on the right one to unlock the Eyeless Boar door (Administrative Section).
Find the now unlocked Eyless Boar door north of the Main Section and proceed to the administrative section.
Boar Section (Administrative)
|
|
Pass through the corridor and check a diary on the desk ahead.
 |
 |
Turn right and enter the Warehouse. Inside, you will have to fight a Mannequin and a Lying Figure. Grab Handgun Ammo from a shelf and find Strange Photo #19: "Old man’s always prepared" on a desk in the back of the room.
 |
 |
Return to the corridor through one of the doors and proceed to the other part of the section. Deal with a Lying Figure in the Visitation Room and find Memo #55: Prisoner’s Letter taped to the glass of the last cubicle.
 |
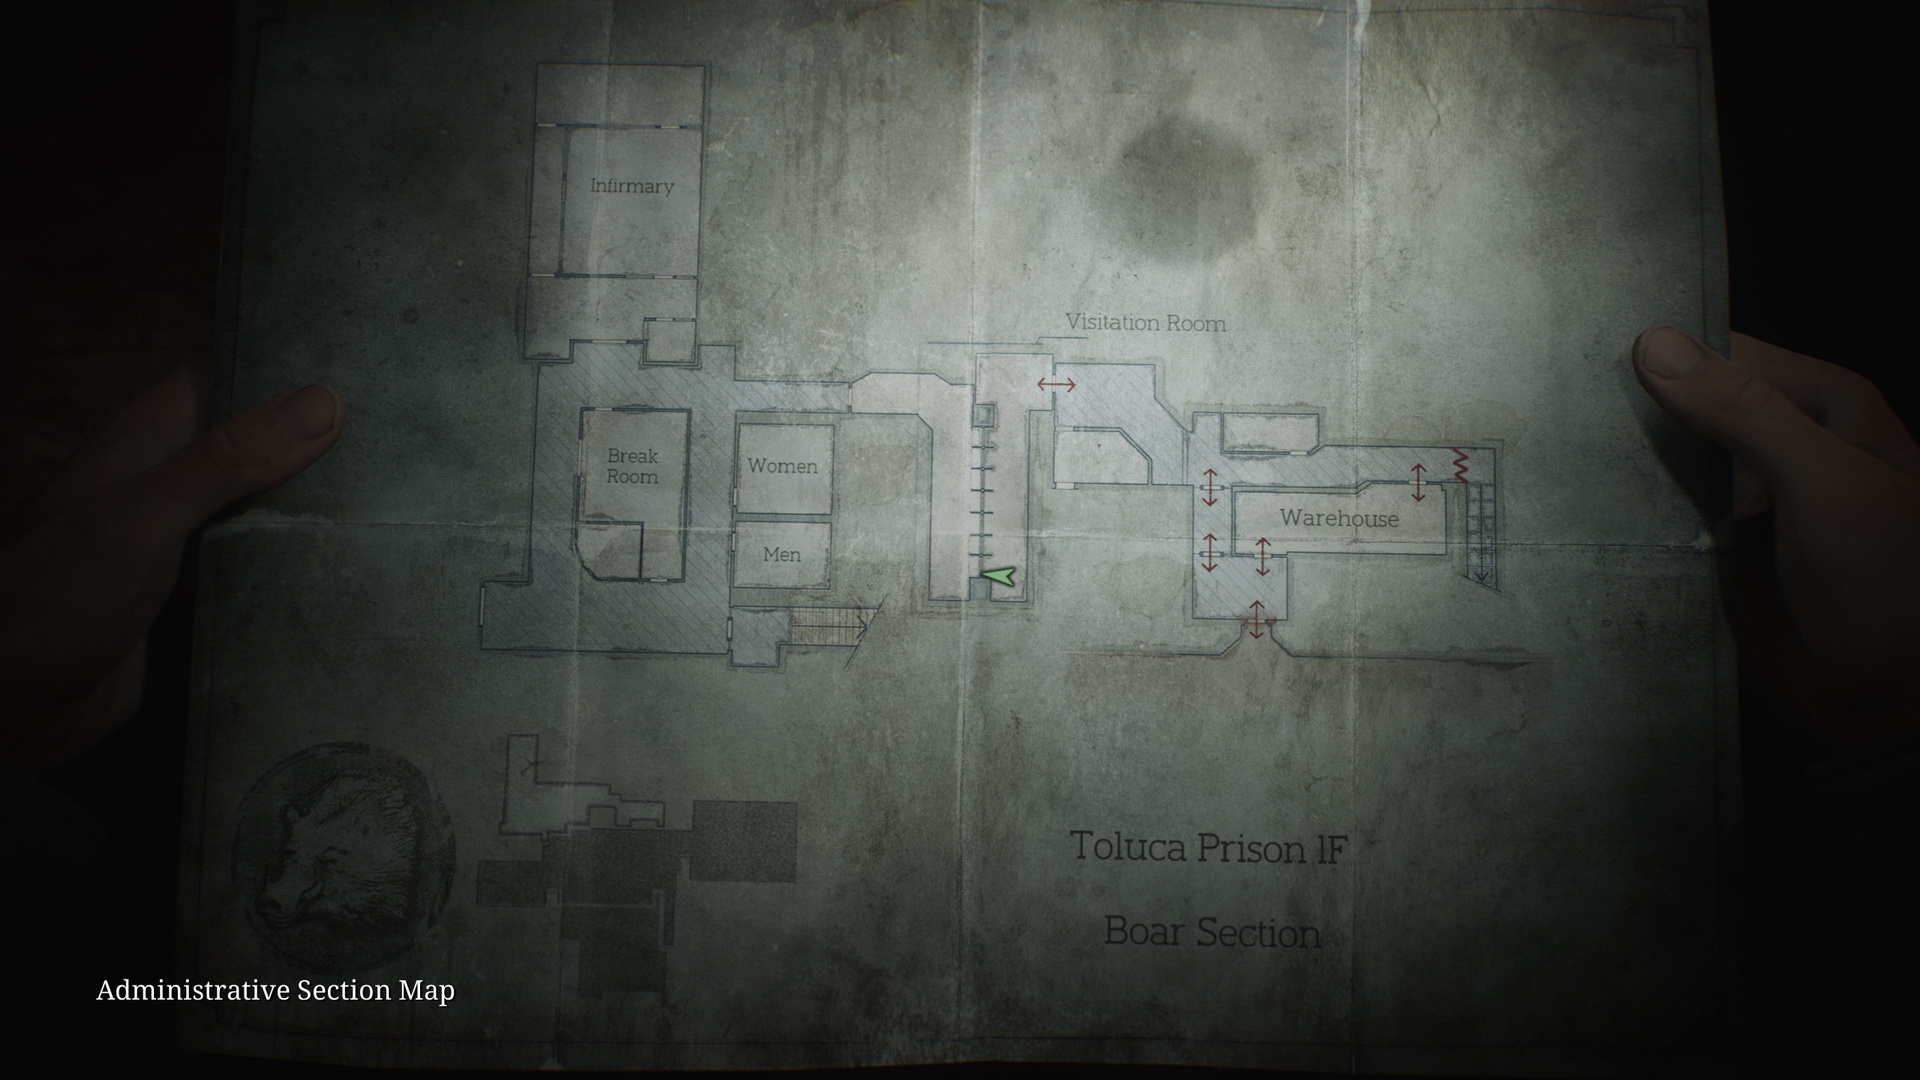 |
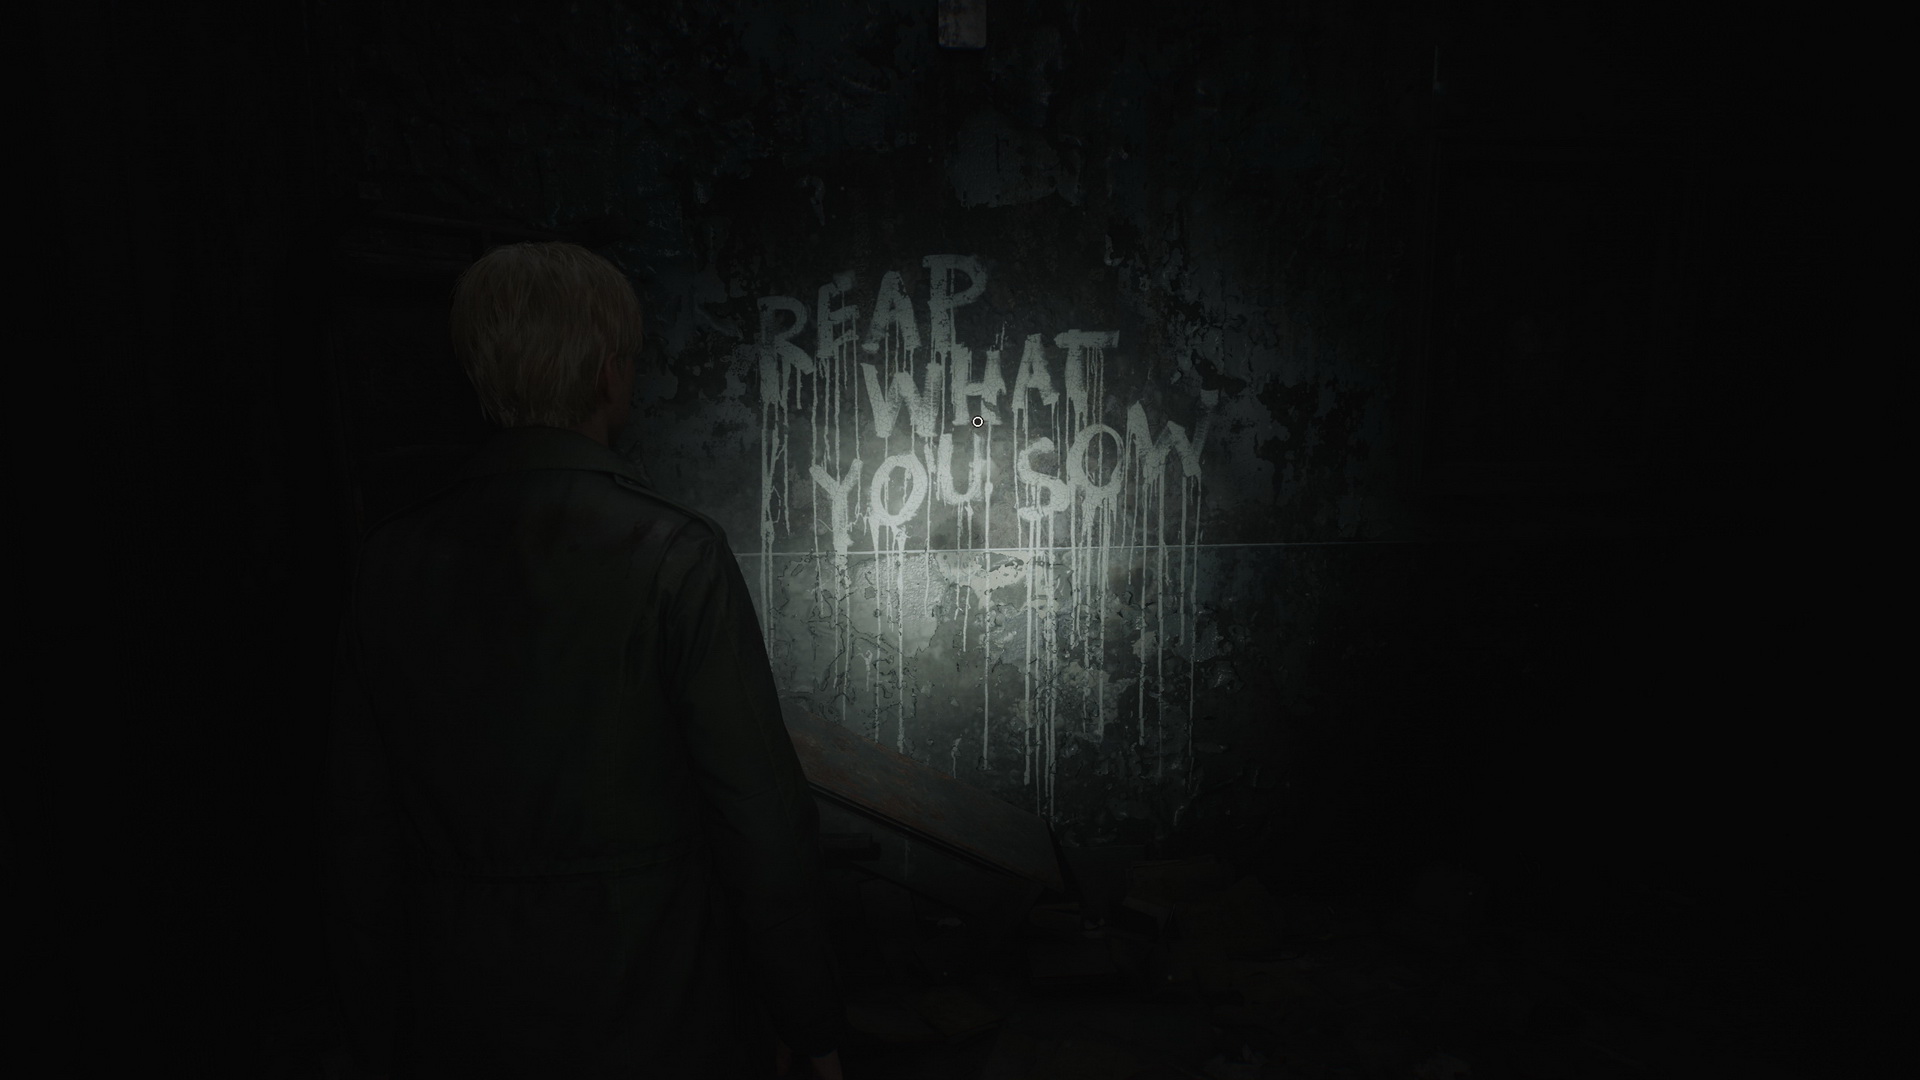
Hop through a broken window and grab Shotgun Shells from the last cubicle on the other side. Follow the corridor with a lone Creeper. You can find a Health Drink in an open toilet cubicle in the Women's restroom. In the Men's restroom, there's a Save Point. Check a writing on a wall in the corridor and a note posted next to it.
 |
 |
For Glimpse of the Past #21, inspect a hatch door in the floor in the southwest corner of the area.
 |
 |
In the Break Room and next to it there are two Nurses. Collect Handgun Ammo from the leftmost locker. You can find more Handgun Ammo and a note on a reception desk in a small room next to the Break Room.
 |
 |
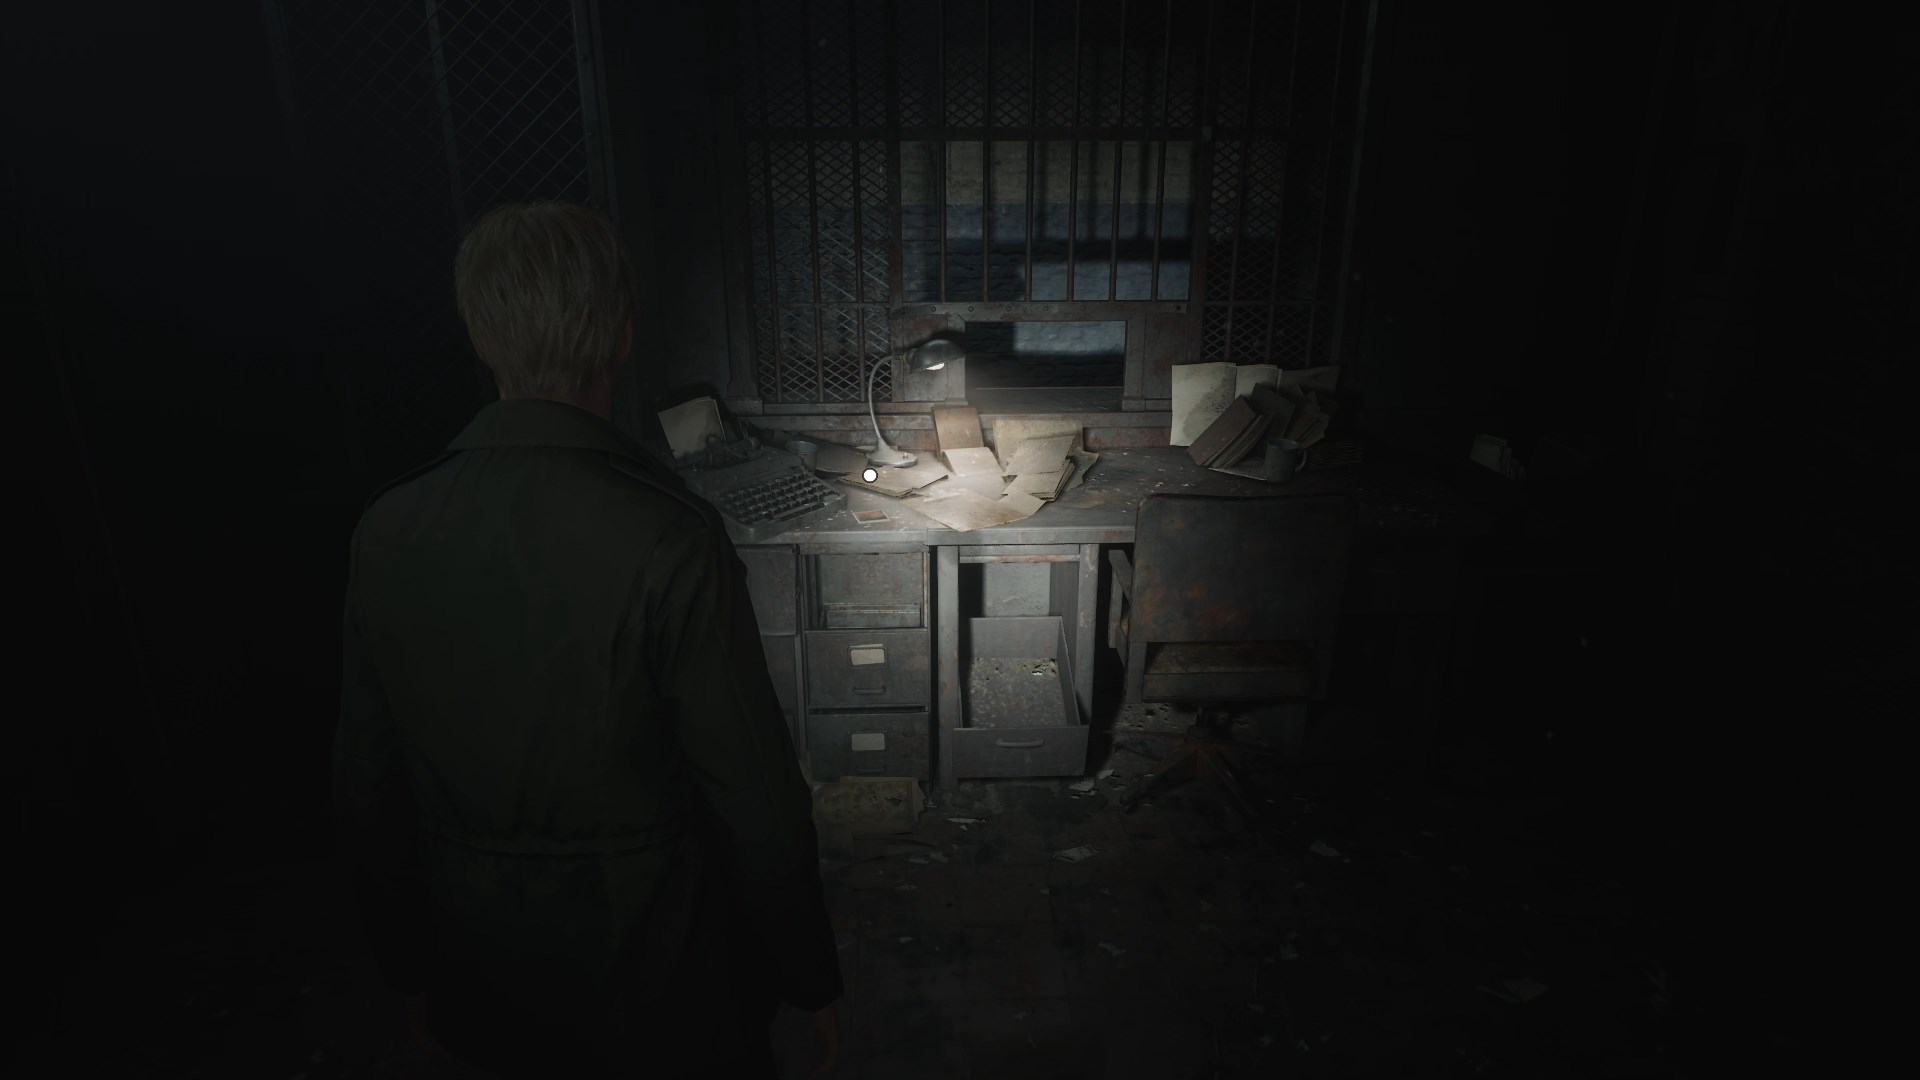
Proceed towards the Infirmary. You can find Handgun Ammo in a desk drawer in a small room to the right. Another Handgun Ammo is in a glass cabinet in front of the Infirmary. Go to the Infirmary and fight two Nurses. Another Nurse is in the back room. Explore the room to find Handgun Ammo in a glass cabinet, Shotgun Shells in a drawer and a Health Drink in another glass cabinet. In the same room is the 80 Upper Floor Key on a desk.

Memo #56: Unfinished Report is on the opposite desk in the same room.
 |
 |
Trace back and use the key to unlock the stairs in the southeastern corner. Then, go upstairs to the third floor.
Third Floor
|
|
Beware a Mannequin in front of the Warden's Office. To the left, you can find Handgun Ammo on a chair. Enter the office. In the storage room, you can find a Save Point as well as Handgun Ammo and Shotgun Shells on the shelves. Approach a typewriter in the office and press the Tab button four times to collect the 81 Light Weight.
Return to the Main Section. You can use the doors on the second floor and pass through Cell Block C using the northeastern stairs.
Main Section
Return to the Yard and proceed with the scales puzzle.
Scales Puzzle: Unlocking the Wingless Dove door
Put the Medium Weight (4) on the right scale and the rest of the weights (1-3-5-6) on the left one to unlock the Wingless Dove door (Basement).
Find the now unlocked Wingless Dove door at the bottom of the stairs in the Main Section.
Dove Section (Basement)
|
|
Squeeze through the opening to find yourself cut off. Cell F2 has a Health Drink on a sink. You will encounter a Mannequin hiding in the last cell in this corridor. Go around the block. Shotgun Shells are in Cell F12 and a Health Drink is on a bed in Cell F14. Mannequins are hiding in Cells F11, F13, a cell across Cell F16 as well as one more in the corridor. In the last cell, you can observe some occult symbols on the walls and heaps of books. Crawl into the big room in the east section. Grab Shotgun Shells from an open locker and check a note on a bulletin board.
 |
 |
Approach a panel with the red glowing buttons and use the button to unlock the Cell F6. Unlock the door and proceed to the Cell F6. Find Memo #57: Confession on the wall of the cell.
 |
 |
Collect 82 The Lightest Weight on the floor in the same cell.
You will seem to be trapped inside, but be not afraid. After some time, the door will unlock. Leave the cell, break the wall in Cell F9 and climb upstairs via the ladder in Cell F10. You will be back in the Main Section.
Escaping Prison
Main Section
Return to the Yard and proceed with the scales puzzle.
Scales Puzzle: Final Solution
Distribute the weights evenly – see the image:
- The Lightest (2), Light (3), Heavy (5) on the left scale;
- Starter (1), Medium (4) , The Heaviest (6) on the right one.
Placing all weights correctly grants you the 83 Execution Lever.
Go to the gallows in the same yard and insert the lever into the podium to unlock the next puzzle.
Gallows Puzzle
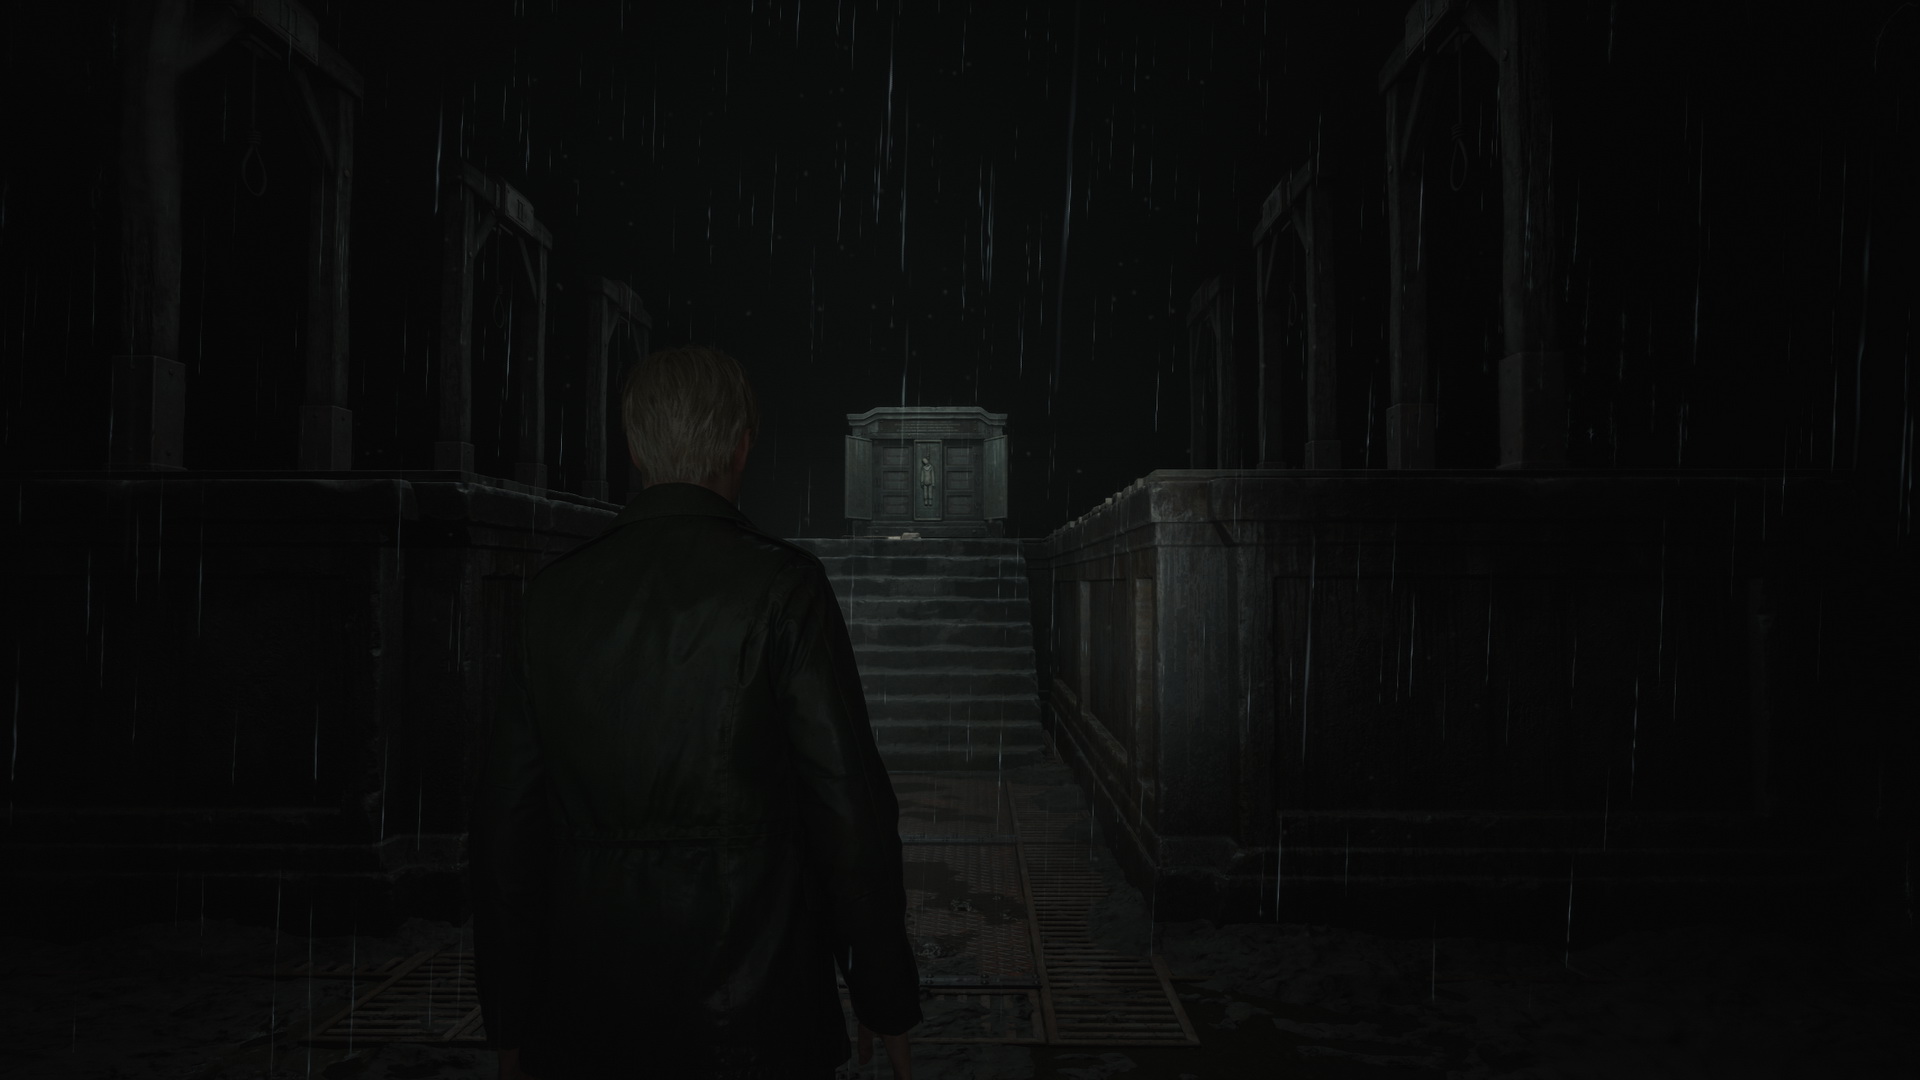
The gallows are located in a U-shape, with three on the left and three on the right – each labeled with a Roman numeral at the top.
| Poems | ||
| I | IV | |
| II | V | |
| III | VI |
In the center, you have a stone monument with the beginning of six poems on metal plates labeled with the same Roman numerals. These are the six committed persons, and the poems are written from their perspectives:
| I Arsonist | IV Burglar | |
| II Thief | V Mother's Killer | |
| III Kidnapper | VI Murderer |
At the bottom are the second halves of the poem plates that you need to match with the initial stanzas. The beginnings of the poems will be the same for each difficulty level, yet the second half will be random for each person with either guilty or innocent variant. Pair the endings with the beginning by placing the plate halves on the monument. Once you match all poems correctly, you won't be able to interact with them and can proceed to the gallows.
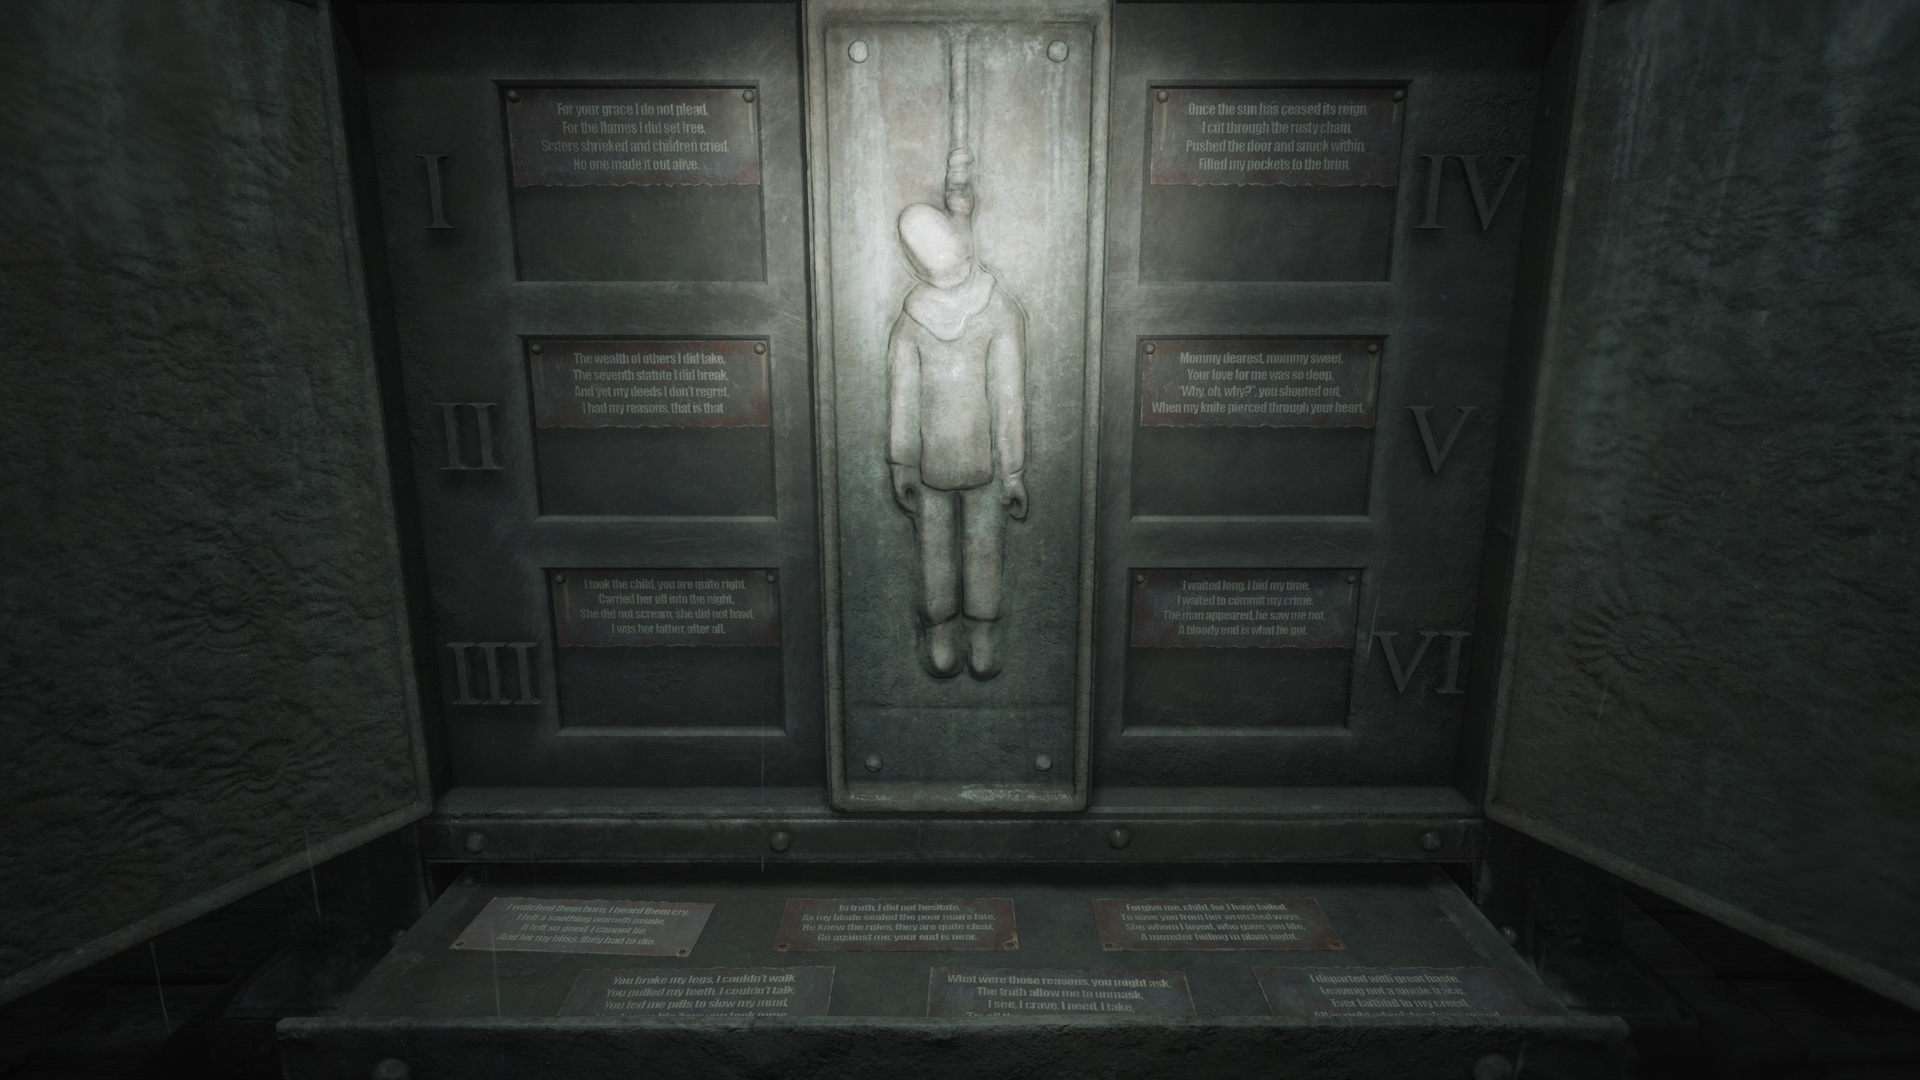
Finally, at the top of the monument, there's a statement:
Pull ye but once on a rope's frayed end.
Choose the one justified from among the damned.
Seek out their tales, think upon each sin,
Or let blind fate choose. Let the judgement begin.
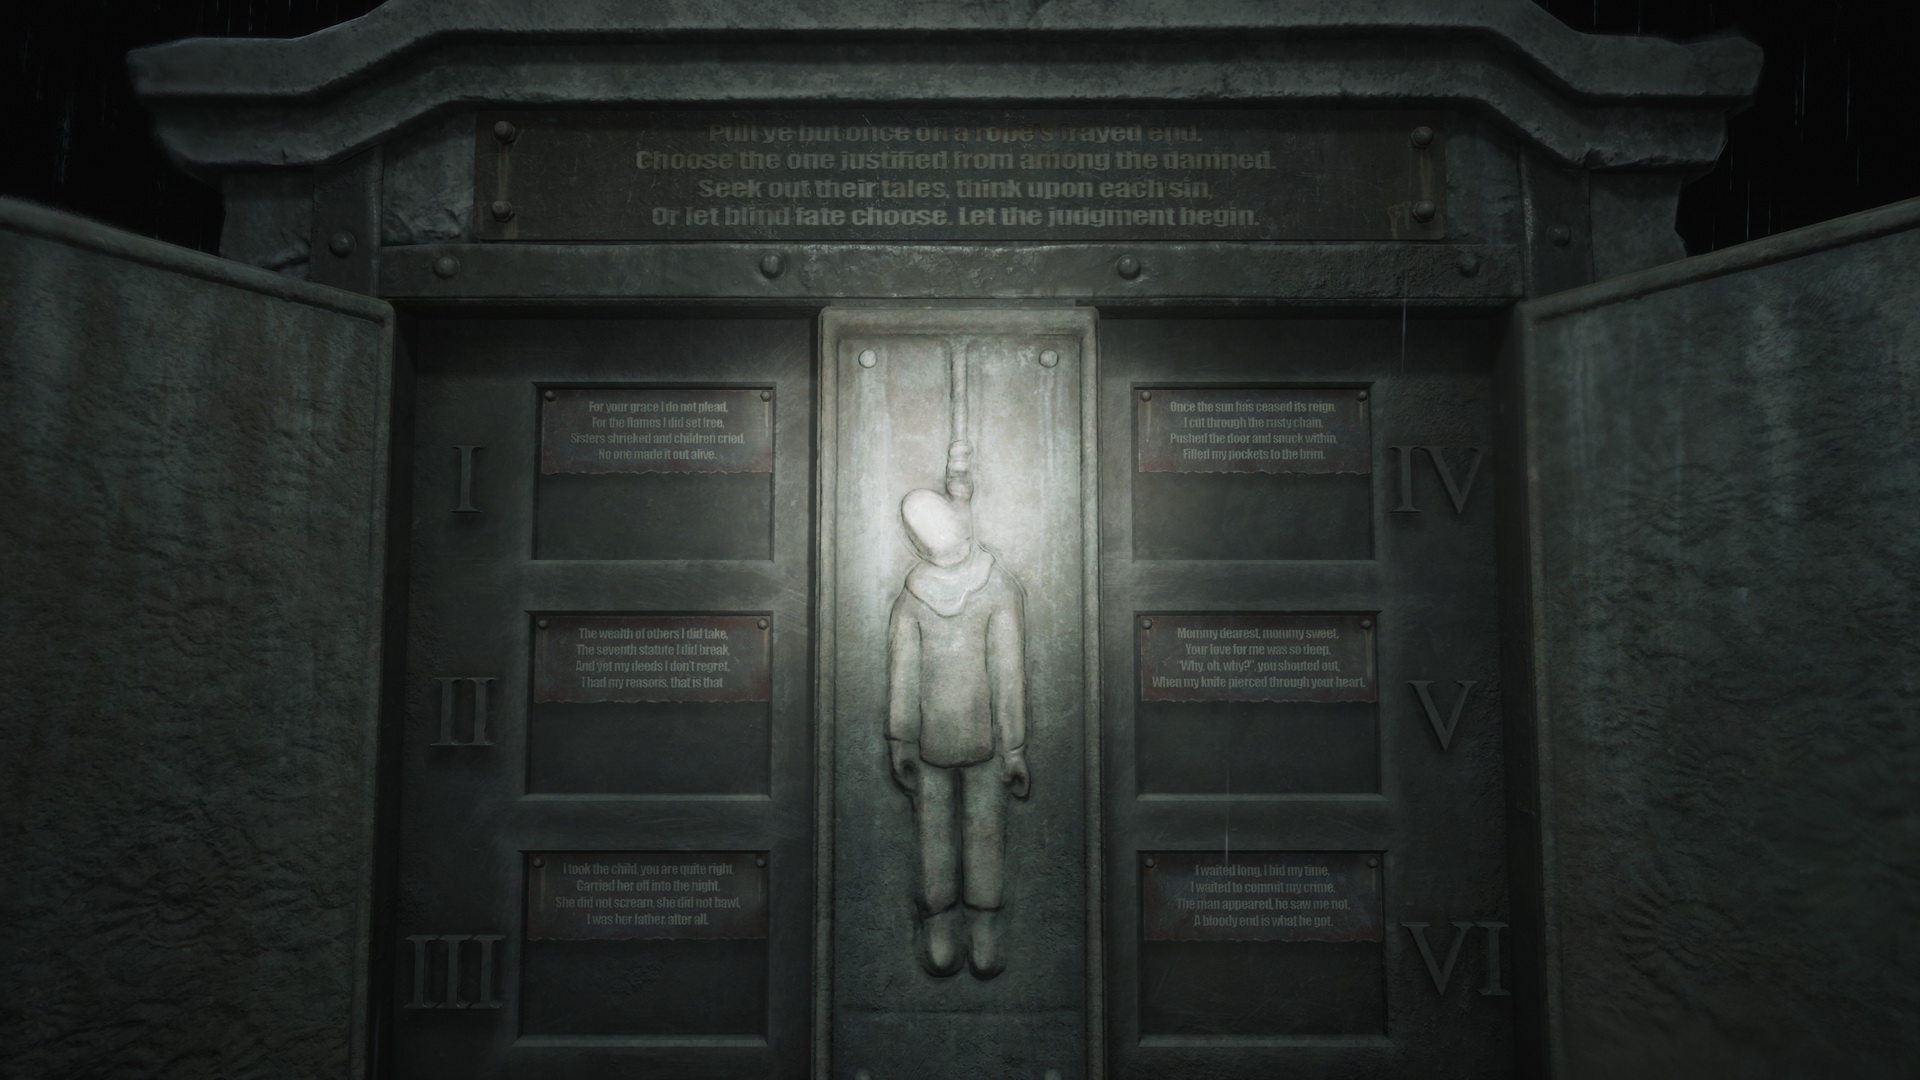
This says it all. You must find the person who committed the crime, but their cause was justified and forced. Note that in all difficulties, two suitable persons can be deemed "innocent." The choice will also affect the ending – read more about it in the Endings section. Once you determine the innocent persons, go to the gallow with the corresponding number and pull the noose to proceed with the game and escape the prison.
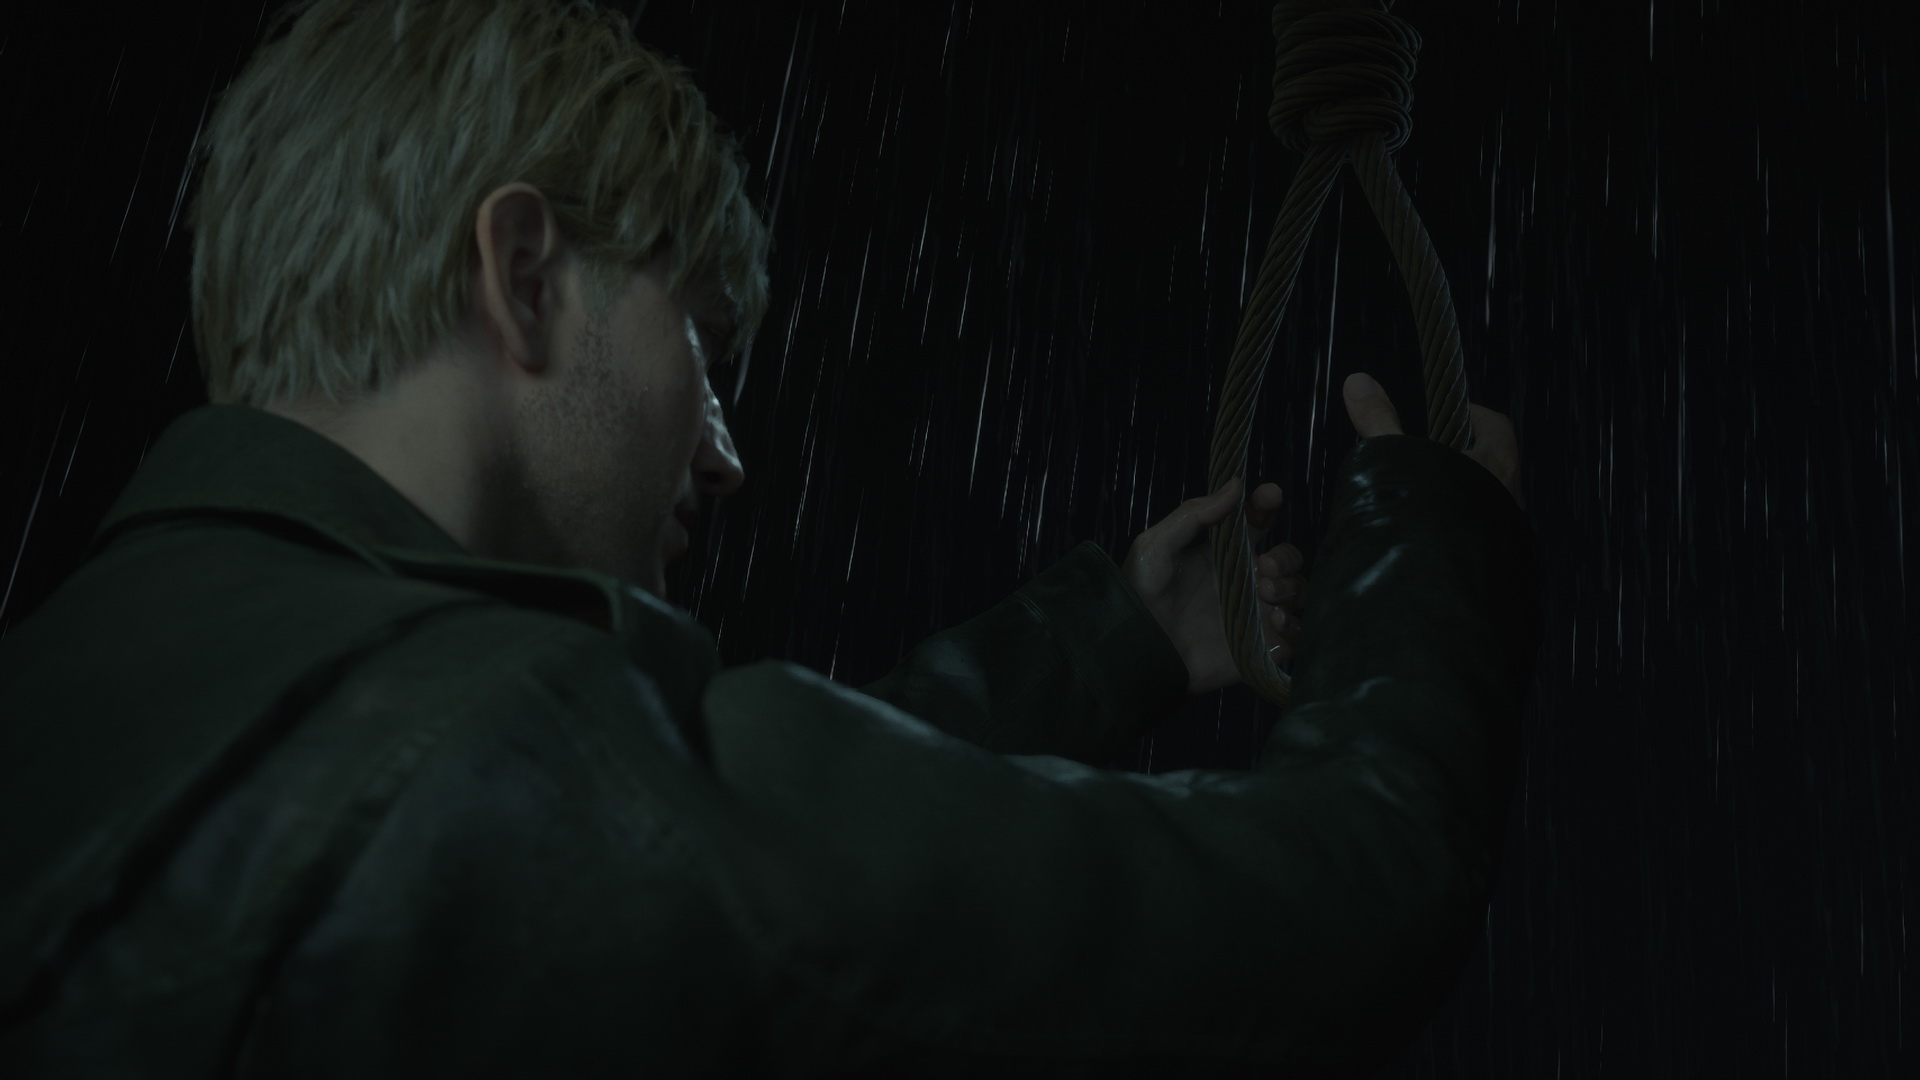
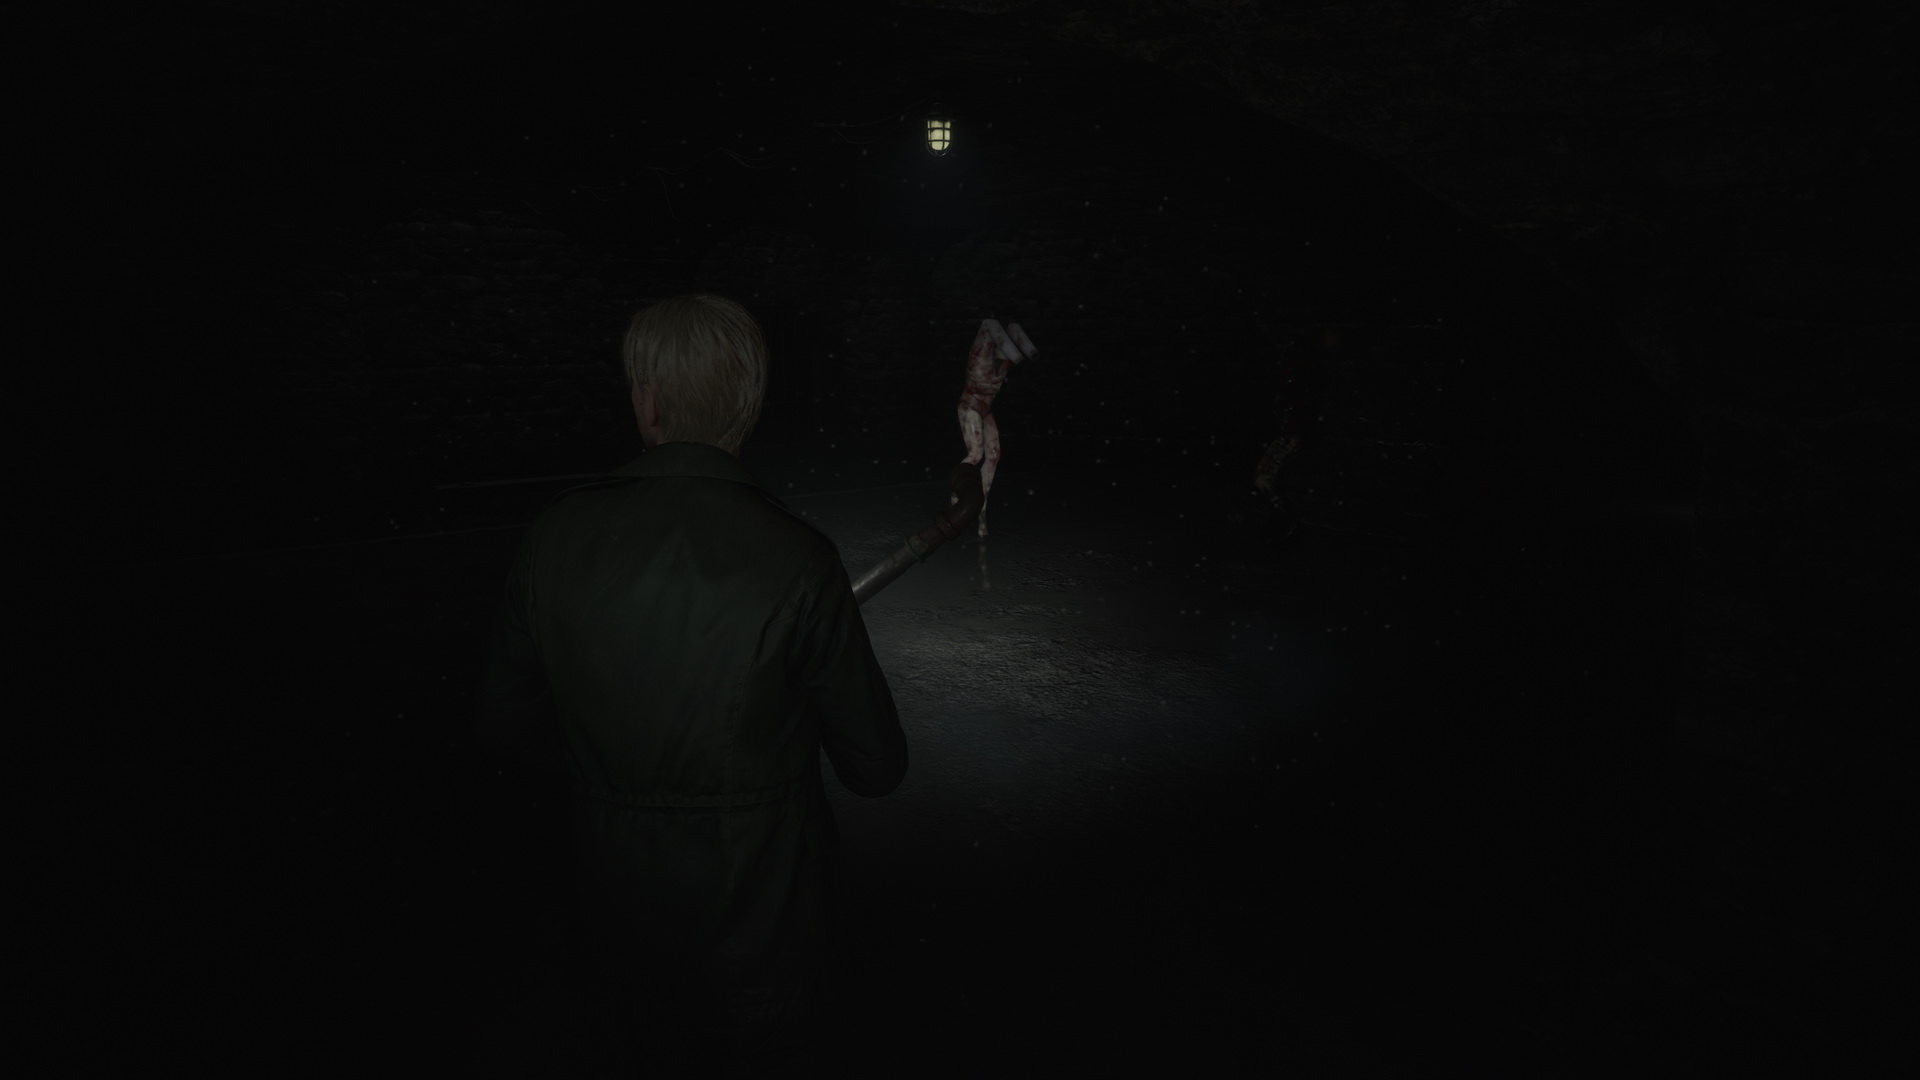
If you pull the wrong noose, James is dropped into a monster-filled underground chamber beneath the yard. You will have to escape the room, return to the yard via a ladder on the other end, and have another try with the gallows. Note that there are also some supplies in the same chamber.
Note: You don't have to match and place every poem on the monument. Once you find the second half that matches the innocent variant, you can proceed and pull the corresponding noose and continue with the game.
Light
The poems are short and straightforward on light riddle difficulty. Every poem has two possible random ending variants: innocent and guilty. There will always be two innocent persons, so you must choose one of them to proceed.
| I | Arsonist |
Hallowed was the place, |
|
Innocent |
T'was the home of evil, |
Guilty |
Stood and watched the fire, |
| II | Thief |
This one took from others, |
|
Innocent |
Stealing to survive, |
Guilty |
Stealing not to eat, |
| III | Kidnapper |
This one, he did kidnap, |
|
Innocent |
Did it just to save her, |
Guilty |
In a fit of anger, |
| IV | Burglar |
This one broke the lock, |
|
Innocent |
And steal he did a remedy, |
Guilty |
One more place to plunder, |
| V | Mother's Killer |
This one dared, |
|
Innocent |
A monster's life, |
Guilty |
Did it just for pleasure, |
| VI | Murderer |
This one clenched his fist, |
|
Innocent |
Turned against his bully, |
Guilty |
Preying on one's weakness, |
Here's an example of the right solution for the light riddle difficulty:
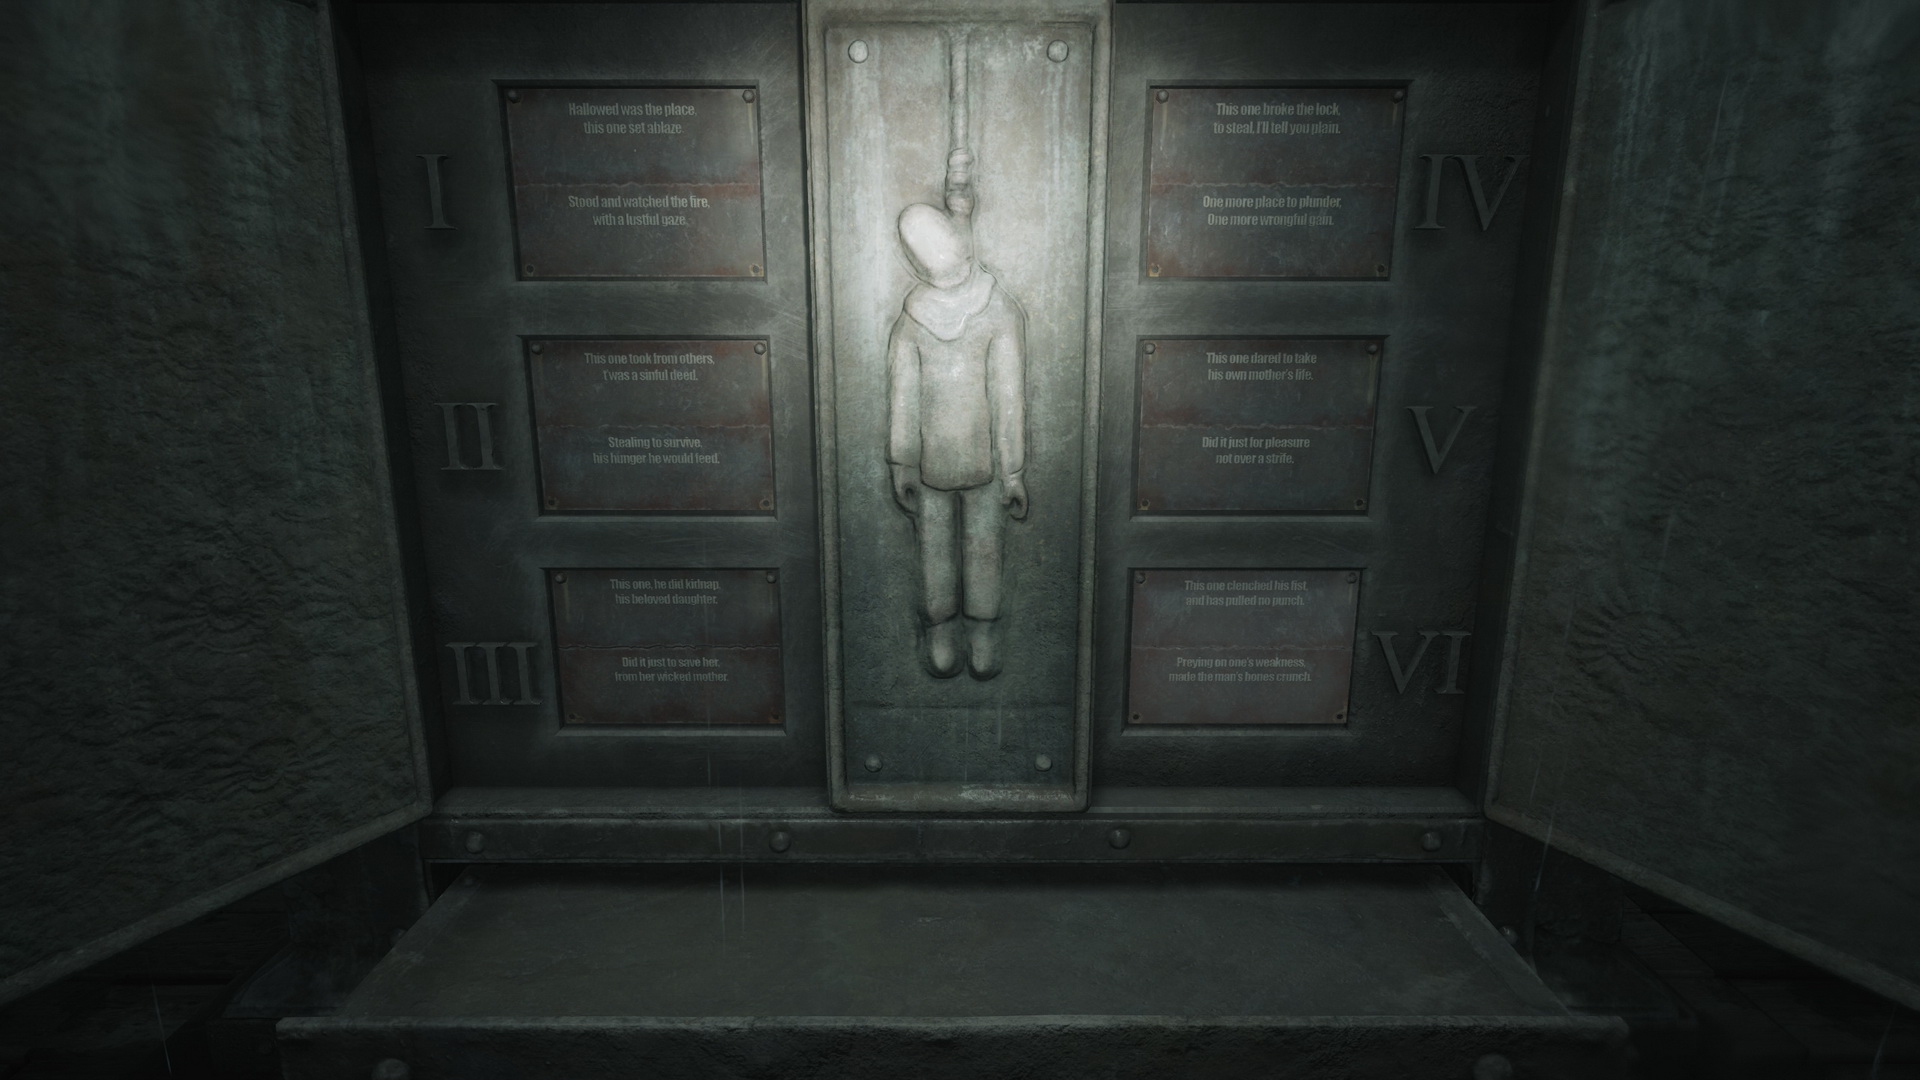
As you can see, the two innocent variants here are II Thief (Stealing to survive...) and III Kidnapper (Did it just to save her...). You can pick either the second or the third noose to proceed in this case.
Standard
On standard riddle difficulty, the poems are longer and more challenging to interpret. Every poem has two possible random ending variants: innocent and guilty. There will always be two innocent persons, so you must choose one of them to proceed.
| I | Arsonist |
For your grace I do not plead, |
|
Innocent |
Though the young ones deaths I mourn, |
Guilty |
I watched them burn,
I heard them cry, |
| II | Thief |
The wealth of others I did take, |
|
Innocent |
The reason is, I have to say, |
Guilty |
What were those reasons you might ask, |
| III | Kidnapper |
I took the child, you are quite right, |
|
Innocent |
Forgive me, child, for I have failed, |
Guilty |
My only daughter, joy of days, |
| IV | Burglar |
Once the sun has ceased its reign, |
|
Innocent |
So my guilt is plain to see, |
Guilty |
I departed with great haste, |
| V | Mother's Killer |
Mommy dearest, Mommy sweet, |
|
Innocent |
You broke my legs, I couldn't walk, |
Guilty |
You were, oh, so kind to me, |
| VI | Murderer |
I waited long, I bid my time, |
|
Innocent |
In truth, he was less man than beast, |
Guilty |
In truth, I did not hesitate, |
Here's an example of the right solution for the standard riddle difficulty:
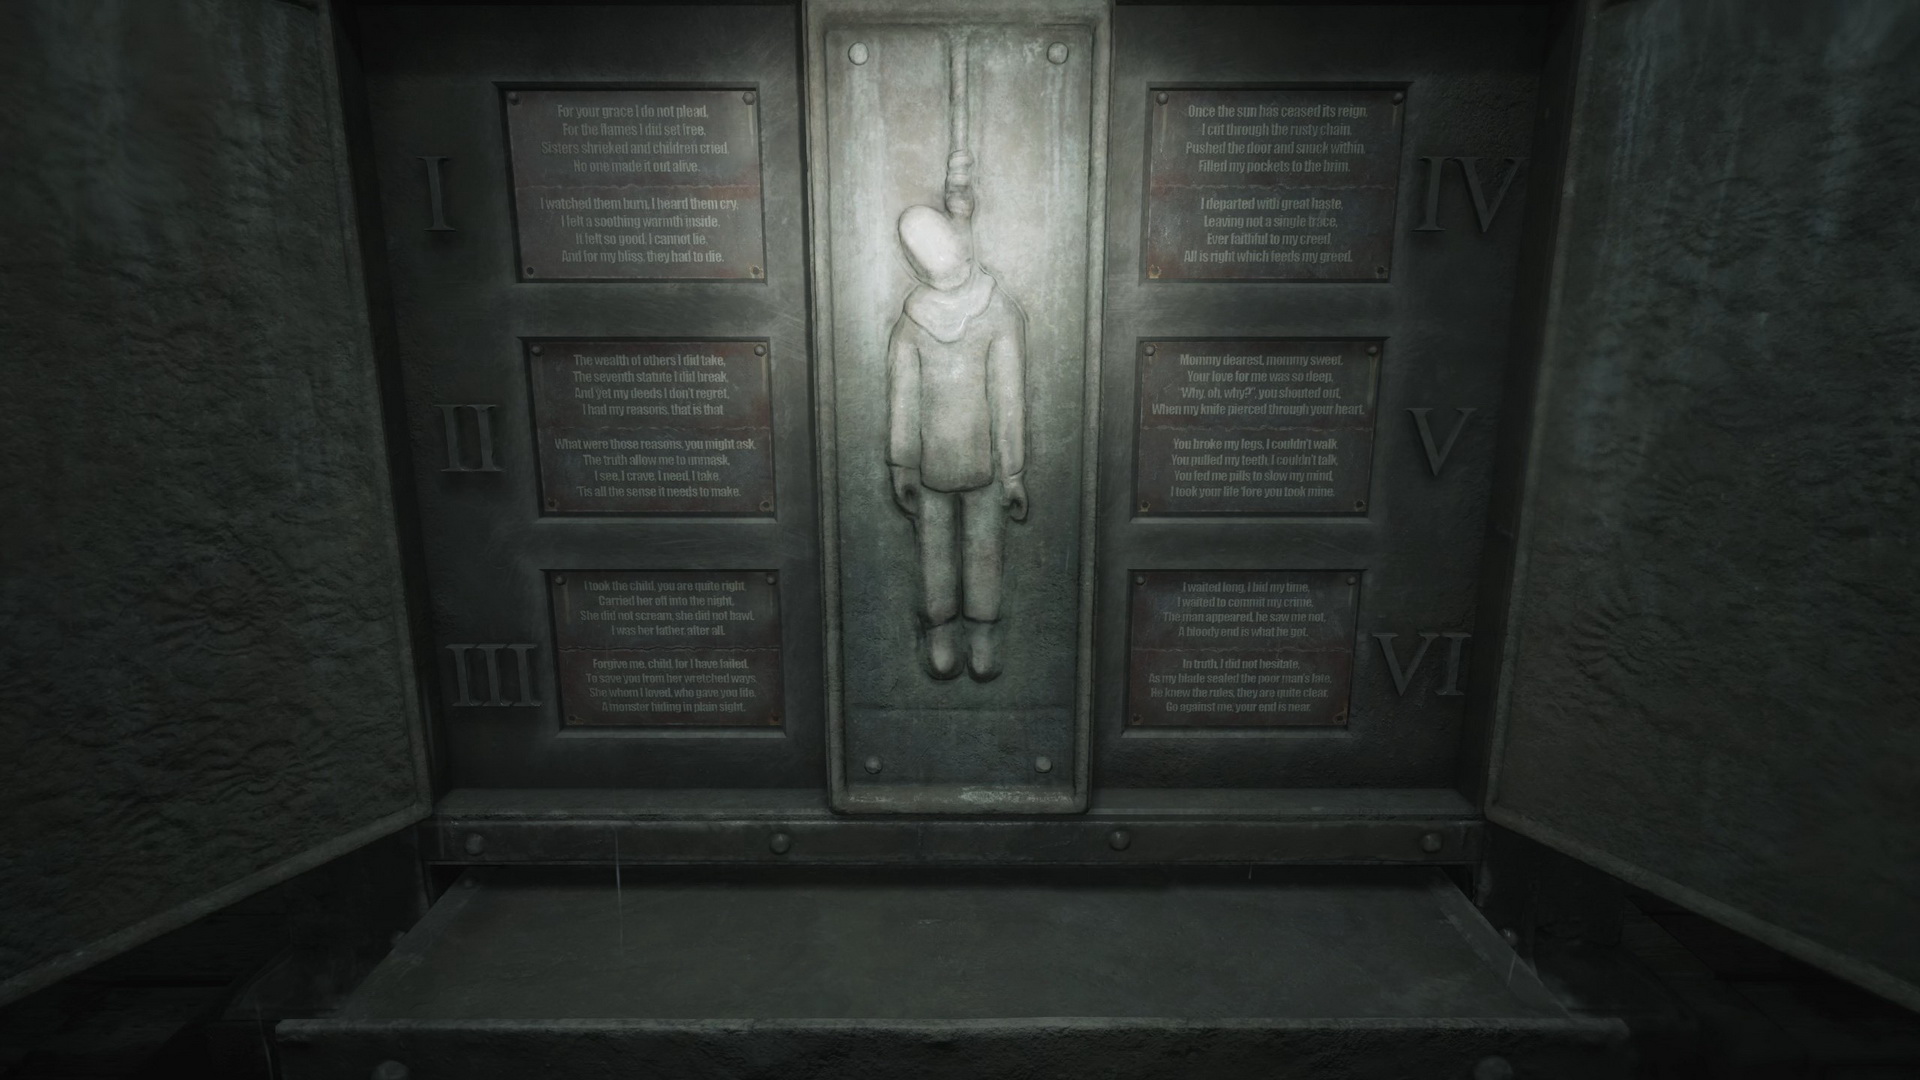
As you can see, the two innocent variants here are III Kidnapper (Forgive me, child, for I have failed...) and V Mother's Killer (You broke my legs, I couldn't walk...). You can pick either the third or the fifth noose to proceed in this case.
Hard
On hard riddle difficulty, the poems are the most complicated and metaphorical. Every poem again has two possible random ending variants — one innocent and one guilty. There will always be two innocent persons, so you must choose one of them to proceed.
| I | Arsonist |
Under veil of nightfall, in the ink of dusk, |
|
Innocent |
Death of the blameless, a damnable sin, |
Guilty |
A contorted chill dances on his spine, |
| II | Thief |
In twilight's grasp, a thief emerges sly, |
|
Innocent |
With hands atremble, he seizes what he must, |
Guilty |
His avarice driving every cunning theft, |
| III | Kidnapper |
In shroud of twilight, a tale doth unfold, |
|
Innocent |
A cruel twist of fate, an outcome unsought, |
Guilty |
A tragic fruition, a mother's despair, |
| IV | Burglar |
In clandestine steps, darkness as his guide, |
|
Innocent |
Amidst the moon's glow, a desperate truth, |
Guilty |
Beneath moonlit guise, a villain's design, |
| V | Mother's Killer |
With her senses failing, she looks, mouth agape, |
|
Innocent |
'Twas a twisted fate that forced the man's hand, |
Guilty |
As the spark of life from her eyes did flee, |
| VI | Murderer |
In shadows cast, the hunter lies in wait, |
|
Innocent |
Desperation's grip suffocates the air, |
Guilty |
The victim's eyes wide with terror and fright, |
Here's an example of the right solution for the hard riddle difficulty:
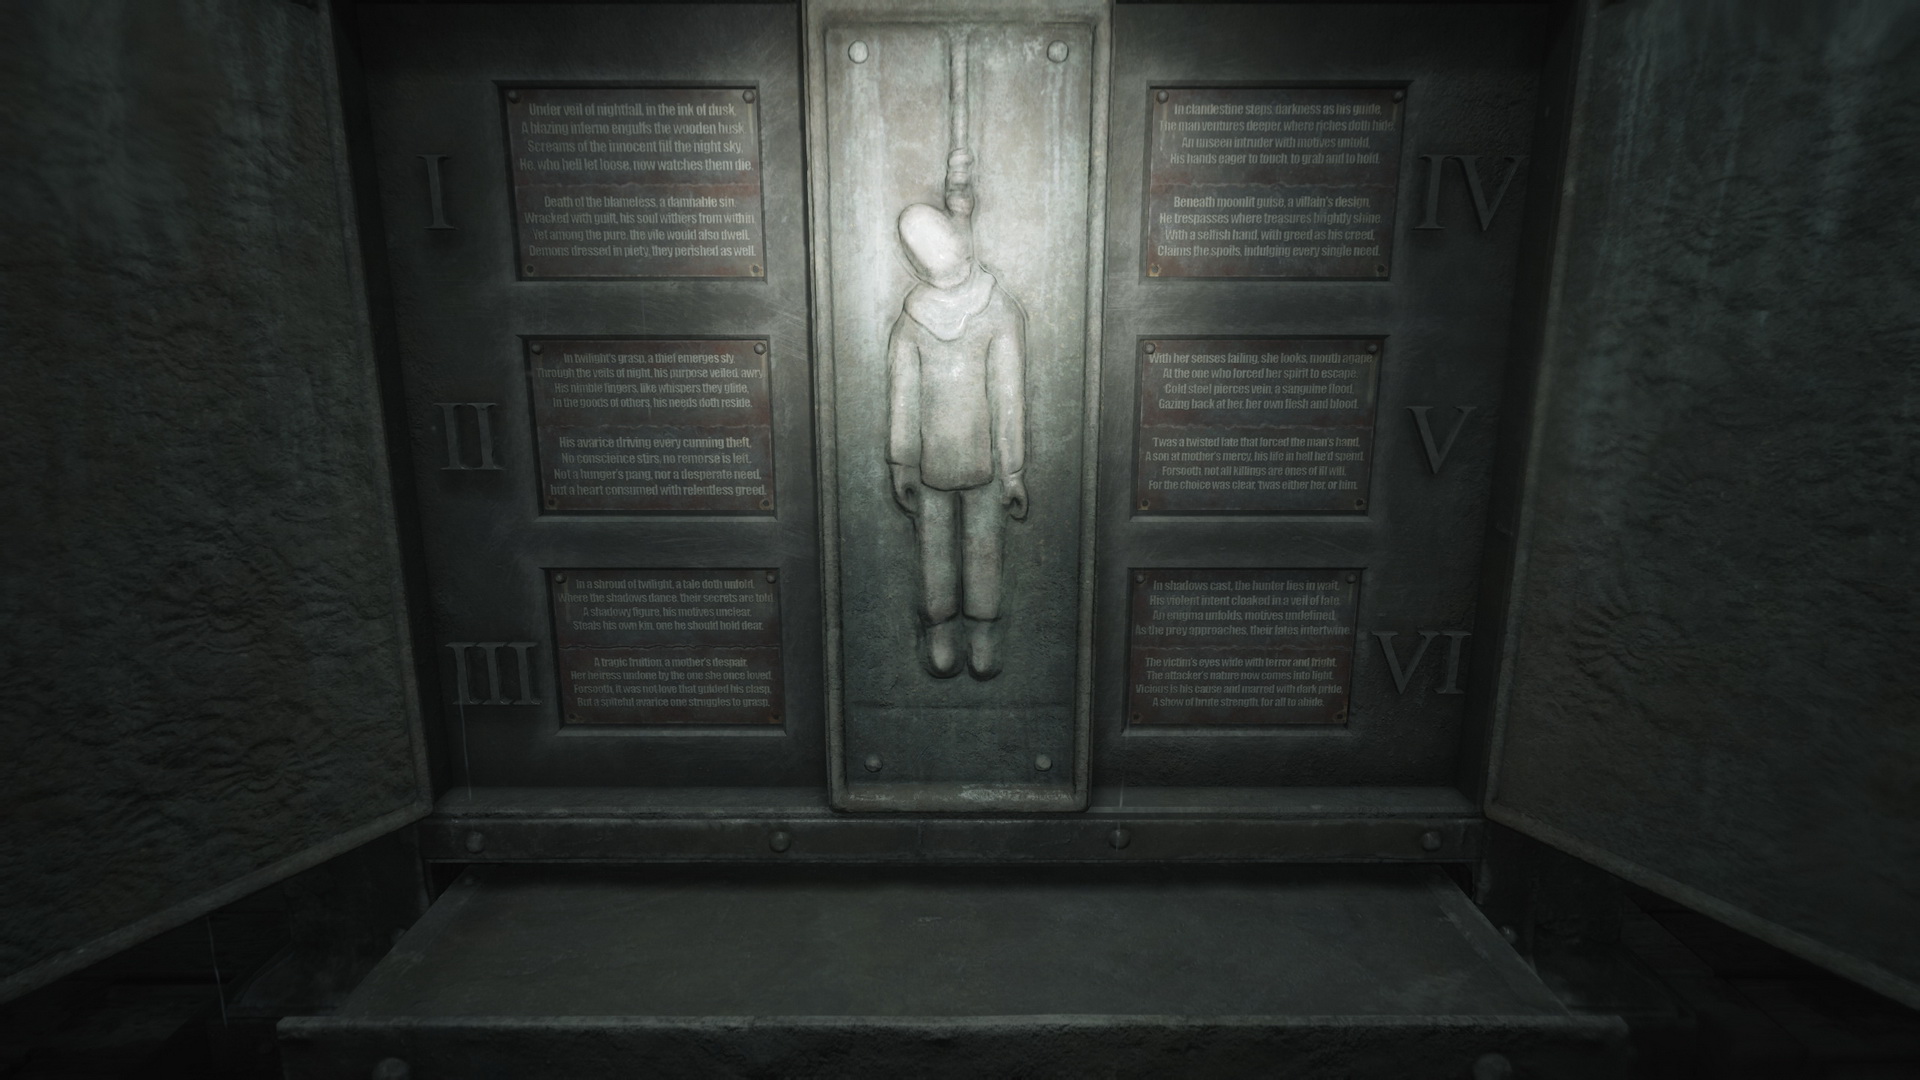
As you can see, the two innocent variants here are I Arsonist (Death of the blameless, a damnable sin...) and V Mother's Killer ('Twas a twisted fate that forced the man's hand...). You can pick either the first or the fifth noose to proceed in this case.
Jump through a square hole, then through another one and use the elevator to descend into the abyss. Grab Handgun Ammo inside the elevator.
| 08. Western South Vale Revisited | 10. Labyrinth |