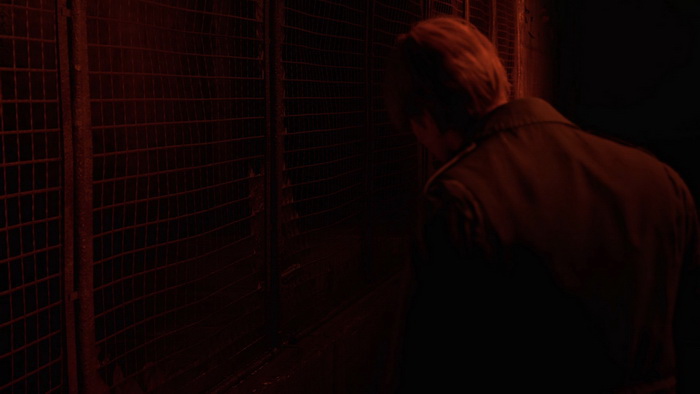
Otherworld Hospital
Welcome to the sixth chapter of the complete walkthrough guide for Silent Hill 2 Remake (2024) covering Otherworld Brookhaven Hospital. Use the key summary below for short, spoiler-free directions and the complete walkthrough section for in-depth guidelines with extra explanations. This walkthrough also includes complete maps with all items and monsters marked for easy reference.
For the original Silent Hill 2 walkthrough please go to this page.
Legend
1 Auto Parts key – key items
2 Radio – equipment
Health Drink – supplies
Map of Silent Hill – maps
Save Point – save points
Flower Shop Message – collectibles: memos, strange photos and glimpses of the past
NG+ – New Game+ items, memos and actions
Contents
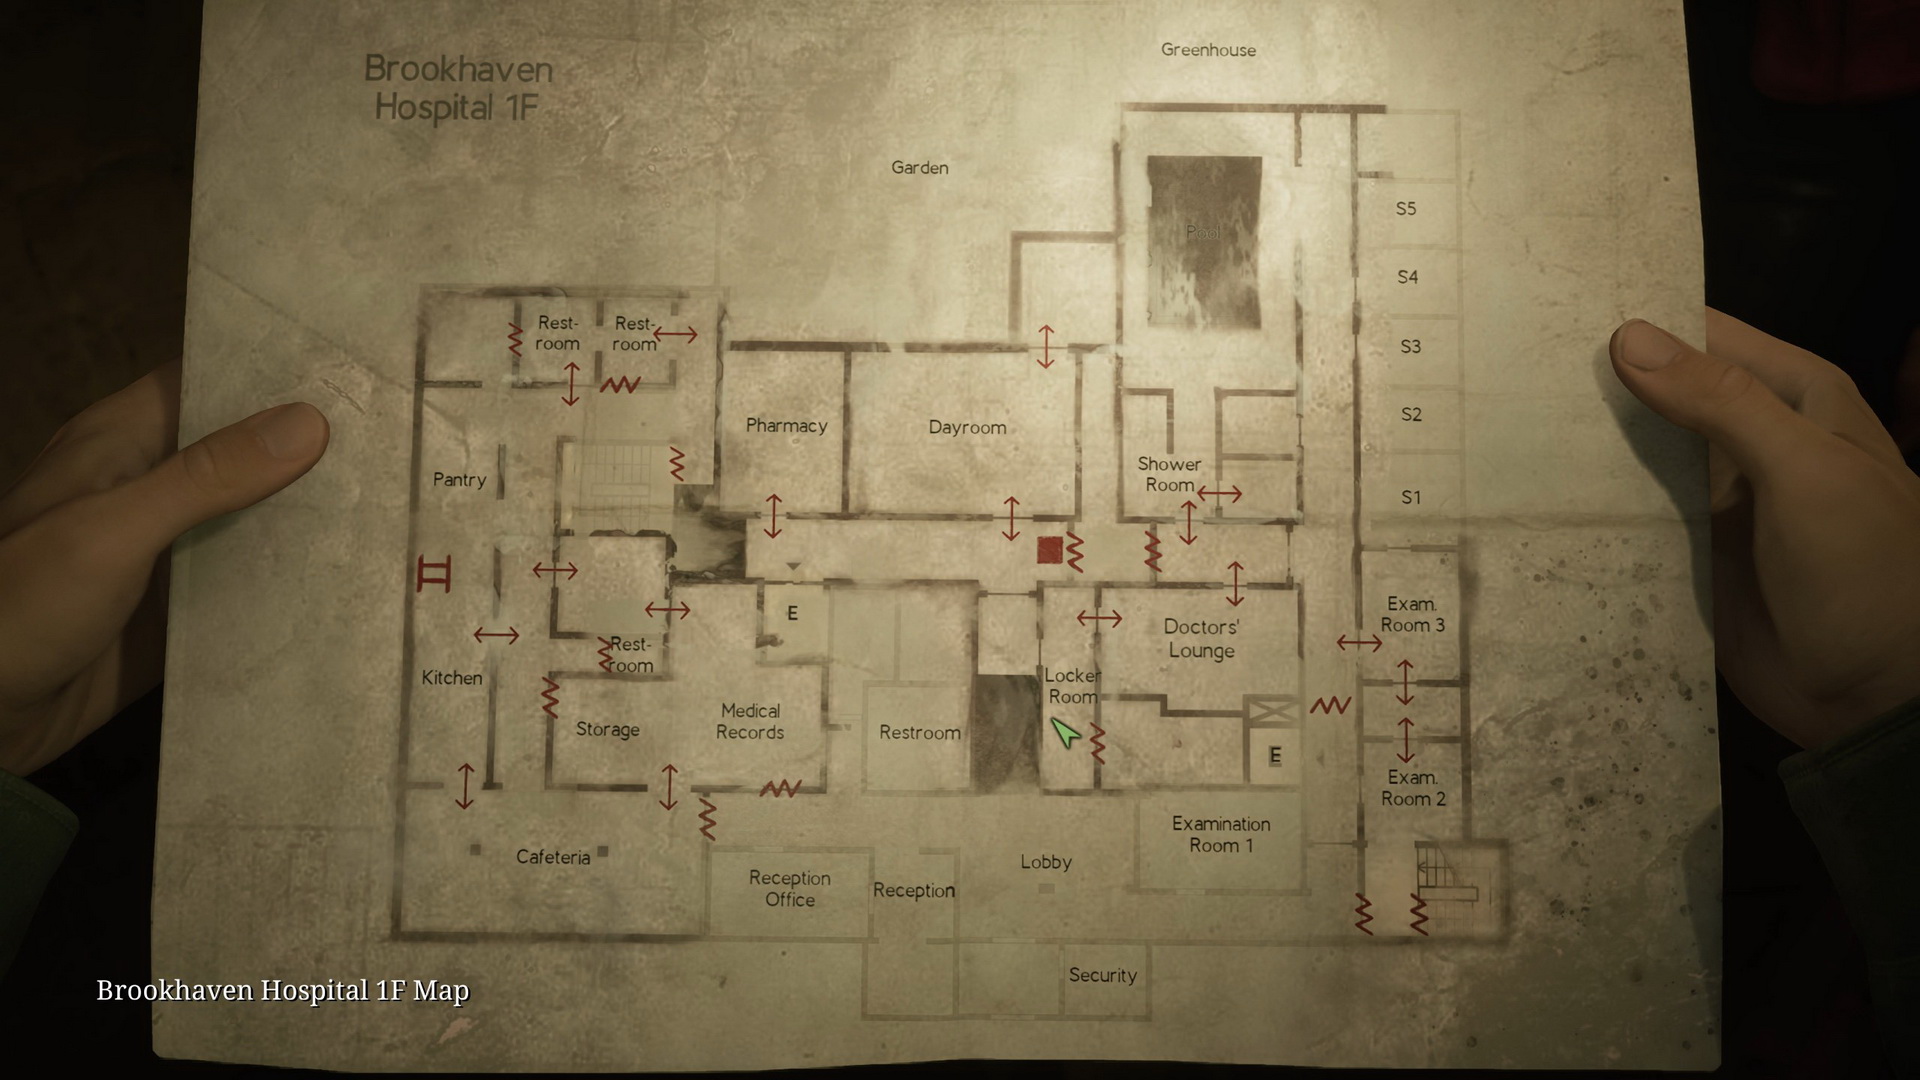
Complete Maps |
|
Collectibles count:
- 9 memos
- 2 strange photos
- 1 glimpse of the past
Key Summary
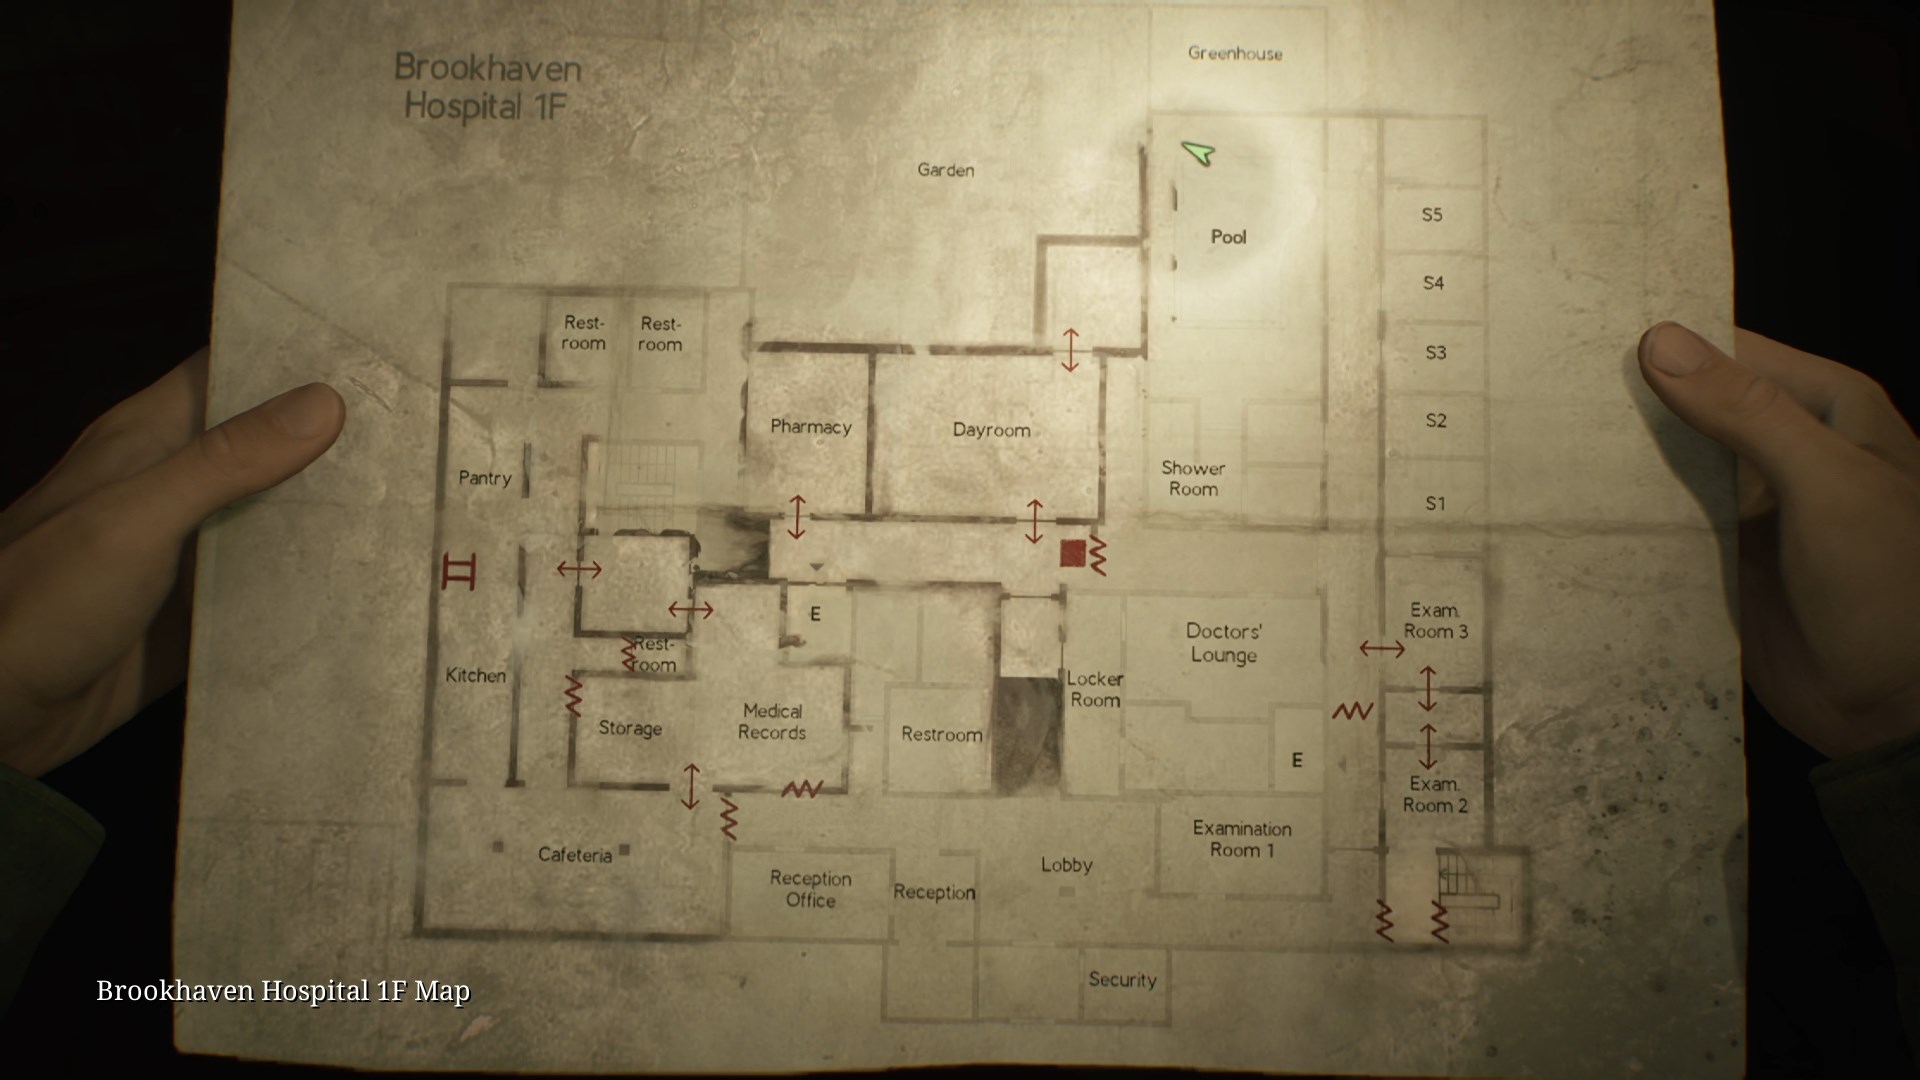
First Floor
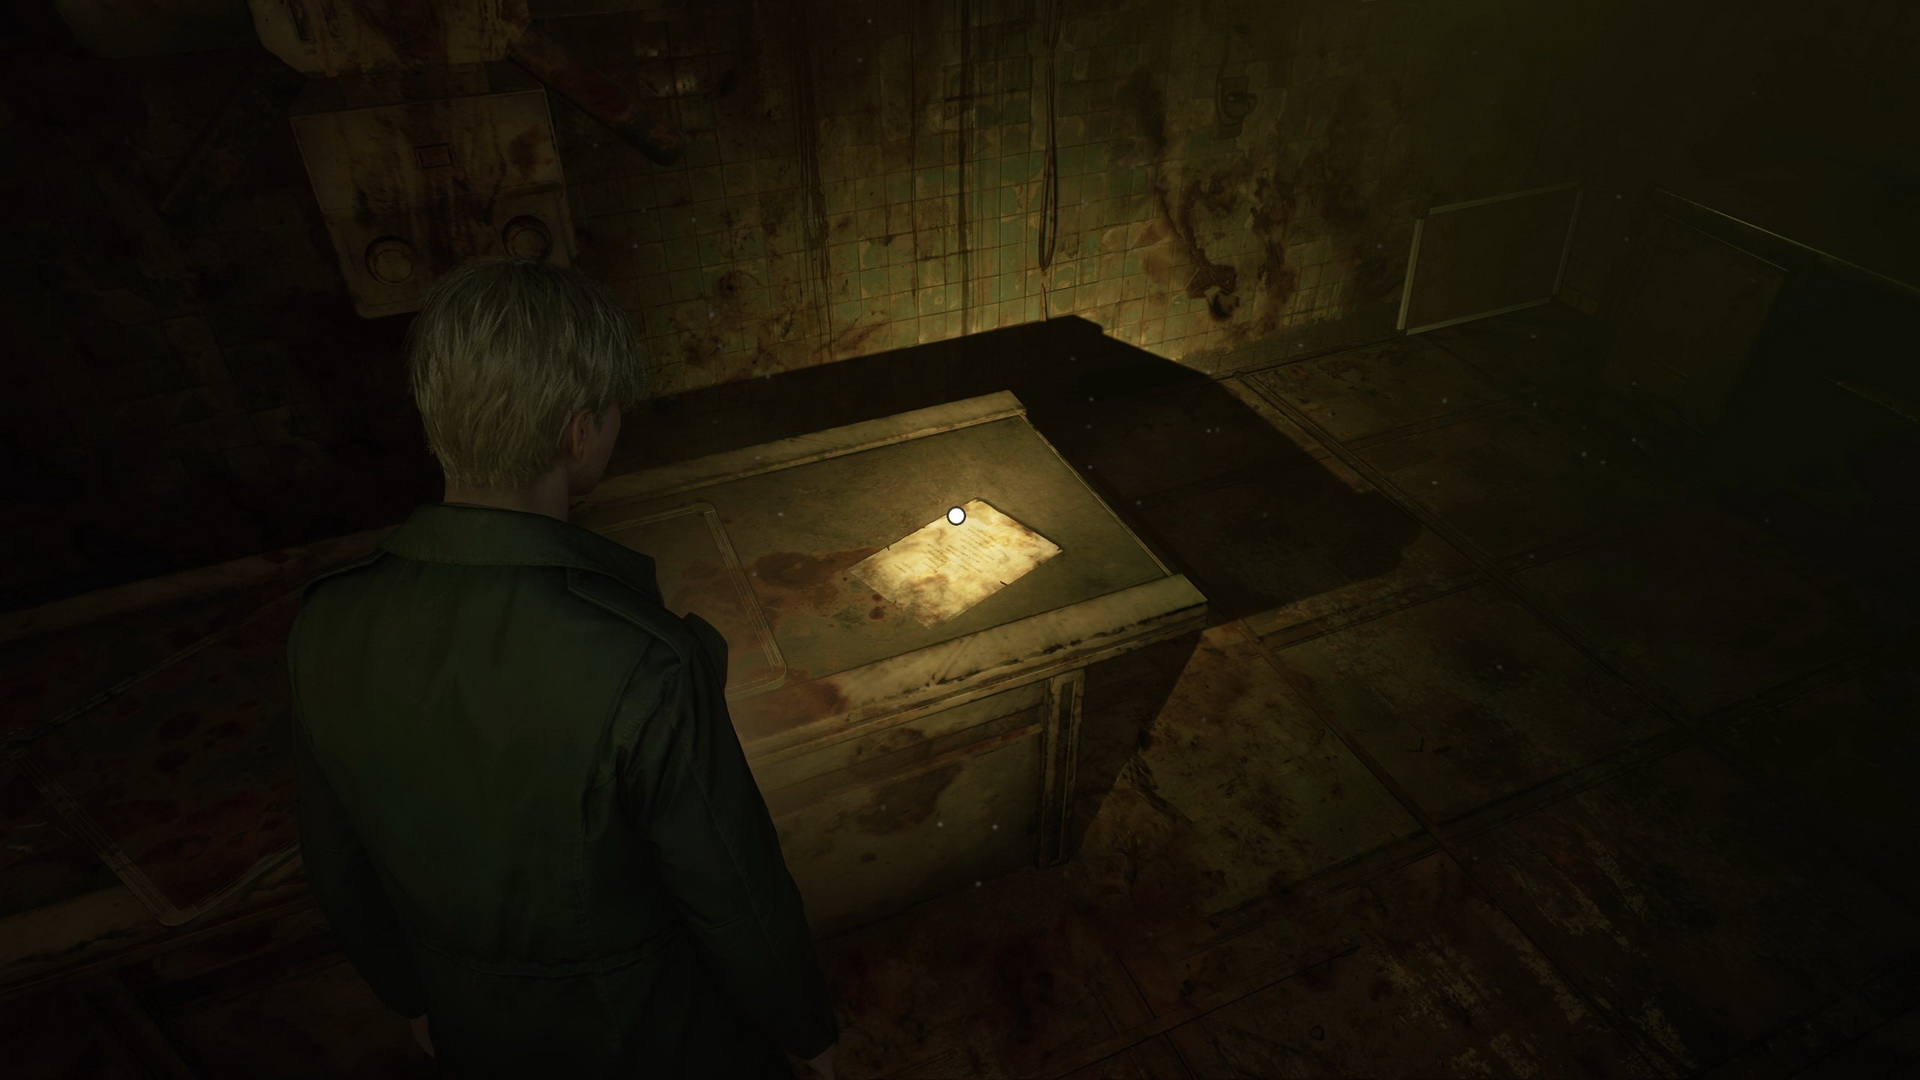
- Memo #38: Evaluation Card, Patient #3141. Dayroom, on a wheelchair ahead of you after going through the first door.
- There's a Save Point at the end of the corridor outside the room.
- Use the elevator to get to the second floor.
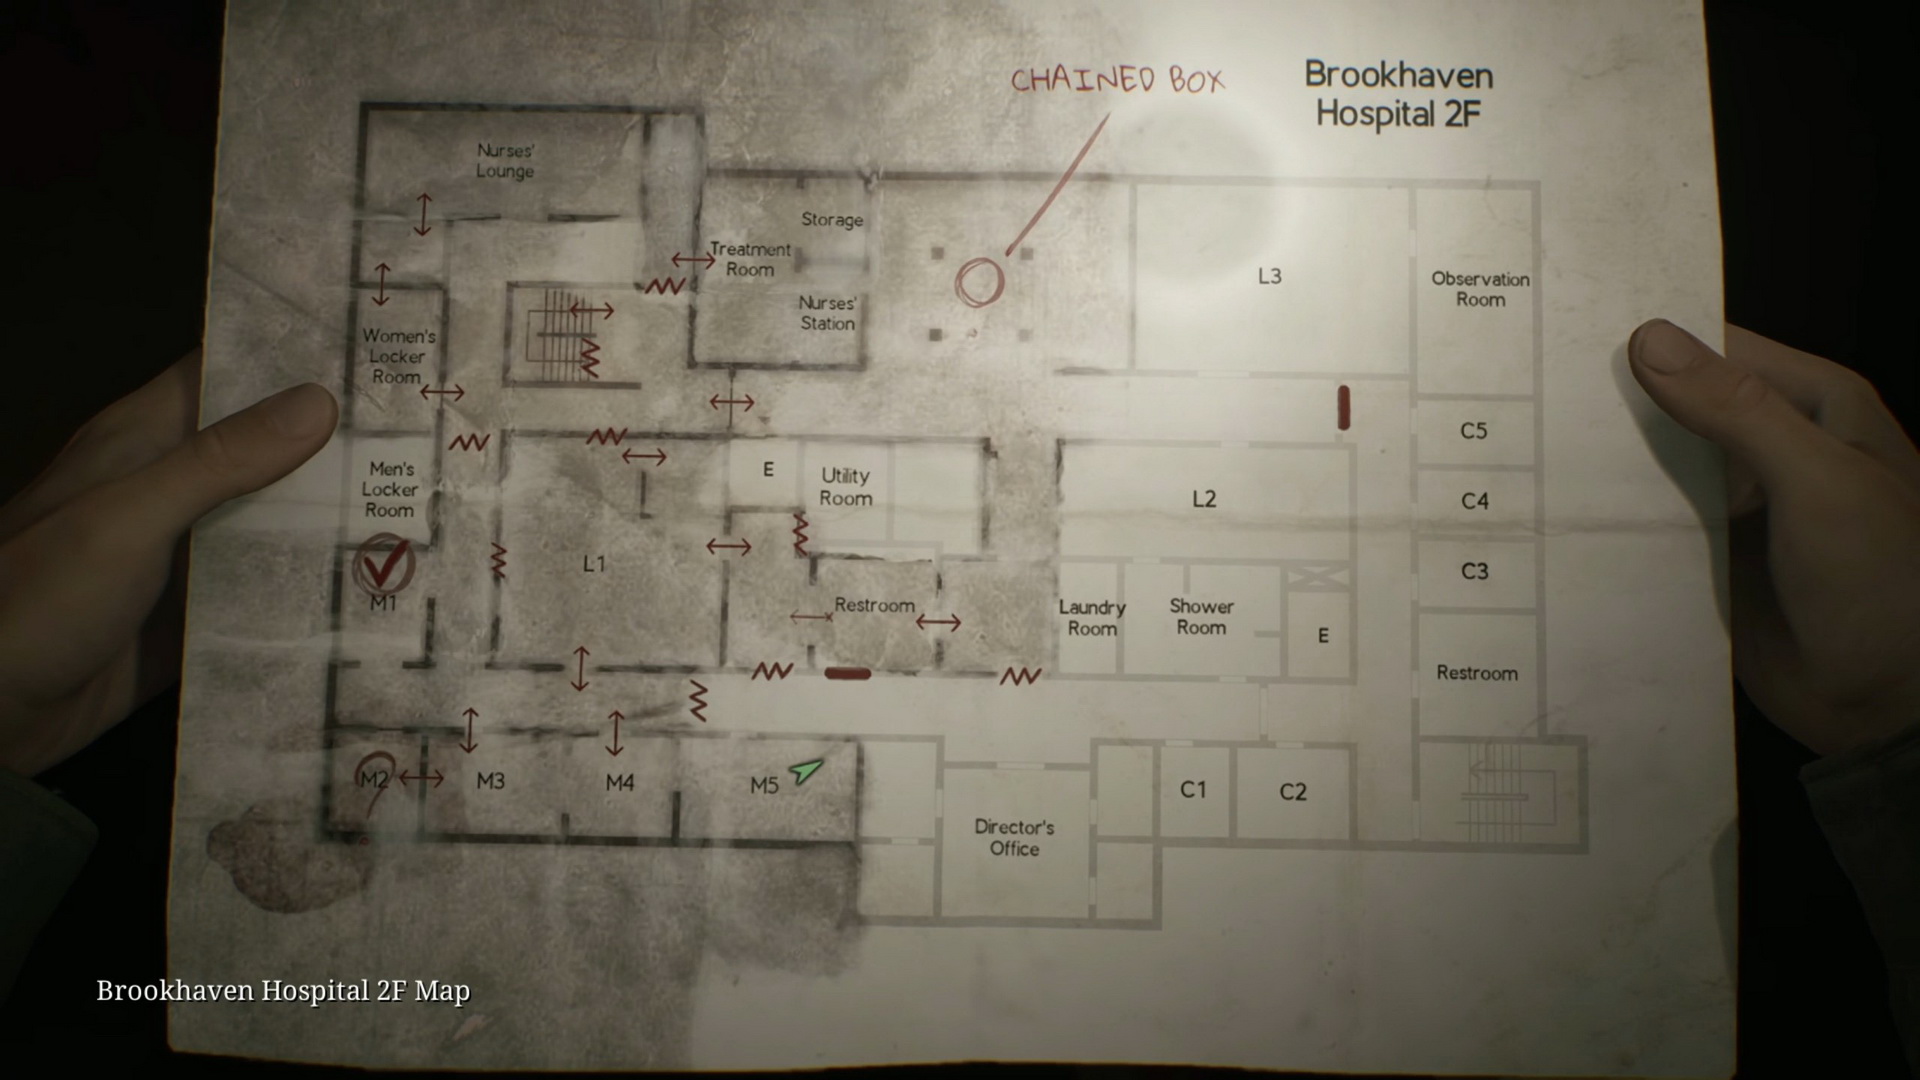
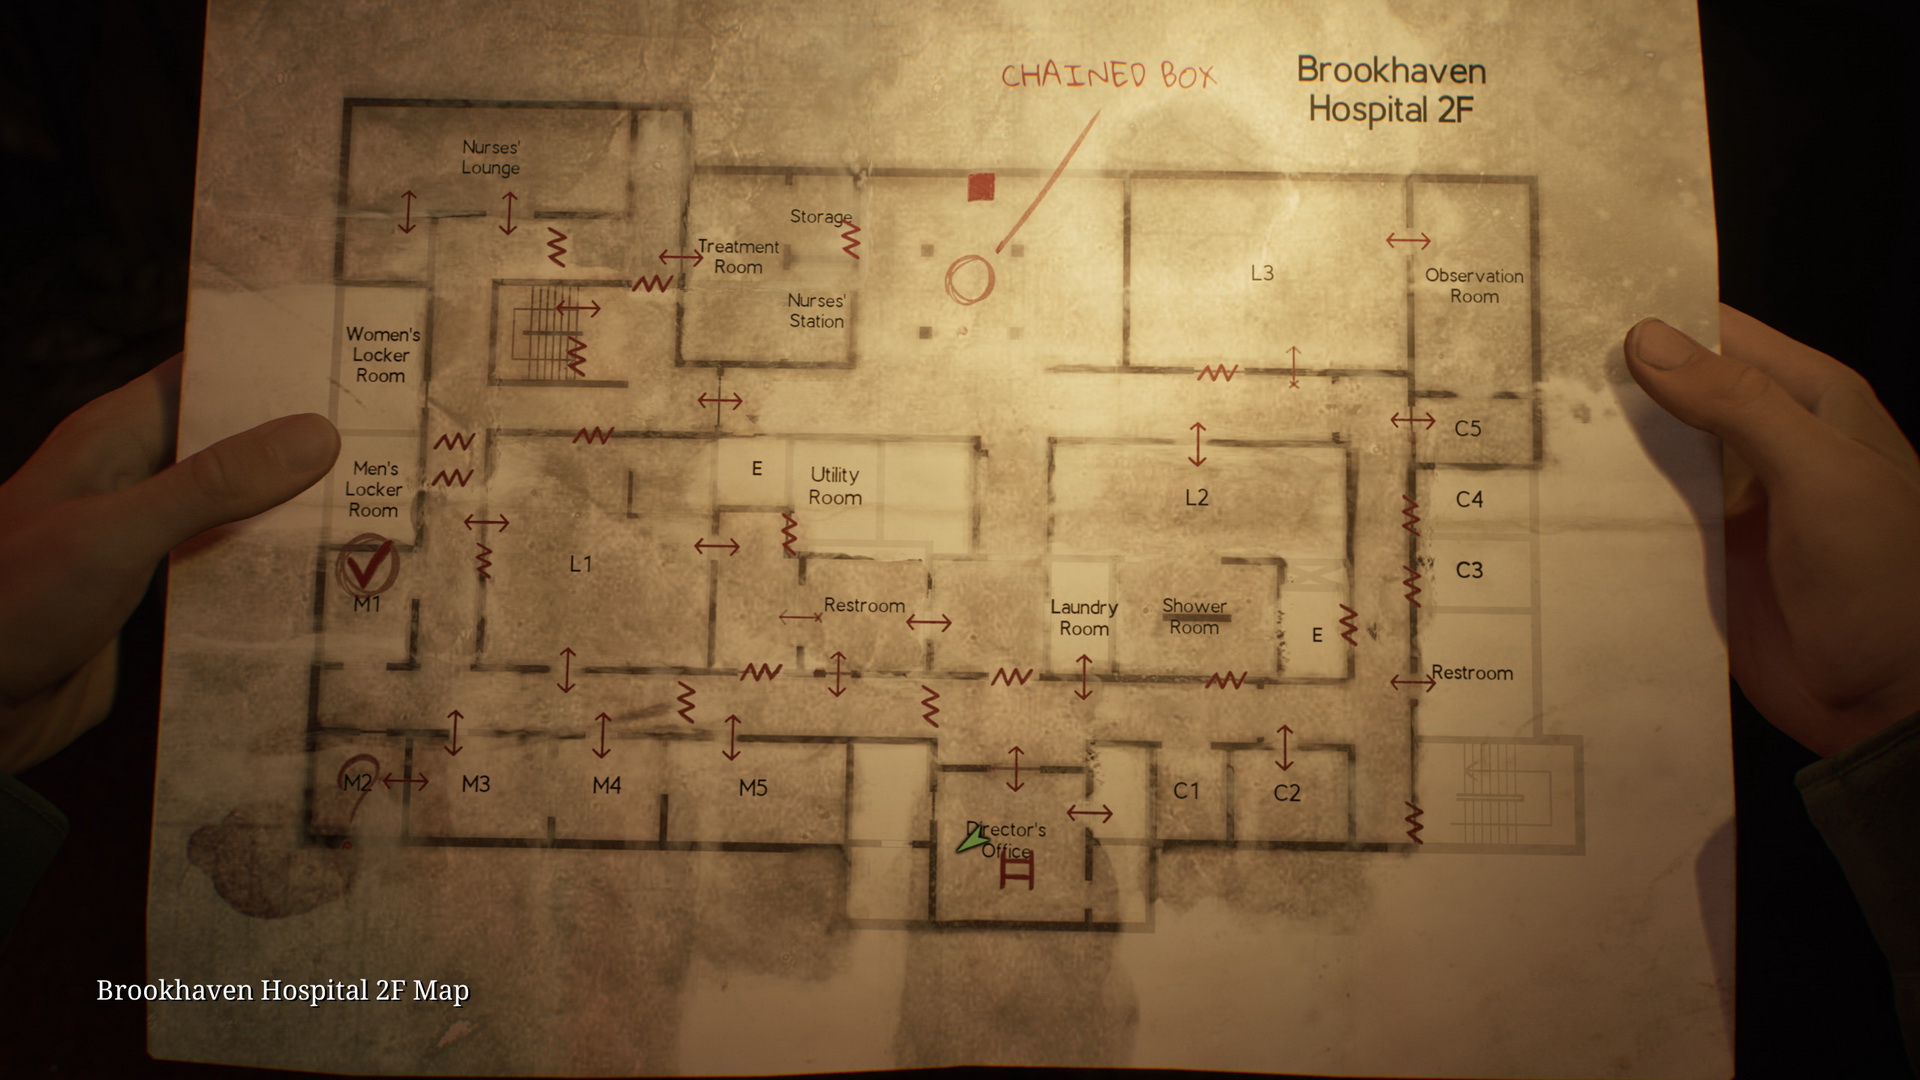
Second Floor
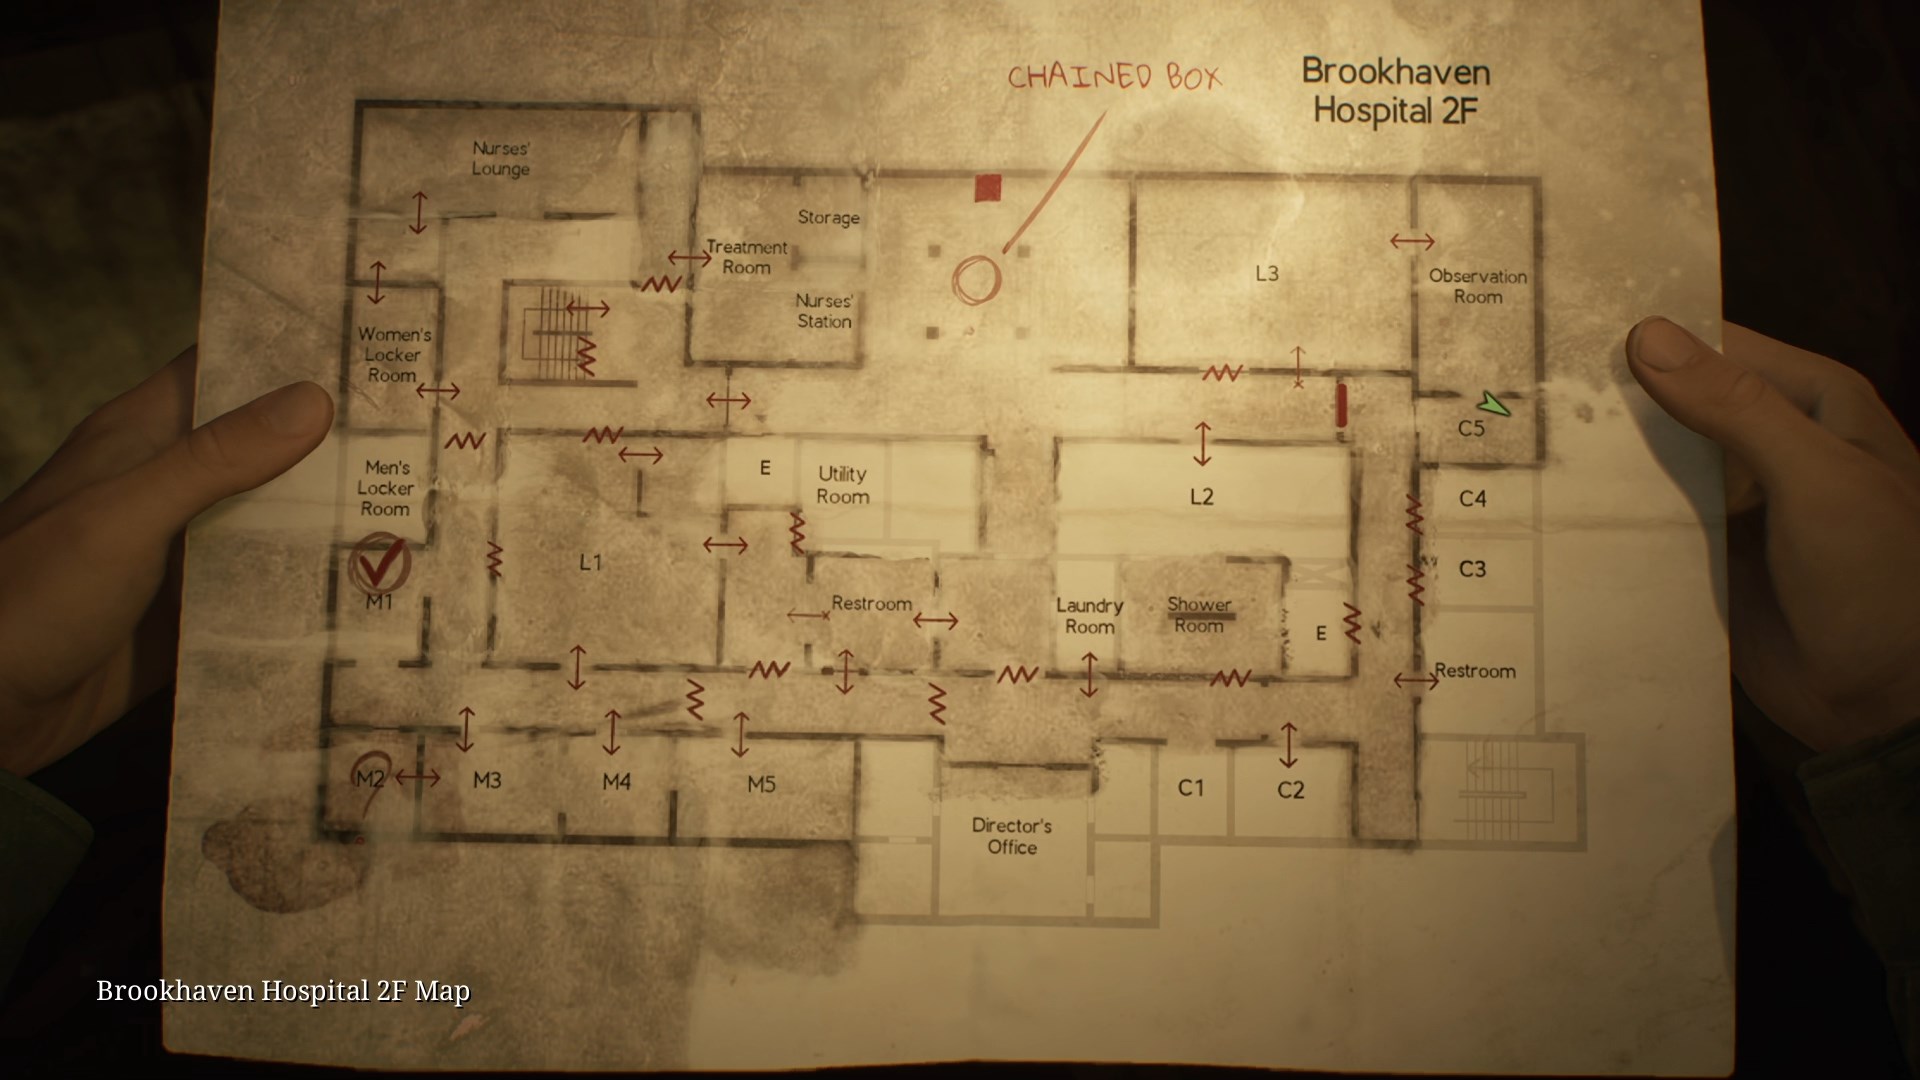
- Approach a covered box with the chains for a future puzzle location. There's also another Save Point in the same area.
- Proceed through the Nurses' Station, Treatment Room and Nurses' Lounge.
- Use the stairs to go to the third floor.
Third Floor
- Memo #39: The Procedure. On a table in the X-Ray Room.
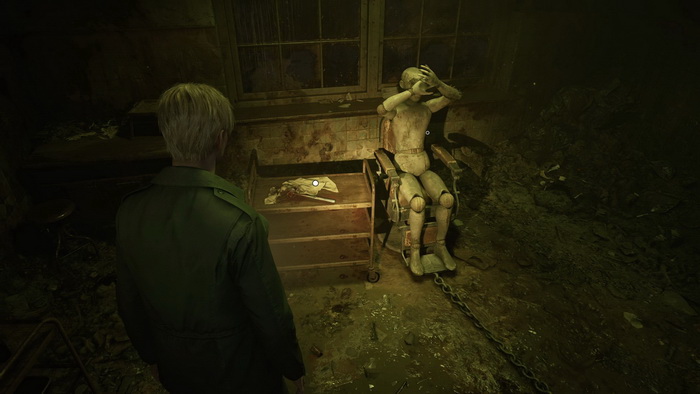
- Find a dummy sitting in a surgical chair in Exam Room 4.
- 62 Instrument of Force is on a medical table next to it.
- Break the wall into Room D2 and use the ladder in D1 to go down to the Kitchen.
First Floor
- Proceed through the Cafeteria, Storage and Medical Records.
- 63 Key of Bliss is in a hole in the wall in a small room northwest of Medical Records.
- Return to the third floor via the ladder.
Third Floor
- 64 Lapis Eye Key. Return to the dummy and use the Instrument of Force on its right arm and the Key of Bliss on its eyehole to obtain the key.
- Get back to the chained box on the second floor.
Second Floor – Southern Part
- Note: You can skip this part, as the codes for the chained box will always be the same. Proceed to the chained box puzzle solution if chosen so.
- Proceed through the Restroom in the southern part of the floor to learn the first code for the chained box.
- Go west to reach Room L1.
- Go to Room M3 and break the wall to get into Room M2.
- Memo #40: Calendar Page. Room M2, on the floor under the hospital bed. This memo contains the hints for the first code for the chained box.
- The first code will be 1622: one year, six pills in the sink in the room, two hours on the clock in Room M1 when you adjust the hand, and two flashes of the ceiling light when looking through the hole.
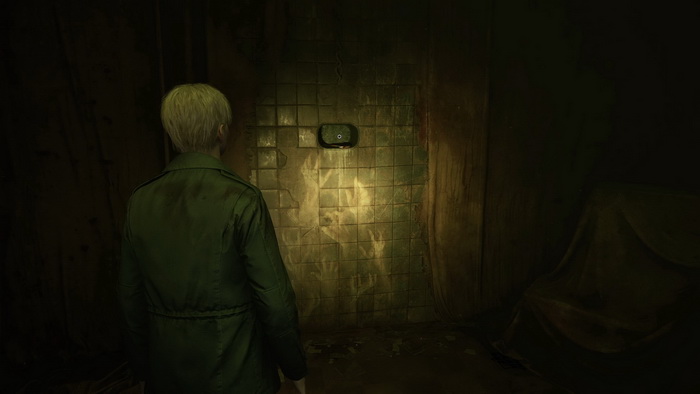
- Glimpse of the Past #16. Room M5, a drawing of hands on the wall on your way back through the Restroom.
- Return to the chained box.
Second Floor – Eastern Part
- Note: You can skip this part, as the codes for the chained box will always be the same. Proceed to the chained box puzzle solution if chosen so.
- Follow the eastern corridor, break the southern wall into the Laundry Room and move the trolley so you can climb into Room L3.
- 65 Director’s Office Key is on the floor in front of a television in the Observation Room through the next door.
- Memo #41: Patient’s Note. Observation Room, on a bed table.
- Strange Photo #14: "No one knows". In the nightstand's drawer of Room C5, accessed through a hole from the Observation Room.
- Proceed to the Director's Office using the key.
- Memo #42: Manic Scribble. On the cabinet inside the Director’s Office.
- Use the ladder to get to the third floor.
Third Floor
- Memo #43: Nurse's Note. On a table in the corner of Room I7.
- Go past the treatment stretcher, following the red cable to locate the generator and power it up.
- Memo #44: Director's Note. Crawl into the Restroom nearby and find this memo on the floor.
- Return to the treatment stretcher in Room I7 and use the machine next to it to reveal the code 9659.
Second Floor – Solving the Chained Box Puzzle
- Return to the chained box on the second floor to open it:
- Use the Lapis Eye Key on the keyhole.
- Input the code from the Calendar Page memo in 2F Room M2 on the left combination lock – 1622.
- Input the code from the treatment stretcher in 3F Room I7 into the right keypad – 9659.
- 66 -1 Elevator Button. James will take the button during the cutscene after opening the box.
- Enter the elevator and insert the new button to go to the basement.
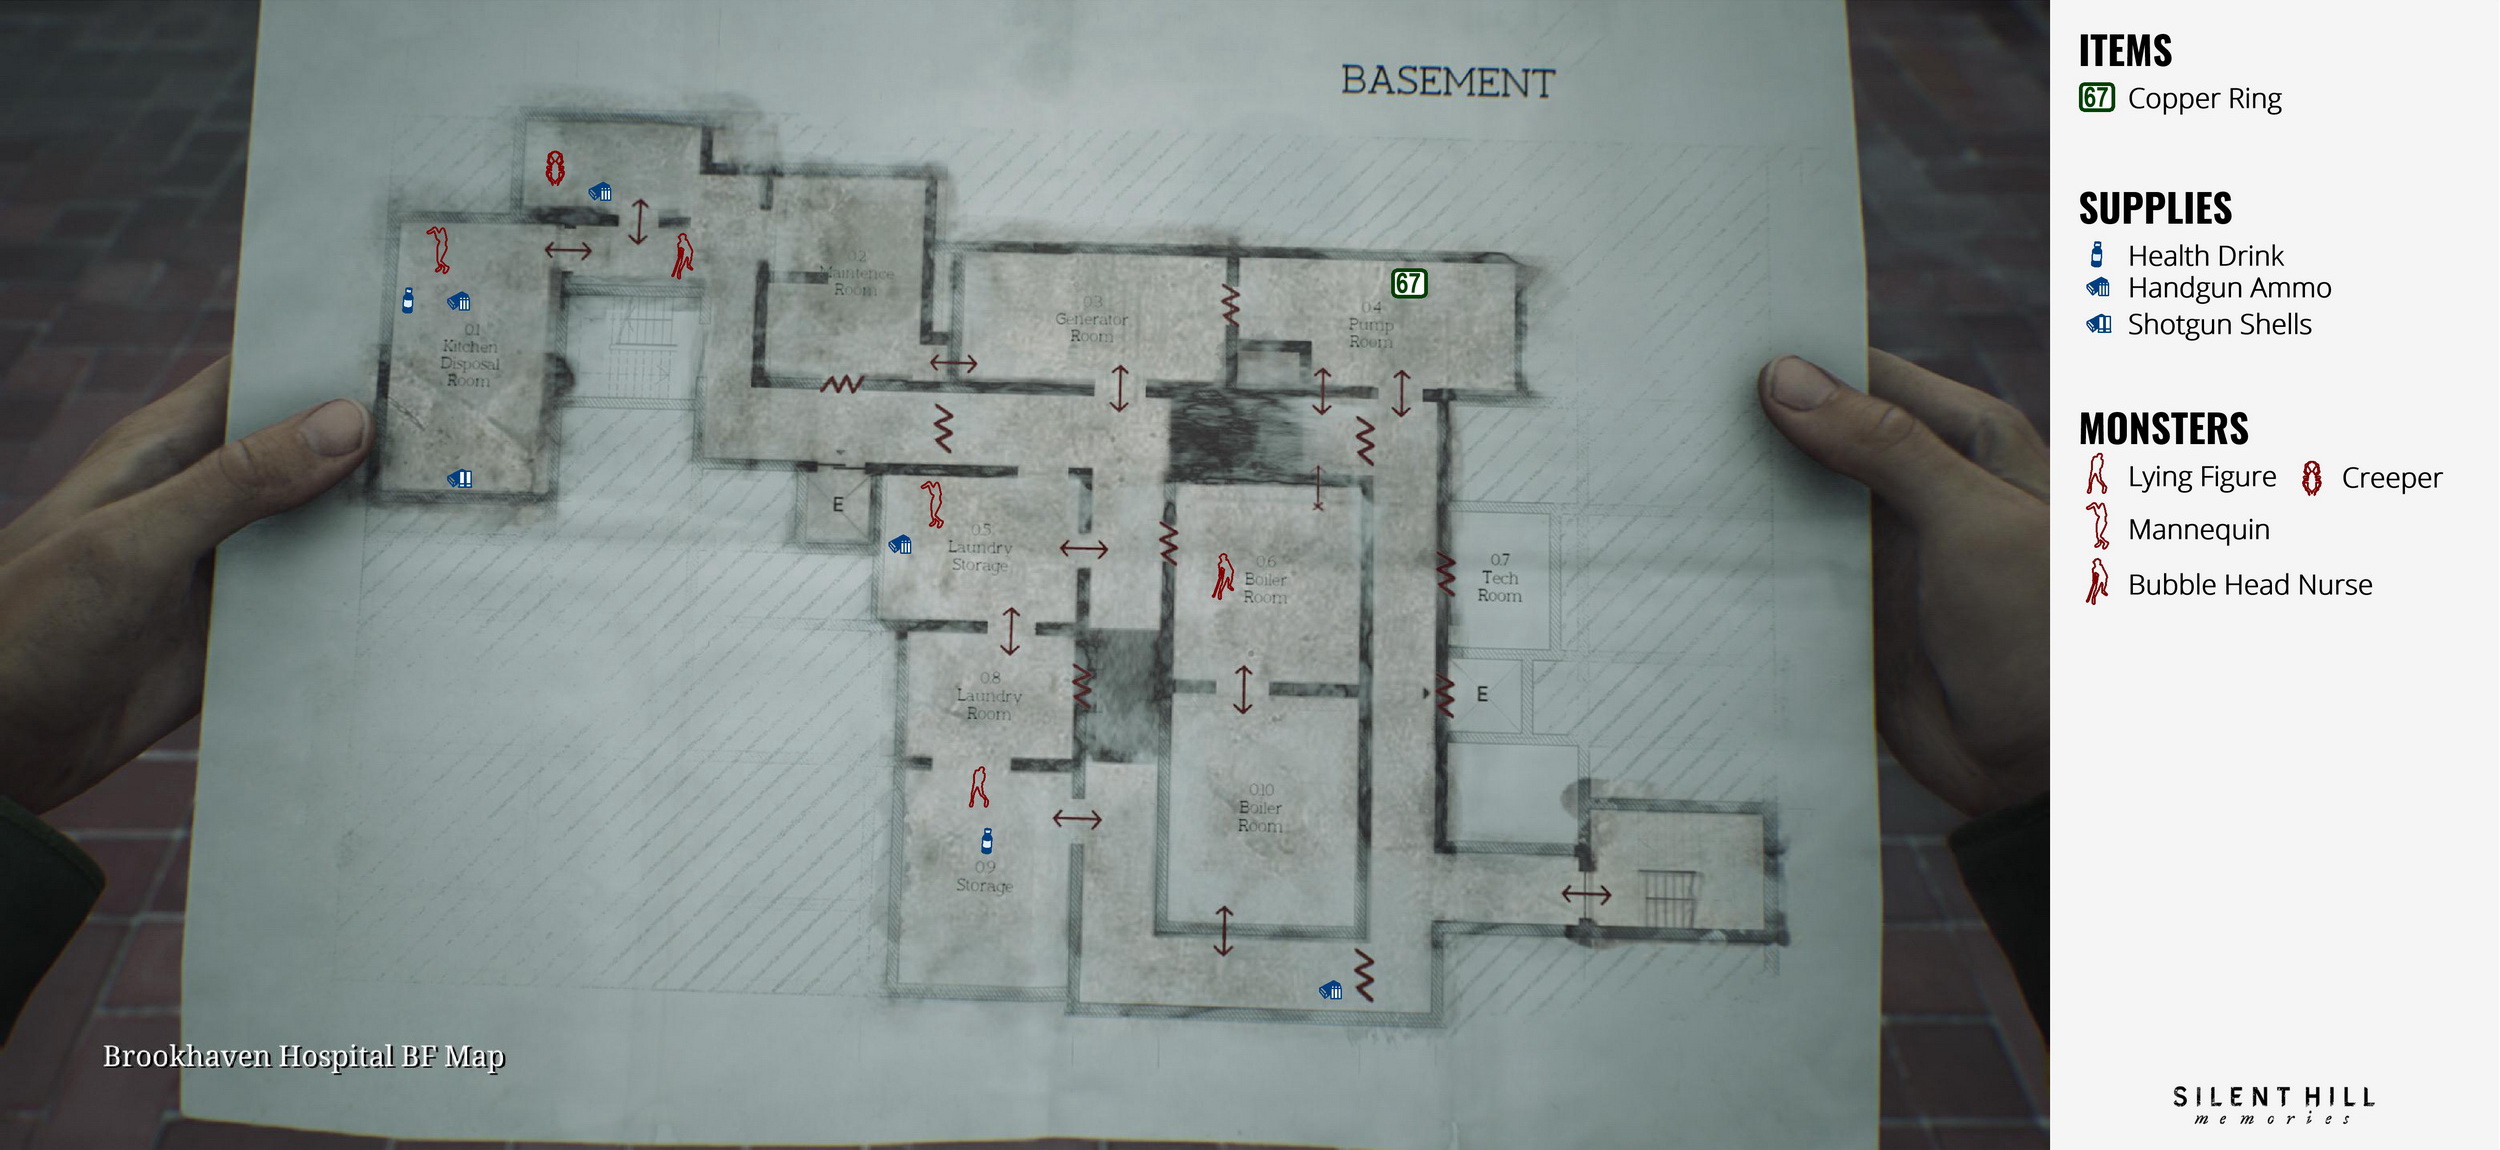
Basement
- Proceed through the basement rooms until you reach the Pump Room.
- 67 Copper Ring is in the Pump Room on a crate.
- Maria will join you again after picking up the ring.
- Take the stairs to get to the first floor.
First Floor
- Proceed into the Pool Room.
- Strange Photo #15: "They mustn’t know". On a bench in the back of the Pool Room.
- Go through the shower area and enter the Doctors' Lounge.
- 68 Lead Ring is inside the fallen freezer in the Doctors' Lounge.
- Memo #45: Dissociated Notice. On a bench in the Locker Room next to the Lounge.
- Optional: You can open the decorative box in the Pharmacy room and get supplies. Enter the correct answers to the elevator "Trick or Treat" quiz:
- Q1 – 2
- Q2 – 3
- Q3 – 1
- Go back to the second floor.
Escaping the Hospital
- Approach the lady of the door and use both rings on it to unlock the door. Go downstairs.
- Memo #46: Ominous Note. On the stair landing after unlocking the door.
- After the cutscene, a chase will begin. Run ahead until you reach the elevator.
- After the cutscene, go to the Reception Office. There's a Save Point there.
- 69 Hospital Entrance Key is found atop the book on a desk in the Reception Office.
- Leave the hospital.
Complete Walkthrough
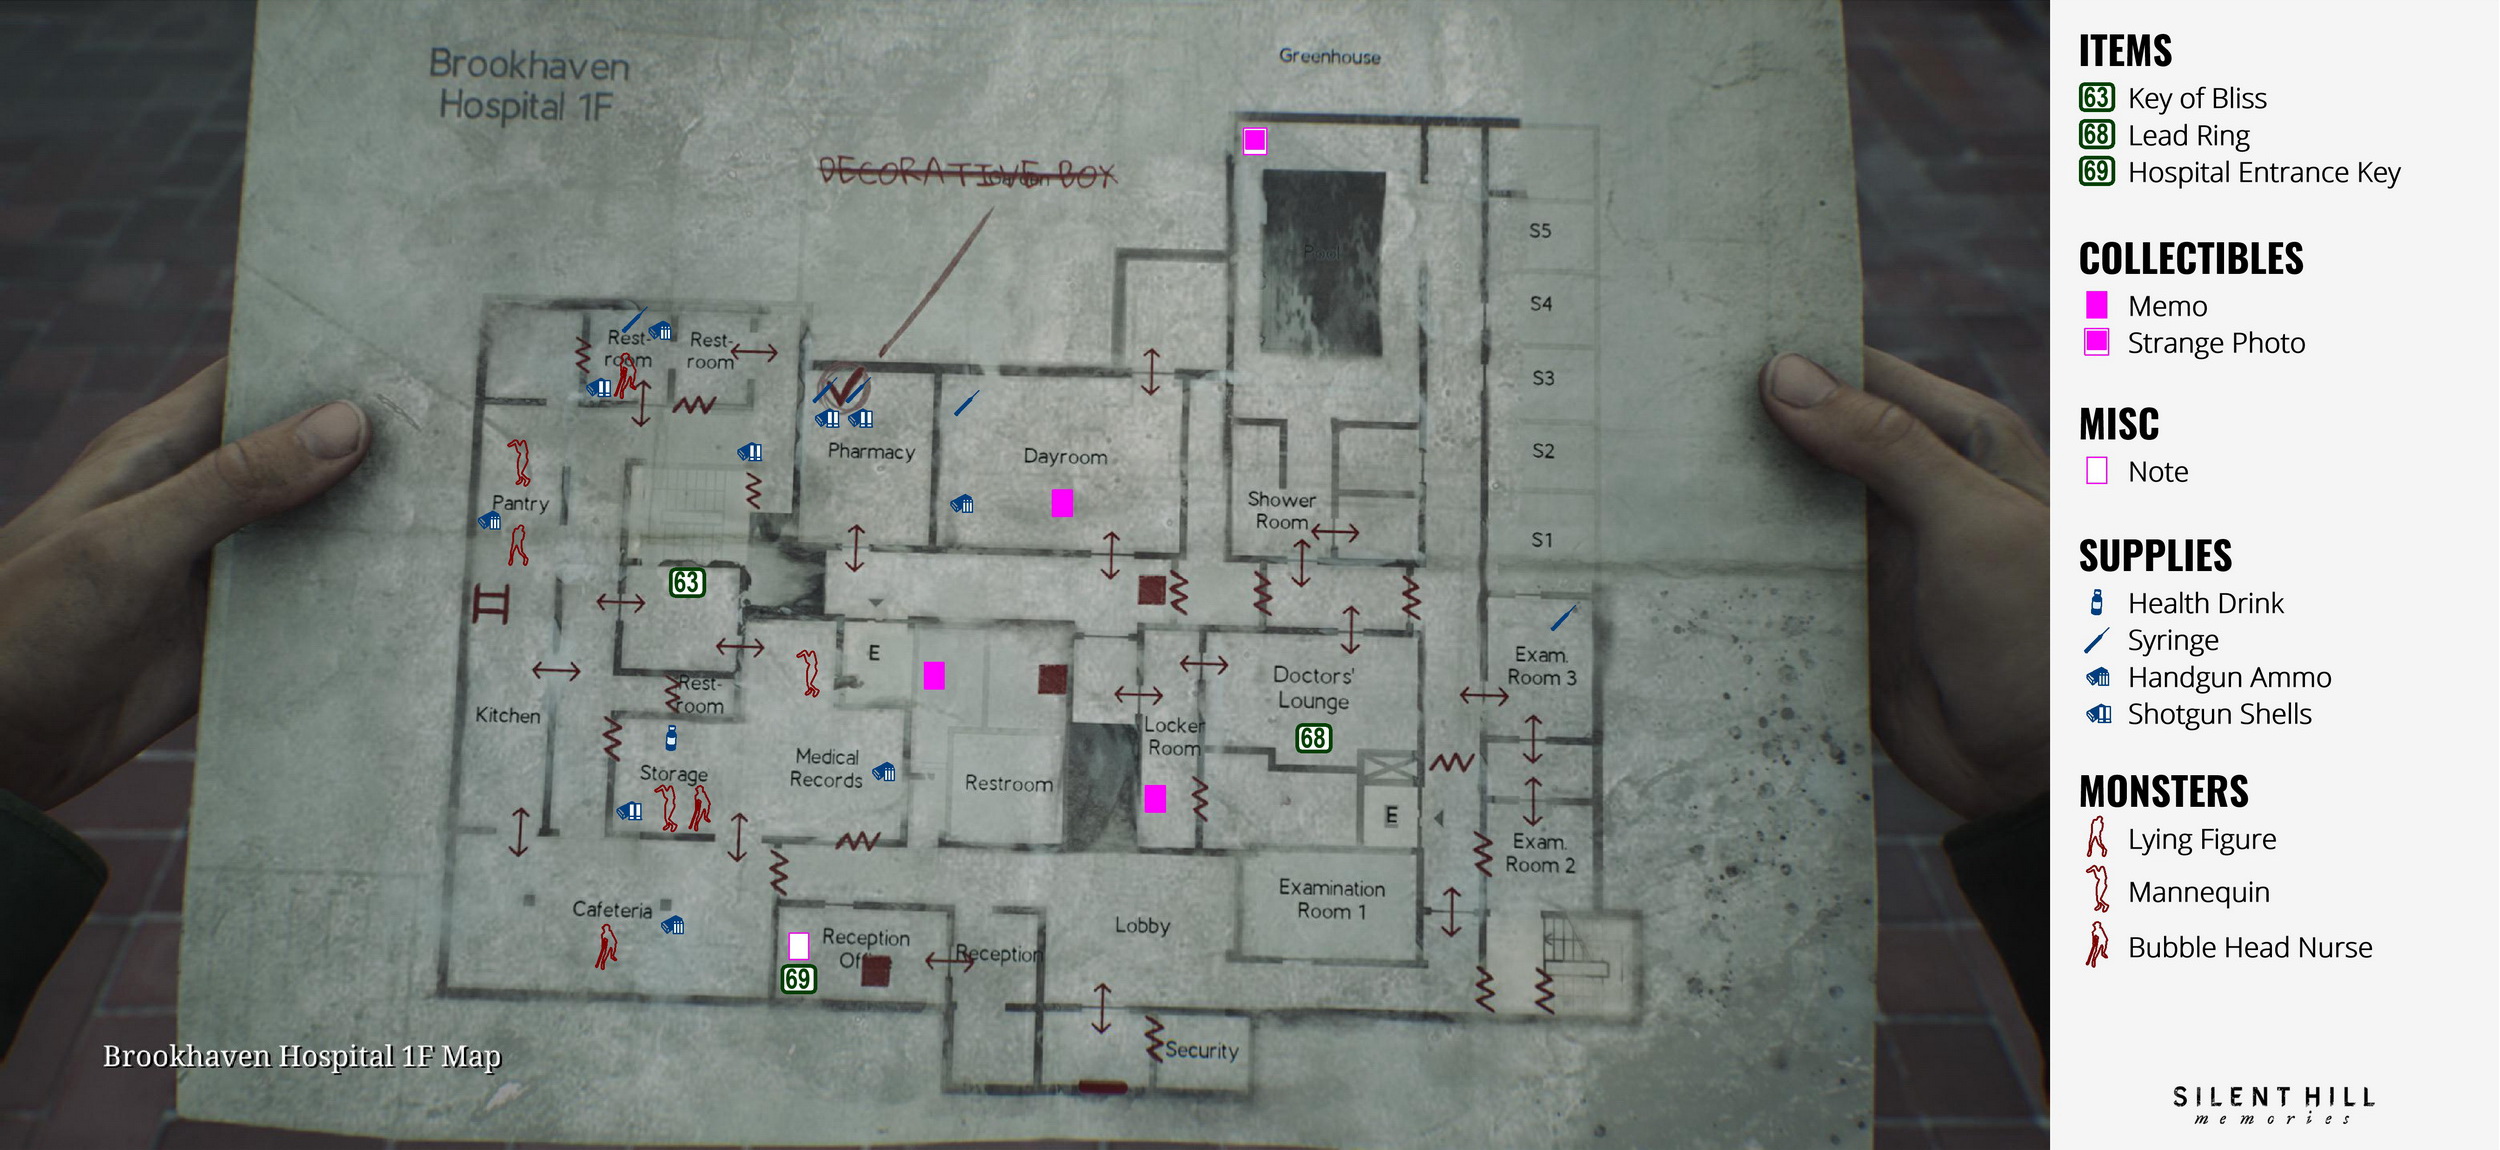
First Floor
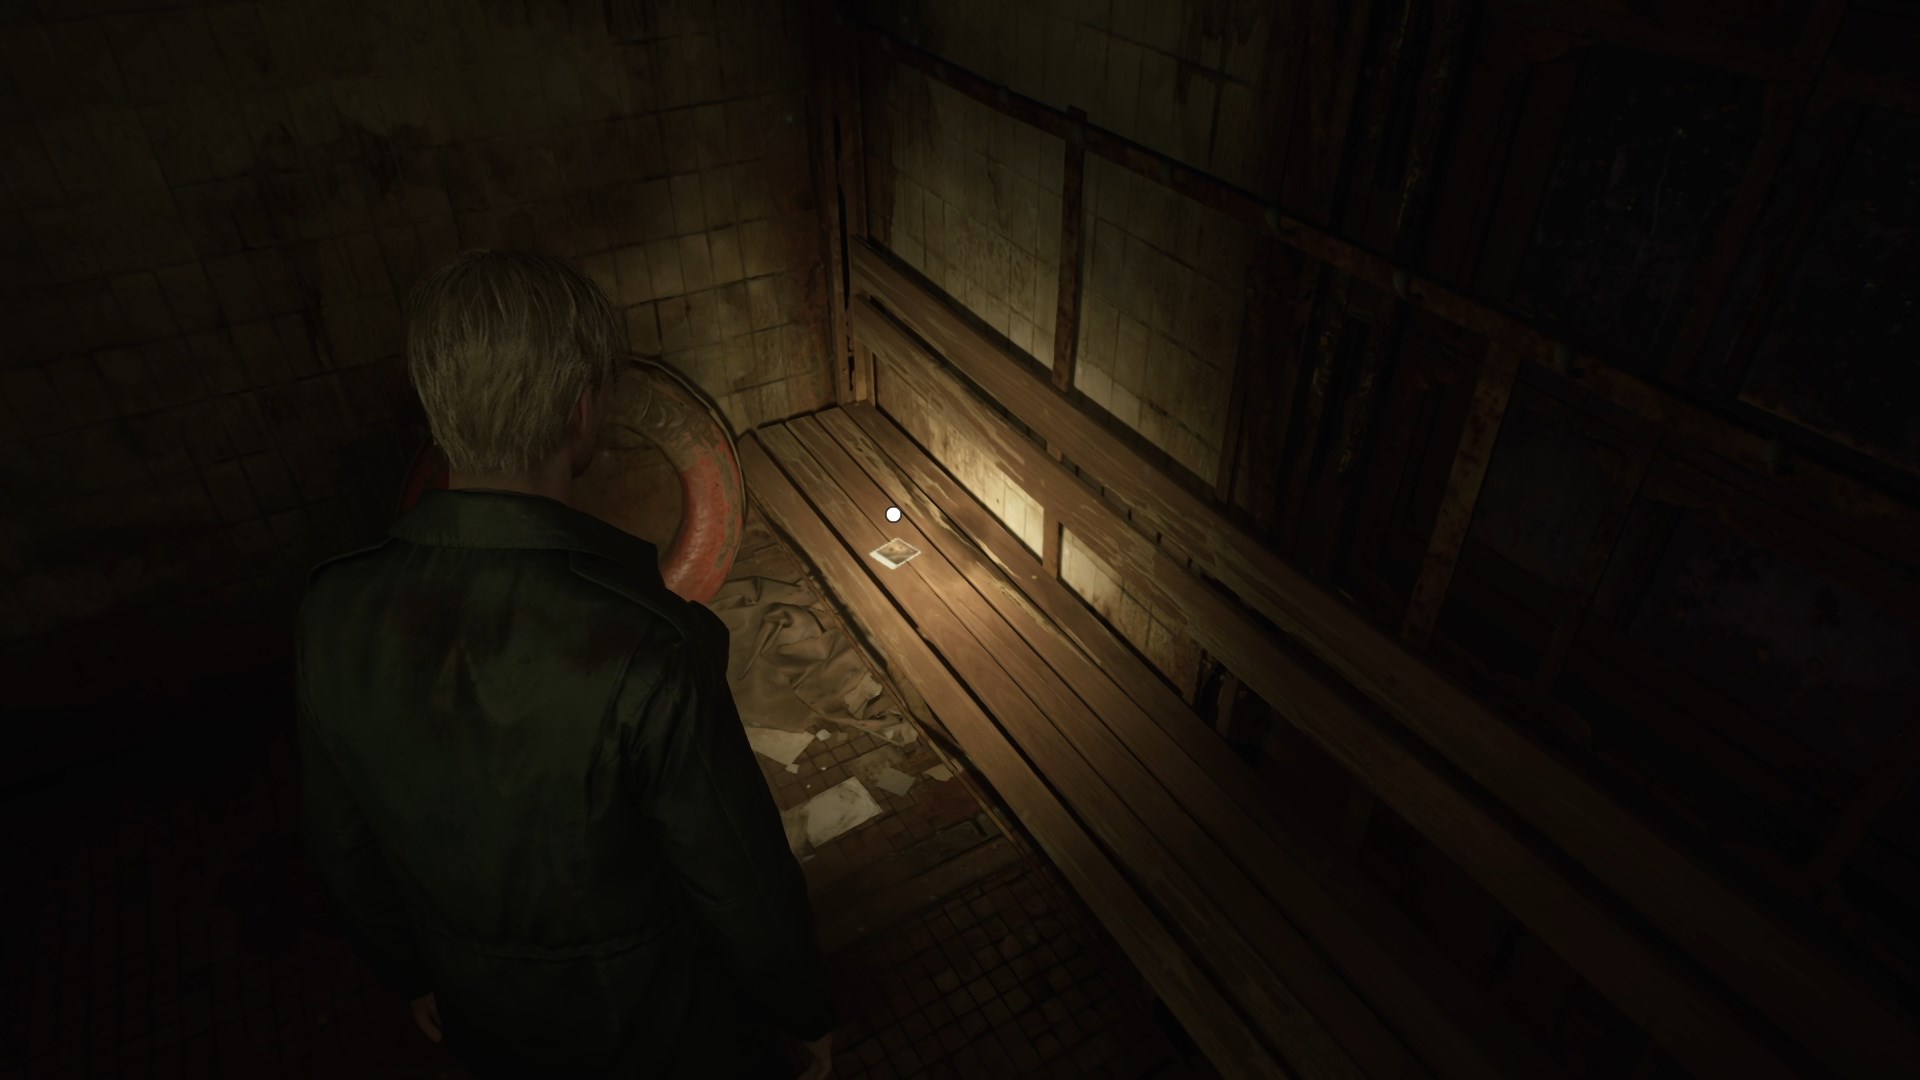
You are starting in a small room north of the Dayroom. Proceed through the double doors up ahead to enter the Dayroom. After going through the first door, you will find Memo #38: Evaluation Card, Patient #3141, in a wheelchair ahead of you.
 |
 |
To the right, you can find Handgun Ammo in the nightstand's drawer and a Syringe in a first aid kit on a table around the corner. Exit the room. At the end of the corridor, there's a Save Point. Enter the open elevator that will take you to the second floor.
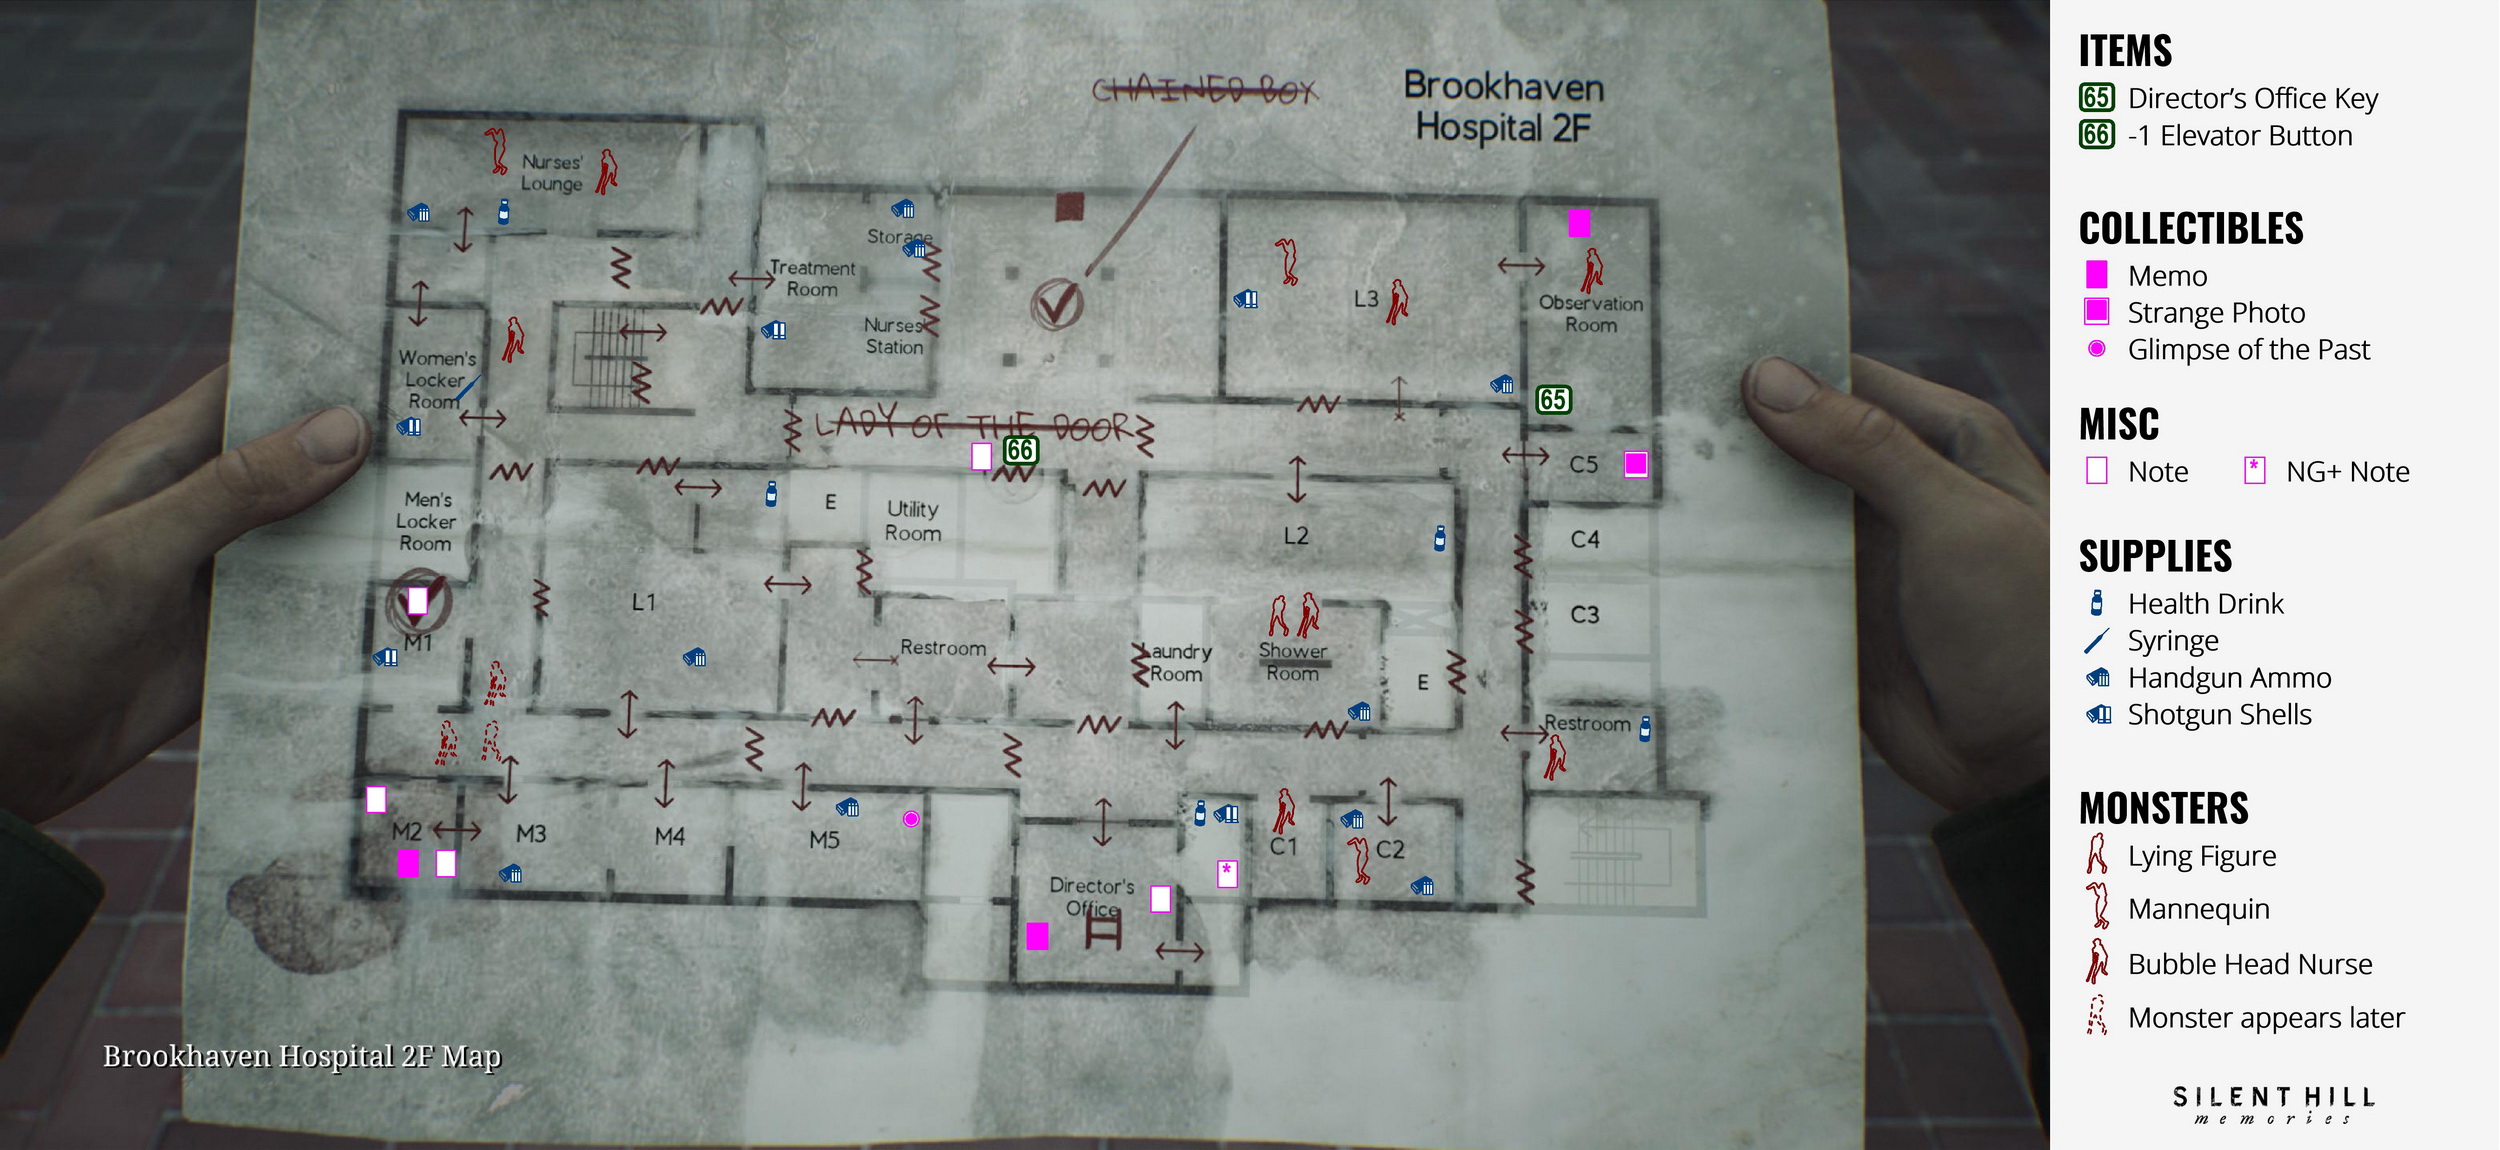
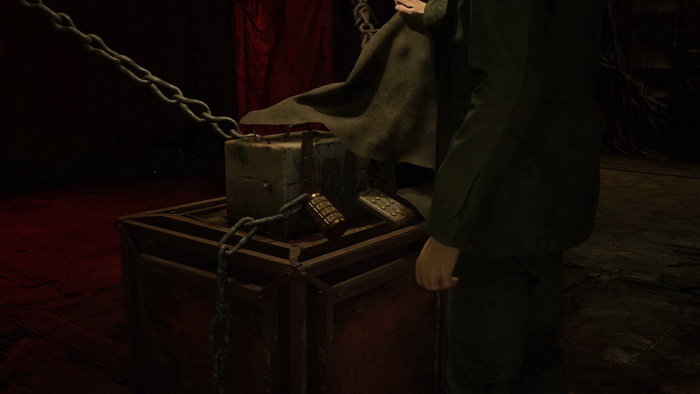
Second Floor
Approach a covered box with the chains in the lobby for a future puzzle location. You must learn two lock codes and find one key to open the box. There's also another Save Point in the same area.
Finding the Key for the Box
Let's start with exploring the western portion of the building. Proceed through the Nurses' Station. There are Shotgun Shells on a stool by the bathtub in the Treatment Room, Handgun Ammo on a shelf and more Handgun Ammo in a glass cabinet in the Storage.
Go to the Nurses' Lounge, where you will meet a new version of the Nurse enemy with a knife and a hiding Mannequin. Also in the room are a Health Drink in the first aid cabinet and Handgun Ammo on an armchair. There's one more Nurse in the next corridor.
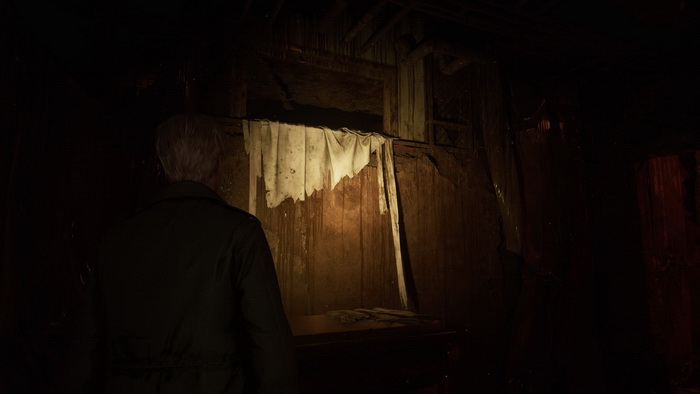
You can crawl into the Women's Locker Room for a Syringe in a first aid kit on a table and Shotgun Shells in a dresser. Use the stairs to go to the third floor.
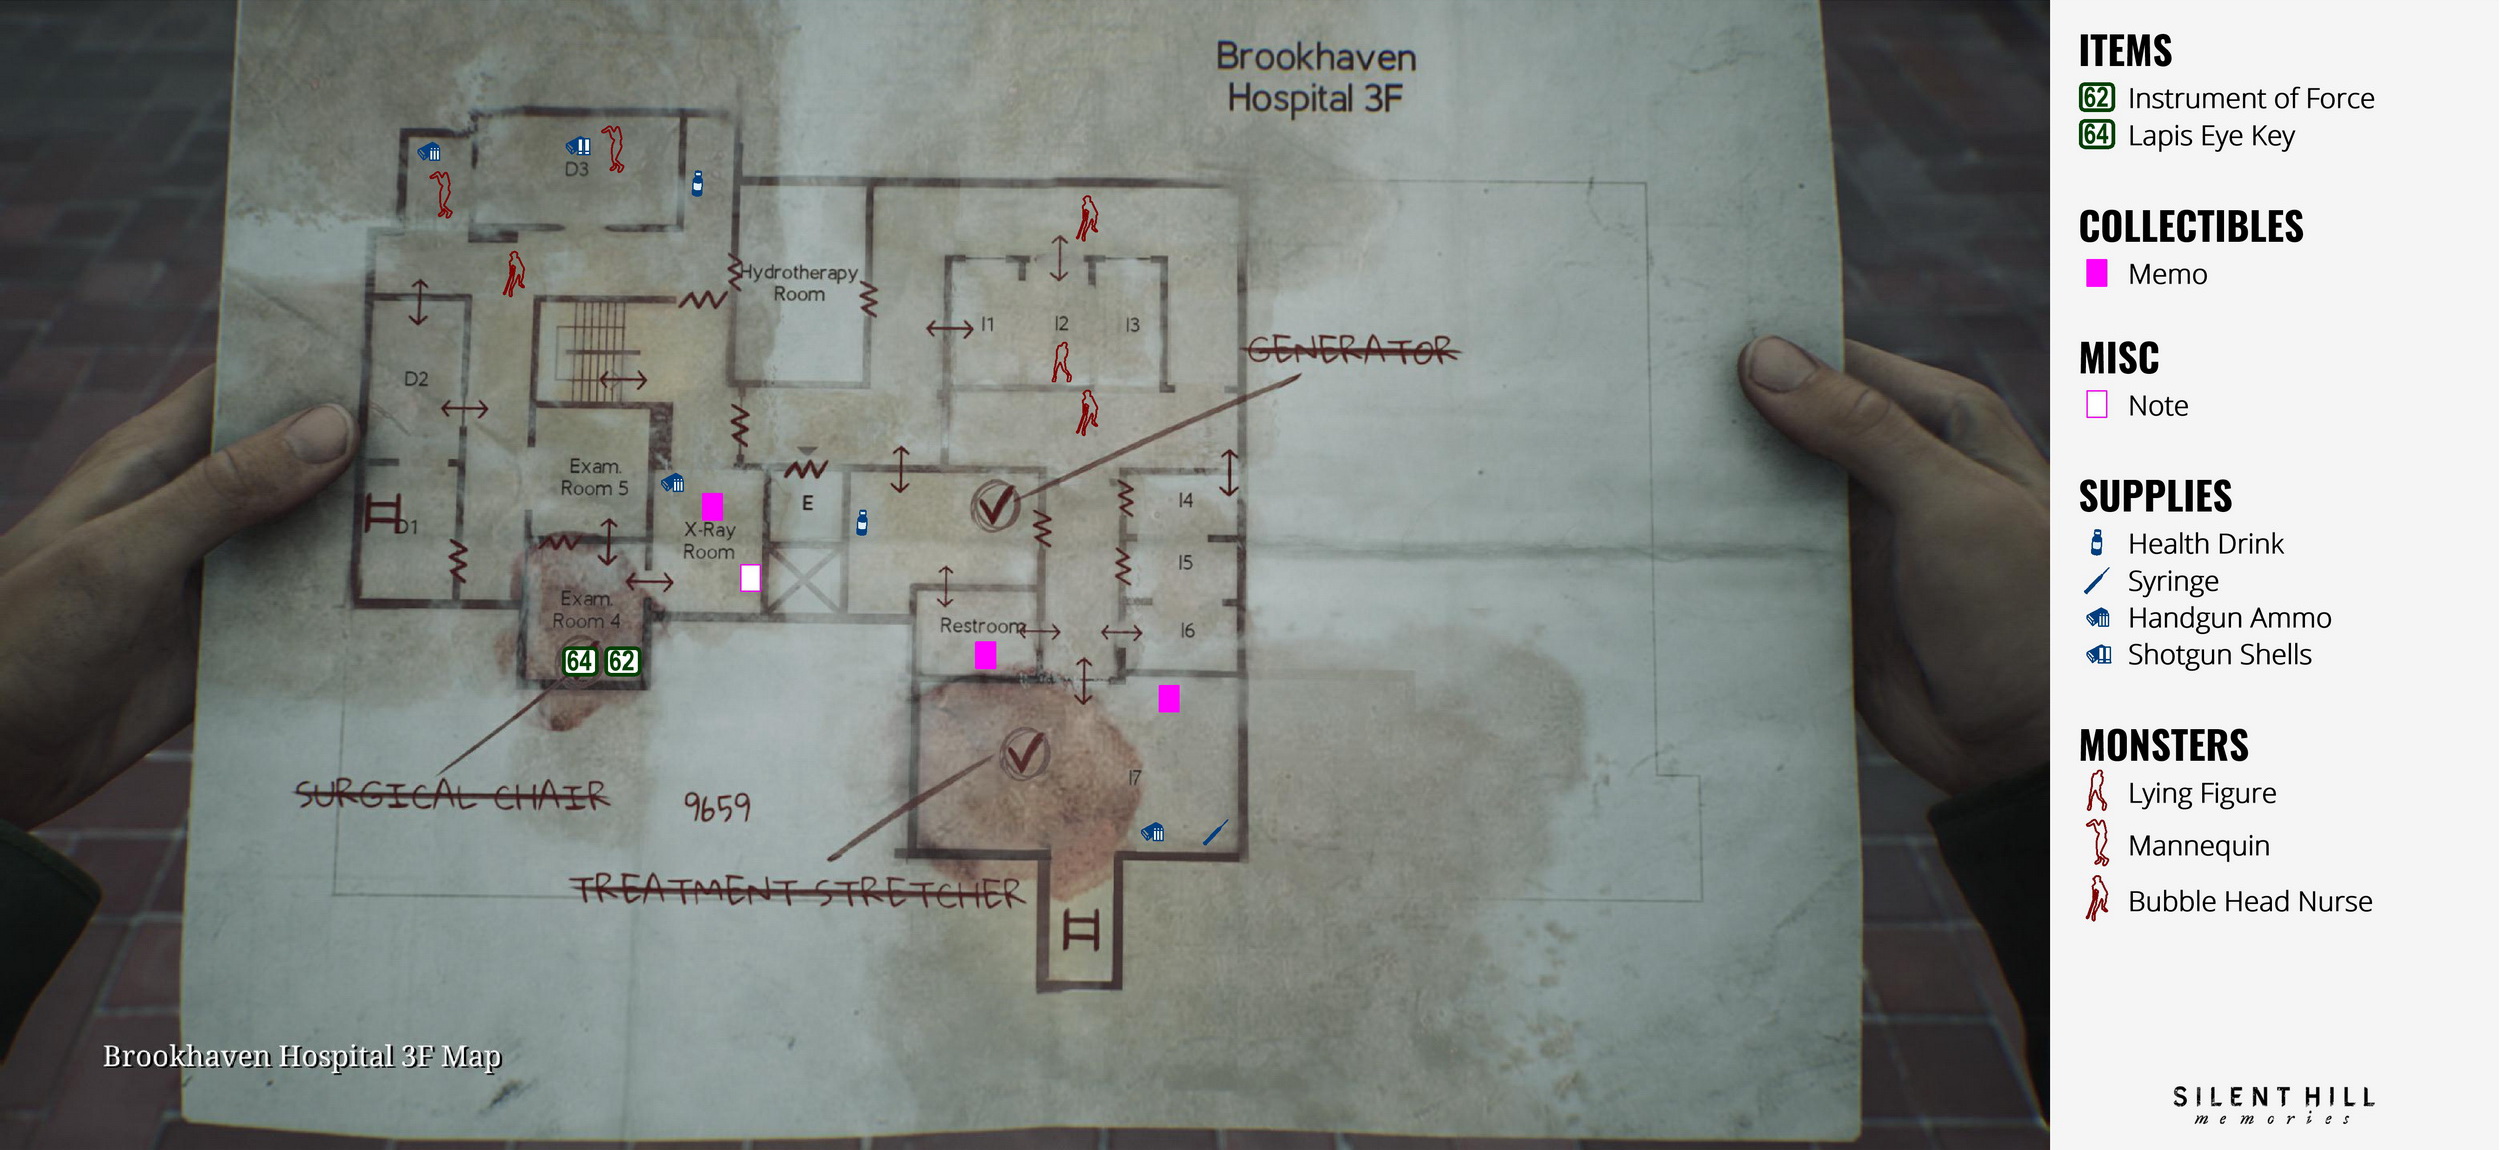
Third Floor
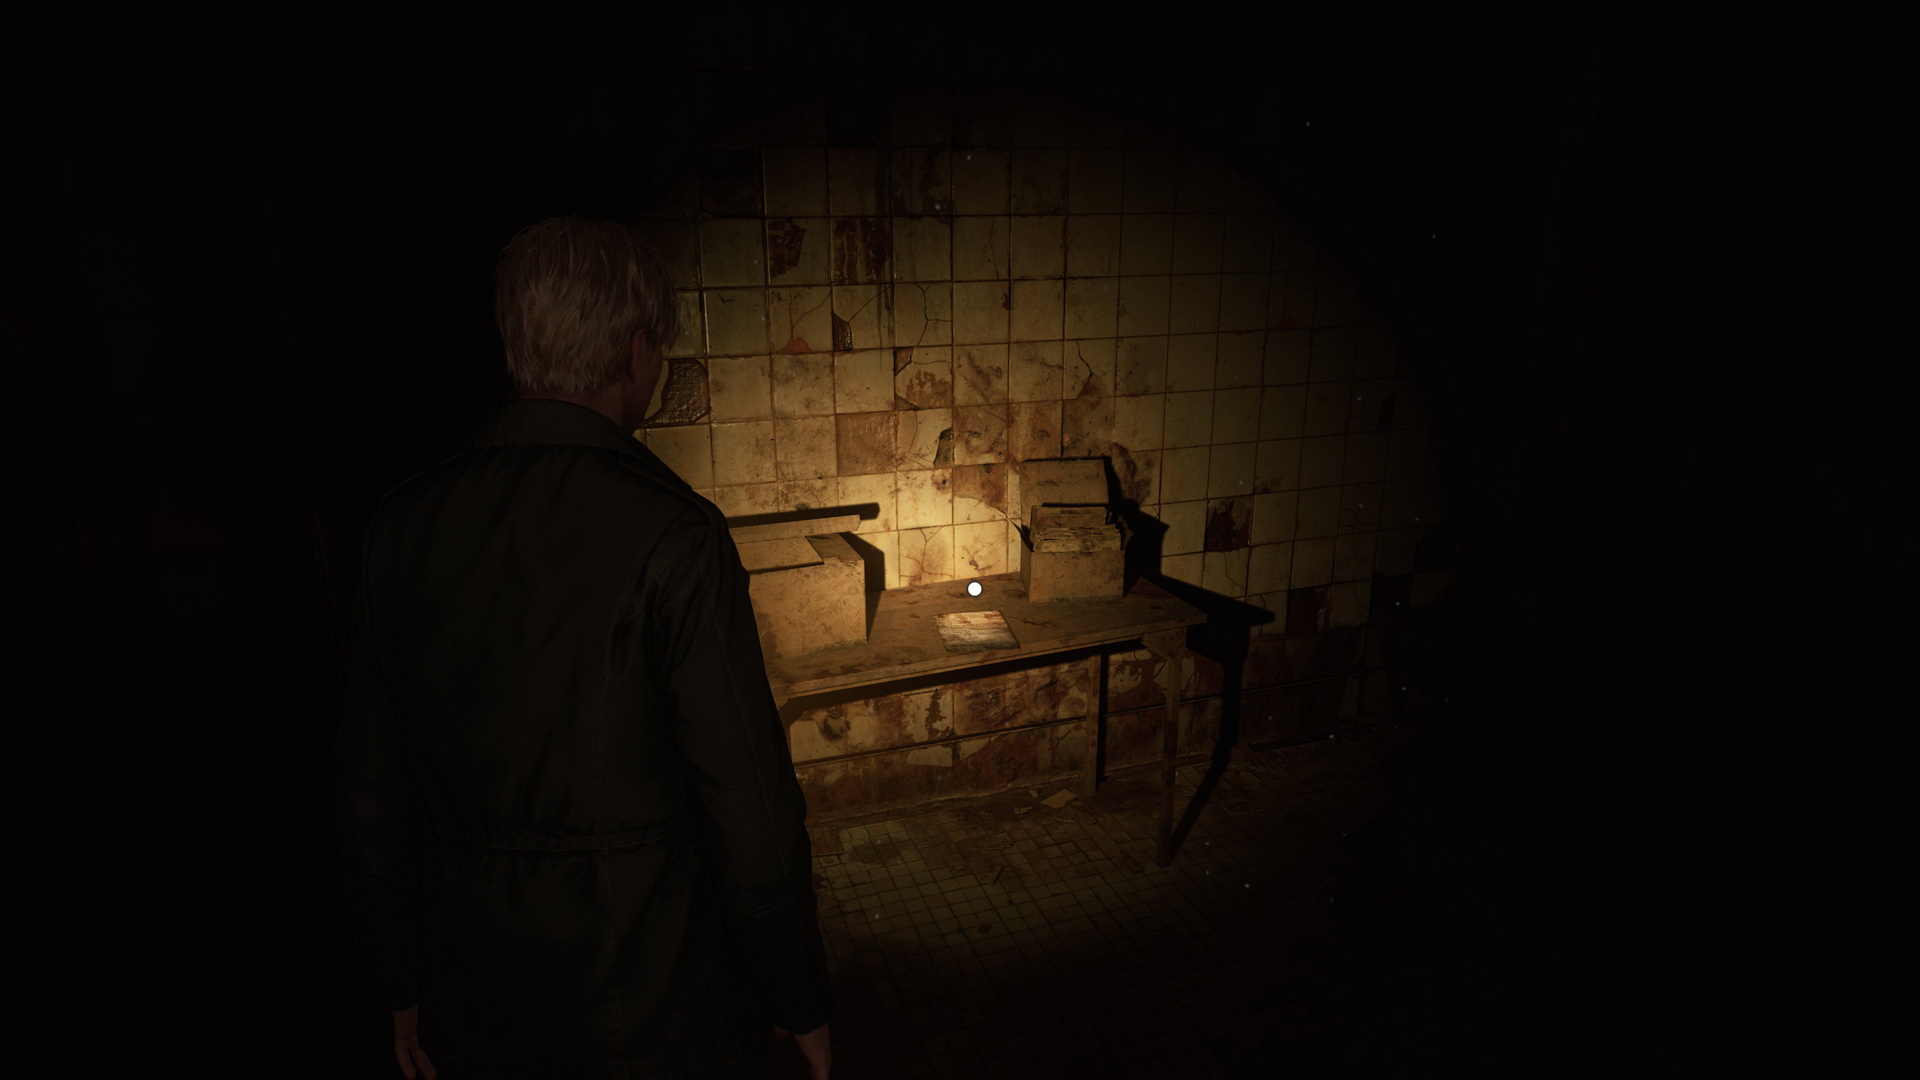
Go to the X-Ray Room to find Memo #39: The Procedure on a table.
 |
 |
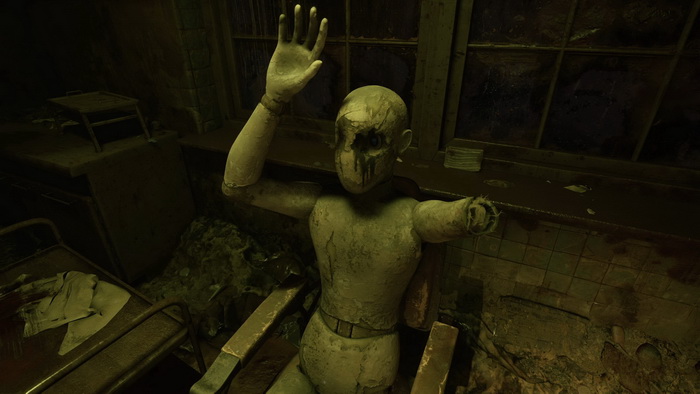
You can also inspect the X-ray viewer and grab Handgun Ammo from a glass cabinet. Proceed into Exam Room 4 to find a dummy sitting in a surgical chair. Next to it is the 62 Instrument of Force on a medical table.
Jump into Exam Room 5. A Nurse is patrolling the next corridor. A Mannequin is also hiding at the northwestern end, guarding Handgun Ammo in the desk's drawer.
Another Mannequin is in Room D3, along with Shotgun Shells above the bed. You can also find a Health Drink at the northeastern end of the corridor. Break the wall into Room D2 and use the ladder in D1 to go down to the Kitchen.
First Floor
A Mannequin and a Lying Figure are awaiting in the Kitchen/Pantry. You can take Handgun Ammo from a chair in the Kitchen, more Handgun Ammo from the countertop in the Pantry and Shotgun Shells on a trash bin at the corner in the northern corridor.
A Nurse is hiding in one of the Restrooms protecting supplies: Handgun Ammo on a sink, a Syringe in a first aid cabinet and Shotgun Shells inside a bathroom stall.
Proceed to the Cafeteria, taking care of a Nurse here. Find some Handgun Ammo on a table by the column.
Next, go to the Storage/Medical Records with another Nurse and a Mannequin. One more Mannequin is hiding in the northern section of the room. Grab Shotgun Shells from a shelf, a Health Drink from a glass cabinet and Handgun Ammo from the desk's drawer. Crawl into a small room northwest of Medical Records through a wall gap to find 63 Key of Bliss in a wall hole.
Return to the third floor via the ladder.
Third Floor
Return to the dummy in Exam Room 4 and use the Instrument of Force on its right arm and the Key of Bliss on its eyehole to obtain the 64 Lapis Eye Key.
Get back to the chained box on the second floor.
Learning the First Code
Second Floor – Southern Part
Note: You can skip this part, as the codes for the chained box will always be the same. Proceed to the chained box puzzle solution if chosen so. There are still some collectibles in the area.
Proceed through the Restroom in the southern part of the floor to learn the first code for the chained box. Leap through the high window, stepping onto a trolley. Follow the chain on the floor and proceed to the L1 room, where you will find Handgun Ammo on a covered box. A Health Drink is on a small table in the northeastern section of the room.
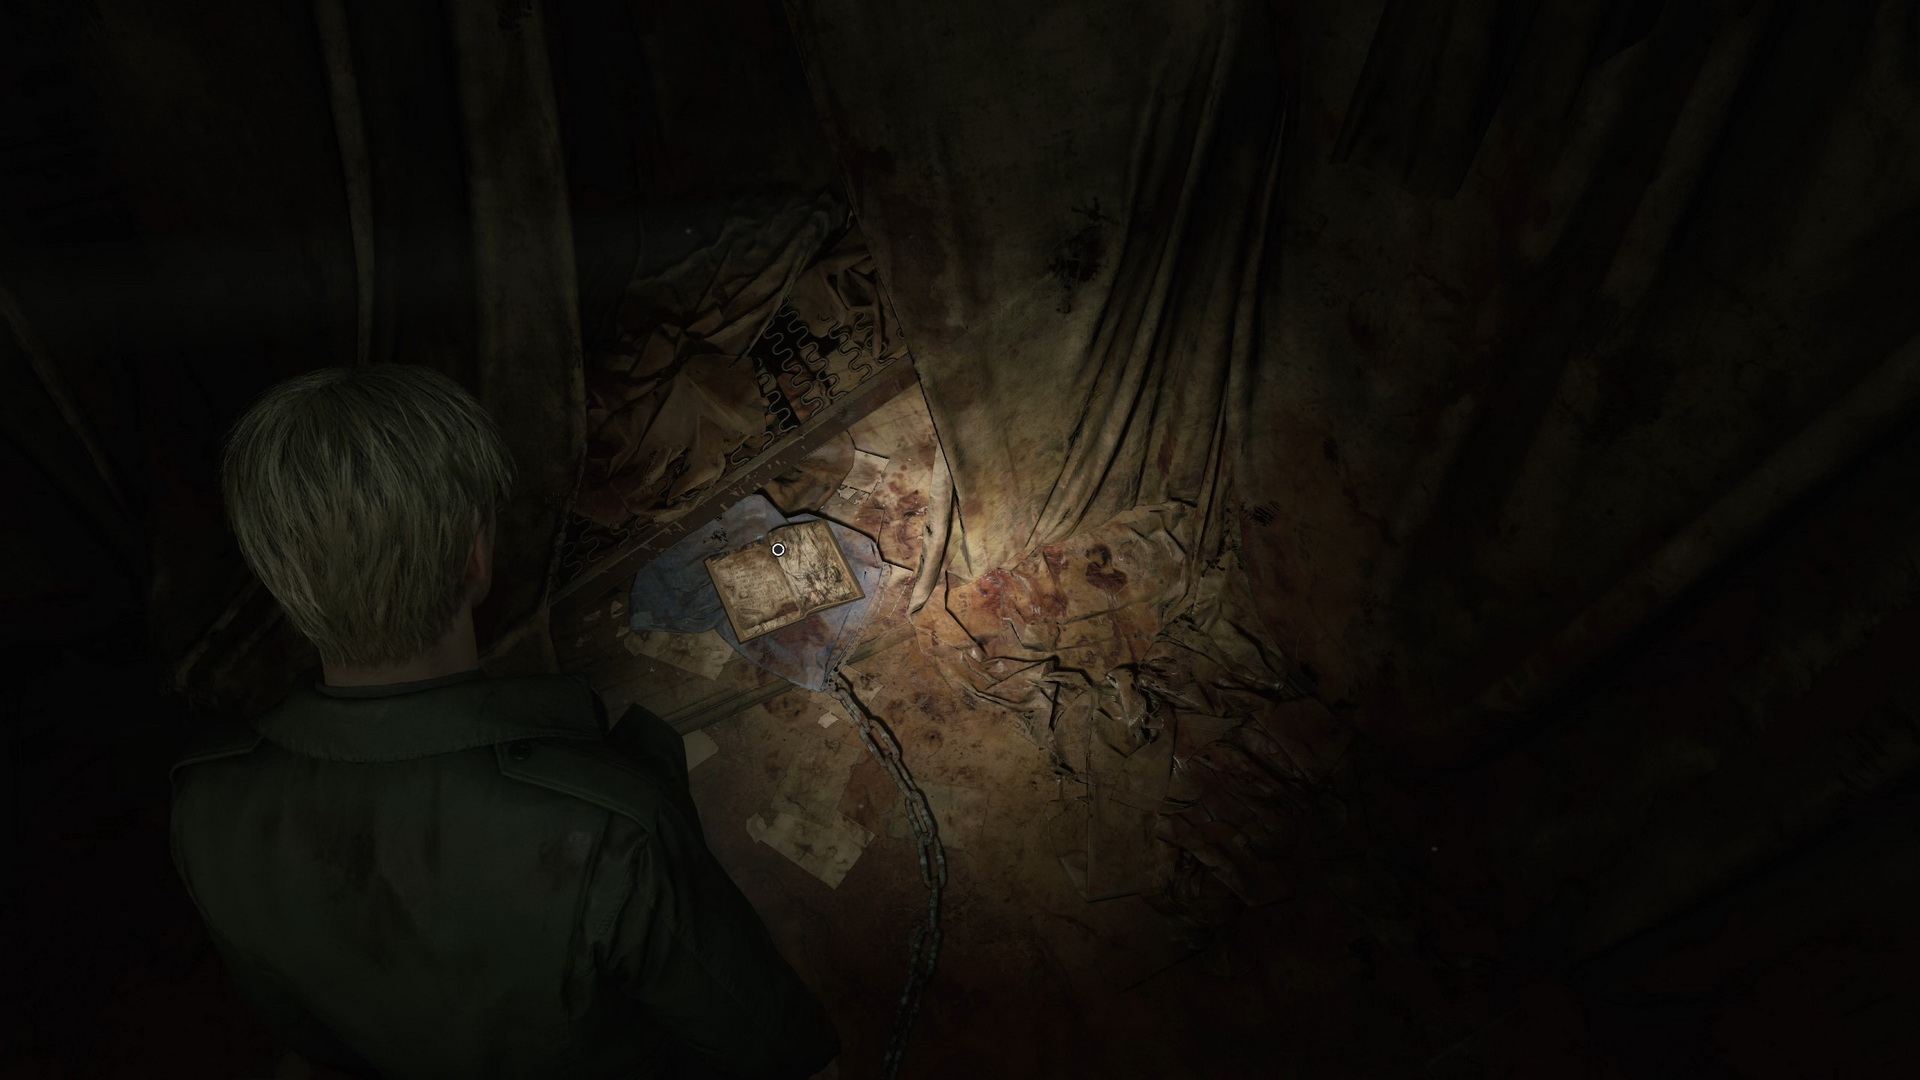
Step into the corridor and go to Room M1 to find Shotgun Shells on a window sill. Go to Room M3, take Handgun Ammo from a bed table and break the wall to get into Room M2. Inspect a diary under the hospital bed to collect Memo #40: Calendar Page.
 |
 |
This memo contains the hints for the first combination:
Light
1 year they've been watching me
The number of the pills in the sink
And the hour the clock makes a sound
All make me count the times the light goes outStandard/Hard
1 year they've been watching me
So many pills they fed me
When a loud hour comes
I tremble every time the light falls
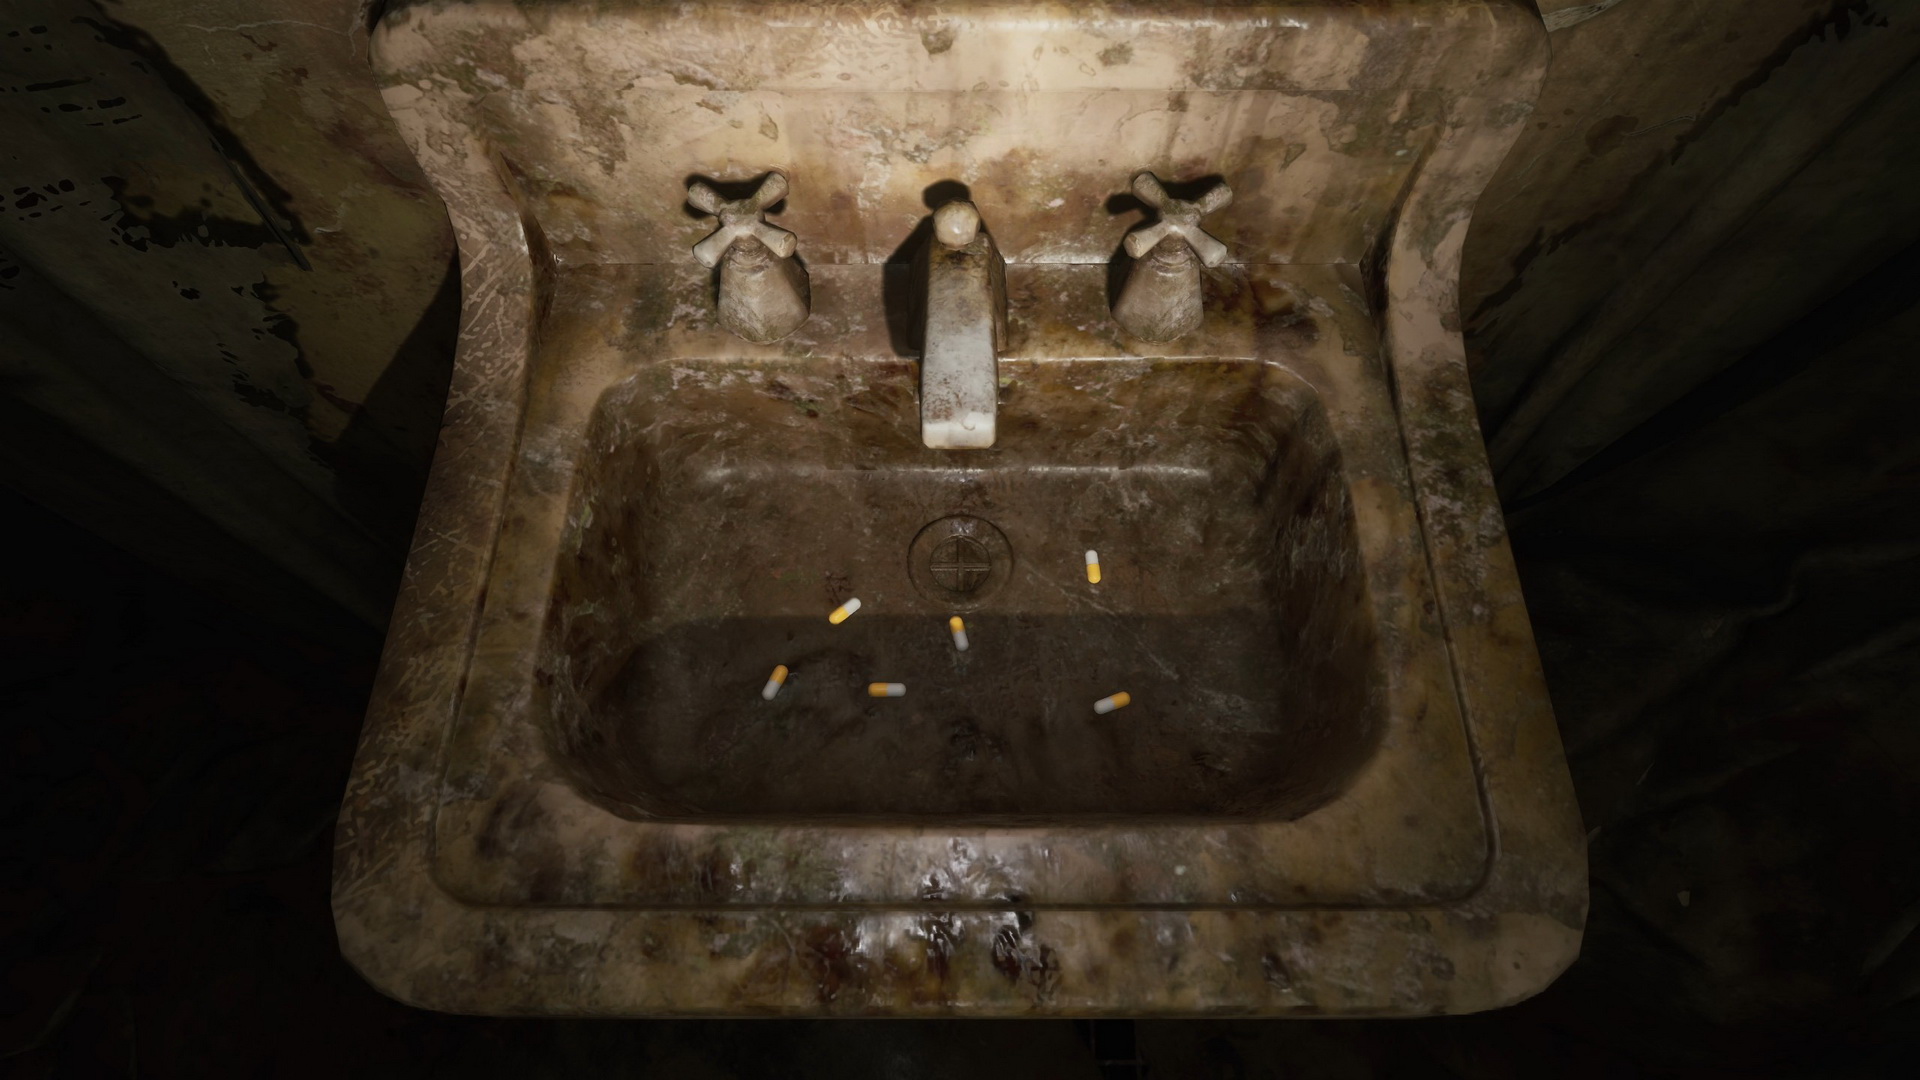
Let's look around to make sense of these clues:
- The first line is simple – one year.
- You will find some pills in the sink in the same room – six if you count them.
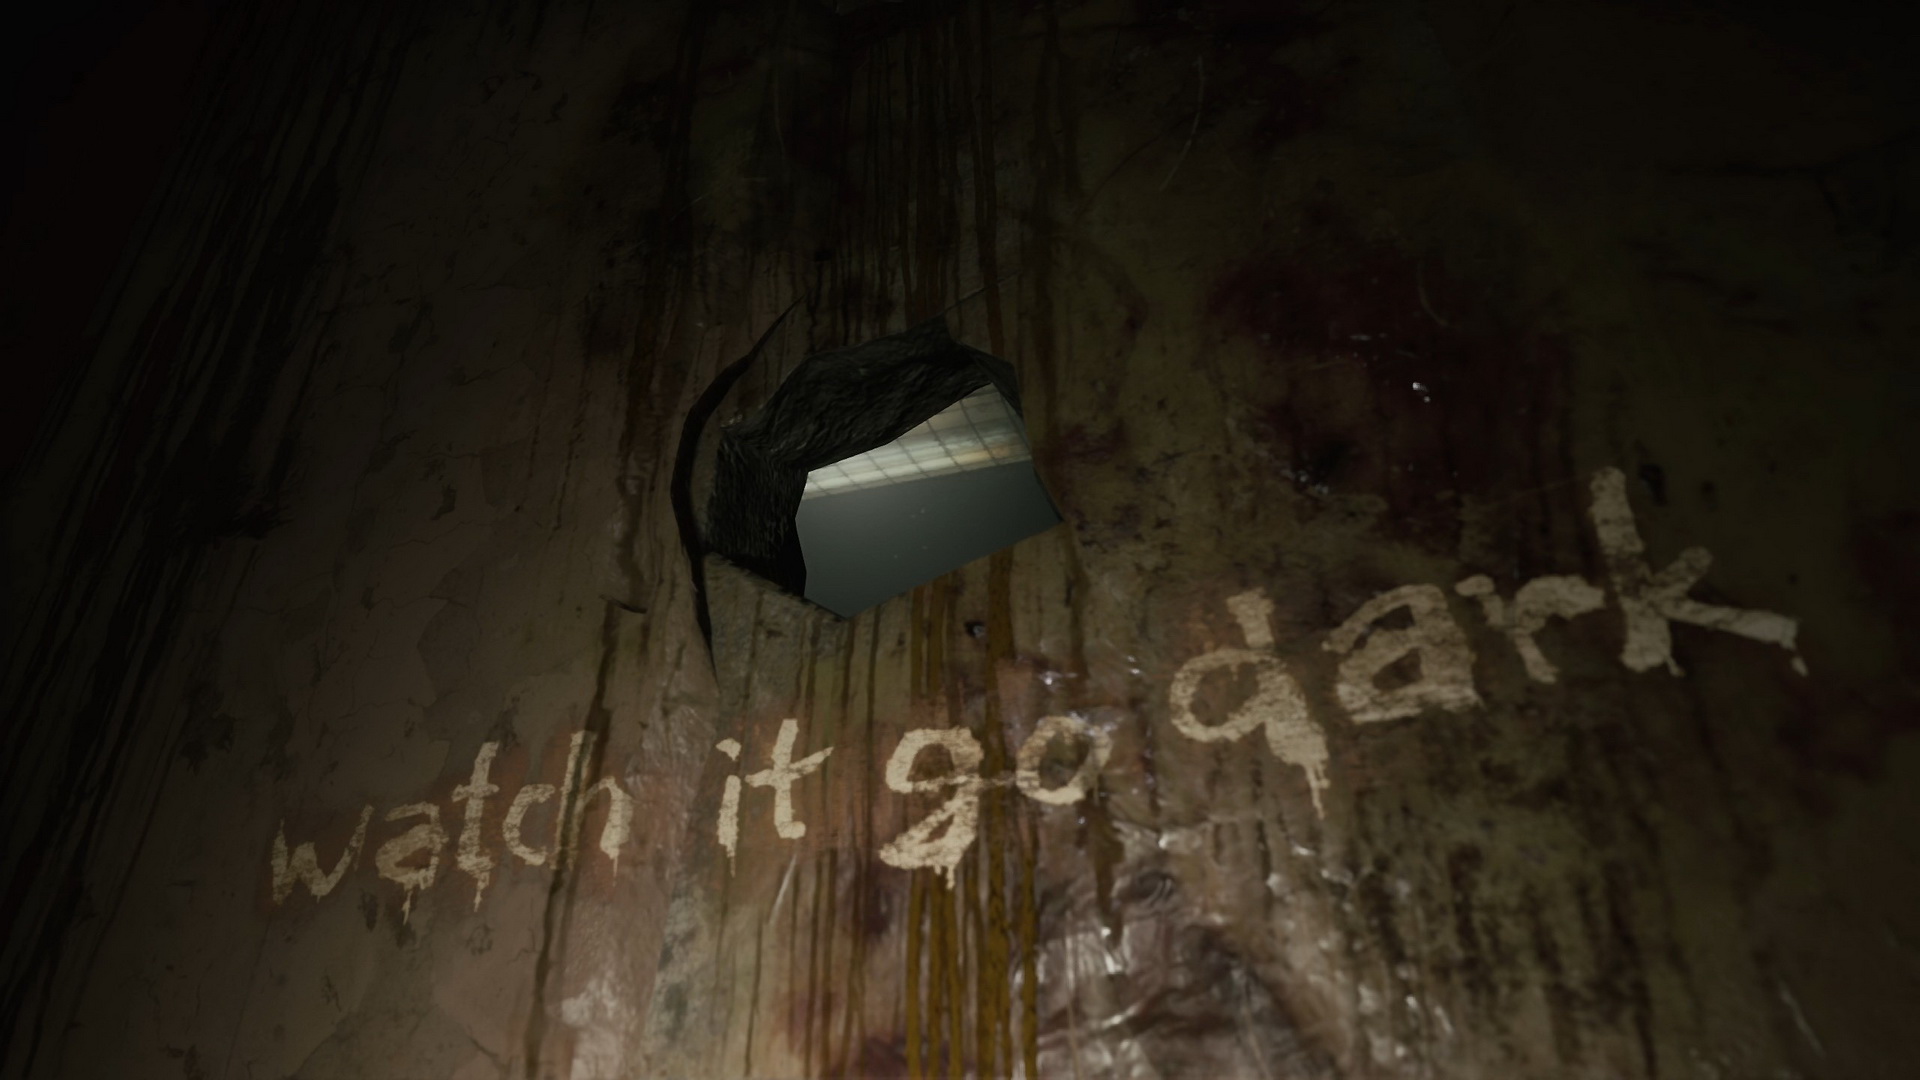
- There's a clock in Room M1. Interact with it to adjust the clock hand, which will stop at two hours. Beware that touching the clock will trigger the alarm and attract monsters to your location: two Nurses and a Lying Figure.
- If you look through the hole in the room with a text "watch it go dark", you will see the ceiling light flashes twice in a sequence.

|
The resulting code then will be 1622.
You can now return to the chained box through Rooms M4 and M5. In Room M5, you will find Handgun Ammo on the table and a Glimpse of the Past #16, a drawing of hands on the wall.
 |
 |
Unlock the door to the Restroom and return to the lobby with the box.
Learning the Second Code
Second Floor – Eastern Part
Note: You can skip this part, as the codes for the chained box will always be the same. Proceed to the chained box puzzle solution if chosen so. There are still some collectibles in the area.
Take the eastern corridor and go all the way around. A Nurse is waiting for you in the restroom. You can also find a Health Drink in the first aid cabinet in the room.
A Mannequin is hiding in Room C2, and another Nurse is in Room C1. Also, Room C2 has Handgun Ammo on a window sill and another Handgun Ammo in a nightstand's drawer.
Break the southern wall into the Laundry Room and proceed into the Shower Room, where you will meet a Lying Figure and a Nurse. You will find more Handgun Ammo on a bench in the southeastern corner of the shower area.
In Room L2, grab a Health Drink from a glass cabinet, push a wardrobe to unblock the door opening, take a trolley from the corner of the room, and push it to get inside Room L3 through a high window.
Inside Room L3, you will have to fight a Nurse and a hiding Mannequin. Another Nurse may come from the Observation Room. When safe, you can explore the room to find Shotgun Shells in a drawer by the western wall and Handgun Ammo in a desk's drawer in the southeastern corner.
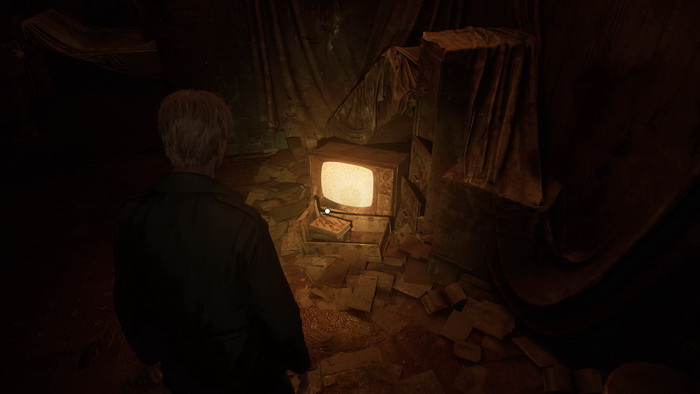
Go to the Observation Room to pick up Memo #41: Patient's Note from the bed table.
 |
 |
Approach the TV and take the 65 Director’s Office Key.
Go to Room C5 and find Strange Photo #14: "No one knows," in the drawer of the nightstand.
 |
 |
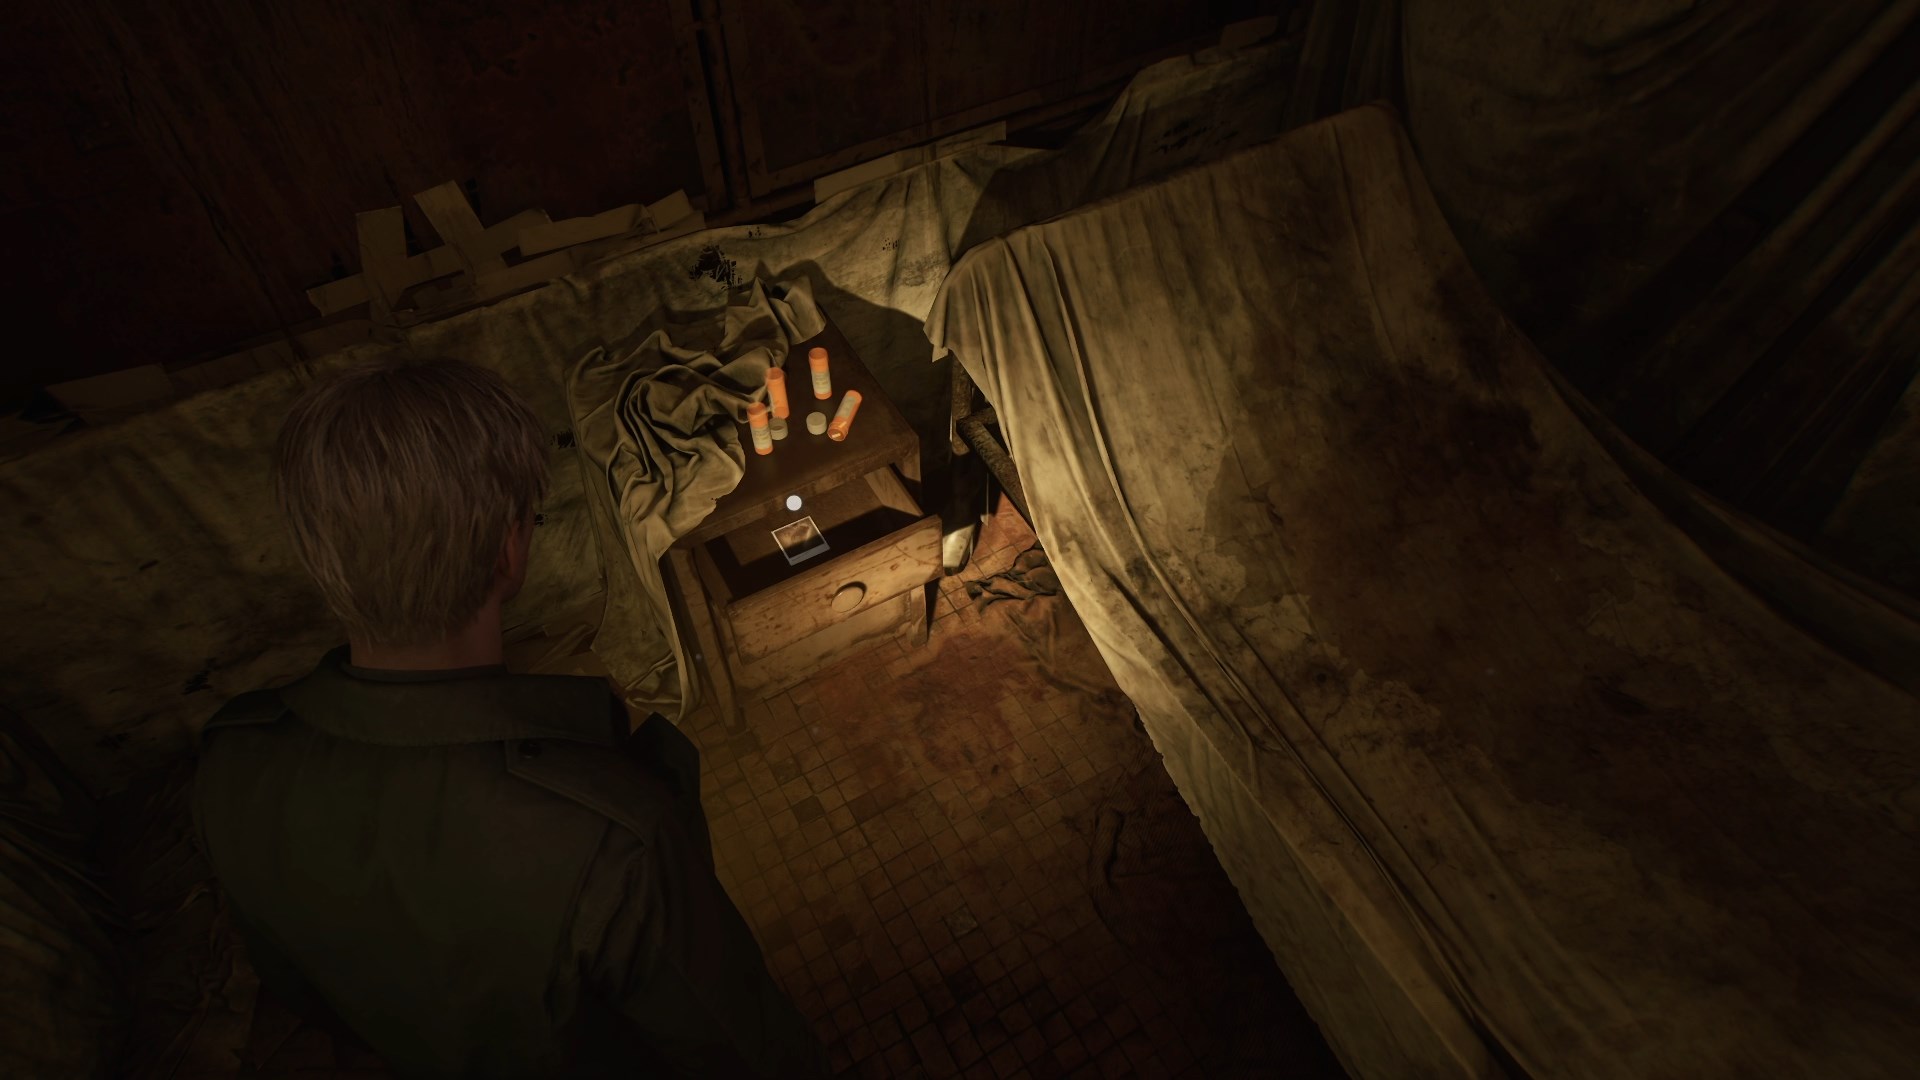
Return to the corridor and use the key to proceed to the Director's Office. In the office storage you can find a Health Drink and Shotgun Shells in a glass cabinet as well as the cardiectomy procedure note on the table (New Game+ only). The note contains the second code hint for the "Stillness" ending.
 |
 |
Find Memo #42: Manic Scribble on a cabinet to the right of the desk.
 |
 |
You can also hit the play on the tape recorder, but it will only play static. Climb the ladder in the center of the room.
Third Floor
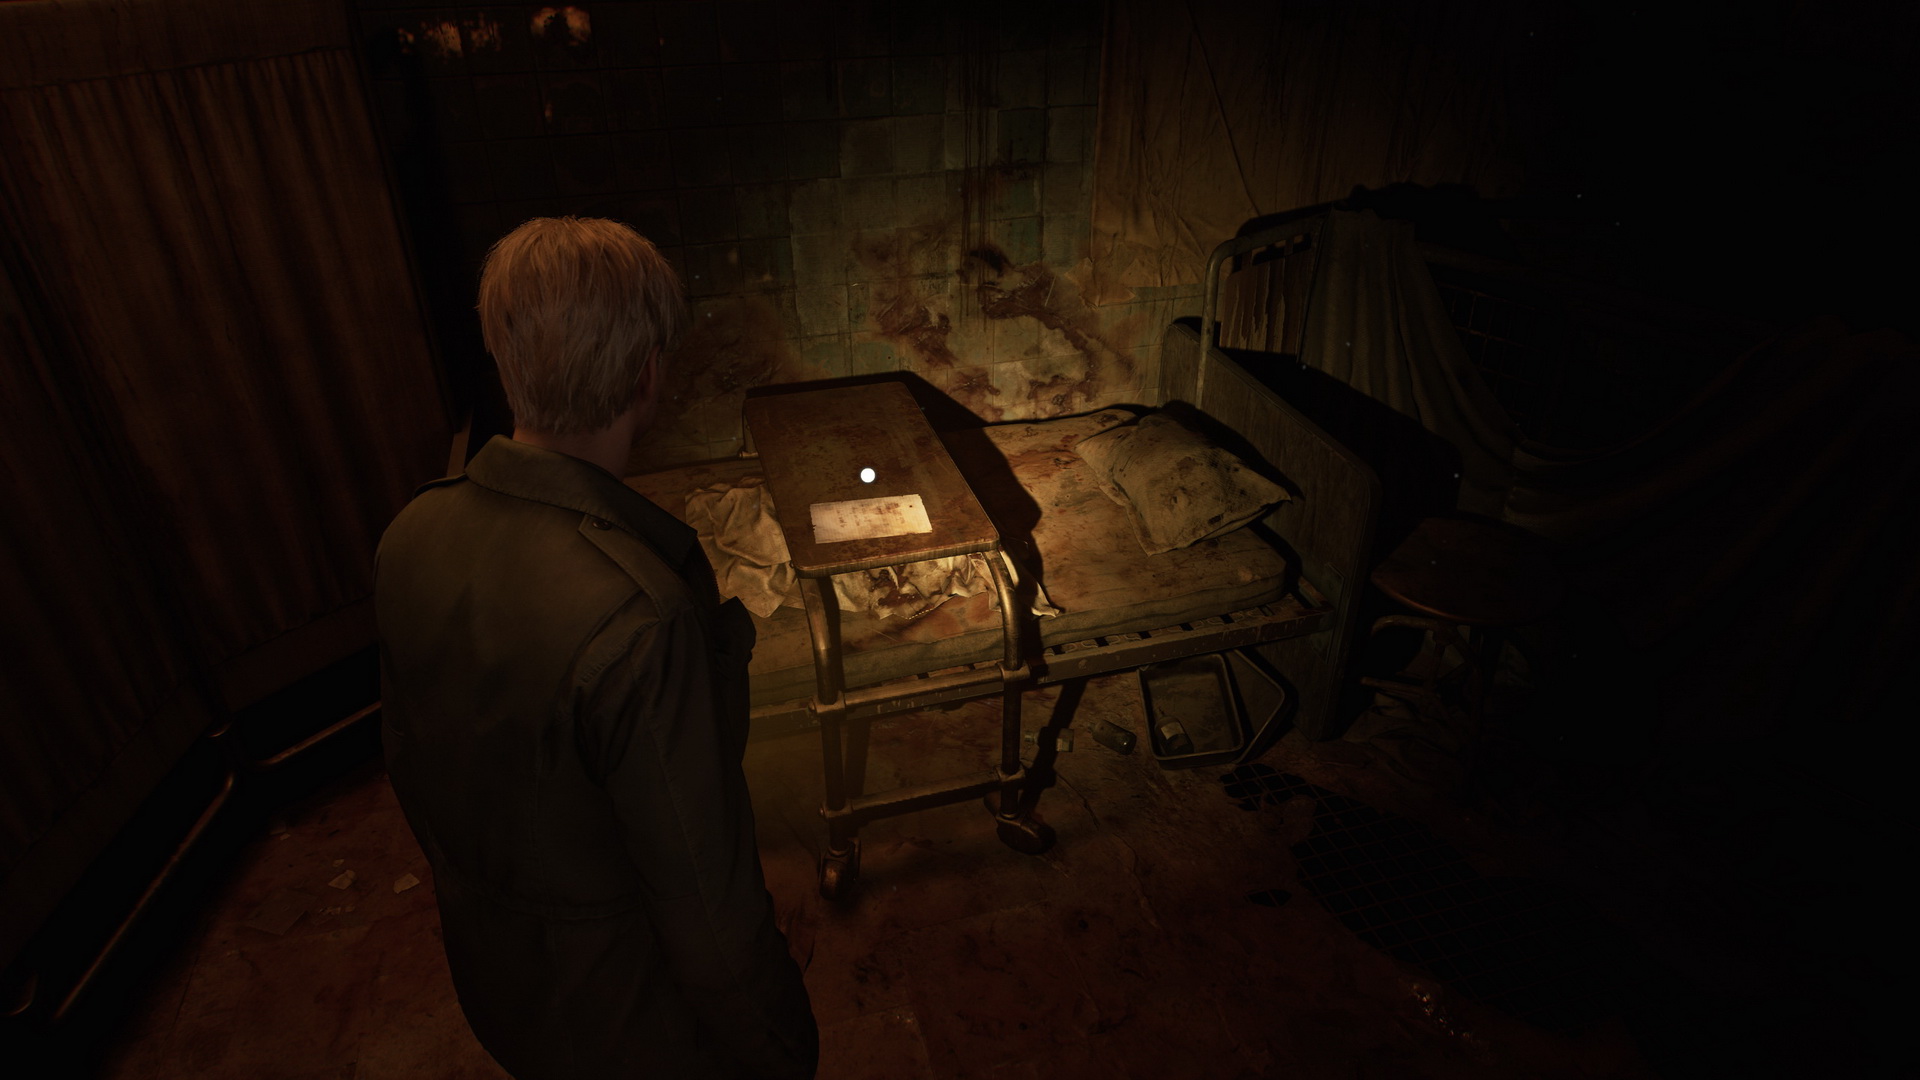
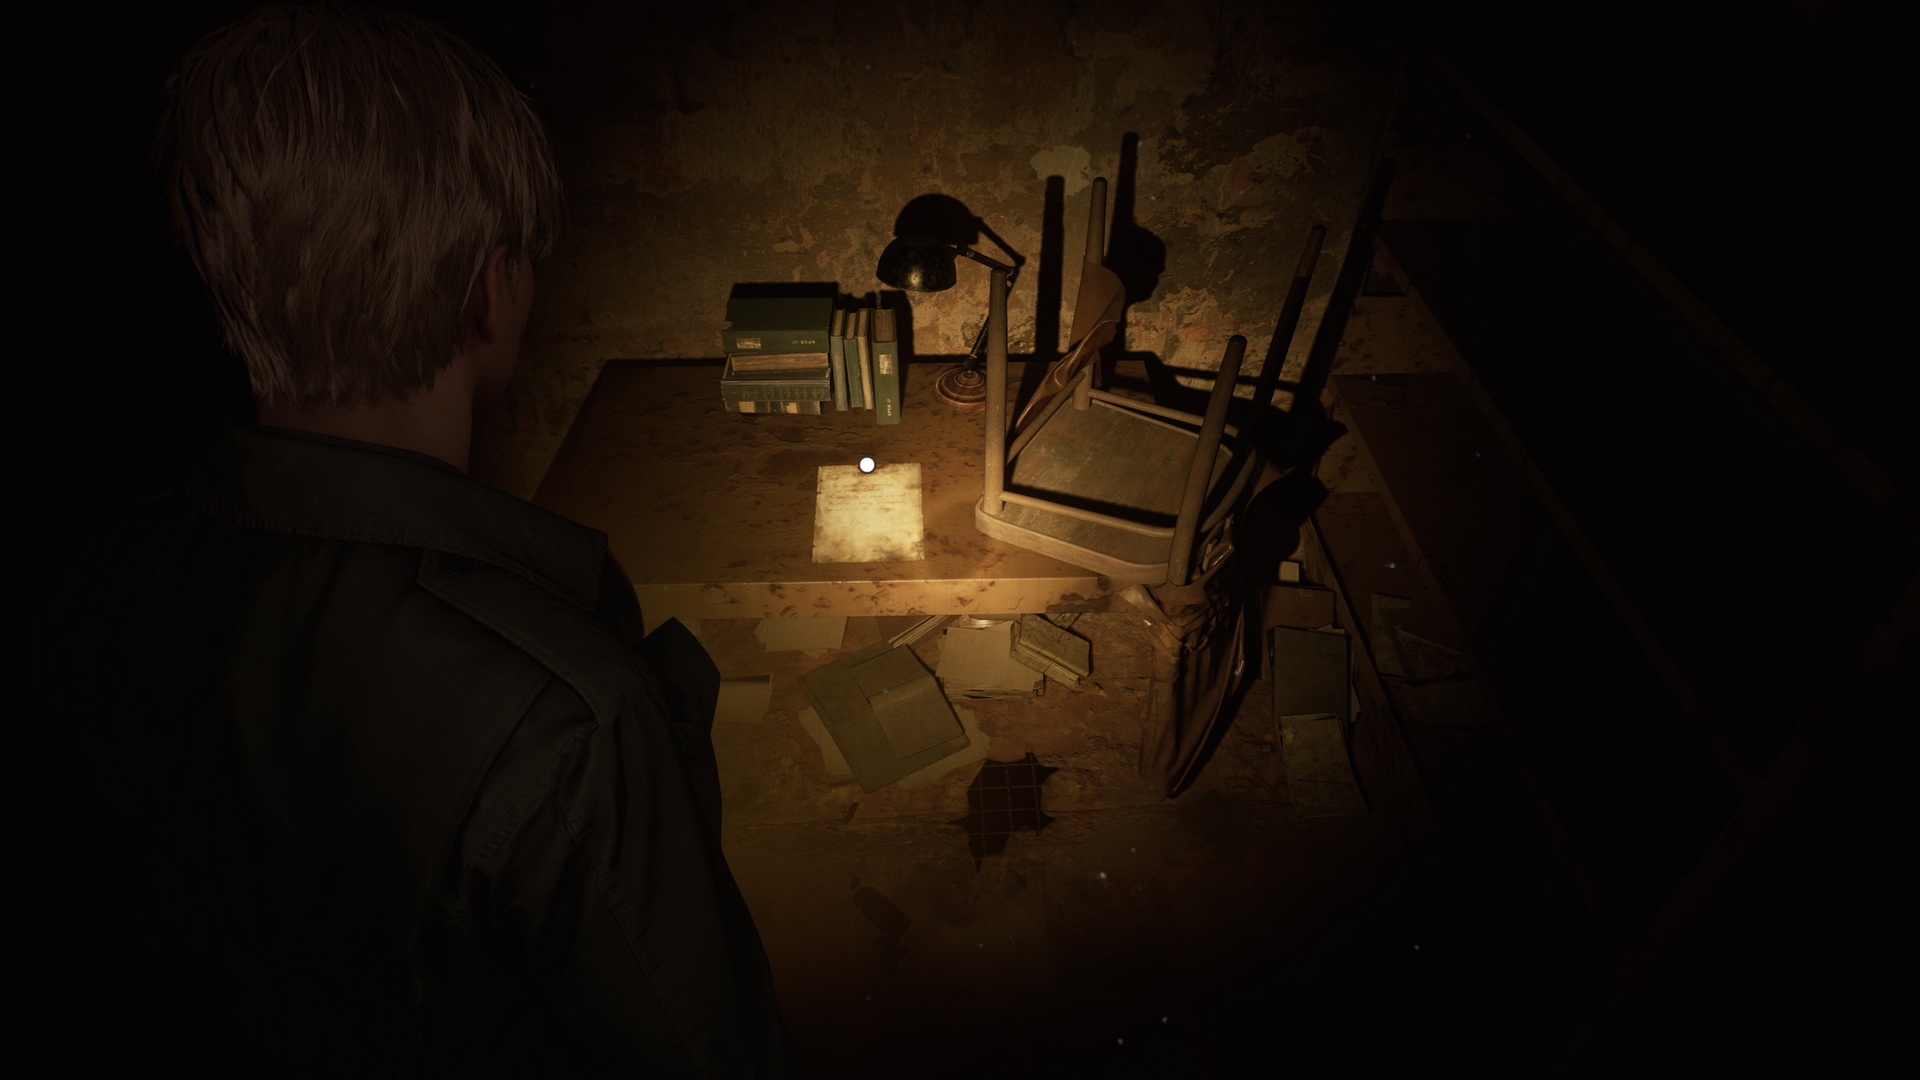
In Room I7, you will find a treatment stretcher and a machine without power next to it. We will need to power it up to learn the second code. Also, in the room, you can find Handgun Ammo on a shelf and a Syringe in the first aid cabinet. Memo #43: Nurse’s Note is on a table by the opposite wall of the same room.
 |
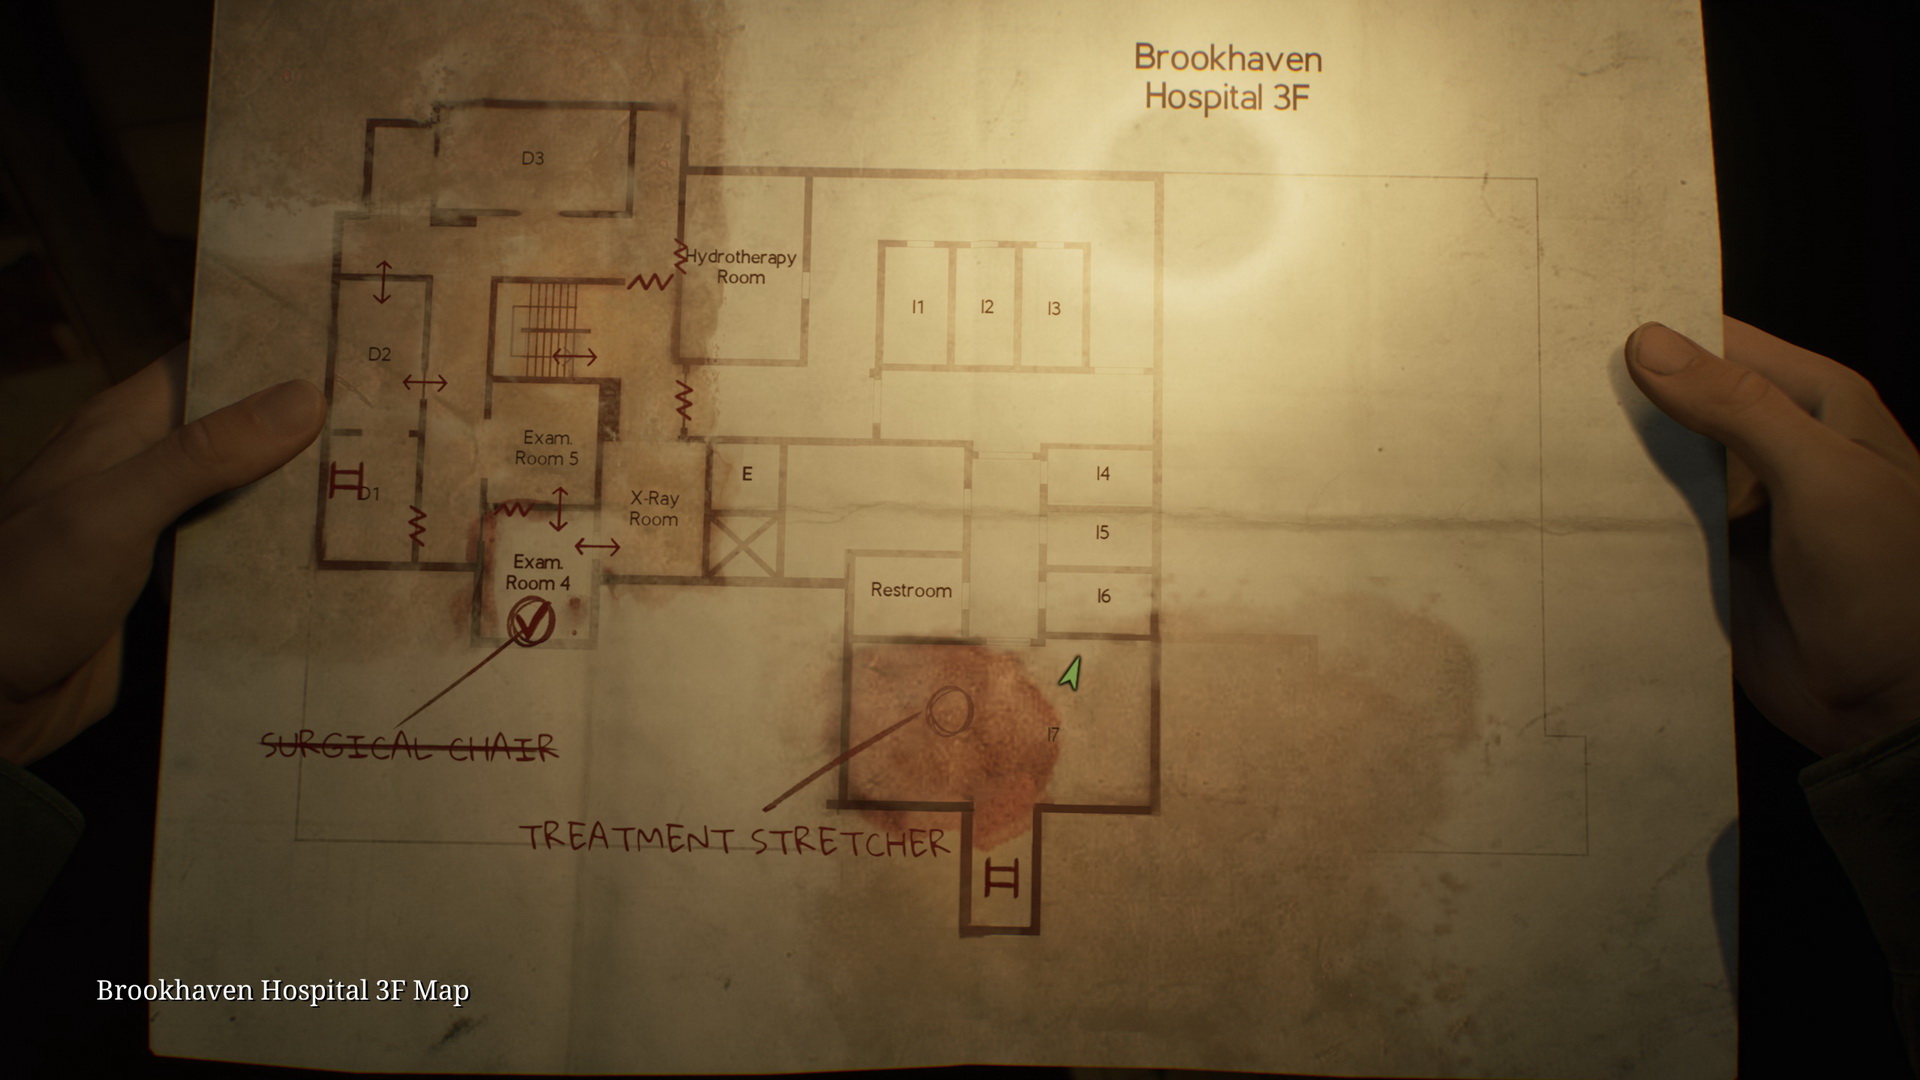 |
Go past the treatment stretcher, following the red cable to locate the generator. You will run into two Nurses and a Lying Figure in the northern section. Hop through an opening in Room I1, grab Handgun Ammo on top of a trash can at the end of the hallway and crawl through a wall gap into a room to the south. You will find a Health Drink in the first aid cabinet and the generator inside the room. Fire it up to power the machine.

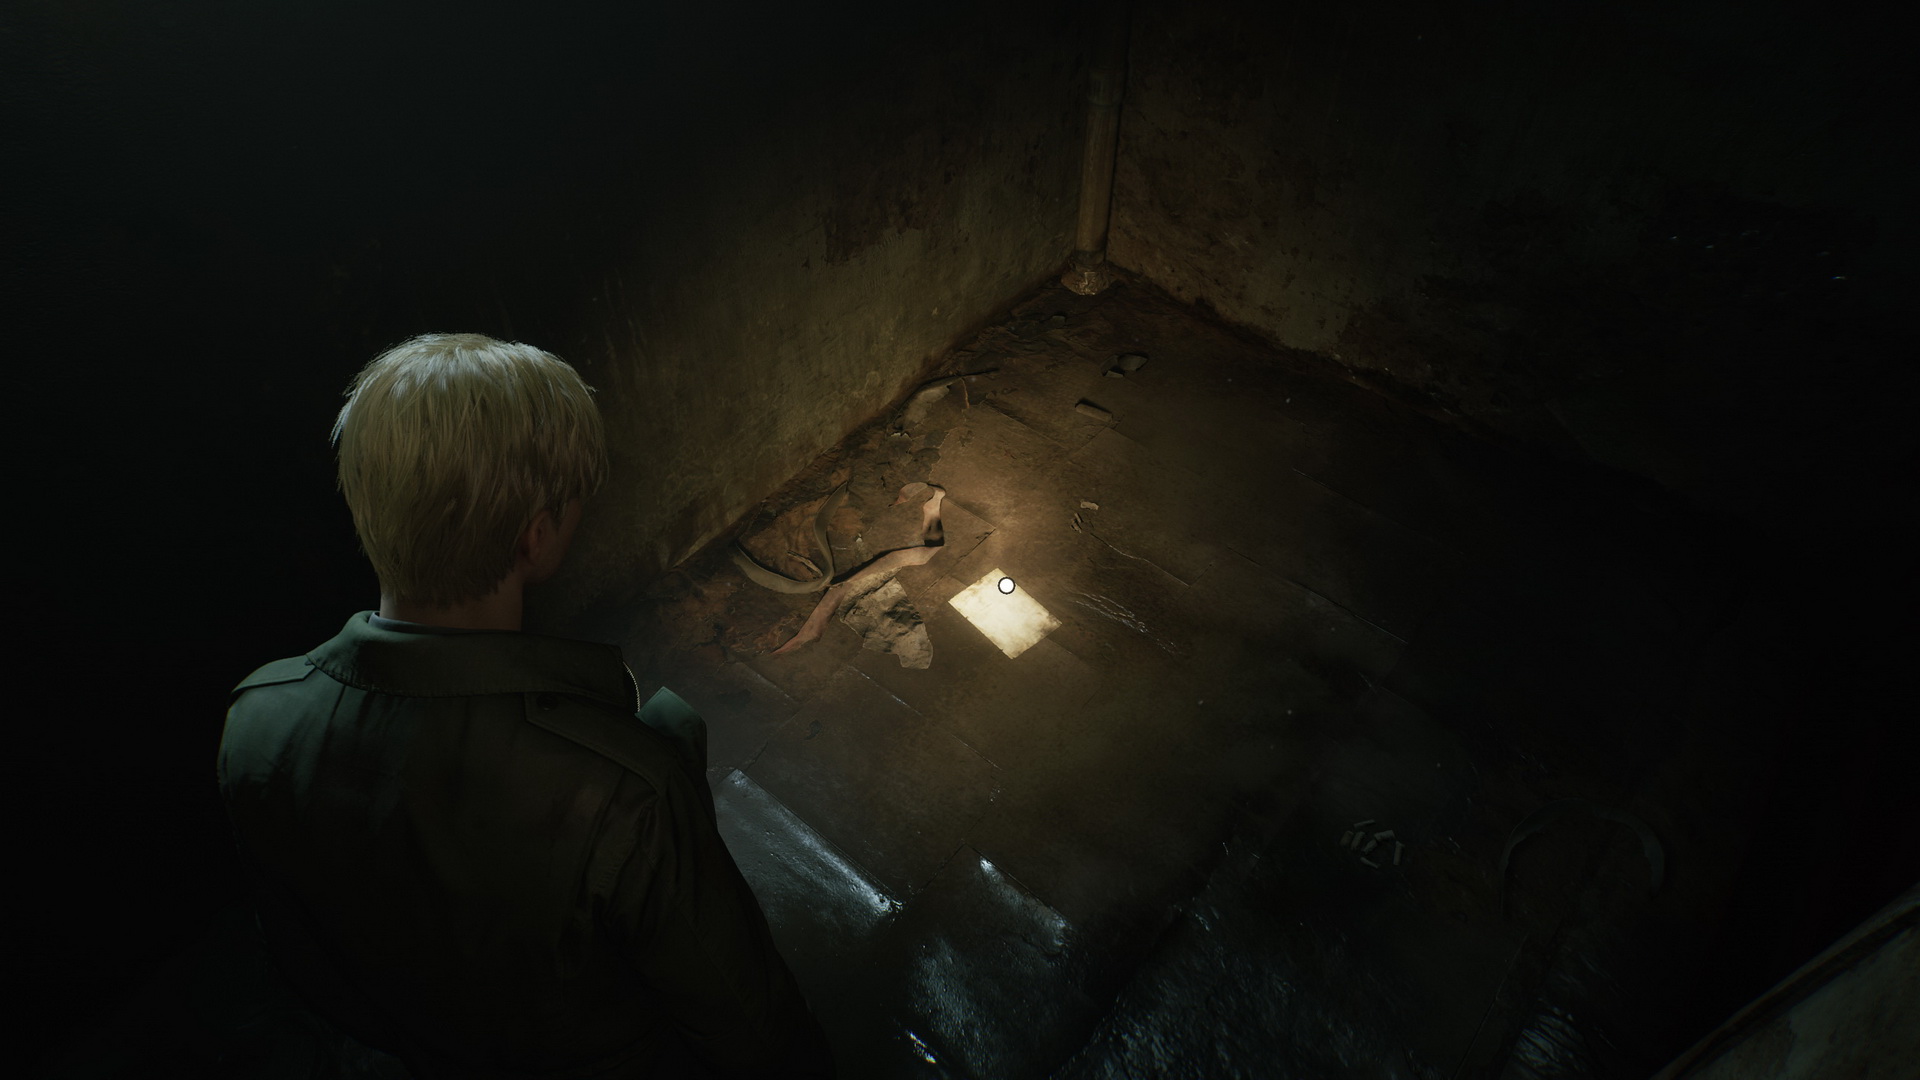
Crawl through a vent opening into the Restroom and find Memo #44: Director’s Note on the floor.
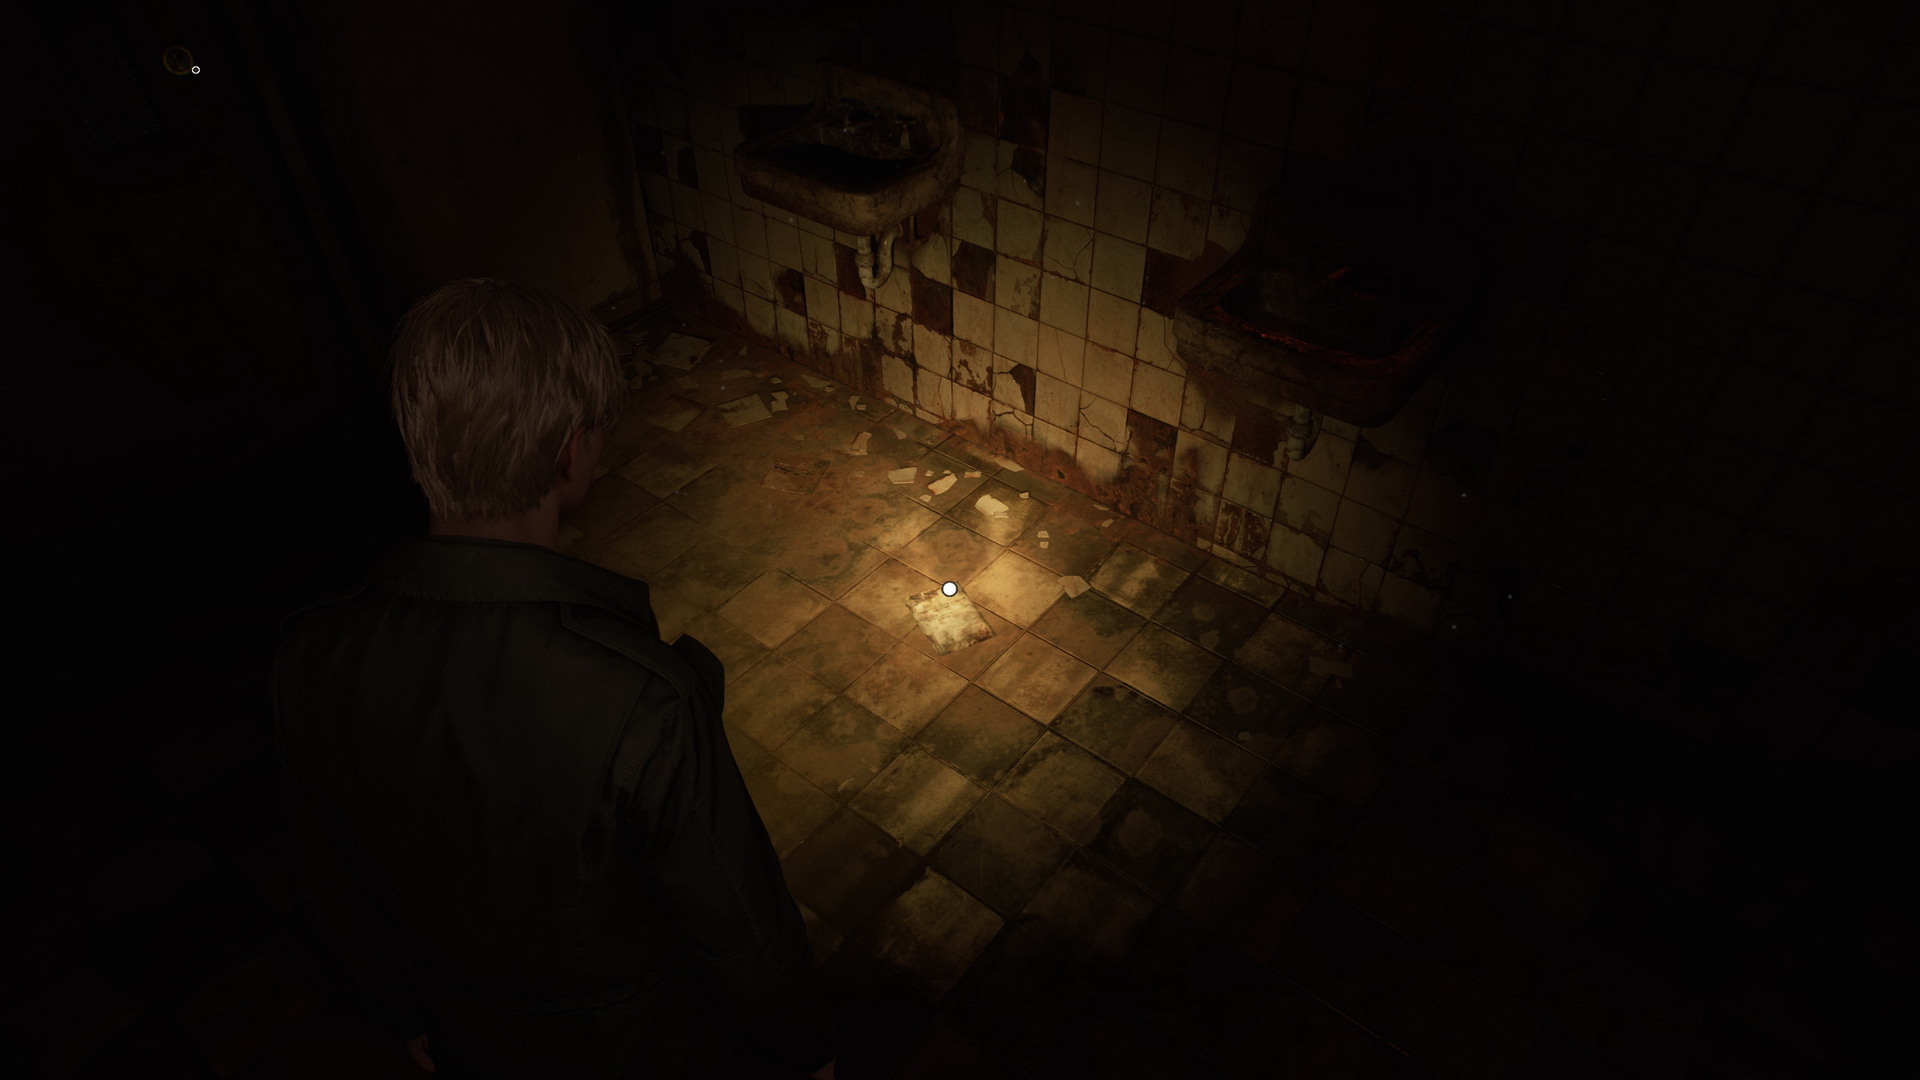 |
 |
Unlock the restroom door and return to the treatment stretcher in Room I7. Use the machine next to it to reveal the code 9659.
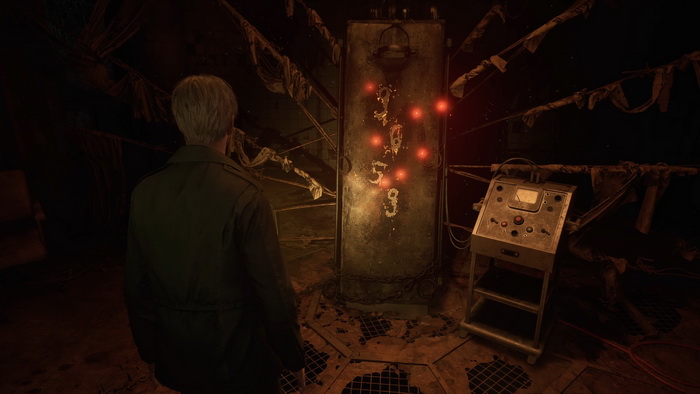
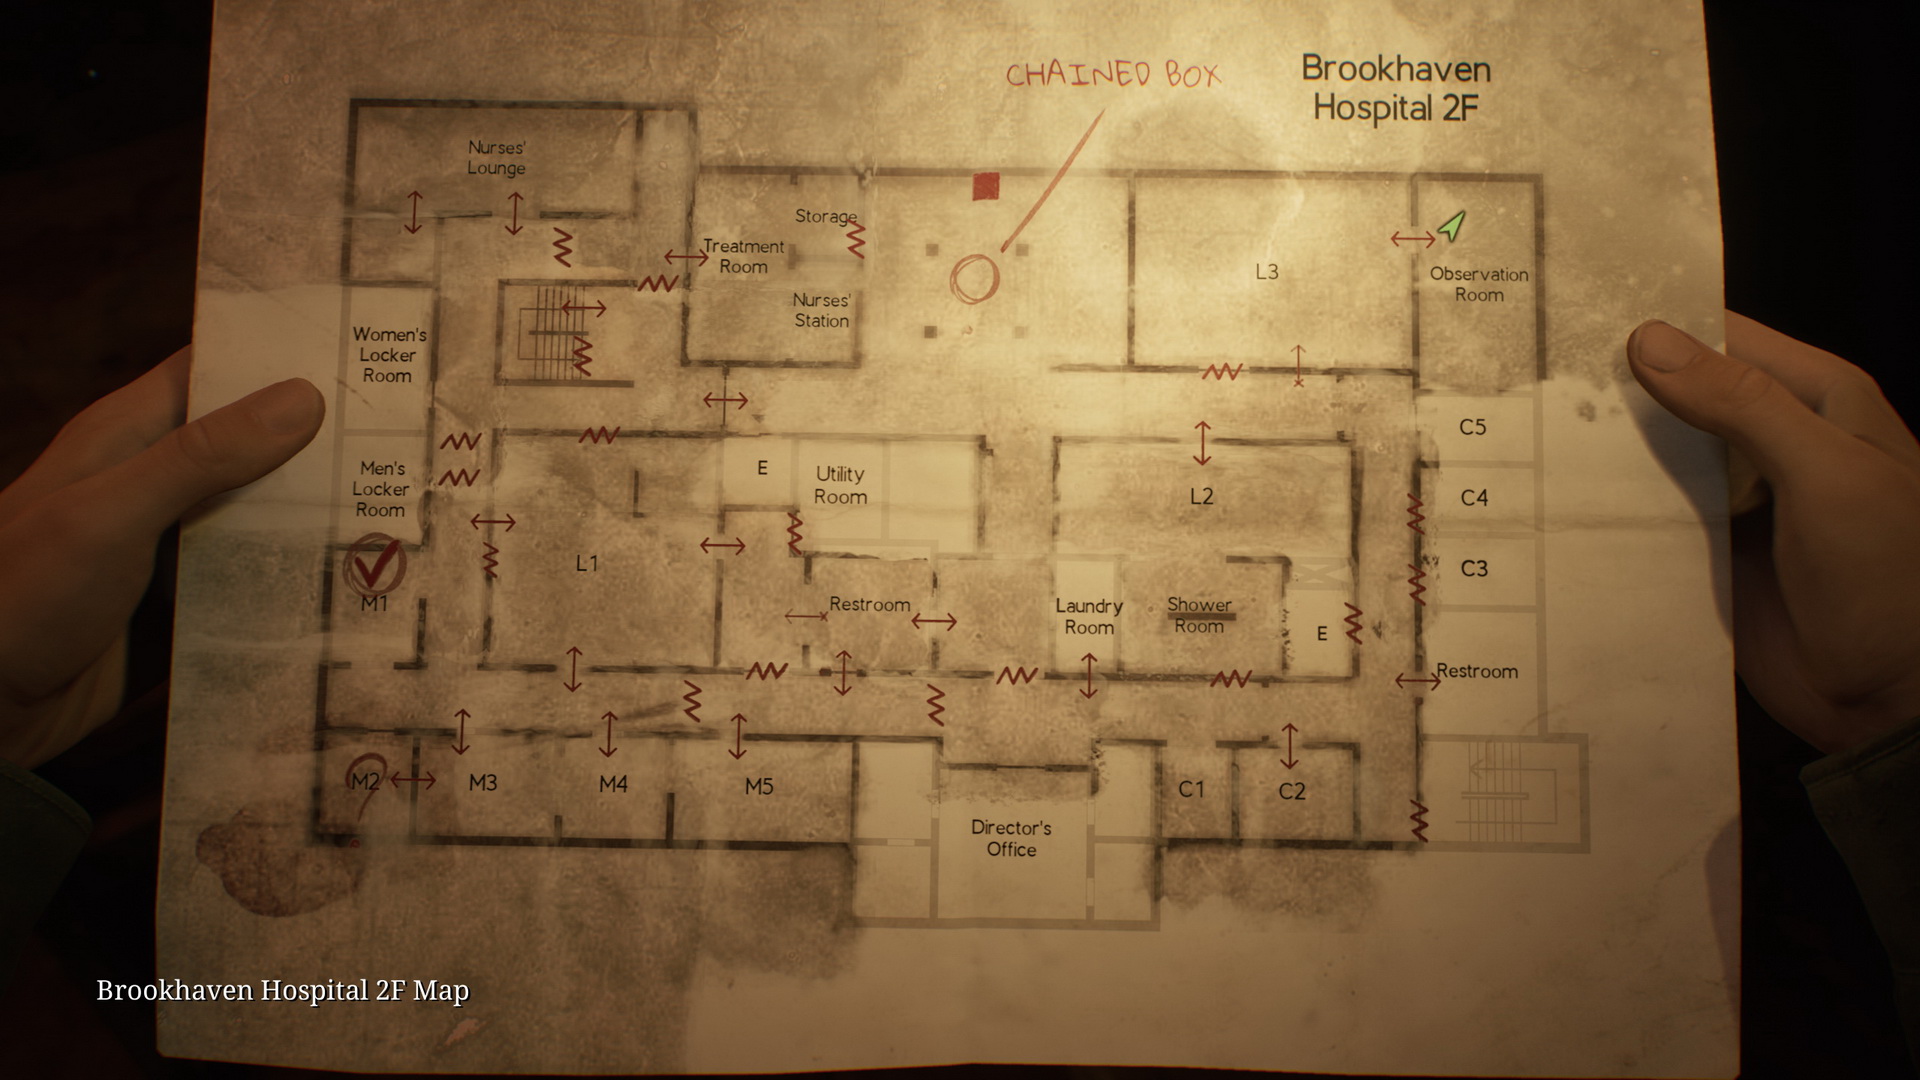
Solving the Chained Box Puzzle
Second Floor
Return to the chained box on the second floor to open it:
- Use the Lapis Eye Key on the keyhole.
- Input the code from the Calendar Page memo in 2F Room M2 on the left combination lock – 1622.
- Input the code from the treatment stretcher in 3F Room I7 into the right keypad – 9659.
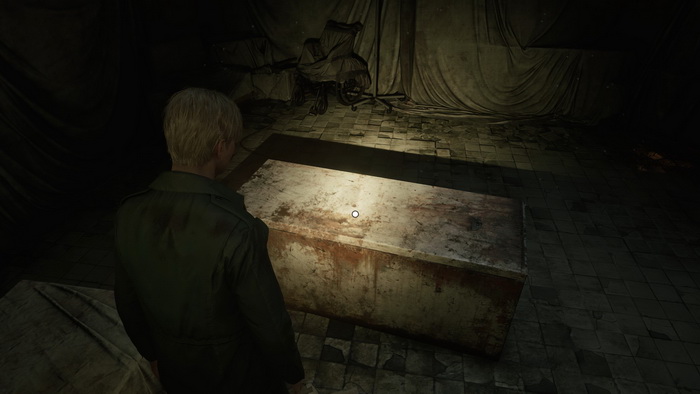
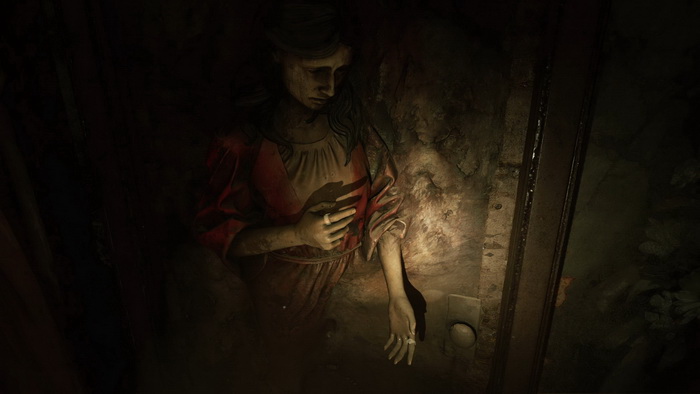
The box is empty, but James will take a 66 -1 Elevator Button during the cutscene. You can read a note on the wall beside the revealed Lady of the Door.
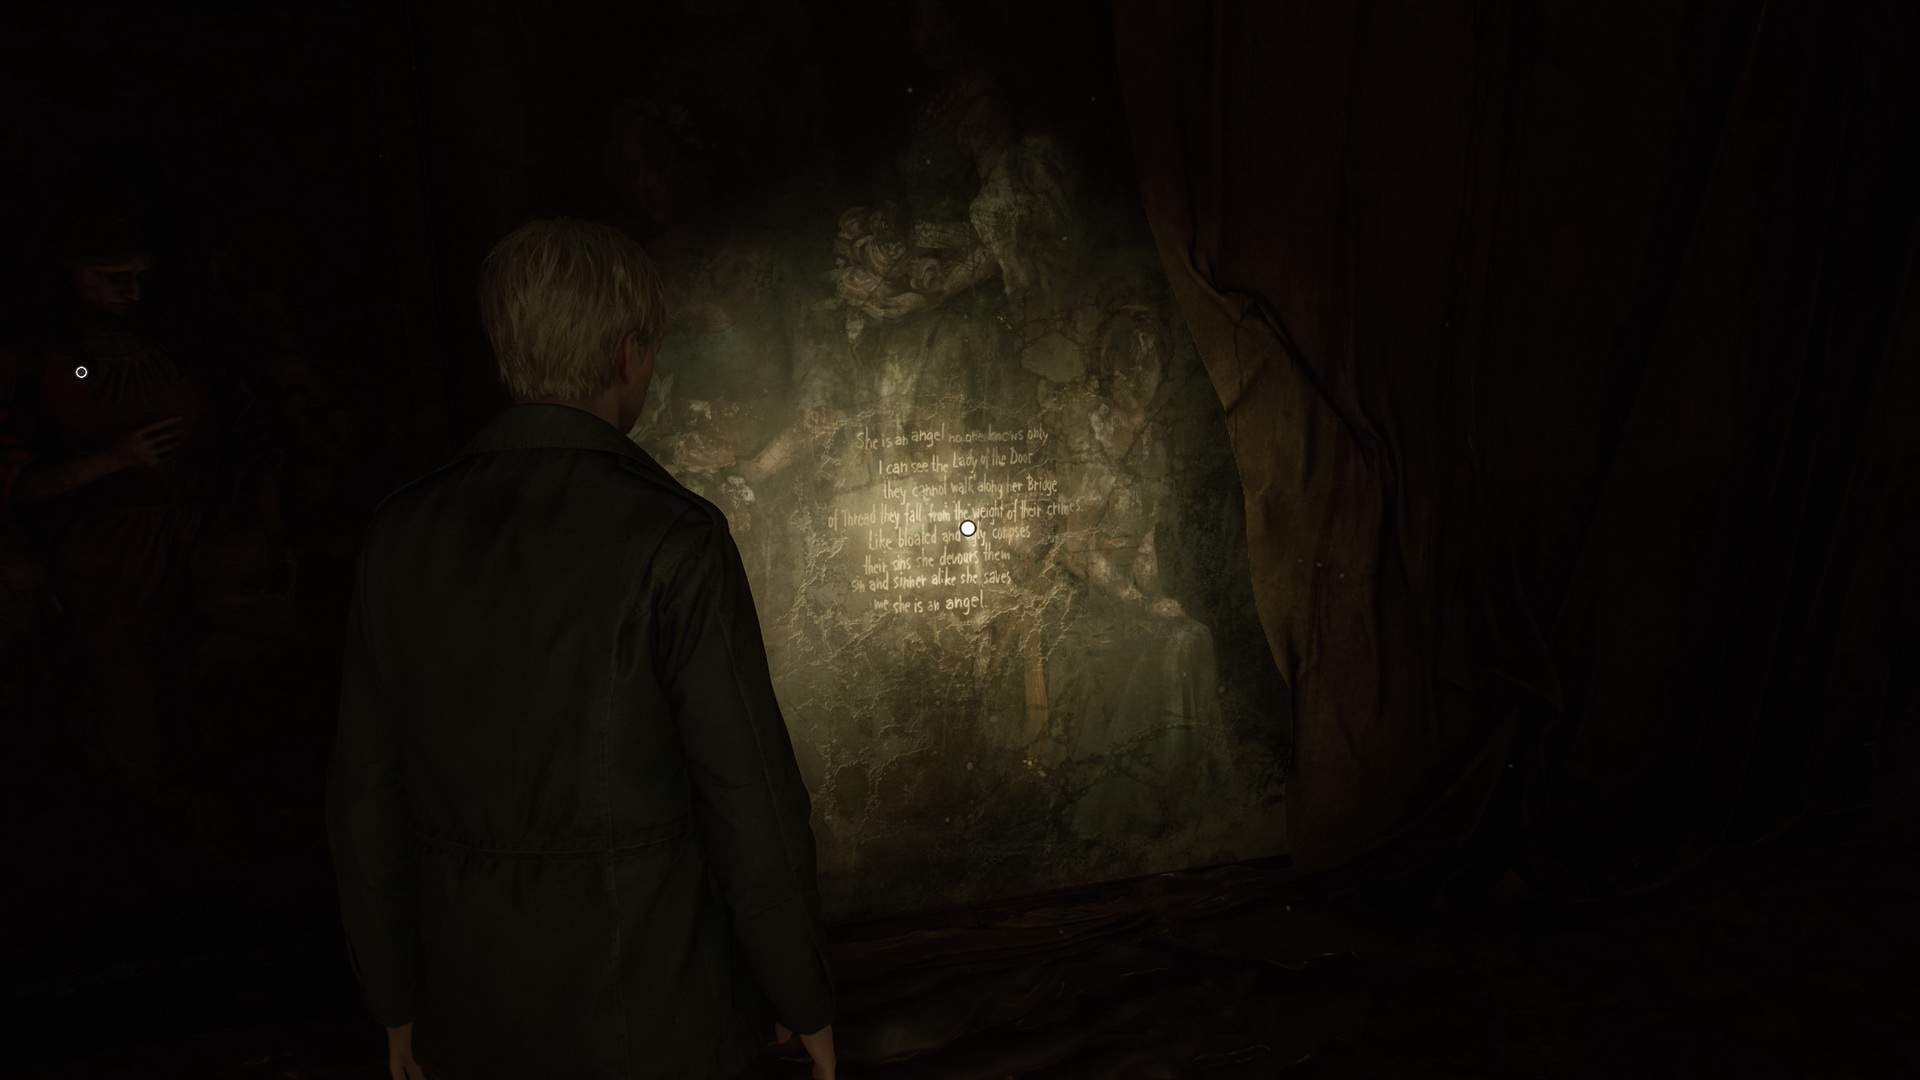 |
 |
To unlock the door, you will need to find two rings. Enter the elevator and insert the new button to go to the basement. As you take the elevator, a mysterious "Trick or Treat" radio show will ask you three questions about Silent Hill lore. Listen carefully, as you will later be able to open a certain locked box using the right answers to these questions.
Finding the Rings
Basement
From the elevator, go left. A Nurse is roaming this corridor. If you want more supplies, you can find them In the Kitchen Disposal Room guarded by a single Mannequin: Shotgun Shells in a glass cabinet, Handgun Ammo on a shelf and a Health Drink in a first aid cabinet. There's more Handgun Ammo on a shelf in the northern storage room and a single Creeper.
Proceed through the Maintenance Room and the Generator Room through a wall gap. Next, go to the Laundry Room, where you will find more Handgun Ammo on a shelf guarded by a Mannequin. Proceed to the Storage with a crawling Lying Figure and a Health Drink on a shelf. At the end of the southern corridor, there's more Handgun Ammo on a chair.
Crawl into the Boiler Room. A Nurse is found in the northern Boiler Room. Crawl through the high opening and then into the Pump Room. Take the 67 Copper Ring from a crate.
Maria will rejoin you after picking up the ring. Go straight to the staircase to the first floor.
First Floor
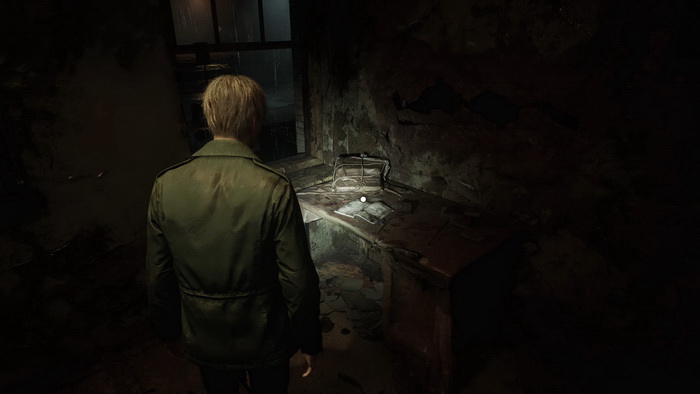
In Exam Room 3, you can find a Syringe in a first aid kit on a table. Proceed with Maria into the Pool Room.
Strange Photo #15: "They mustn’t know" is on a bench in the back of the Pool Room.
 |
 |
Go through the shower area and enter the Doctors' Lounge. Inspect the fallen freezer to collect the 68 Lead Ring after a cutscene.
Find Memo #45: Dissociated Notice on a bench in the Locker Room next to the Lounge.
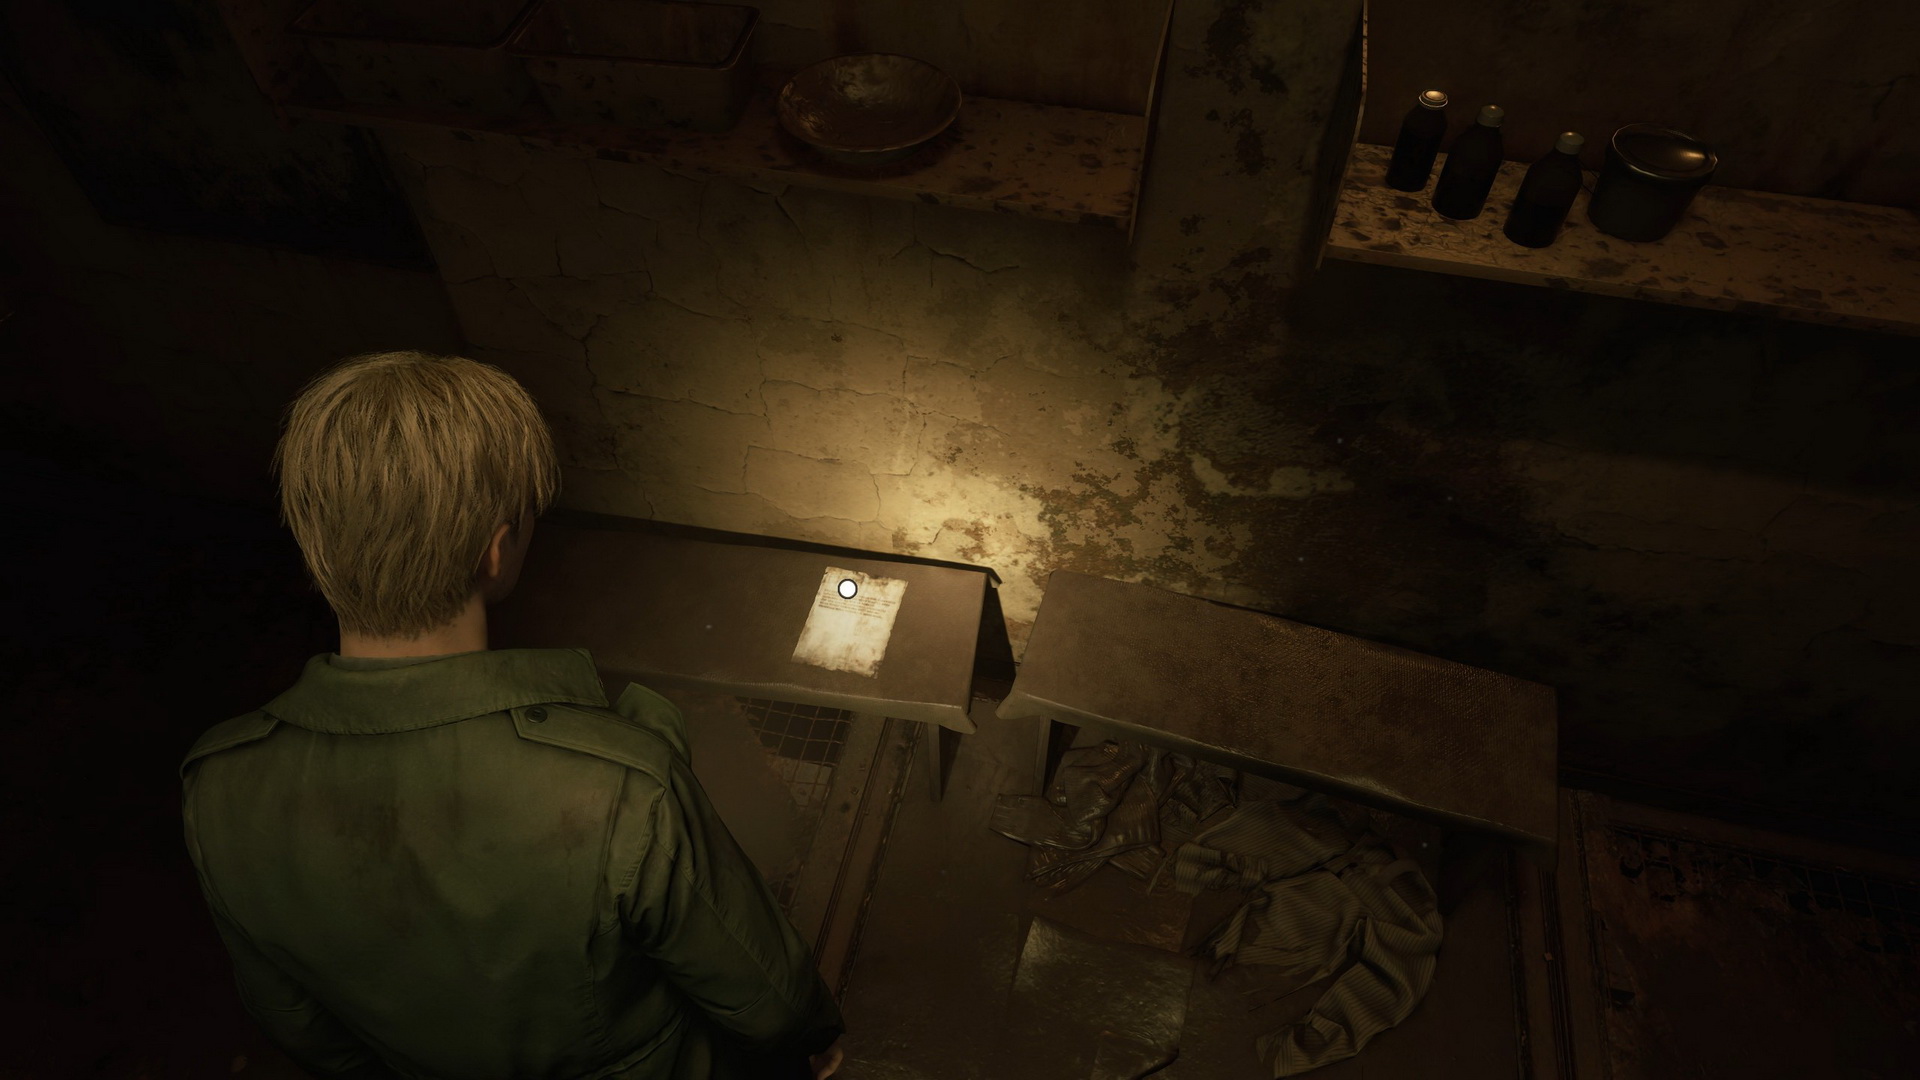 |
 |
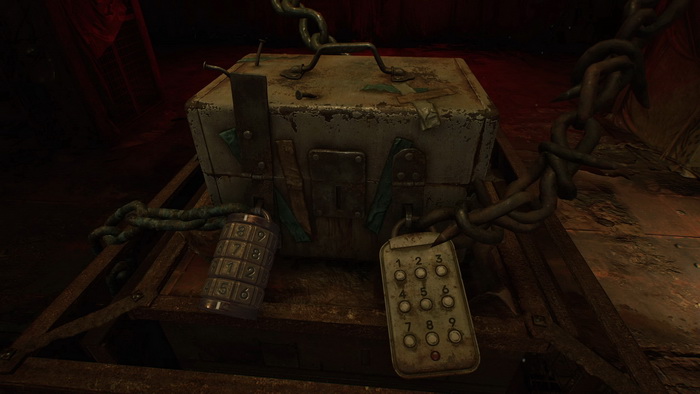
Before returning to the second floor, you can visit the Pharmacy, where you will find a locked decorative box.
Puzzle: Pharmacy Decorative Box
This puzzle is optional, and the reward awaiting you inside the box is supplies.
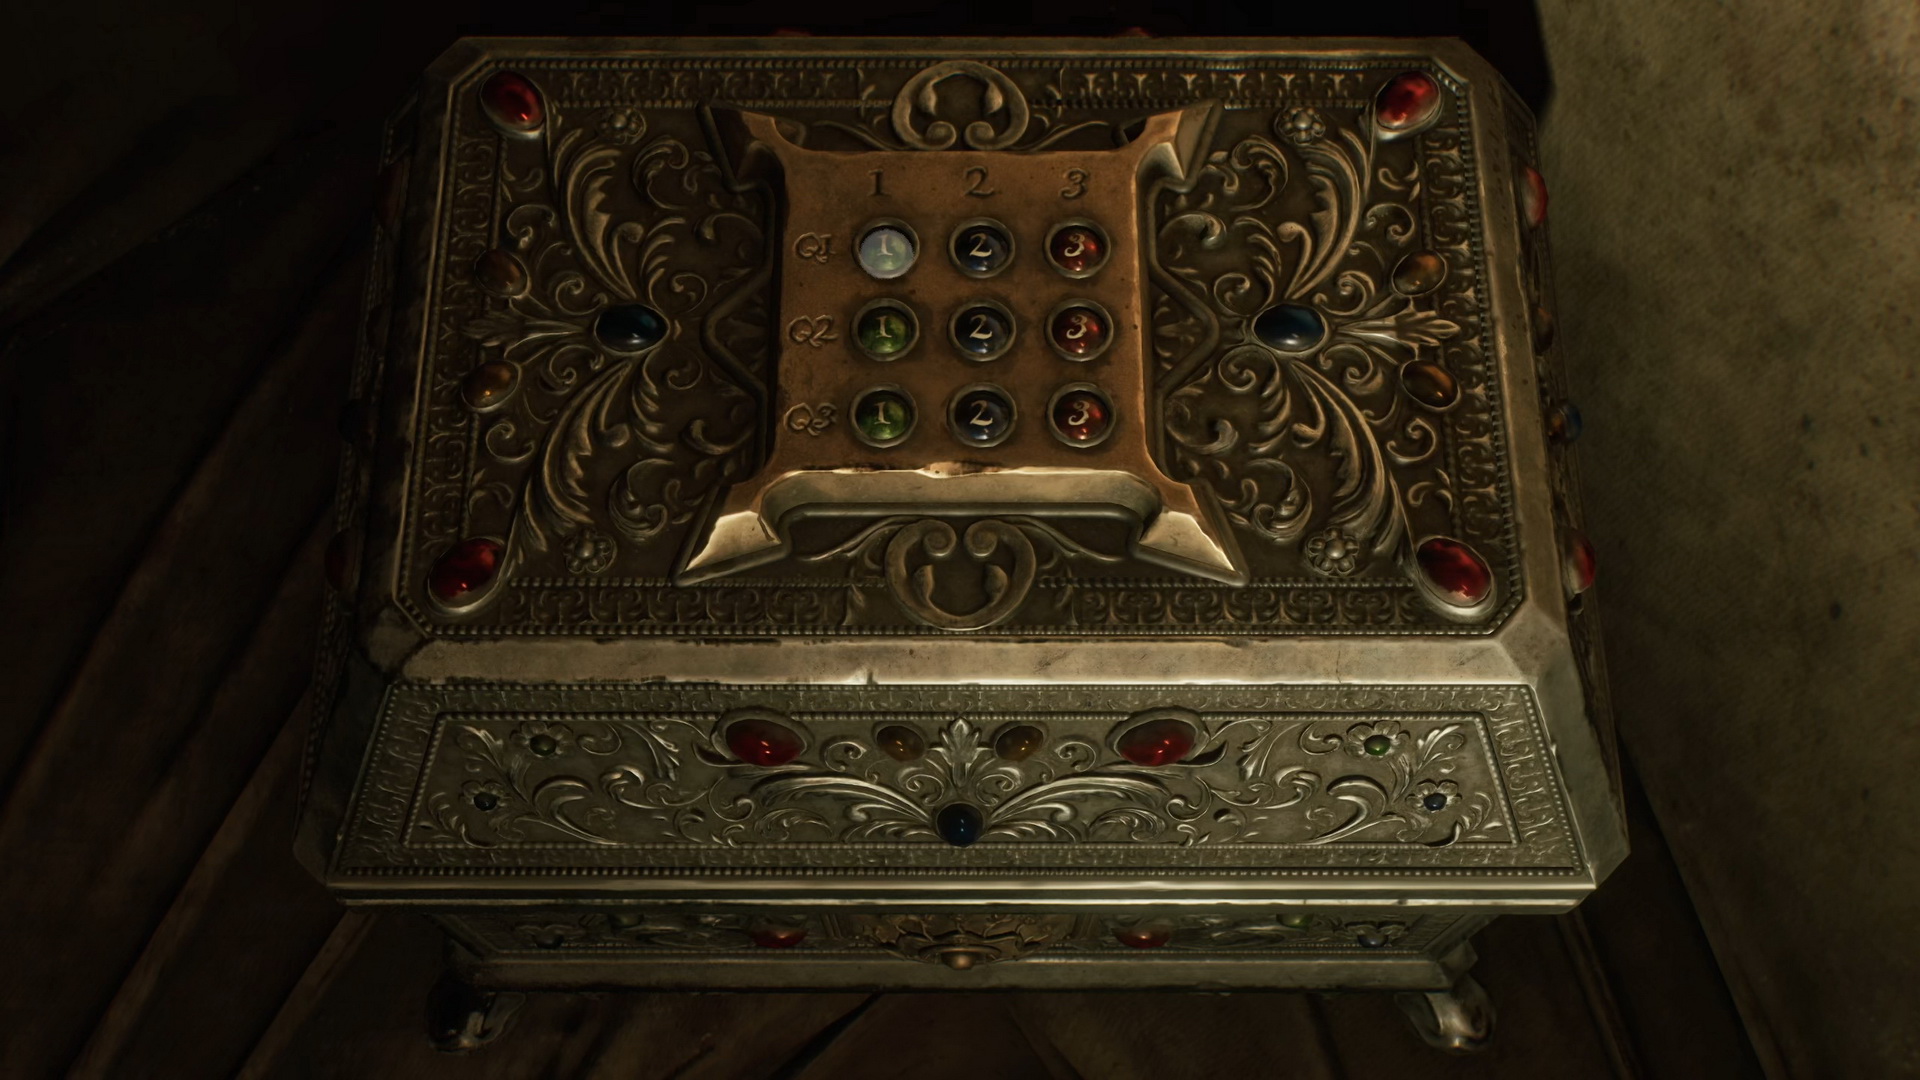
"Trick or Treat" Quiz
The three questions asked during the elevator quiz game are:
- In the early eighteen-hundreds, a terrible disease spread across Silent Hill, resulting in the death of many of its inhabitants. Their bodies thrown into the lake to sleep forever in their watery grave. How many souls were lost during the plague?
- One: 42.
- Two: 67.
- Three: 85.
- Follow Sanders Street heading East and further on, to the outskirts of town. One - and only one - road will take you towards the lumber yard and the cemetery. What is the name of that road?
- One: Bachman Road
- Two: Munson Street
- Three: Wiltse Road
- Silent Hill witnessed a gruesome murder a few years back. A brother and sister were playing in the road when they were attacked and chopped into pieces with an axe. Torn flesh, smashed bones, splattered blood... What a terrible tragedy. What a gruesome end to such innocent lives. One of the victims was a local boy named Billy Locane. BUT... what was the name of the other victim, Billy's sister?
- One: Miriam
- Two: Heather
- Three: Julia
Solution
All answers to the quiz questions can be found in the game, but two of them are contained in the notes, which are not collected as memos, so you will have to remember them from before.
 The answer to the first question lies within the inscription to the Rosewater Park memorial:
The correct answer is Two: 67. |
 The answer to the second question is easy to find – just check your town map. The correct answer is Three: Wiltse Road. |
 The answer to the third question is found in the newspaper article from apartment 112 at Wood Side Apartments describing the murder of the Locane siblings. The names of the sibilings were Billy and Mirriam, so the correct answer is One: Mirriam. |
Enter the correct answers to the elevator "Trick or Treat" quiz – 2-3-1:
| 1 | 2 | 3 | |
| Q1 | ○ | ● | ○ |
| Q2 | ○ | ○ | ● |
| Q3 | ● | ○ | ○ |
Inside the box you will find 2 boxes of Shotgun Shells and 2 Syringes. Note that you will have only one attempt at this before the box is locked out. James will also suffer some damage from inputting the wrong answers.
Take the elevator to the second floor.
Escaping the Hospital
Second Floor
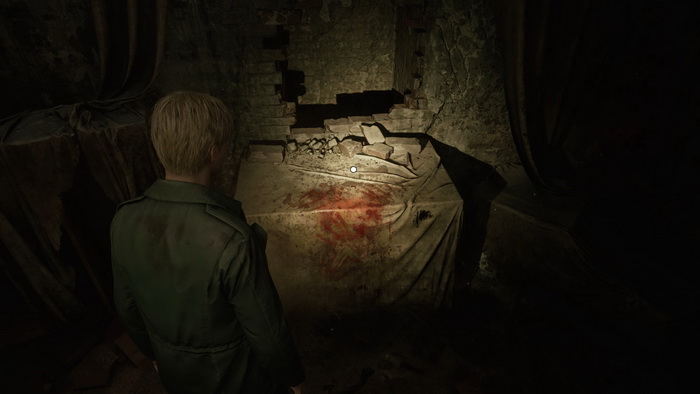
Approach the Lady of the Door and use both rings on it to unlock the door.
Find Memo #46: Ominous Note on the stair landing immediately after the cutscene.
 |
 |
In the next landing, there's a Save Point. Proceed downstairs and through the door. Follow the corridor until a cutscene starts.
Run forward, avoiding the gaps in the floor until you reach the elevator at the end for another cutscene.
First Floor
After the cutscene, go to the Reception Office. On your way there, you can grab a Health Drink from a shelf in Examination Room 1. In the Reception Office, there's a Save Point. Find the 69 Hospital Entrance Key atop the book on a desk.
Go to the main entrance and use the key to leave the hospital.
| 05. Brookhaven Hospital | 07. Otherworld South Vale |