Brookhaven Hospital
Welcome to the fifth chapter of the complete walkthrough guide for Silent Hill 2 Remake (2024) covering Brookhaven Hospital. Use the key summary below for short, spoiler-free directions and the complete walkthrough section for in-depth guidelines with extra explanations. This walkthrough also includes complete maps with all items and monsters marked for easy reference.
Legend
1 Auto Parts key – key items
2 Radio – equipment
Health Drink – supplies
Map of Silent Hill – maps
Save Point – save points
Flower Shop Message – collectibles: memos, strange photos and glimpses of the past
NG+ – New Game+ items, memos and actions
Contents
- Complete Maps
- Key Summary
- Complete Walkthrough
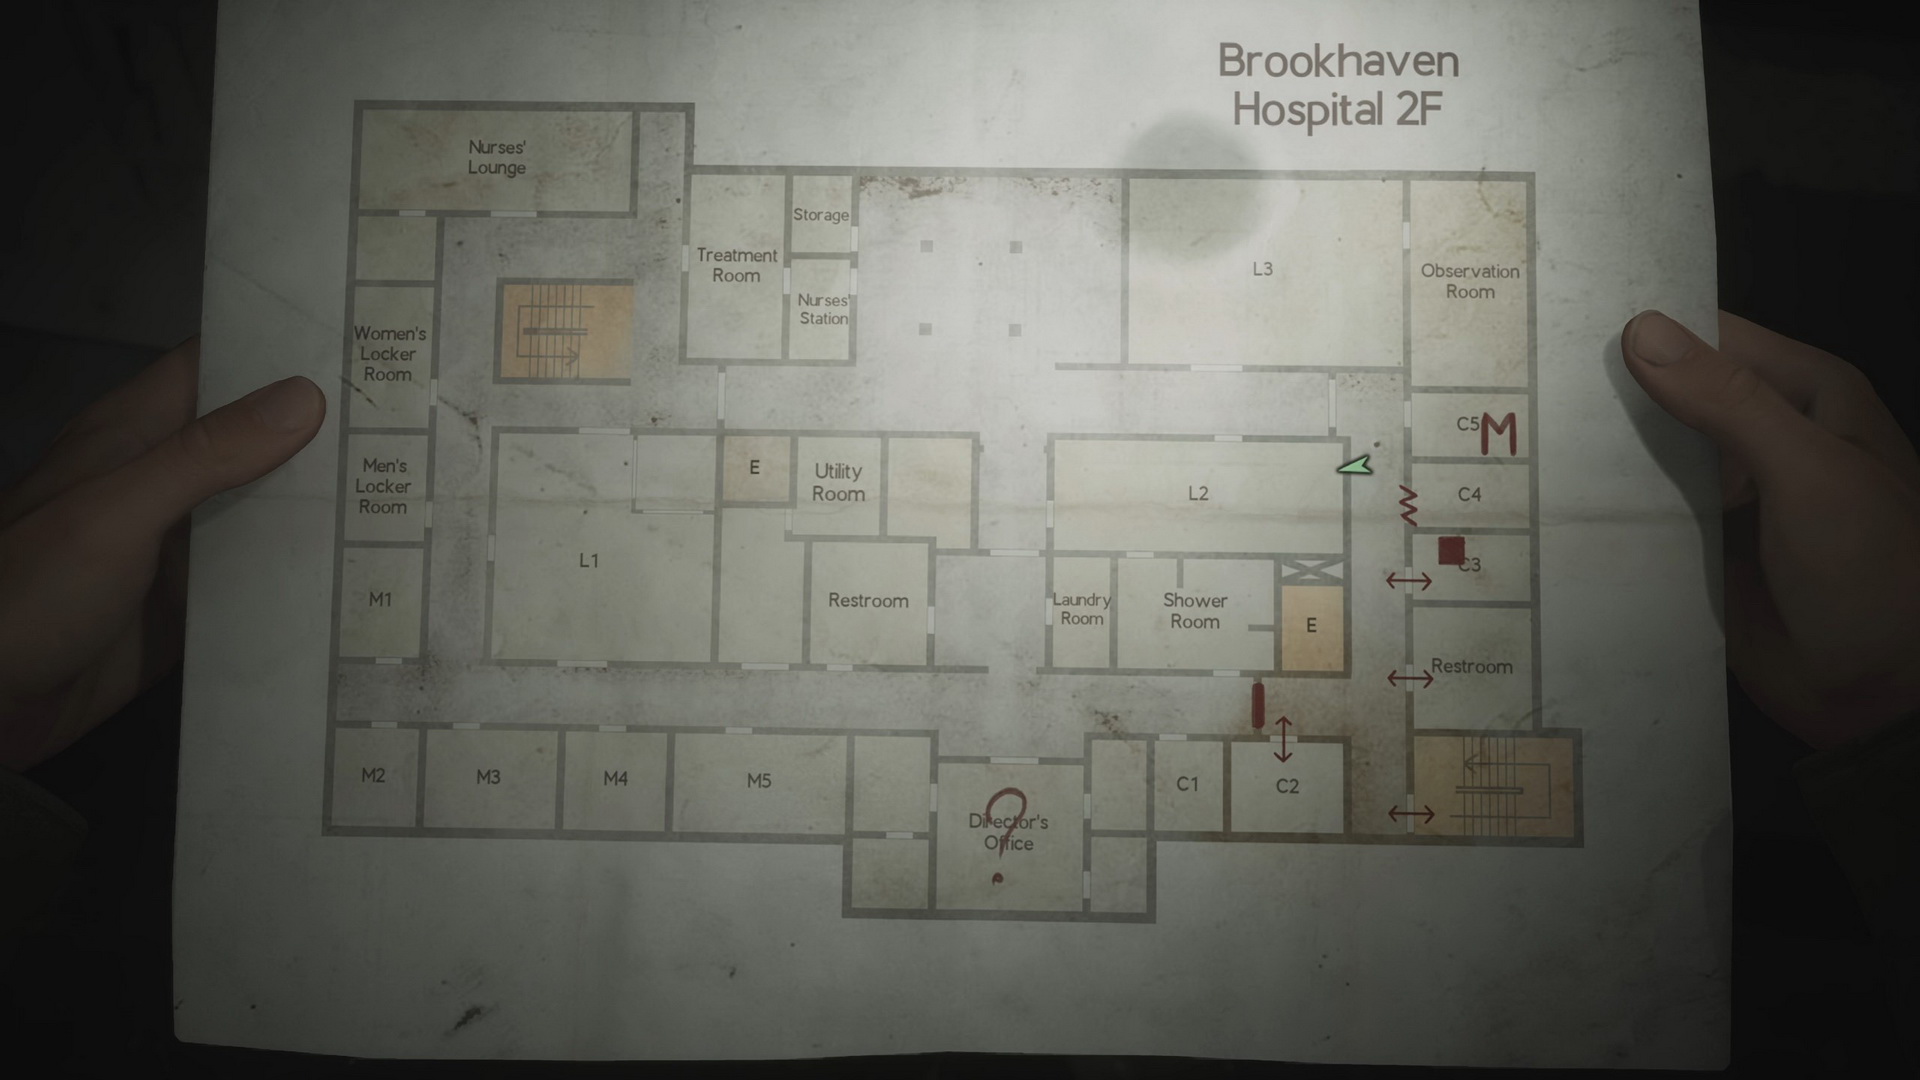
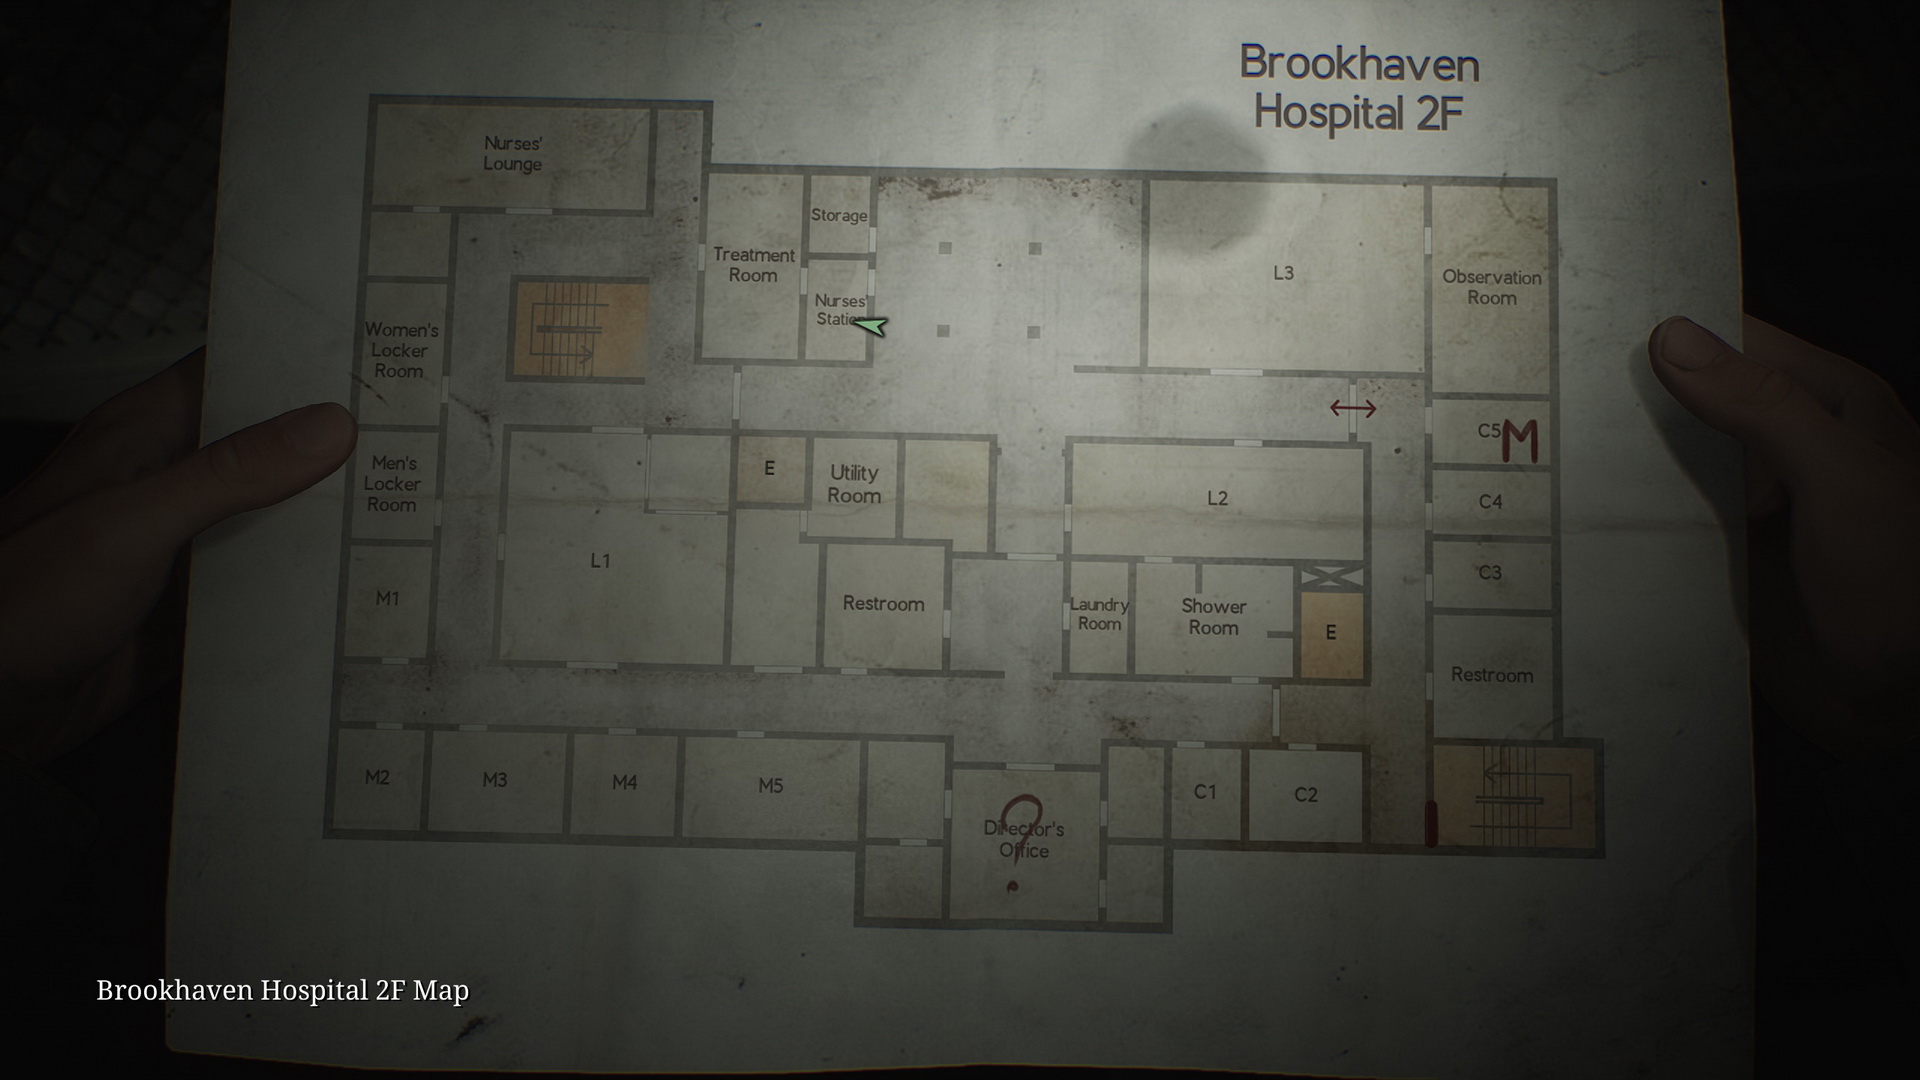
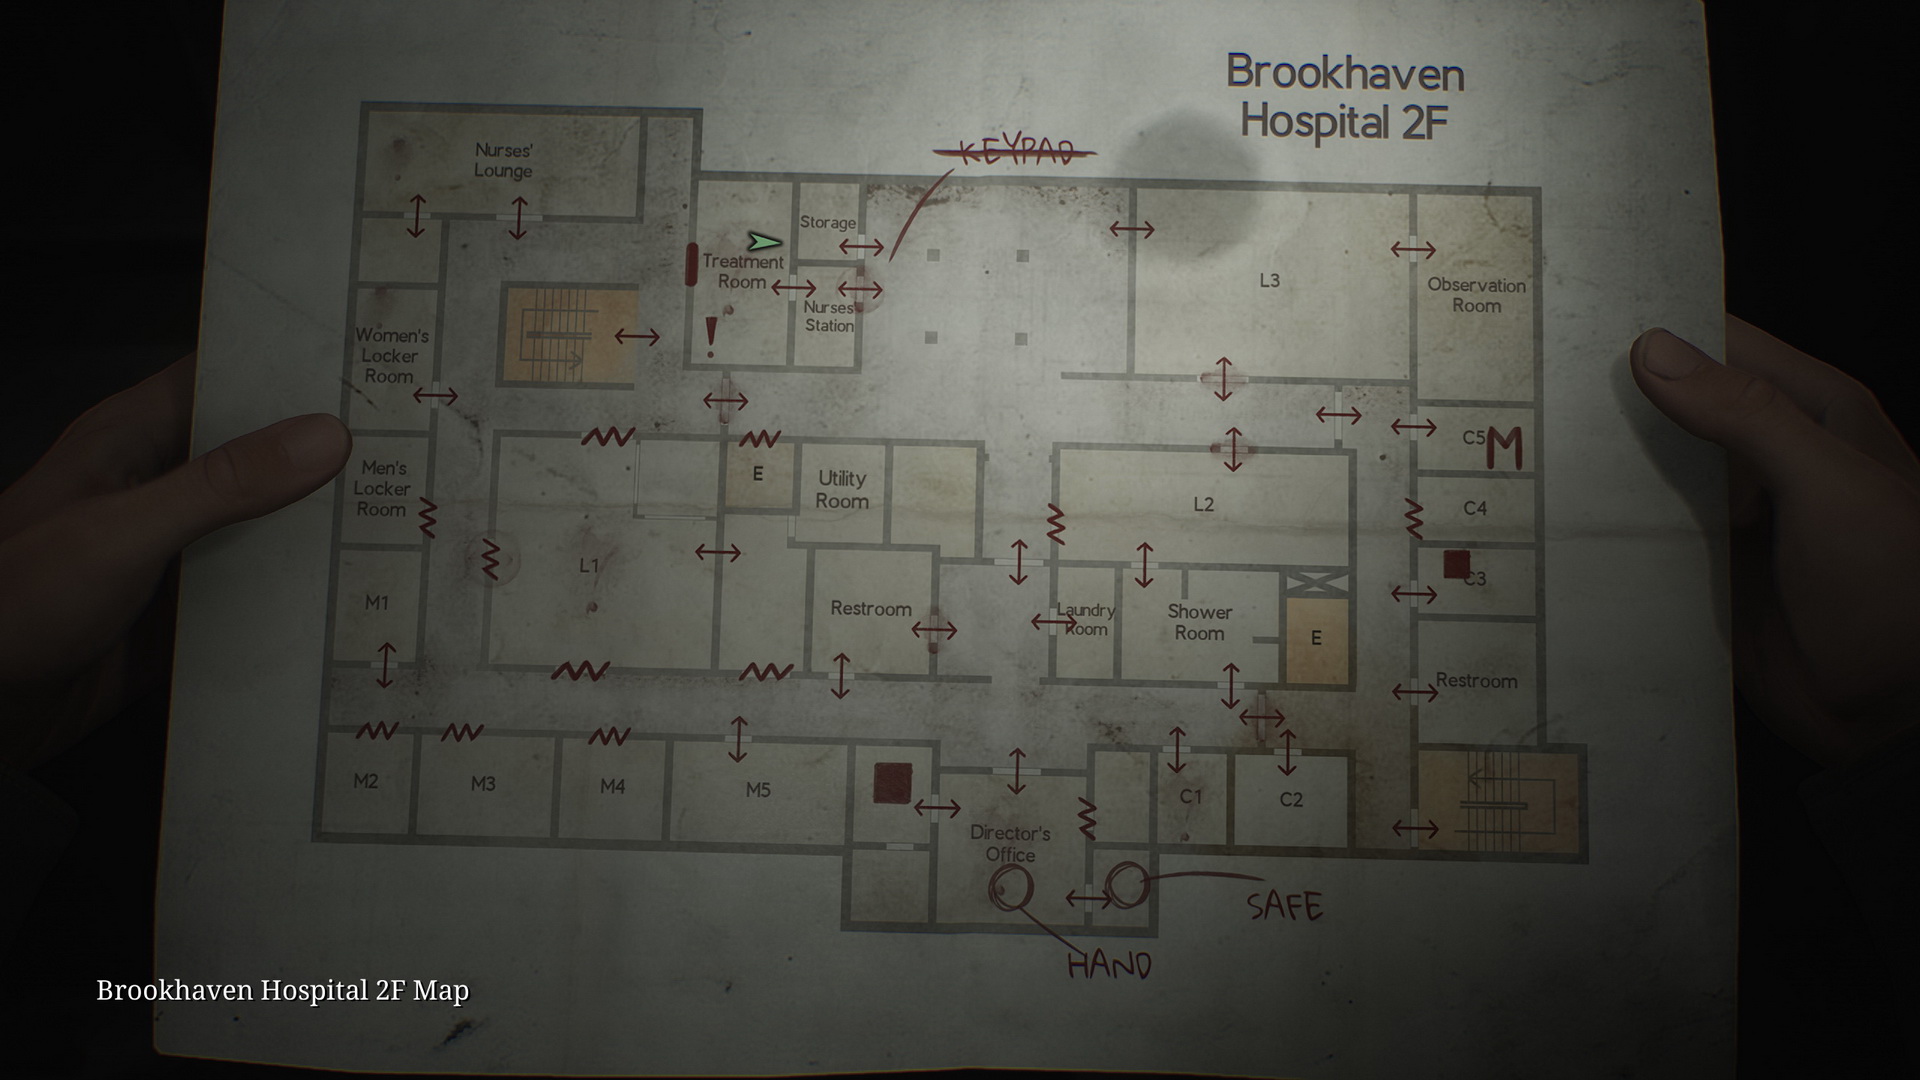
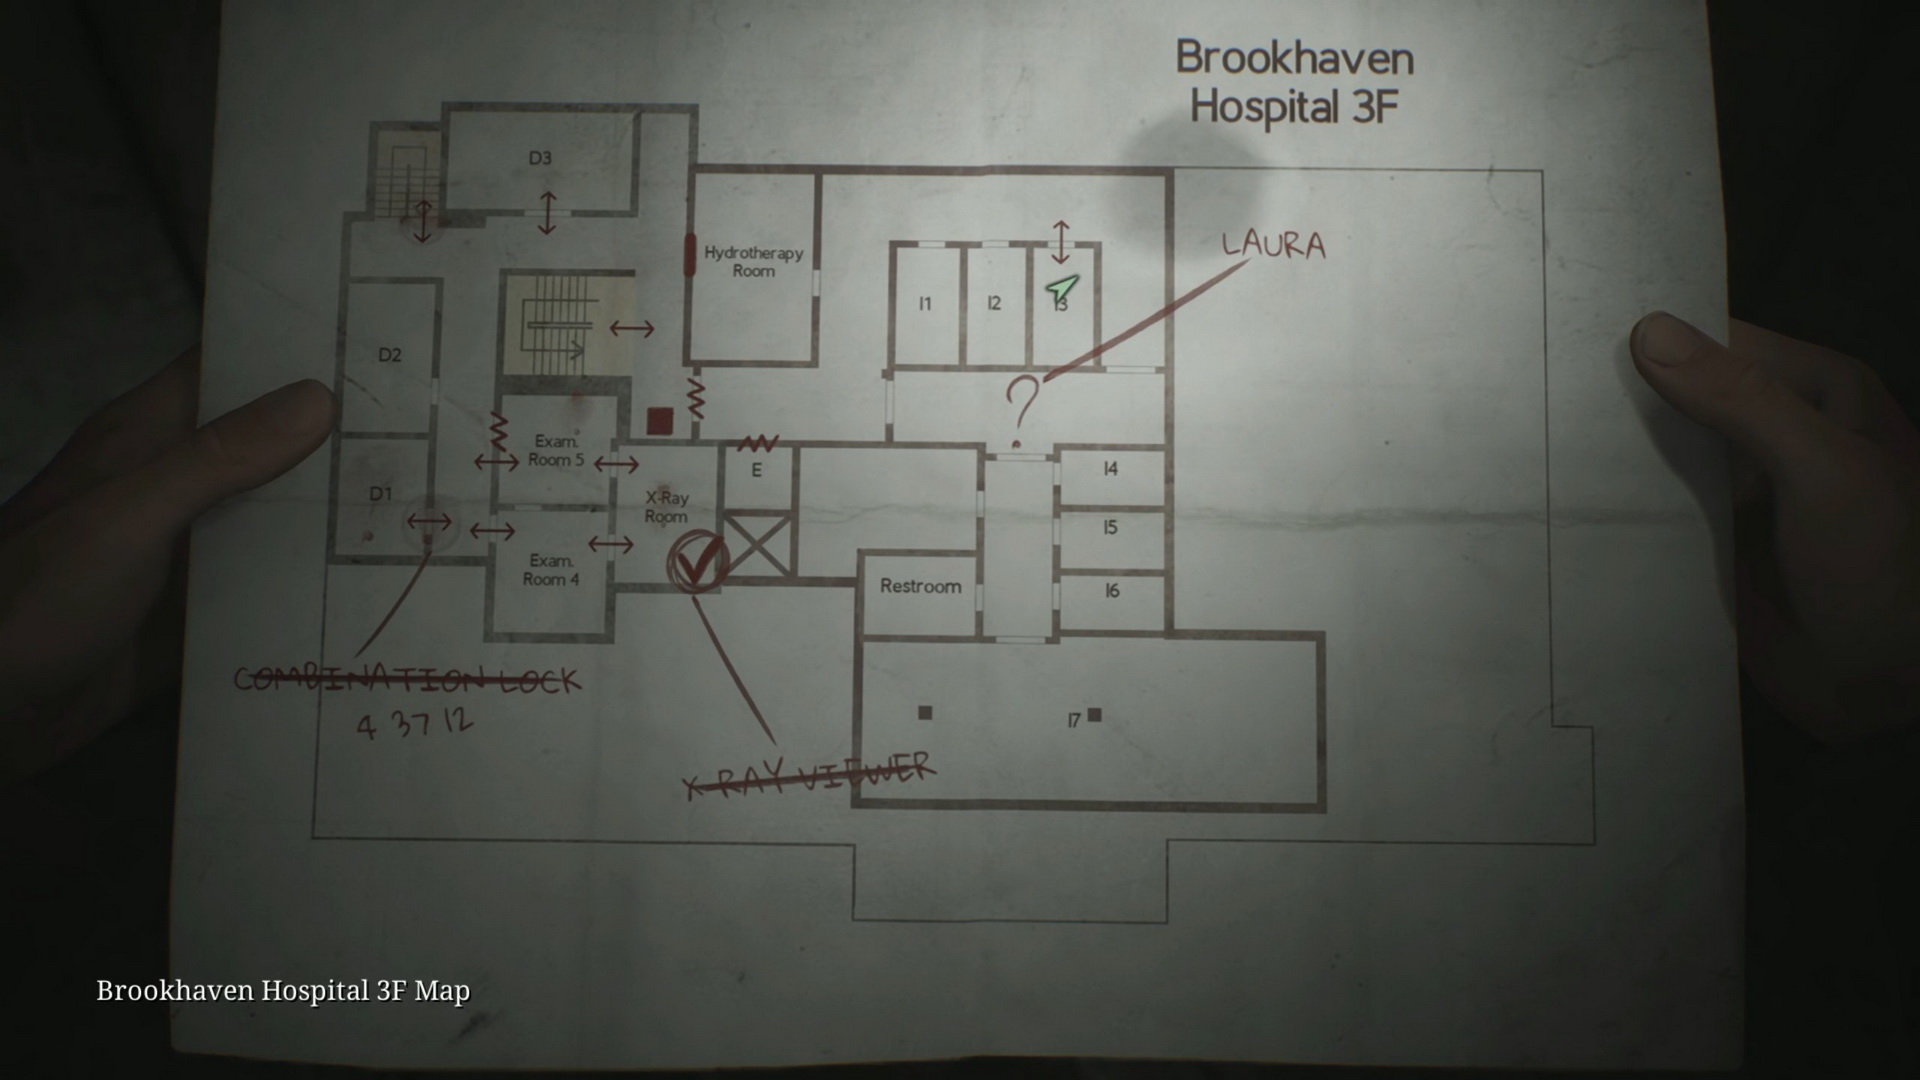
Complete Maps |
|
Collectibles count:
- 13 memos
- 2 strange photos
- 5 glimpses of the past
Key Summary
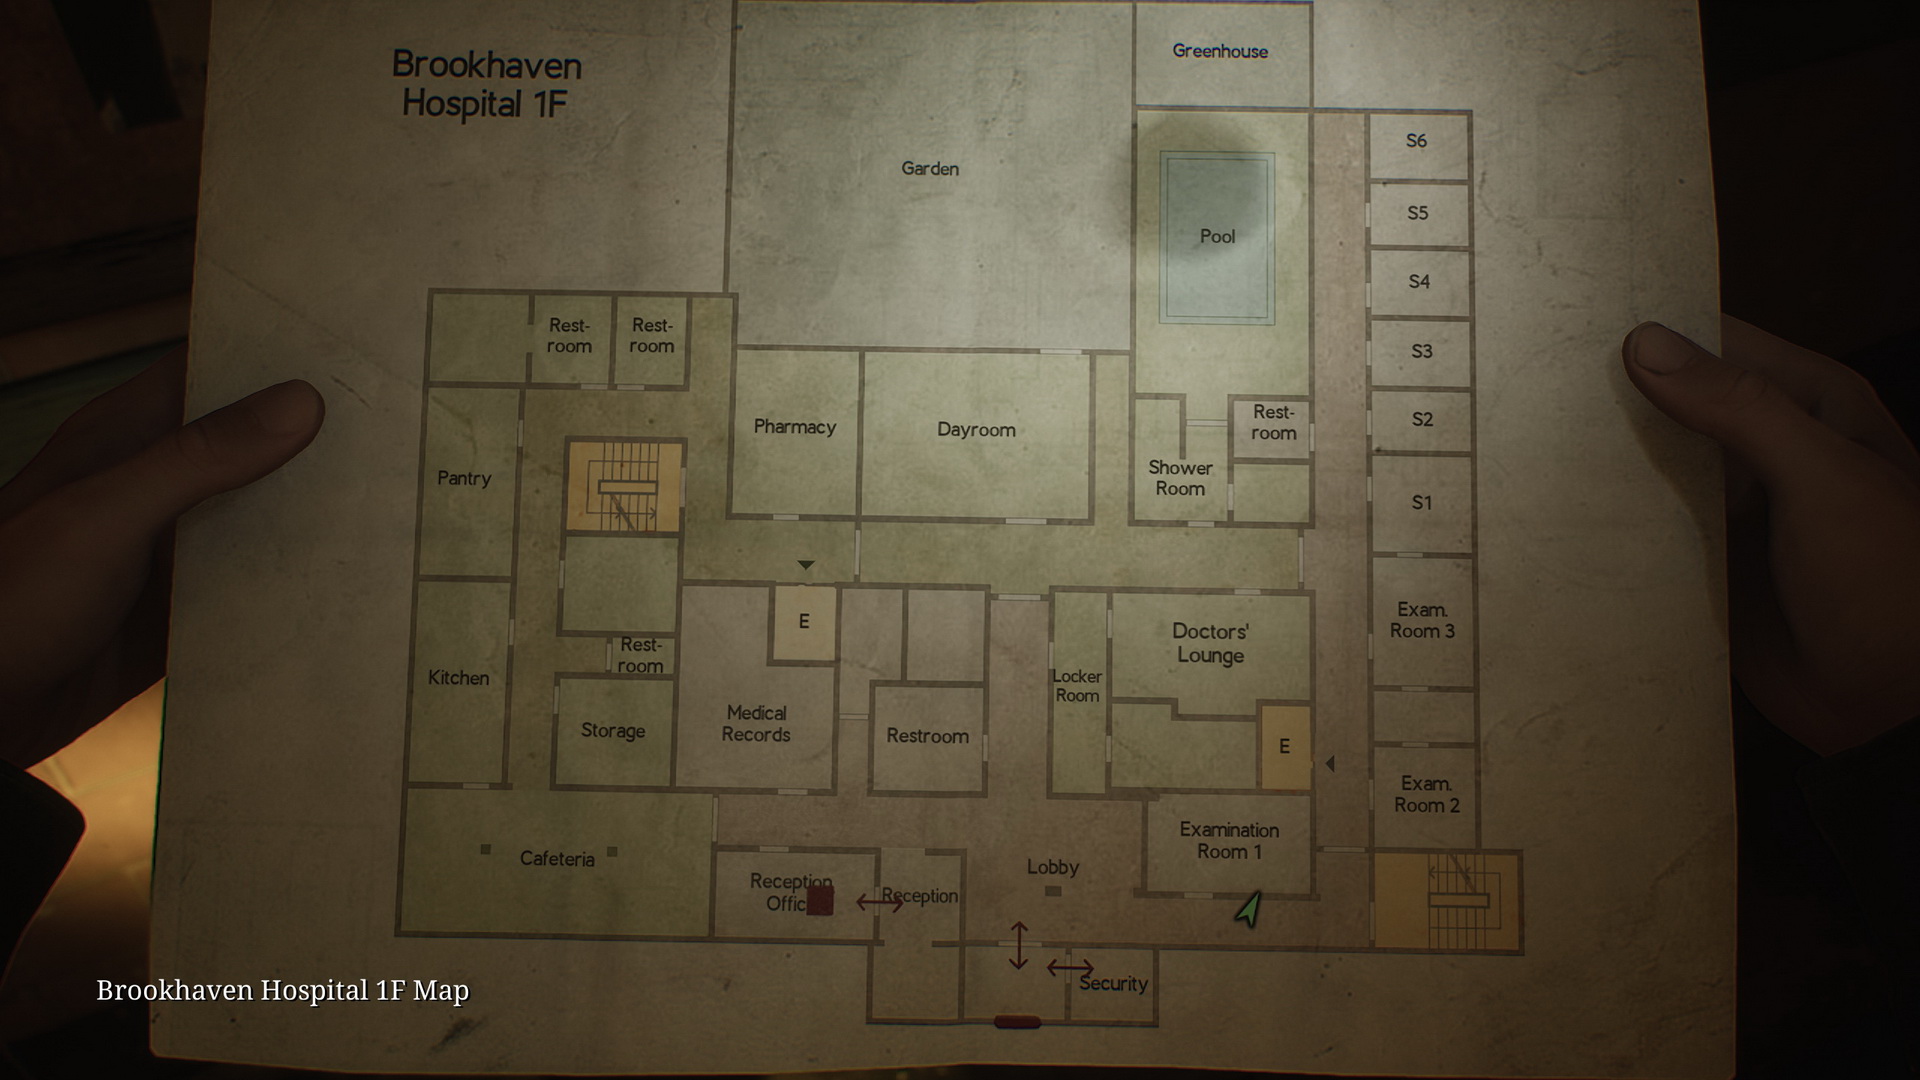
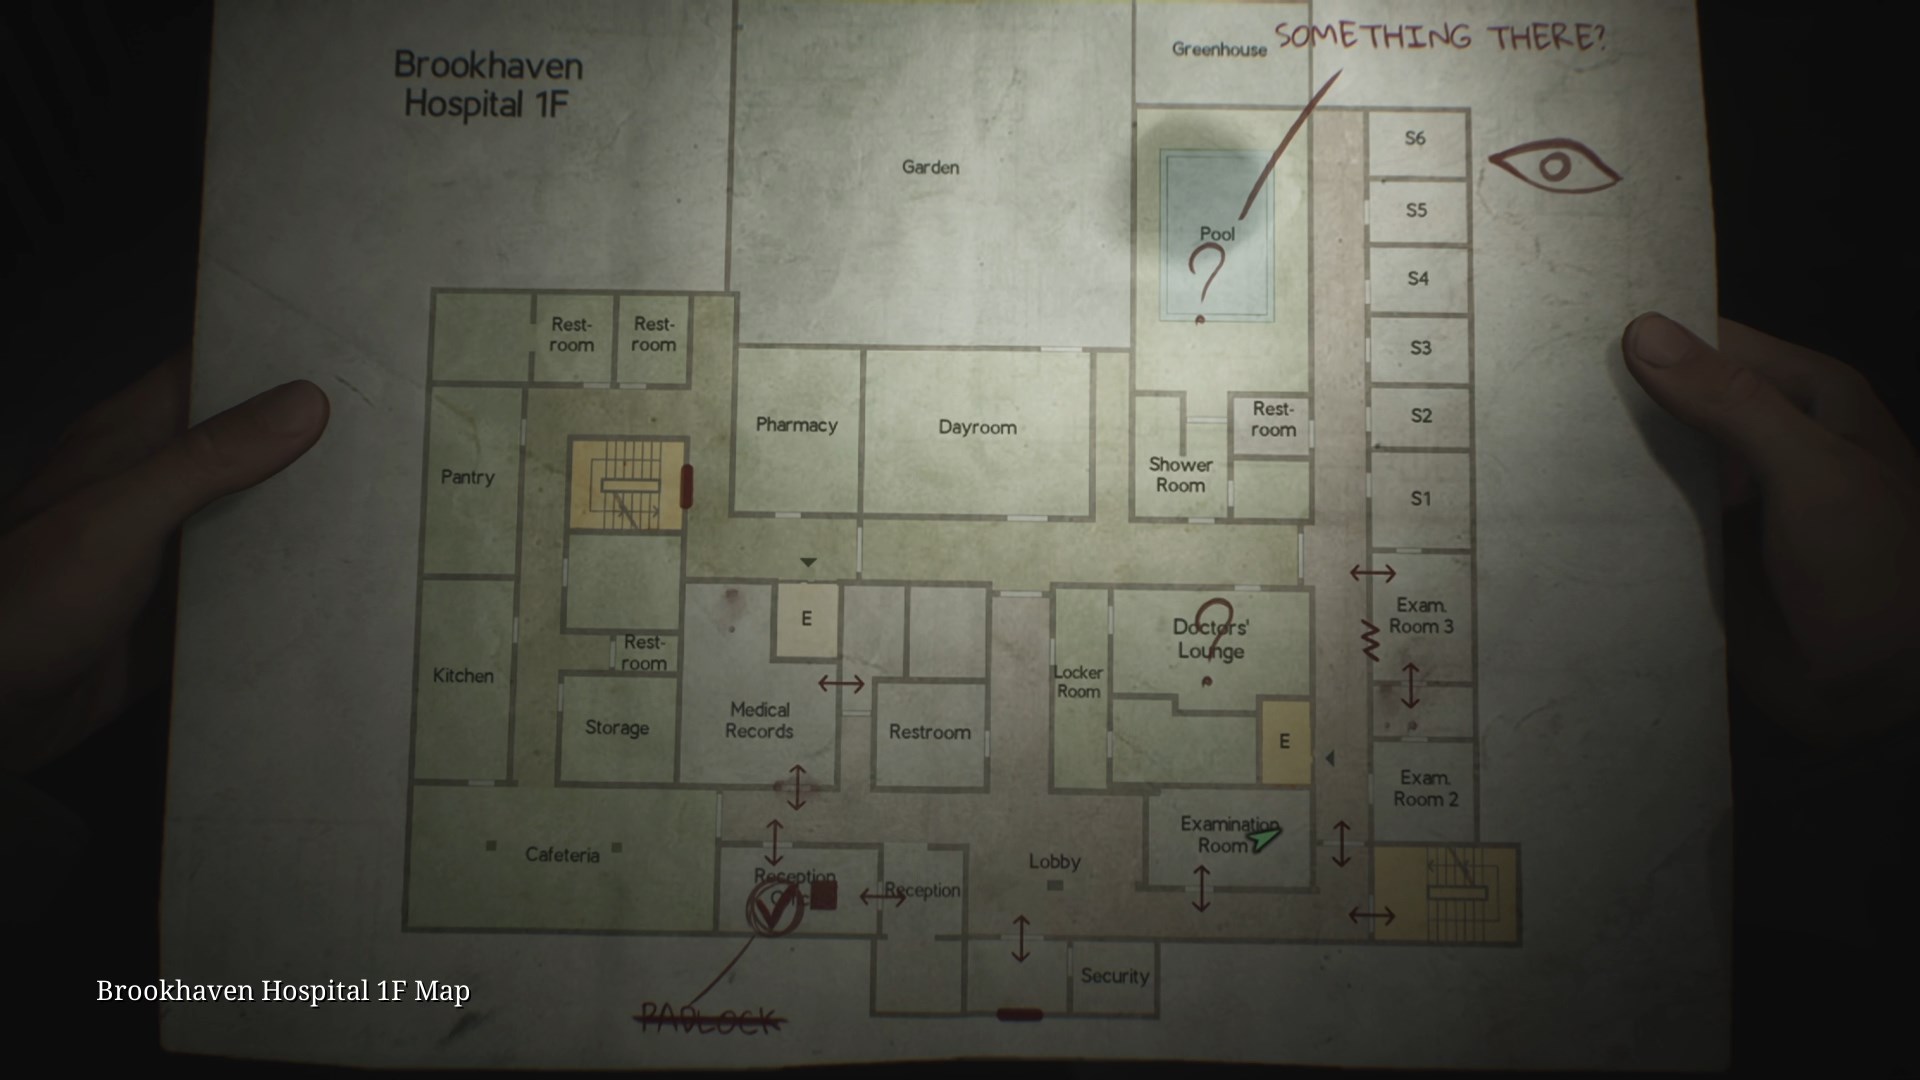
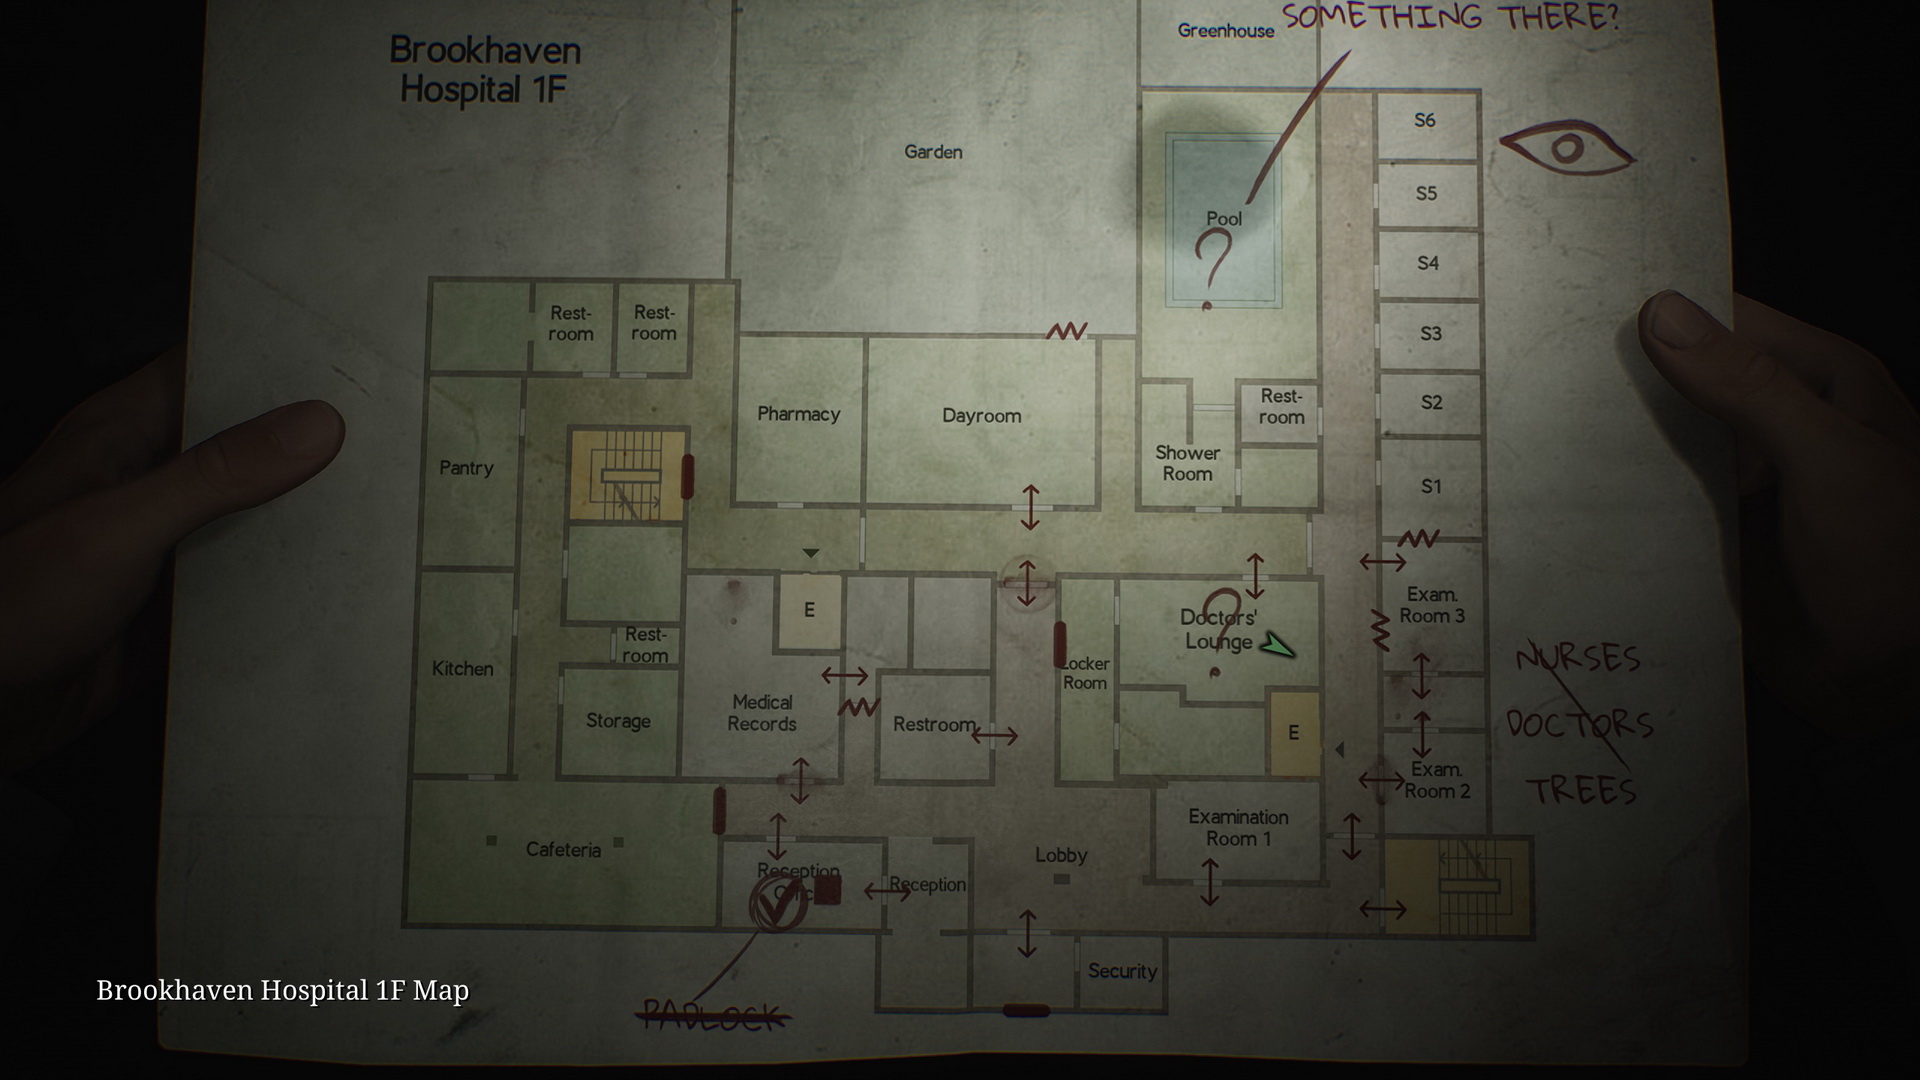
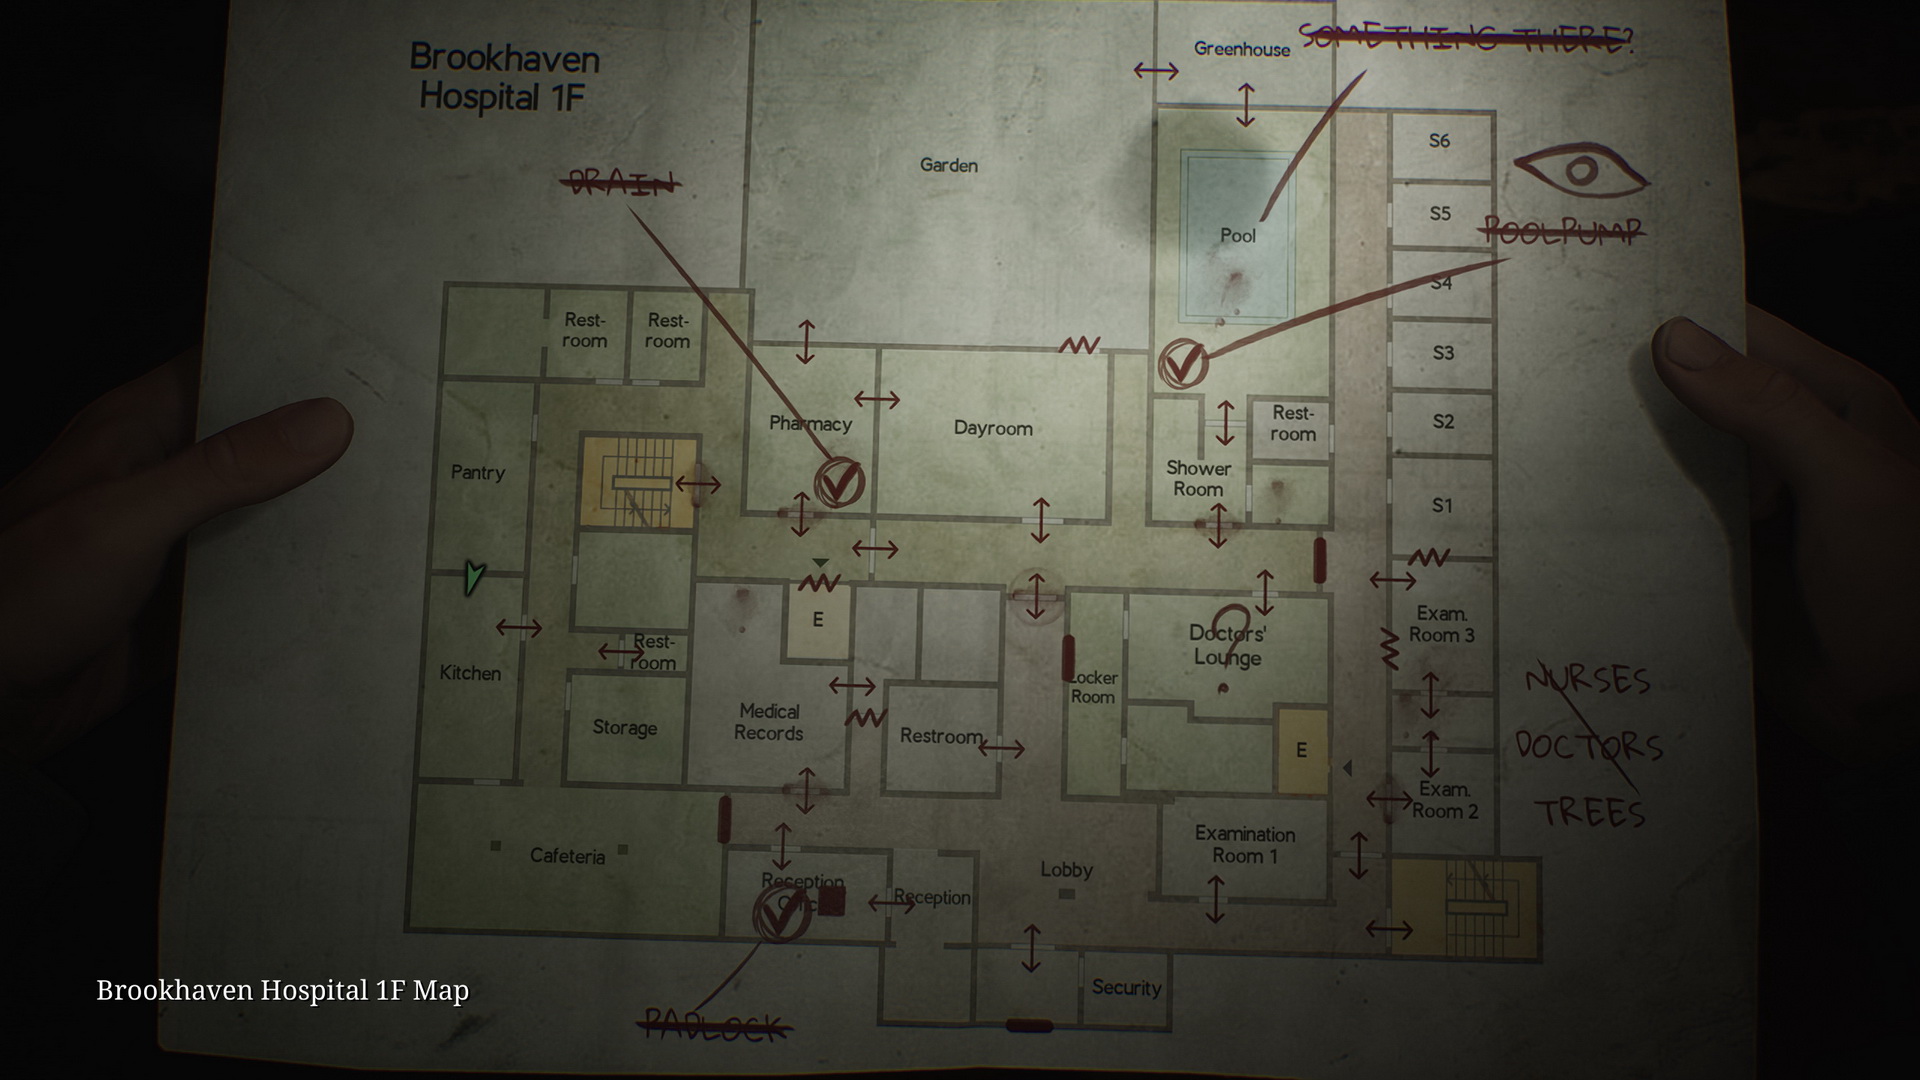
First Floor
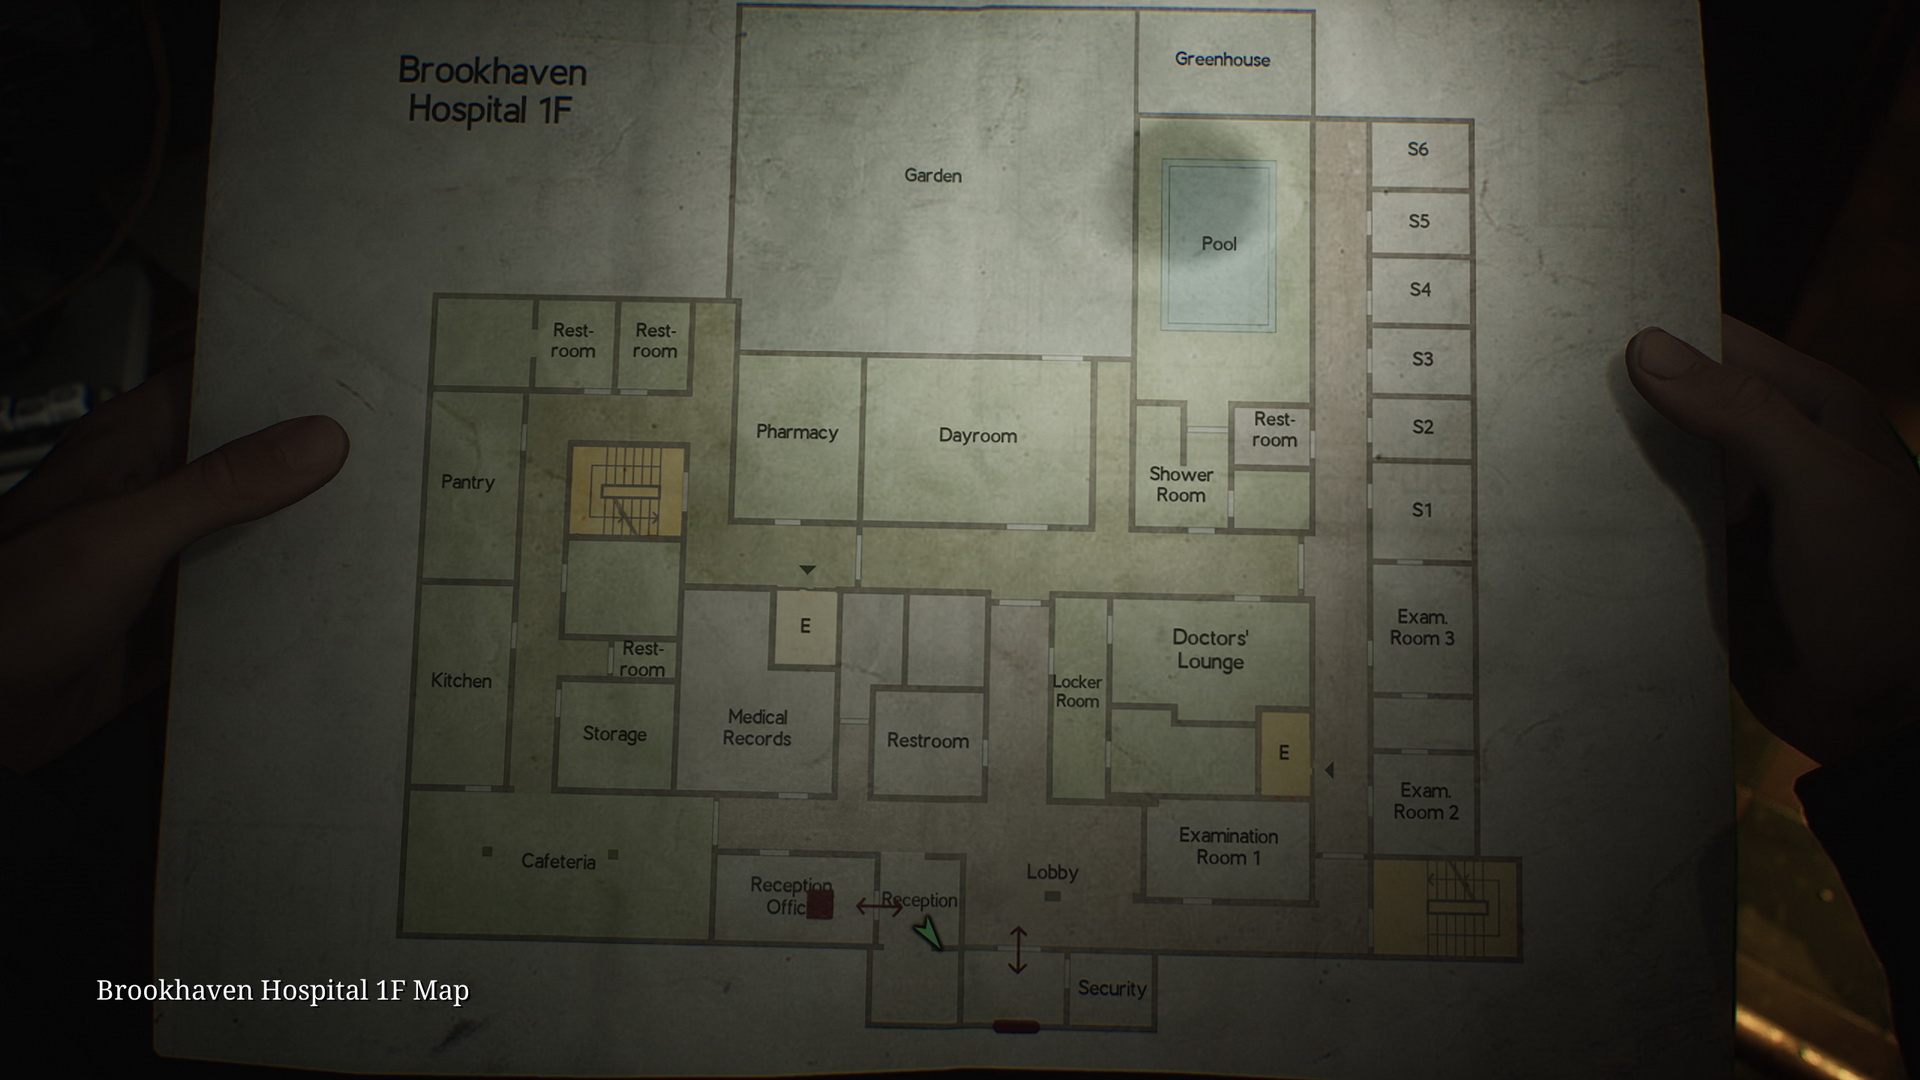
- Collect the Brookhaven Hospital Maps from the booklet holder in the main lobby.
- Memo #25: Key Locker Note. On the noticeboard inside the Reception.
- There's a Save Point in the Reception Office and a key inside the key locker.
- Memo #26: Nurse's Memo. Break into Examination Room 3 and enter the next room to find it in a desk drawer.
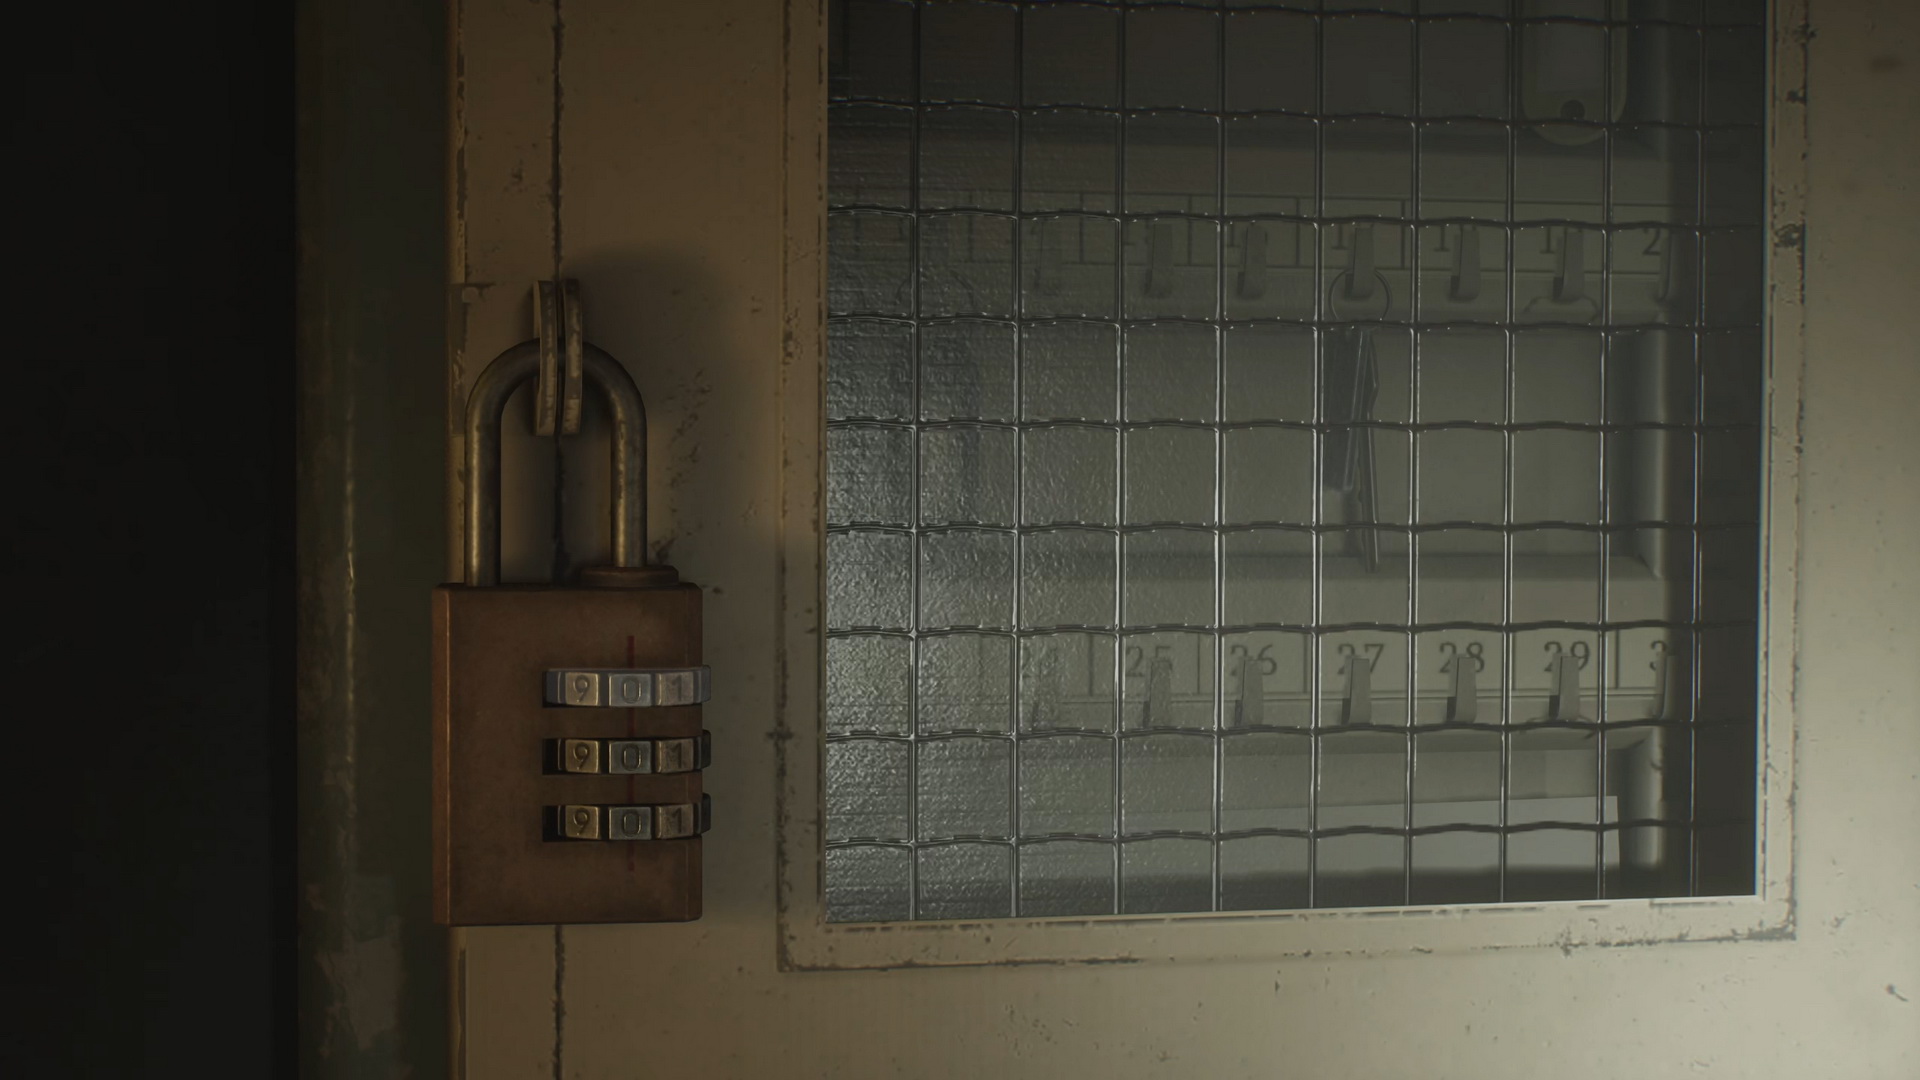
- 42 Basement Key. Return to the Reception Office and unlock the key locker with the following combination for the padlock:
- Light: 287
- Standard: 724
- Hard: 152
- Go downstairs and use the key to access the basement floor.
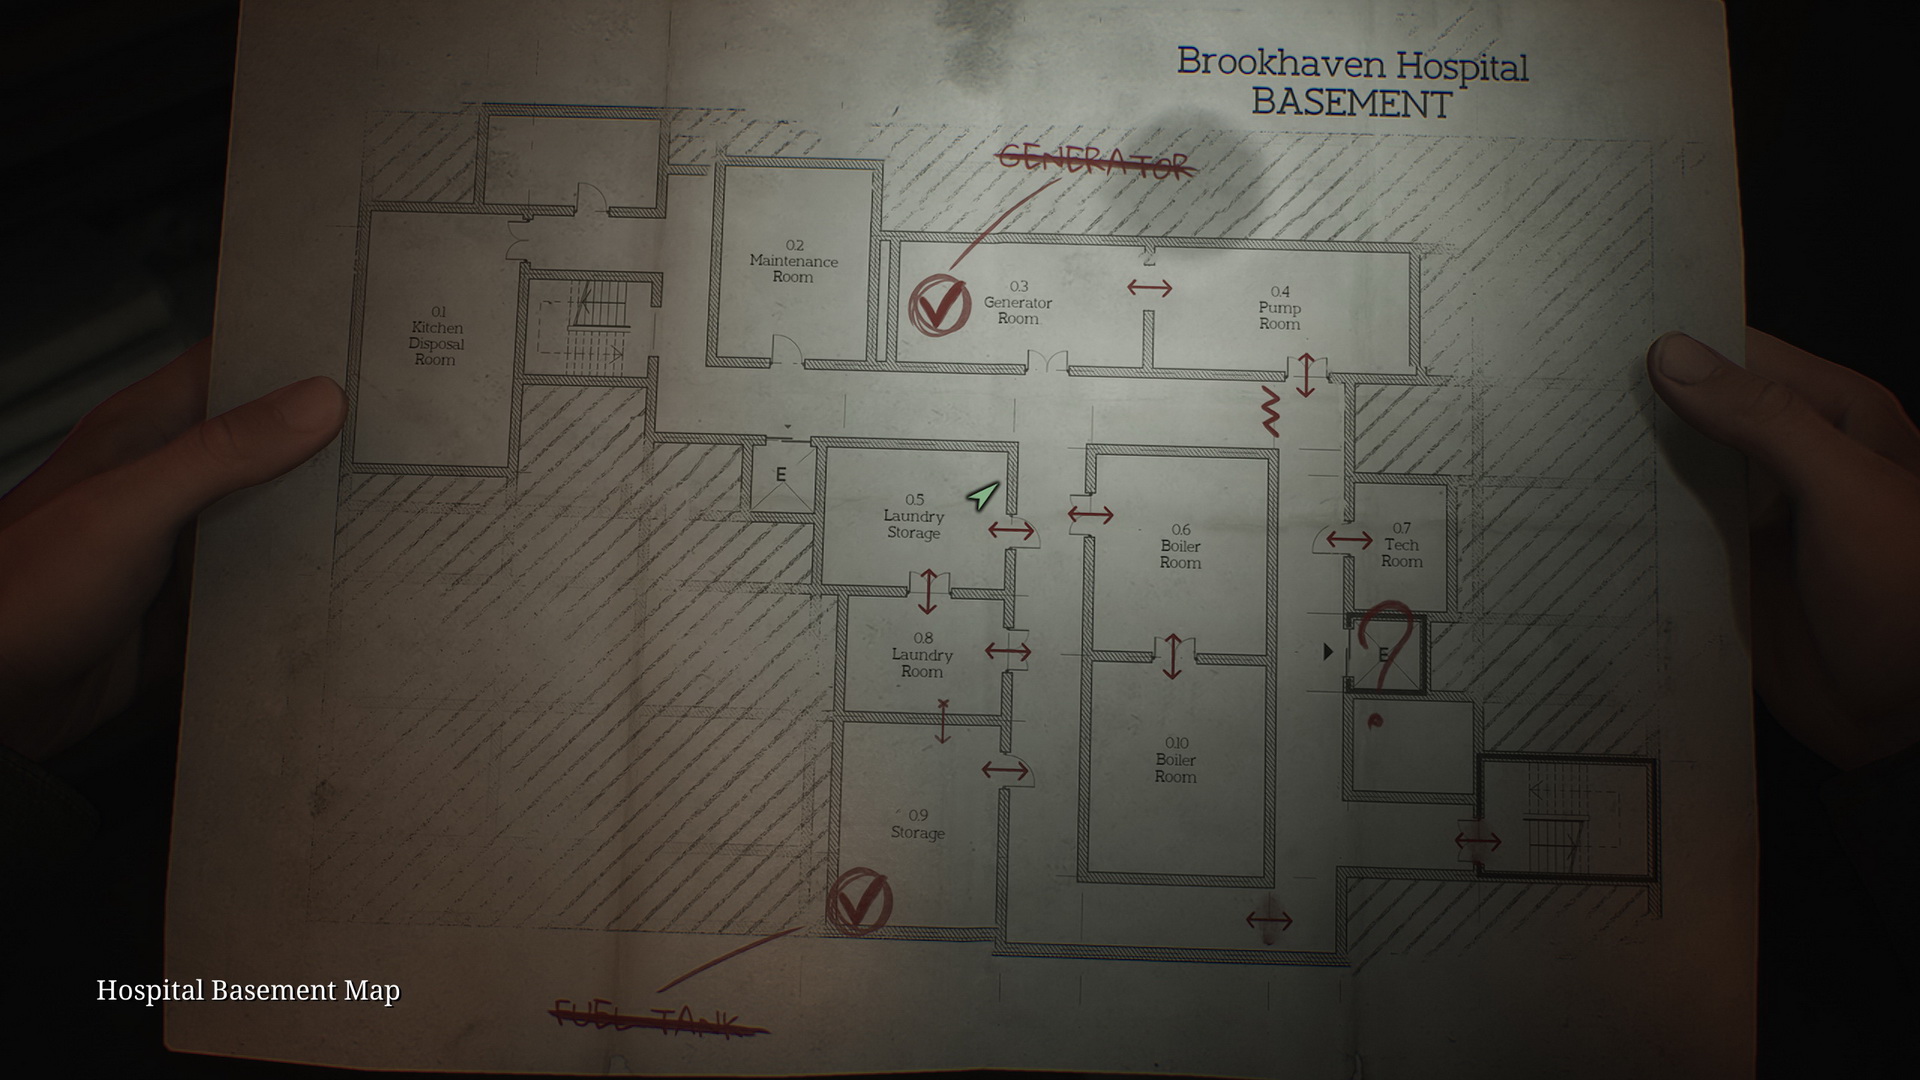
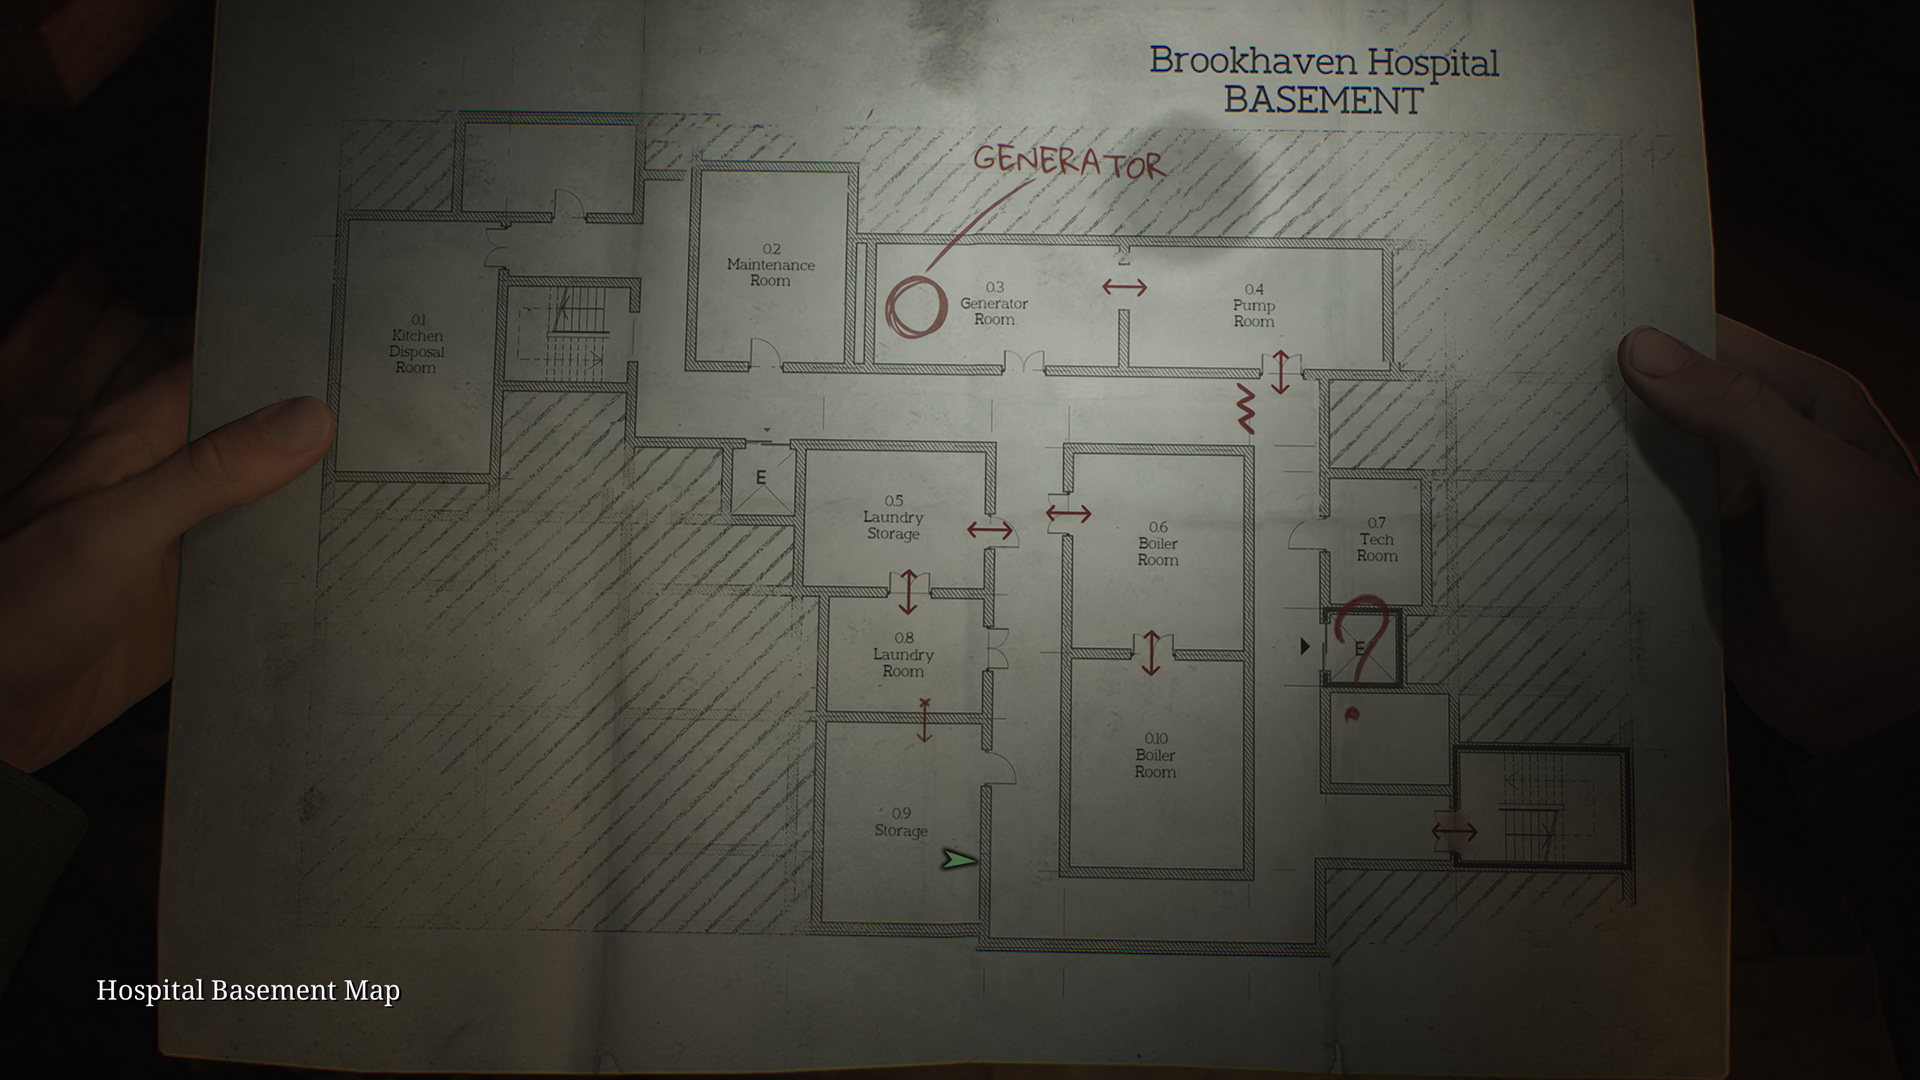
Basement
- Take the Hospital Basement Map from the wallboard directly ahead.
- Proceed through the Pump and Generator Rooms.
- 43 Empty Fuel Can is found on the pallets in the back of the Boiler Room.
- Climb into the Storage using a trolley in the Laundry Storage.
- 44 Filled Fuel Can. Use the Empty Fuel Can on the tank in the Storage.
- Return to the Generator Room, use the Filled Fuel Can on the generator and press the button to start it.
- Step into the elevator and go to the second floor.
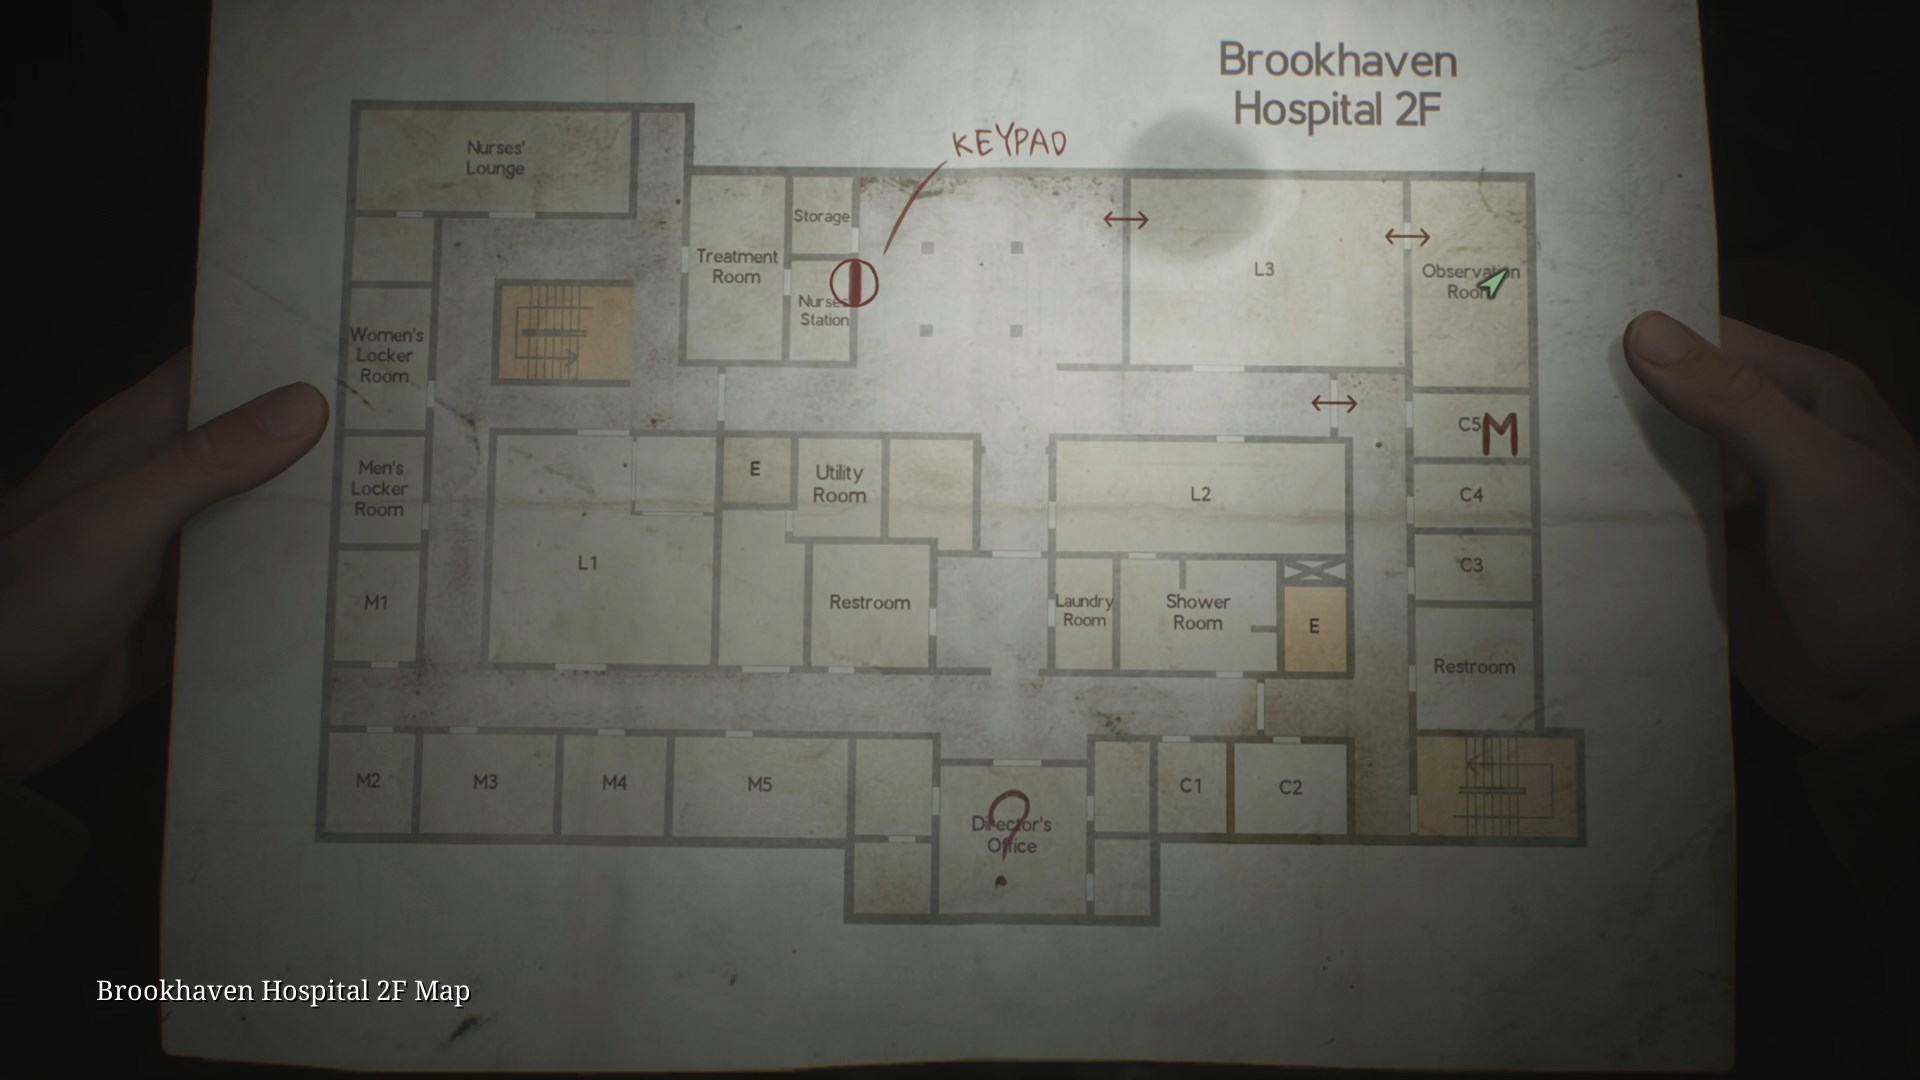
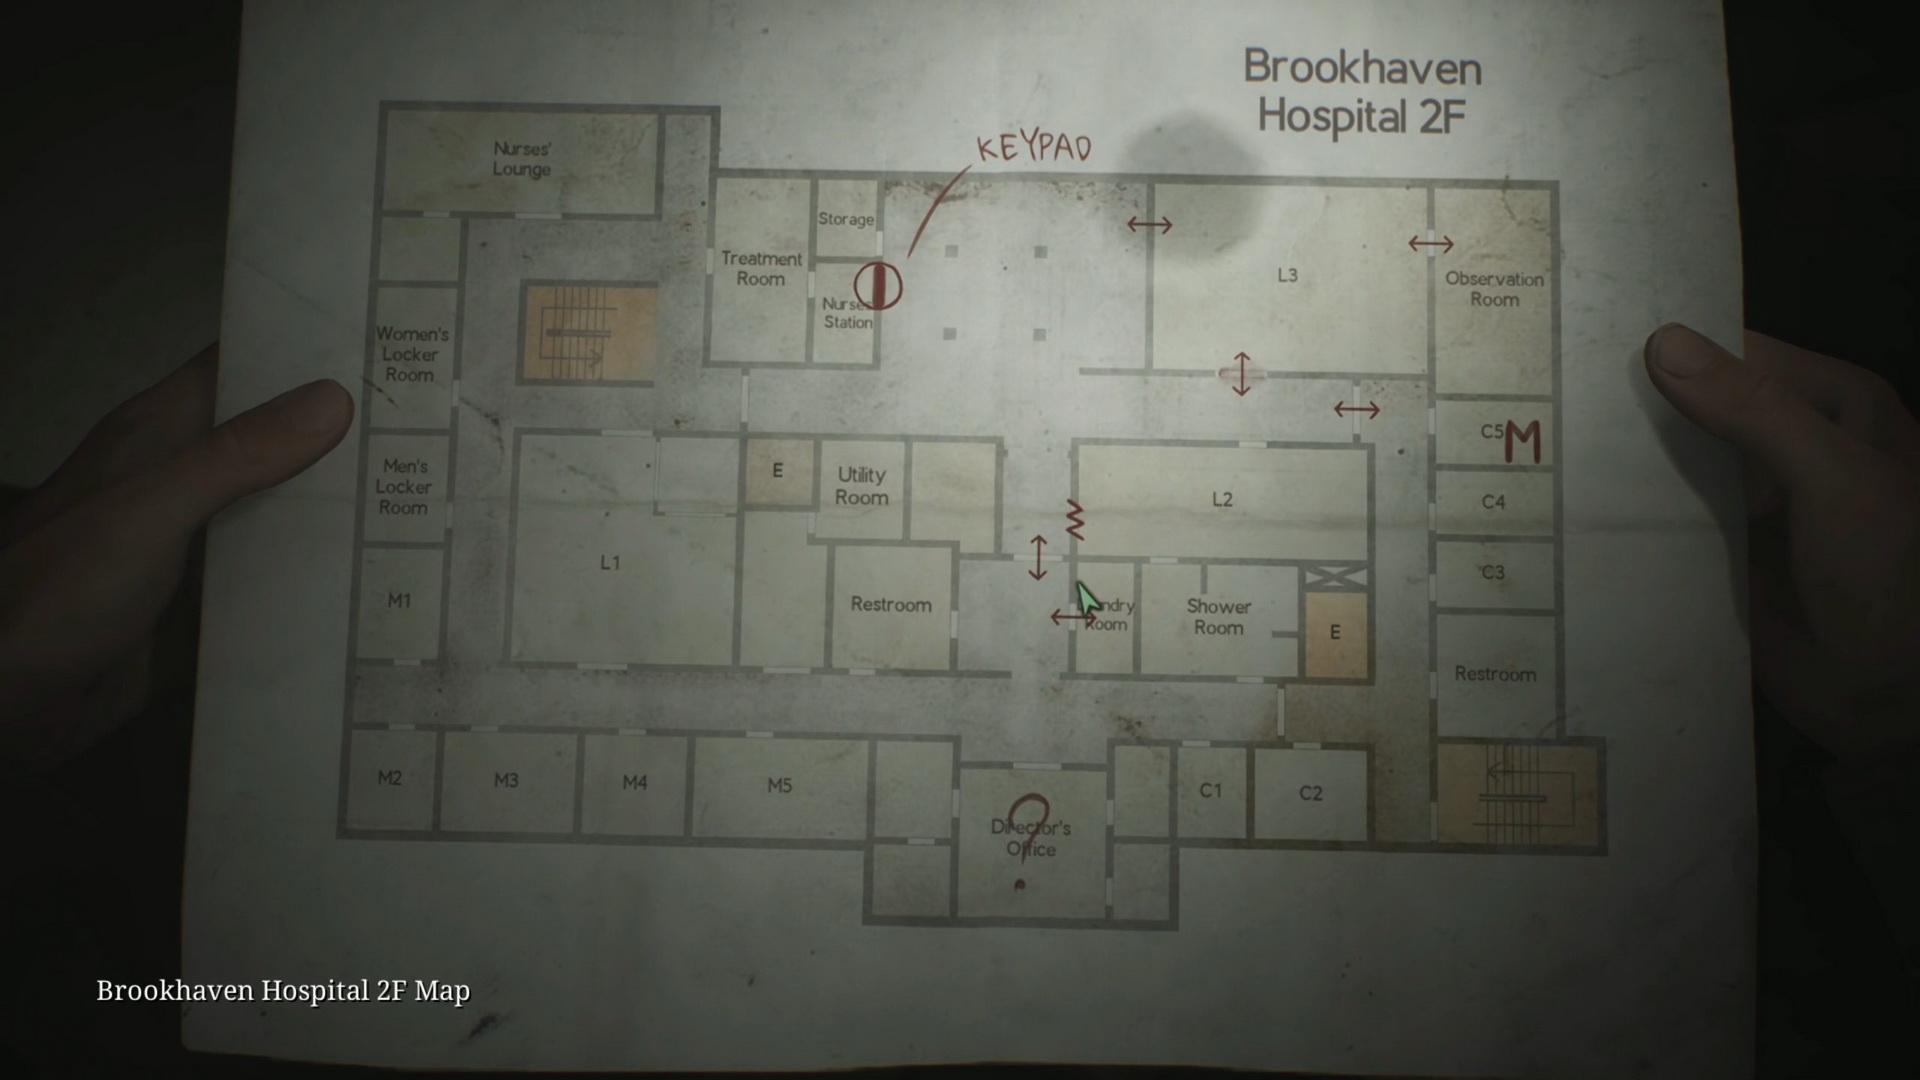
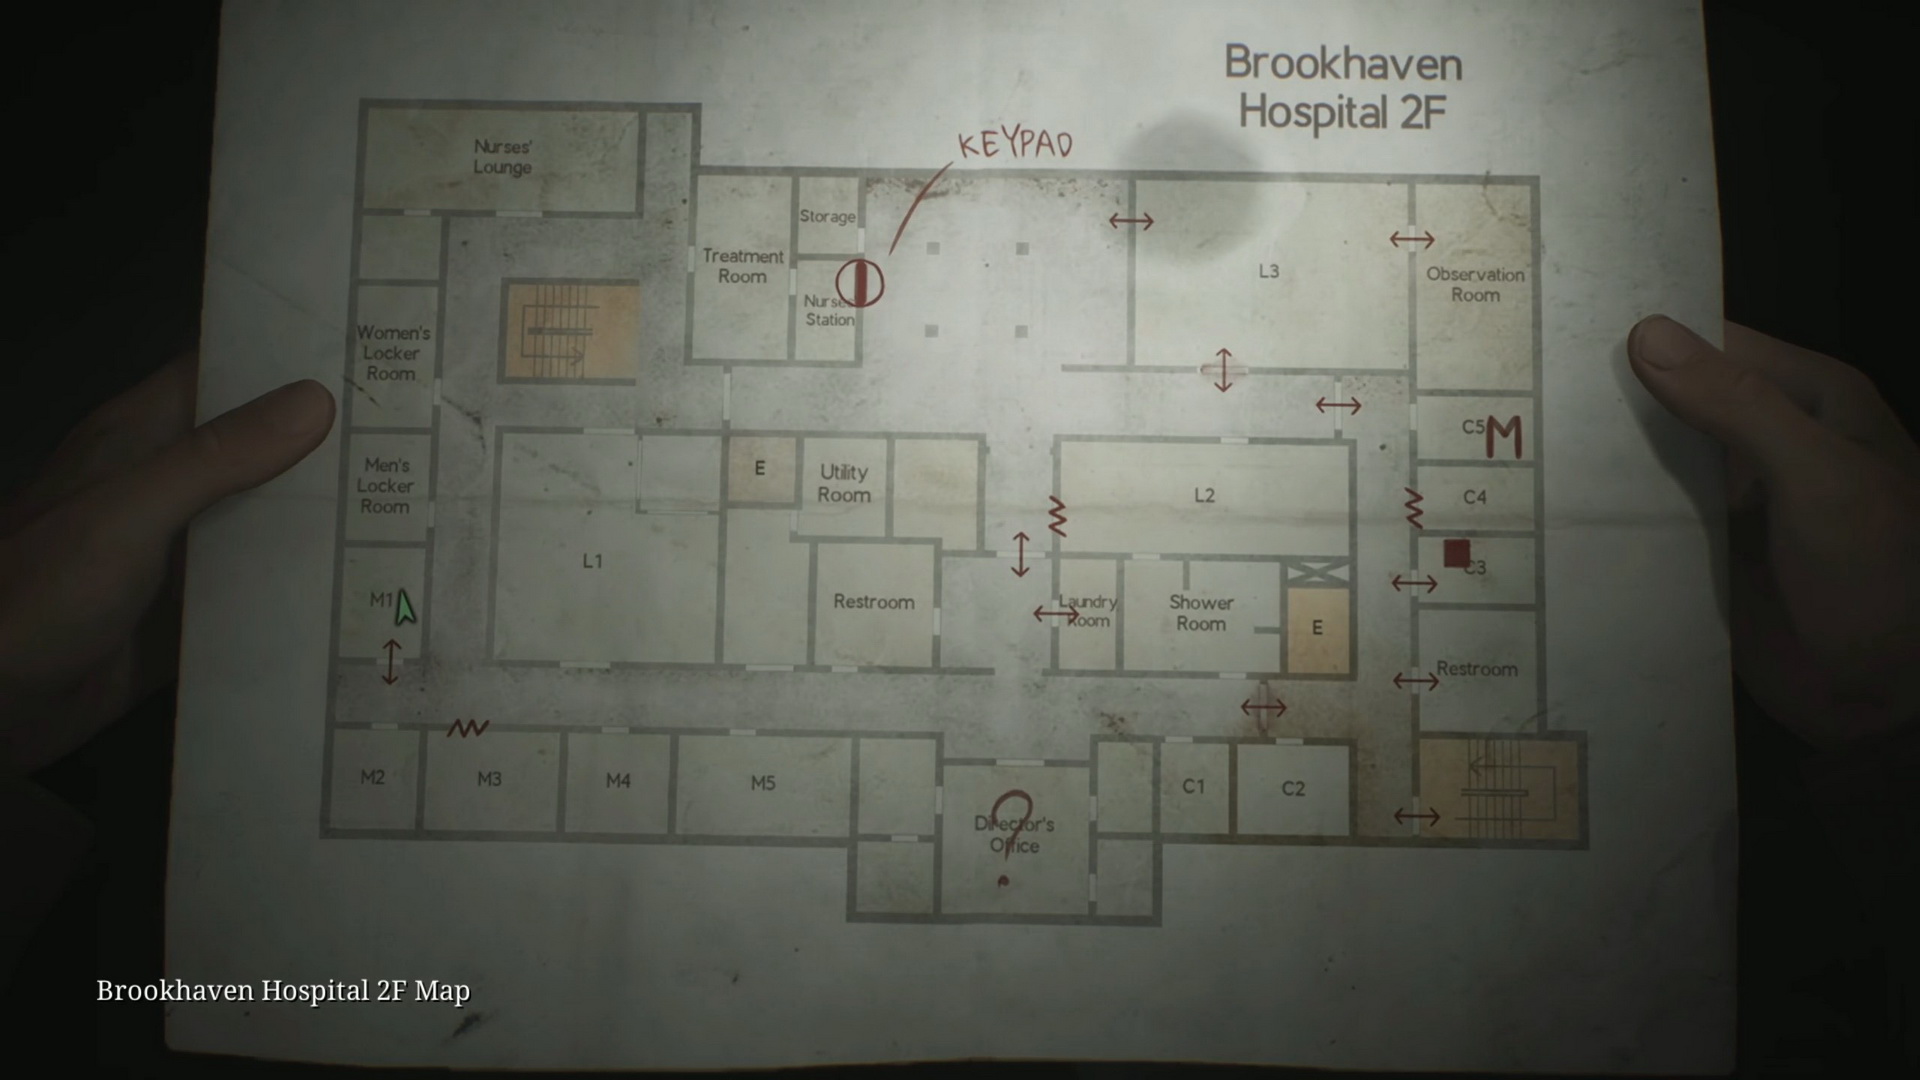
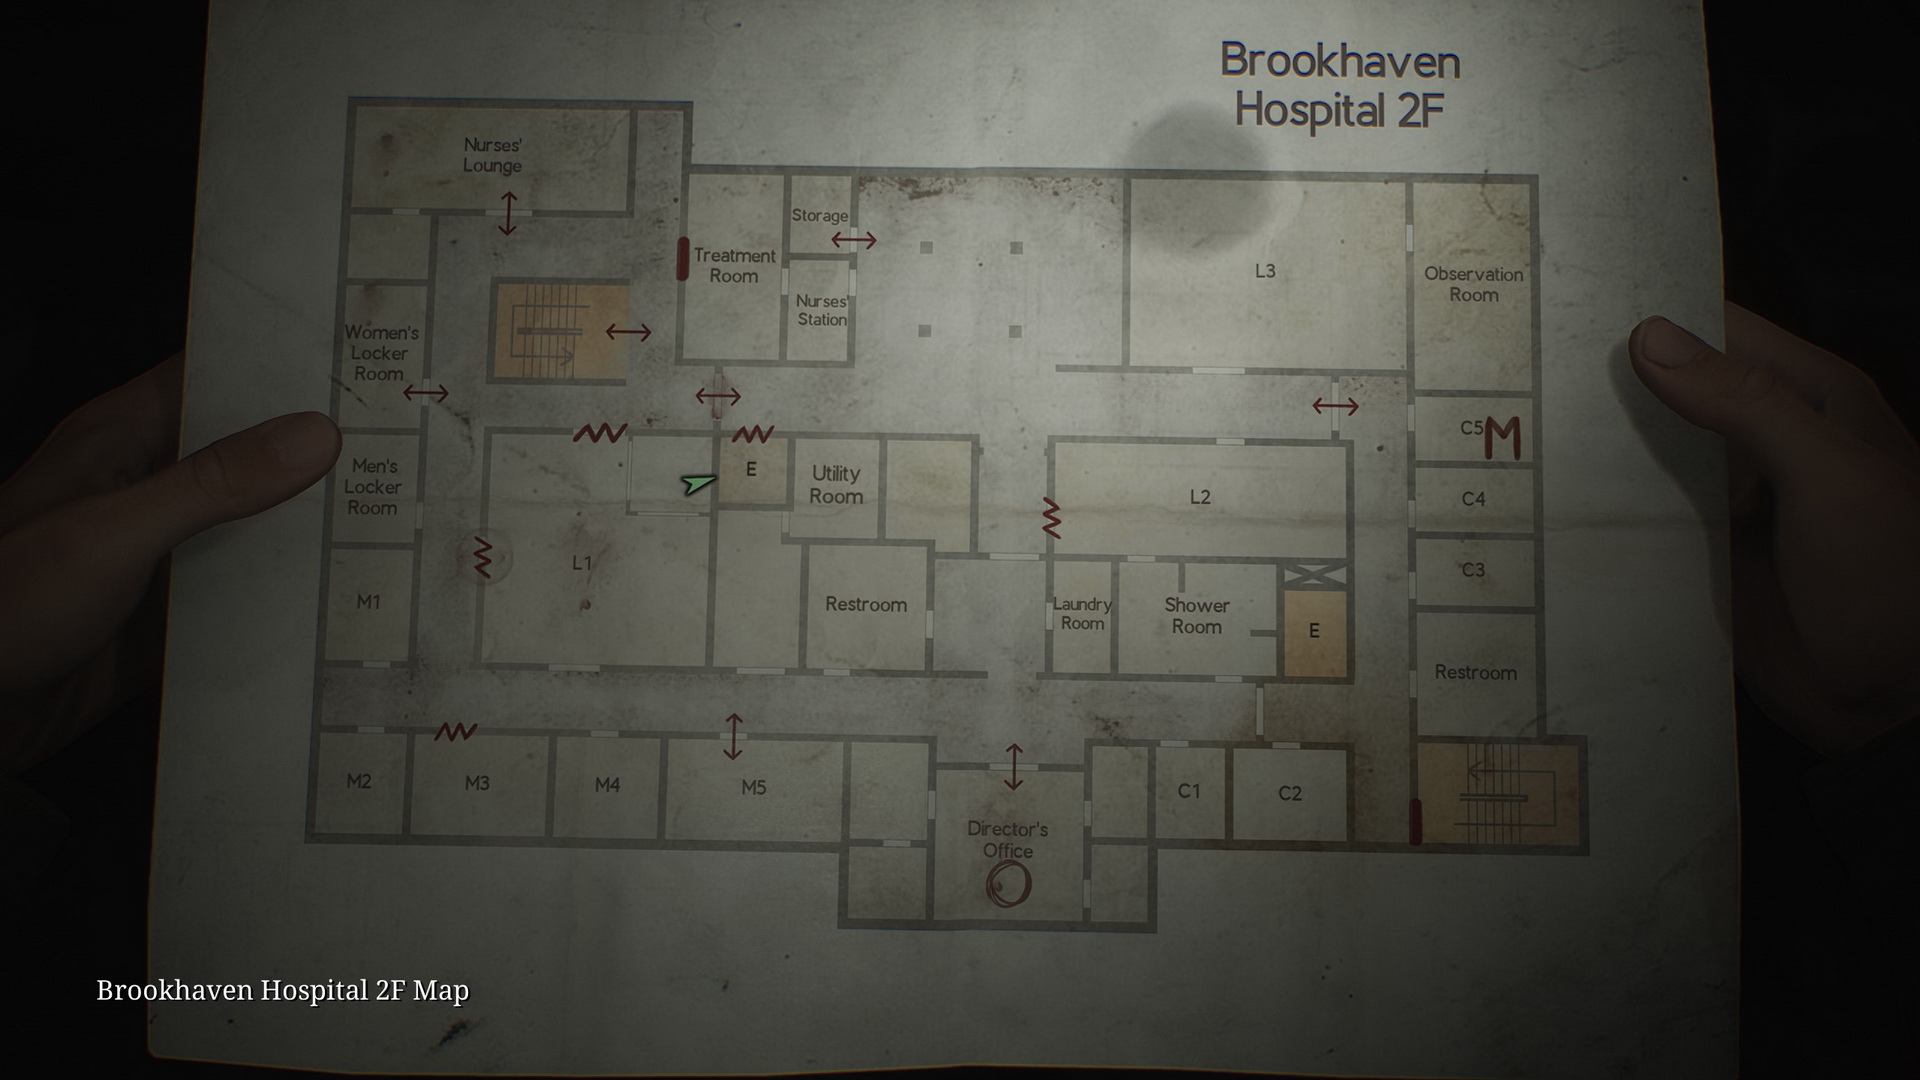
Second Floor
- You can find a Save Point in Room C3.
- Memo #27: Staff Memo. On the window of the Nurses’ Station.
- Strange Photo #12: "Her drawings". On a desk inside the Observation Room accessed by crawling through a vent into Room L3 just opposite the Nurses' Station.
- Glimpse of the Past #11. In the Laundry Room, interact with blue carbon paper thrown in the garbage bin.
- Enter the Director's Office to find a hand holding a key on the desk and a safe with a missing button behind the red curtains. There's a Save Point in the back room.
- Memo #28: Evaluation Card, Patient #0050, Memo #29: Evaluation Card, Patient #0090 and Memo #30: Evaluation Card, Patient #0130. Director’s Office, on a cabinet next to the desk.
- Memo #31: Interview Transcript. Room C1, behind the poster on the wall.
- Glimpse of the Past #12. Room M1, interact with the chains on the bed.
- 45 Bent Needle is found inside the Women’s Locker Room. To get the item, interact with the teddy bear on a chair.
- 46 Shotgun is in the open locker in the same room.
- 47 L1 Room Key is on a coffee table inside the Nurses’ Lounge.
- Using the key, go to Room L1. Crawl into the next room using the trolley. Proceed into the Utility Room to find a hole in the wall. Use it to get to the first floor.
First Floor
- 48 Marked Bracelet is sitting on a red book in the corner of Medical Records.
- Memo #32: Scribbled Note. Medical Records, lying on the ground.
- Glimpse of the Past #13. Medical Records, interact with the typewriter on the desk.
- Return to the second floor and use the northwest stairs to go to the third floor.
Third Floor
- There's a Save Point at the end of the corridor.
- 49 1F Inner Ward Key is on the desk inside Exam Room 5, break the window to get inside.
- Memo #33: X-ray Memo (skippable). On an examination table in the X-Ray Room next door.
- 50 Radiograph of a Pelvis (skippable). Underneath the previous memo.
- Return to the first floor.
First Floor
- Strange Photo #13: “At least she was there”. Examination Room 1 will now be unlocked. Find the photo inside the drawer in the back of the room.
- Use the 1F Inner Ward Key to access restricted area on the first floor.
- Memo #34: Keypad Combination Note. On the bulletin board in the Doctors’ Lounge. Contains the code for the Nurses’ Station's door.
- Go to the Garden through Dayroom and Pharmacy.
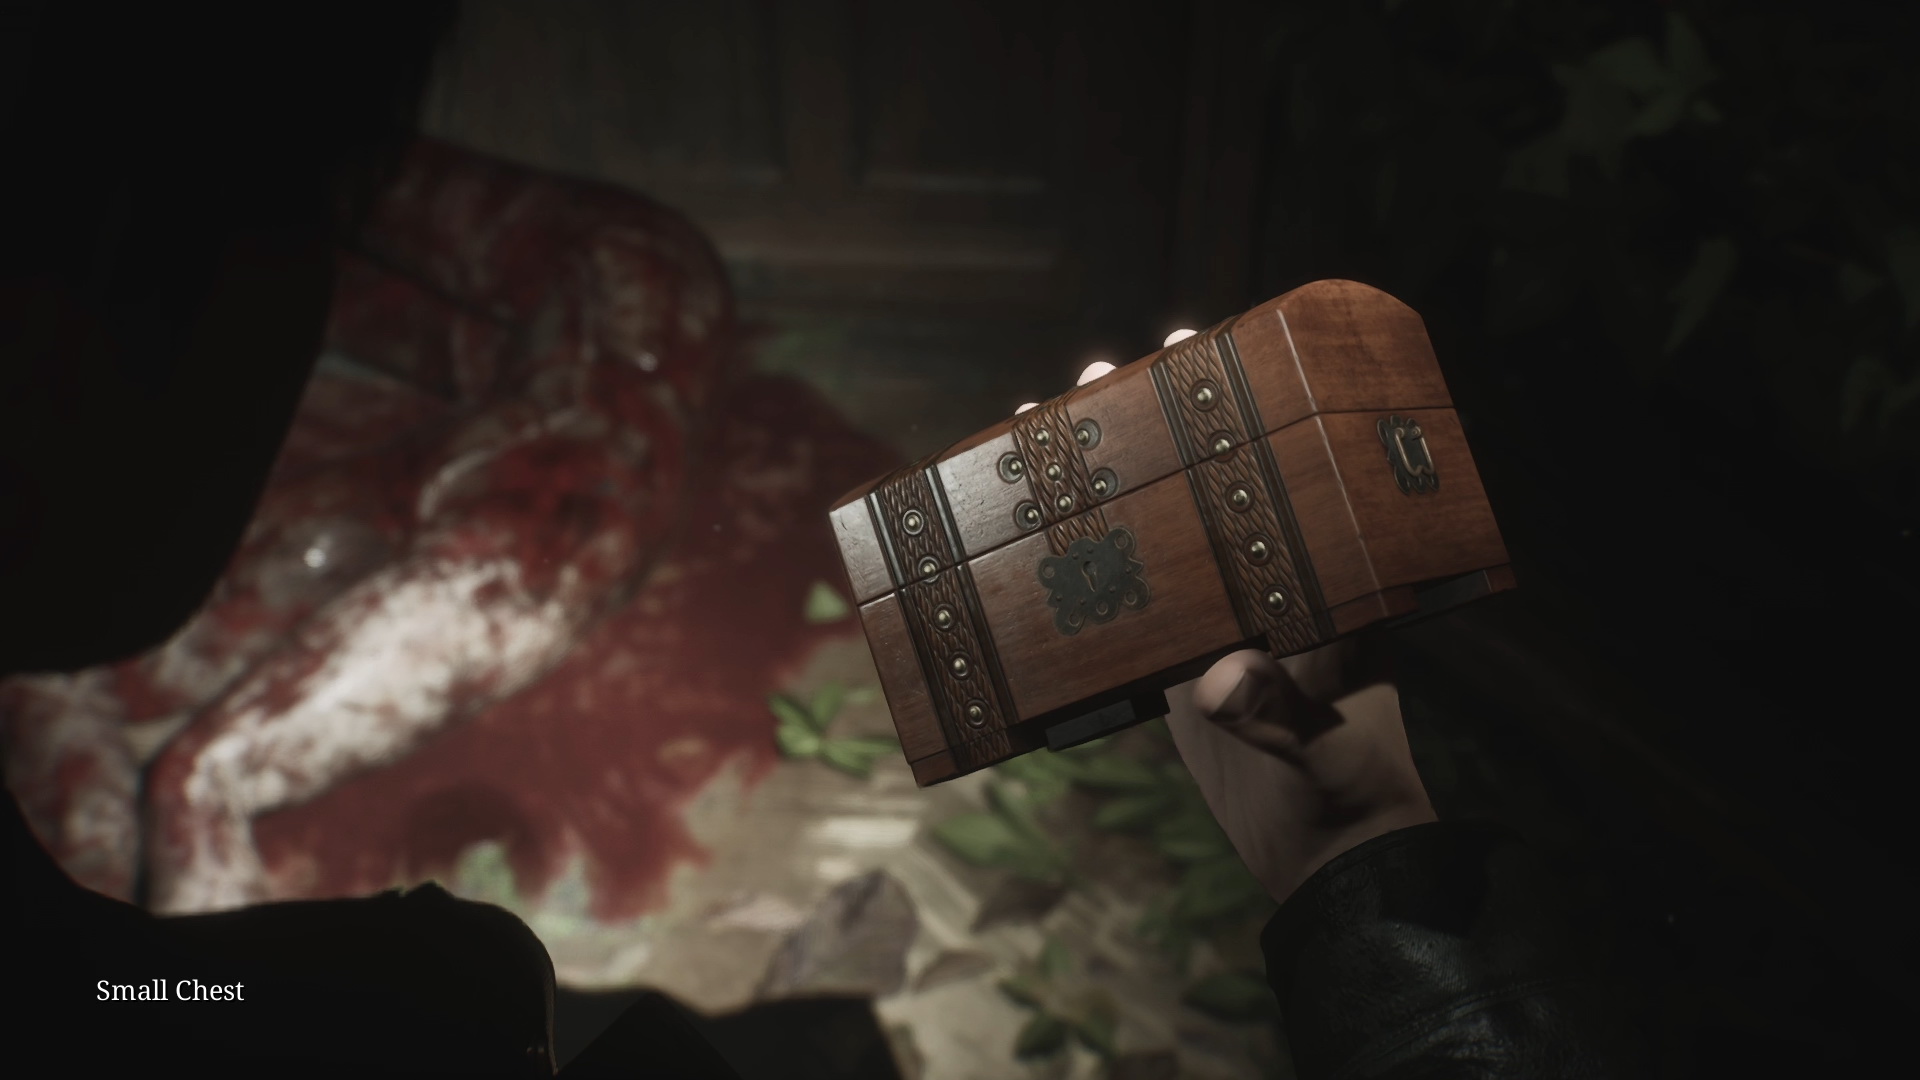
- NG+ E9 Small Chest is found in the gazebo of the Garden. Combine the Small Chest with the Rusted Key in your inventory, and you will receive the White Claudia needed for the Bliss Ending.
- Proceed to the Pool area.
- 51 Medical Tube is sitting on a sink inside the Shower Room of the Pool.
- 52 Medical Tube with Bent Needle attached. Combine the Medical Tube with the Bent Needle in your inventory.
- 53 Maintenance Key. Return to Pharmacy and use the combined item on the drain to get the key.
- Return to the Pool and use the key on the trap door. Turn the valve to drain the pool.
- 54 Bloodstained Bracelet. Step inside the drained pool and smash the wall with a crying eye symbol on it.
- 55 Mold Remover (skippable) is in the Kitchen, sitting on the garbage chute's hatch.
Second Floor
- Go to the second floor and unlock the door to the Nurses' Station using the code:
- Light/Standard: 3578
- Hard: 7456
- 56 Moldy Radiograph (skippable) is in the bathtub in the Treatment Room.
- 57 Cleaned Up Radiograph (skippable). Combine the Moldy Radiograph with the Mold Remover.
- Memo #35: Treatment Room Note. On a bench in the Treatment Room.
Third Floor
- Return to the X-Ray Room on the third floor. Place the two missing radiographs on the X-ray film viewer. Rotate and arrange the radiographs to learn the code – 4 37 12 (this puzzle is skippable as the code is always the same).
- Use this code for the Room D1 combination lock on the same floor – right to 4, left to 37, right to 12.
- 58 Filthy Bracelet. Room D1, inspect the bed in the room.
Second Floor
- Return to the Director's Office on the second floor to solve the hand puzzle. Place the bracelets on the hand matching the stains and markings on the hand in the following order, top to bottom:
- Bloodstained Bracelet
- Marked Bracelet
- Filthy Bracelet
- The resulting code from top to bottom is 92, 45, 71.
- 59 Director’s Storage Room Key. Once you place the bracelets correctly, you will get the key.
- Use the key to access the storage room in the office.
- 60 Safe Button. On the table inside the Director's Storage Room.
- Solve the Director's Office safe puzzle:
- Rearrange the books in the Director's Office's storage to match astrological symbols with the numbers and learn the cipher (skippable).
- Insert the missing safe button. Enter the 92, 45, 71 code using the astrological symbols as shown in the image:
- 61 Rooftop Key is found inside the safe after solving the puzzle.
- Memo #36: Safe Note. In the same safe.
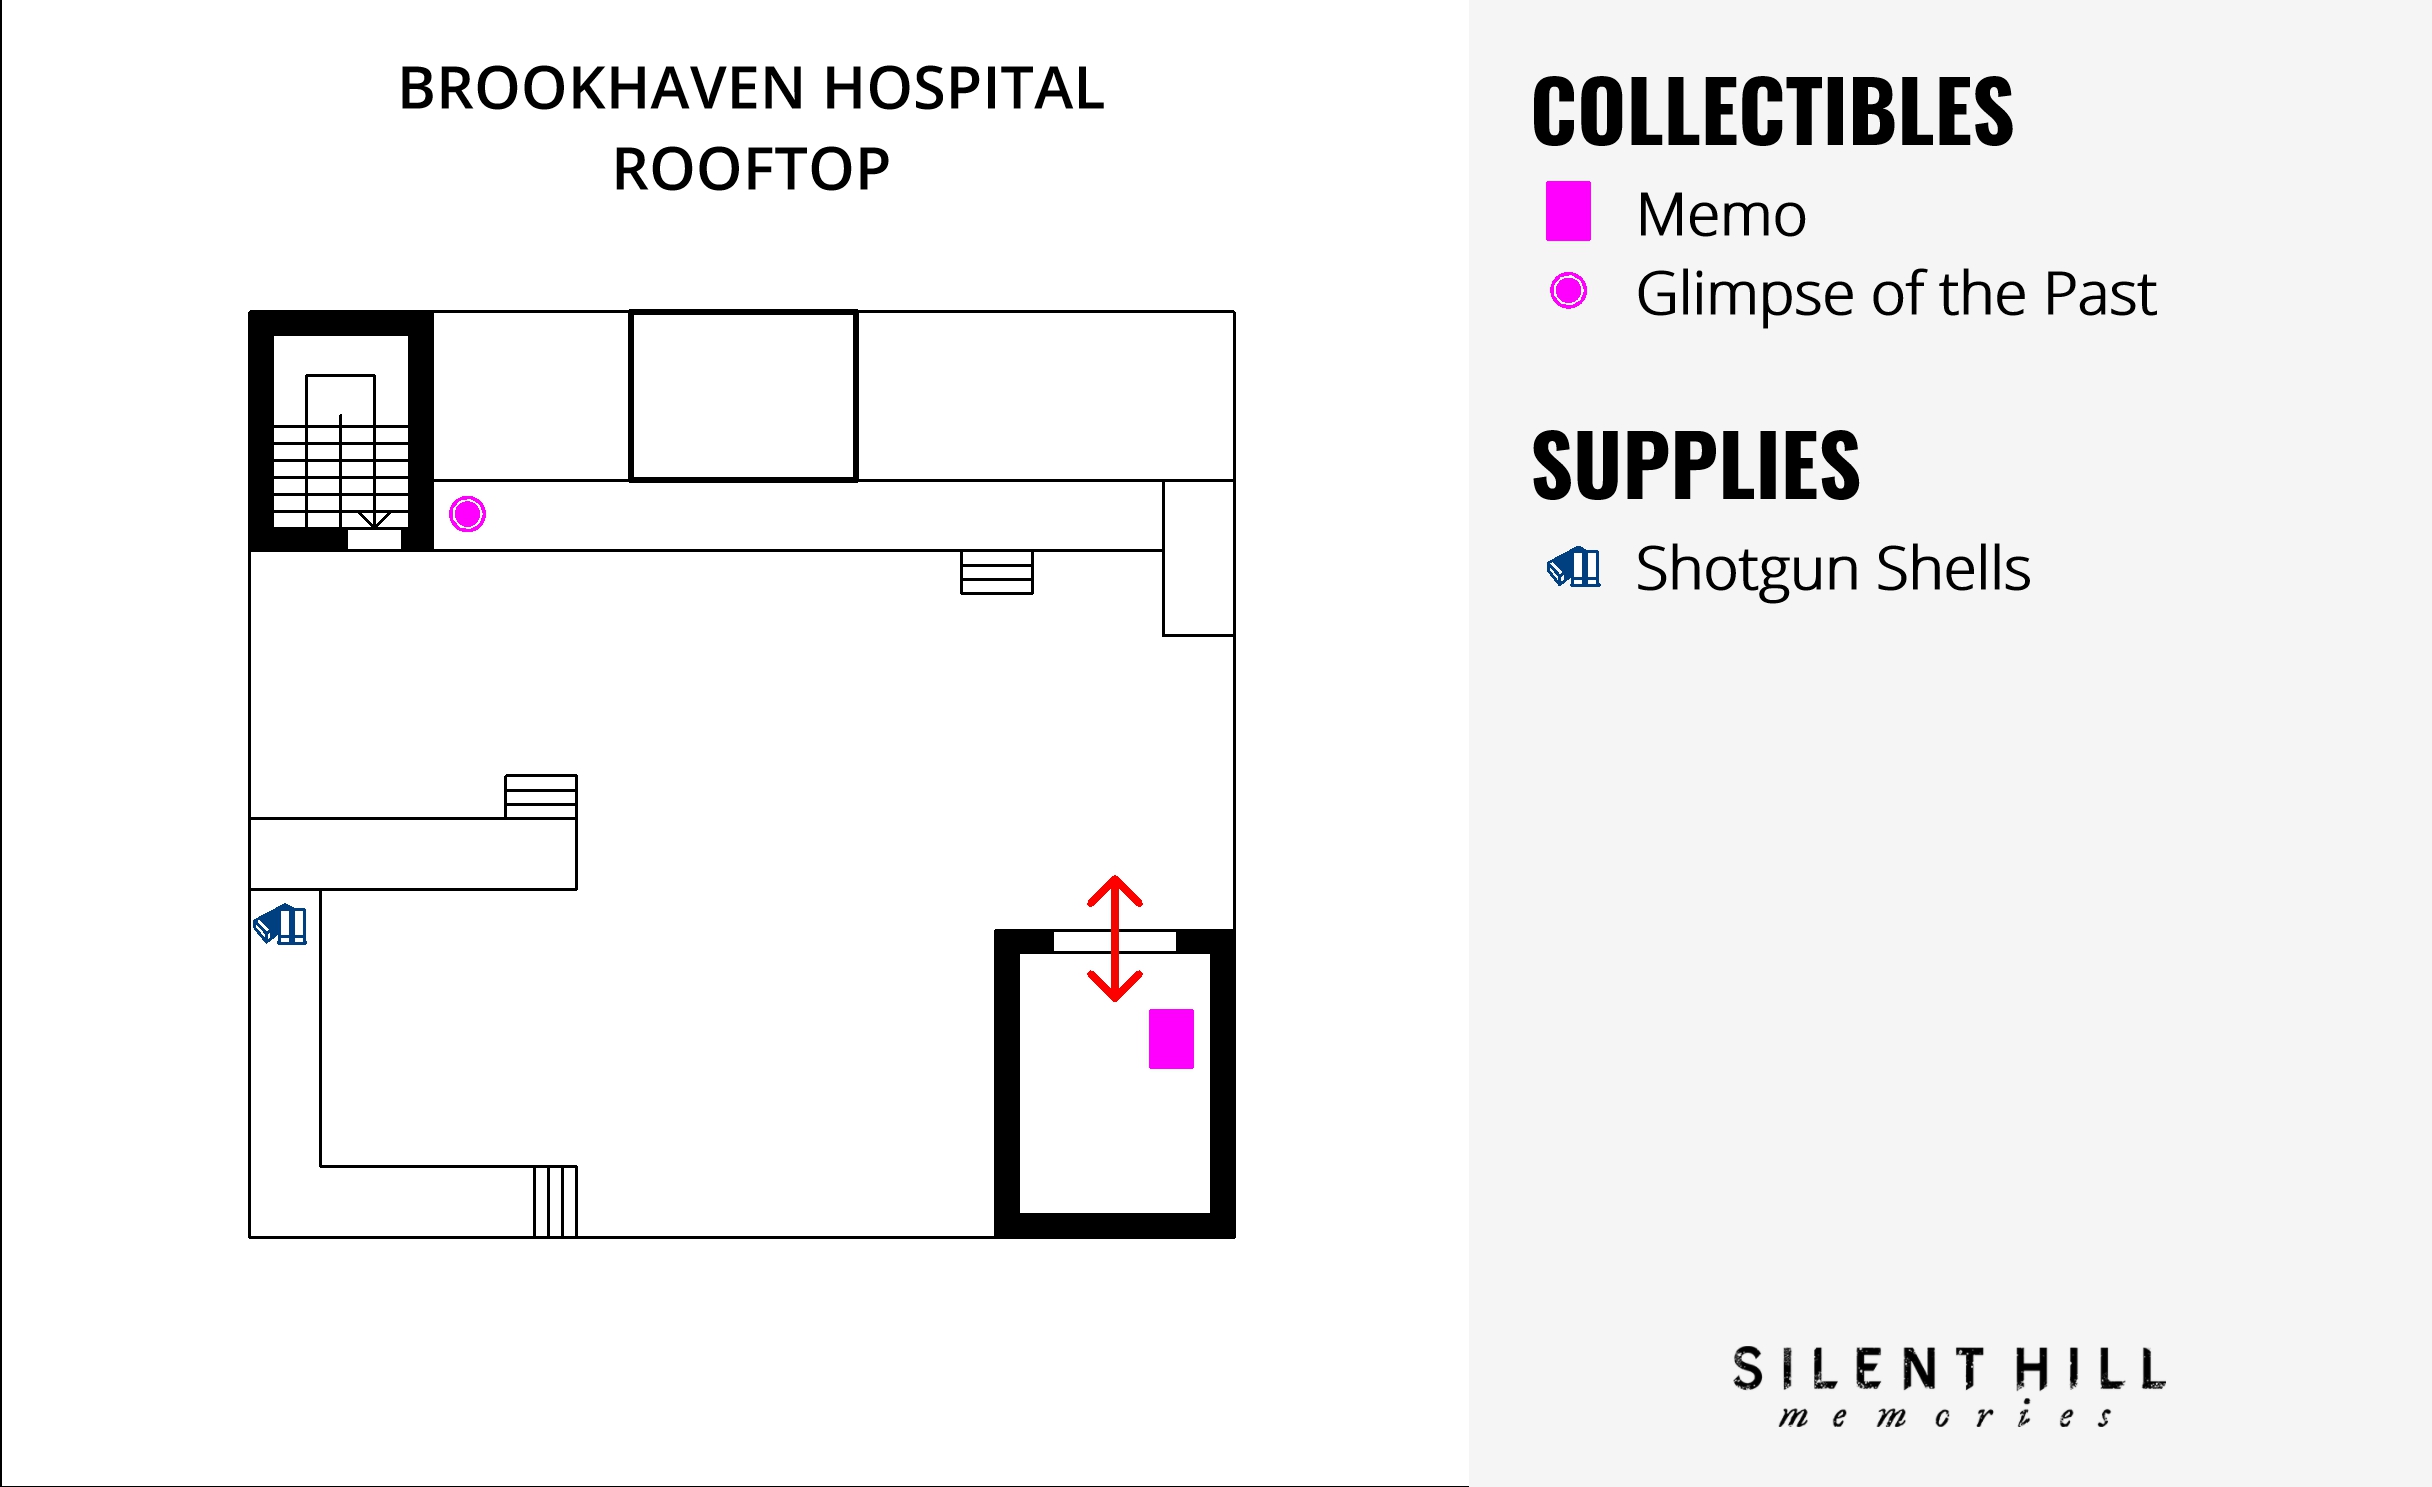
Rooftop
- Proceed to the roof going to the third floor and using the northwestern stairs.
- Glimpse of the Past #14. Once on the rooftop inspect a broken fence visible from the end of the catwalk.
- Memo #37: Page From A Diary. On the floor in the small room in the corner of the roof level.
- A cutscene will be triggered after you try exiting the room.
Third Floor
- Glimpse of the Past #15. Inside Room I3, inspect a blood-stained wall behind the door.
- Find Laura and prepare for the boss fight.
Complete Walkthrough
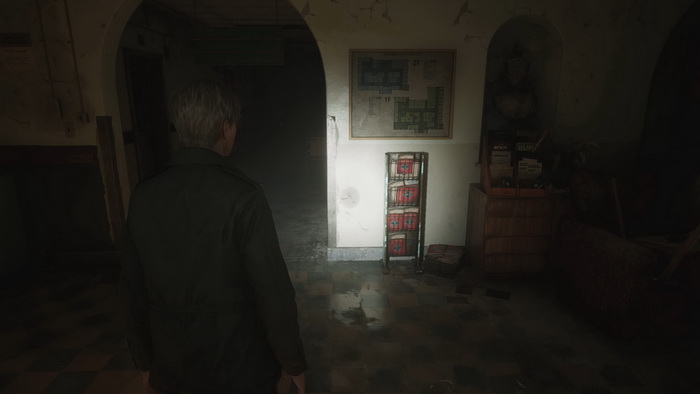
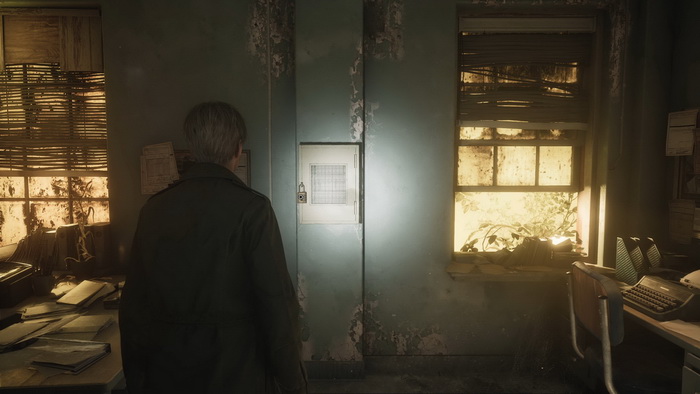
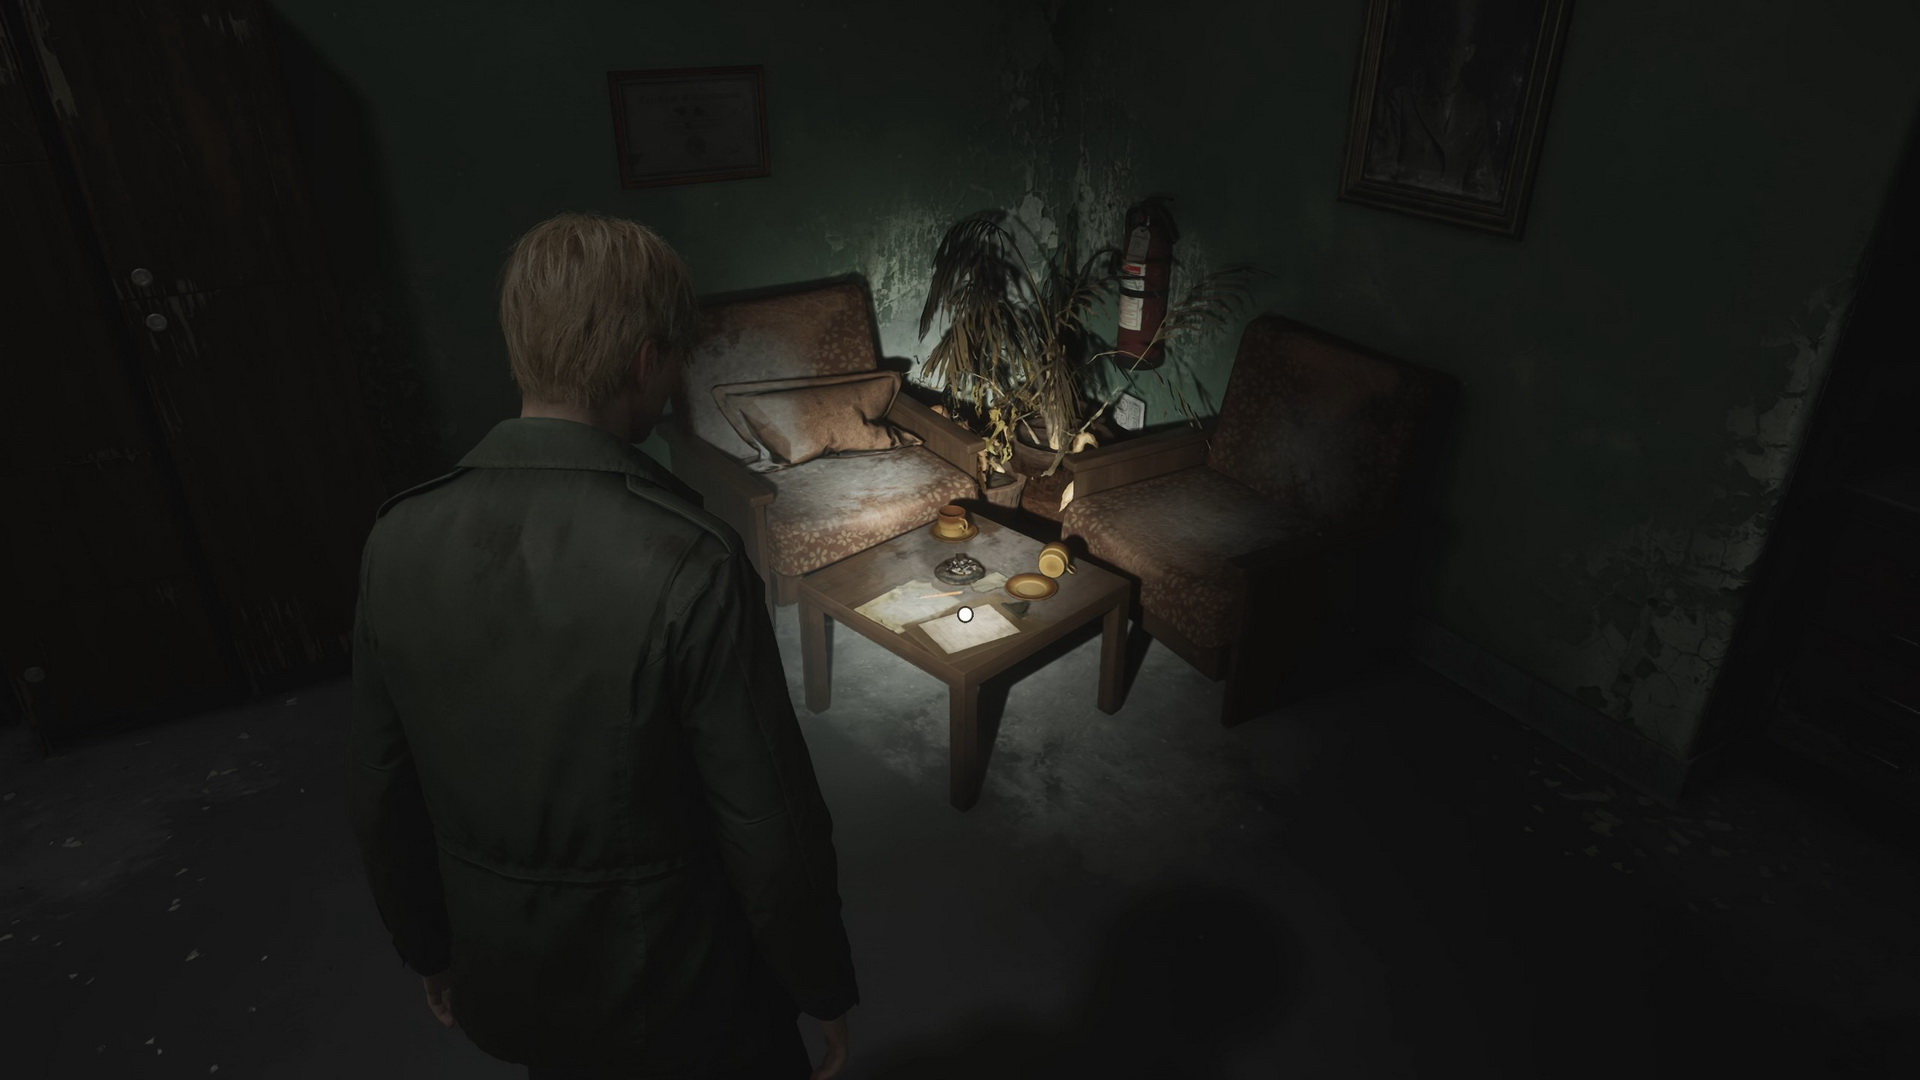
In the room to the right, Security, you will find an empty weapon locker and your first box of Shotgun Shells in the desk drawer. Walk to the main lobby and collect the Brookhaven Hospital Maps from the booklet holder.
In the Restroom, a Health Drink is on a shelf. Go to the Reception to grab Handgun Ammo from the desk's drawer. On the notice board inside the Reception, you will find Memo #25: Key Locker Note.
 |
 |
Also, you will find another note about the director's request on the wall to the right of the window.
 |
 |
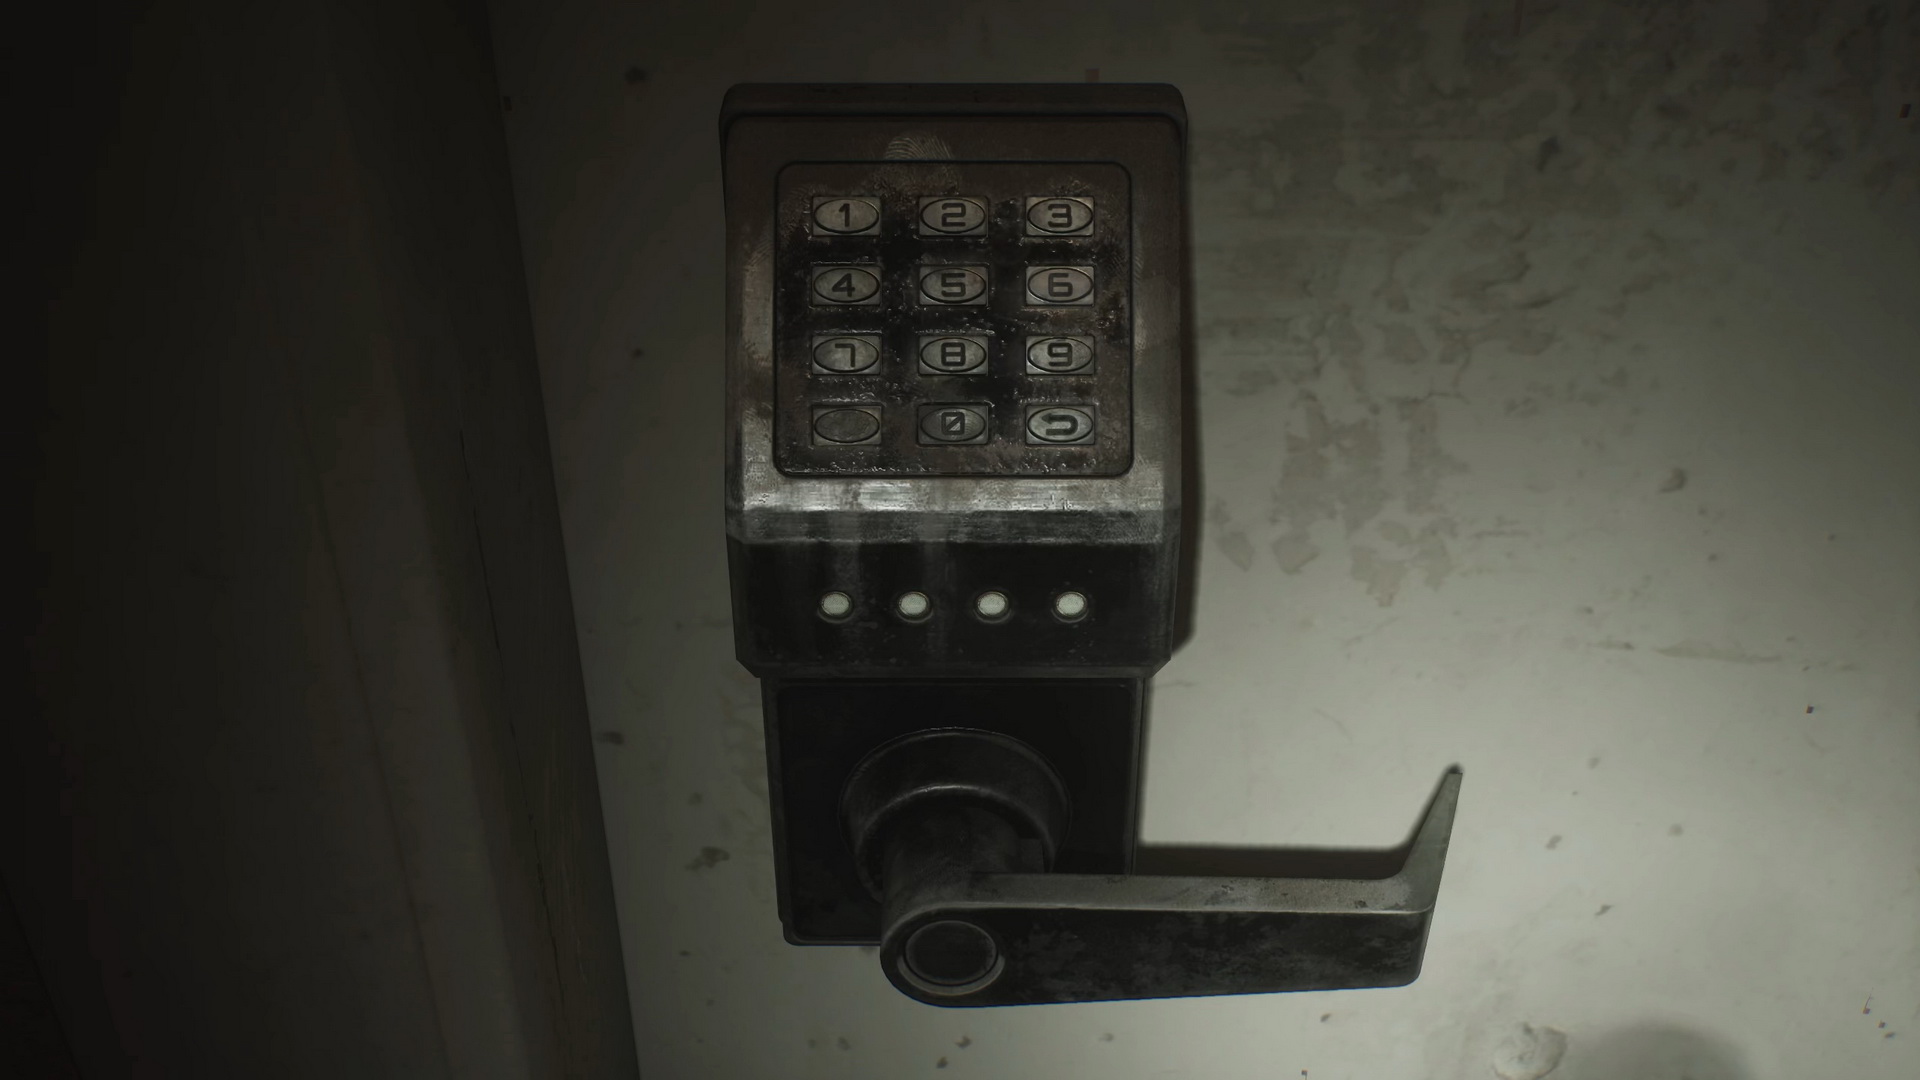
Go to the Reception Office for a Save Point and a locked key locker. You will need to learn a combination for the padlock.
Accessing the Basement
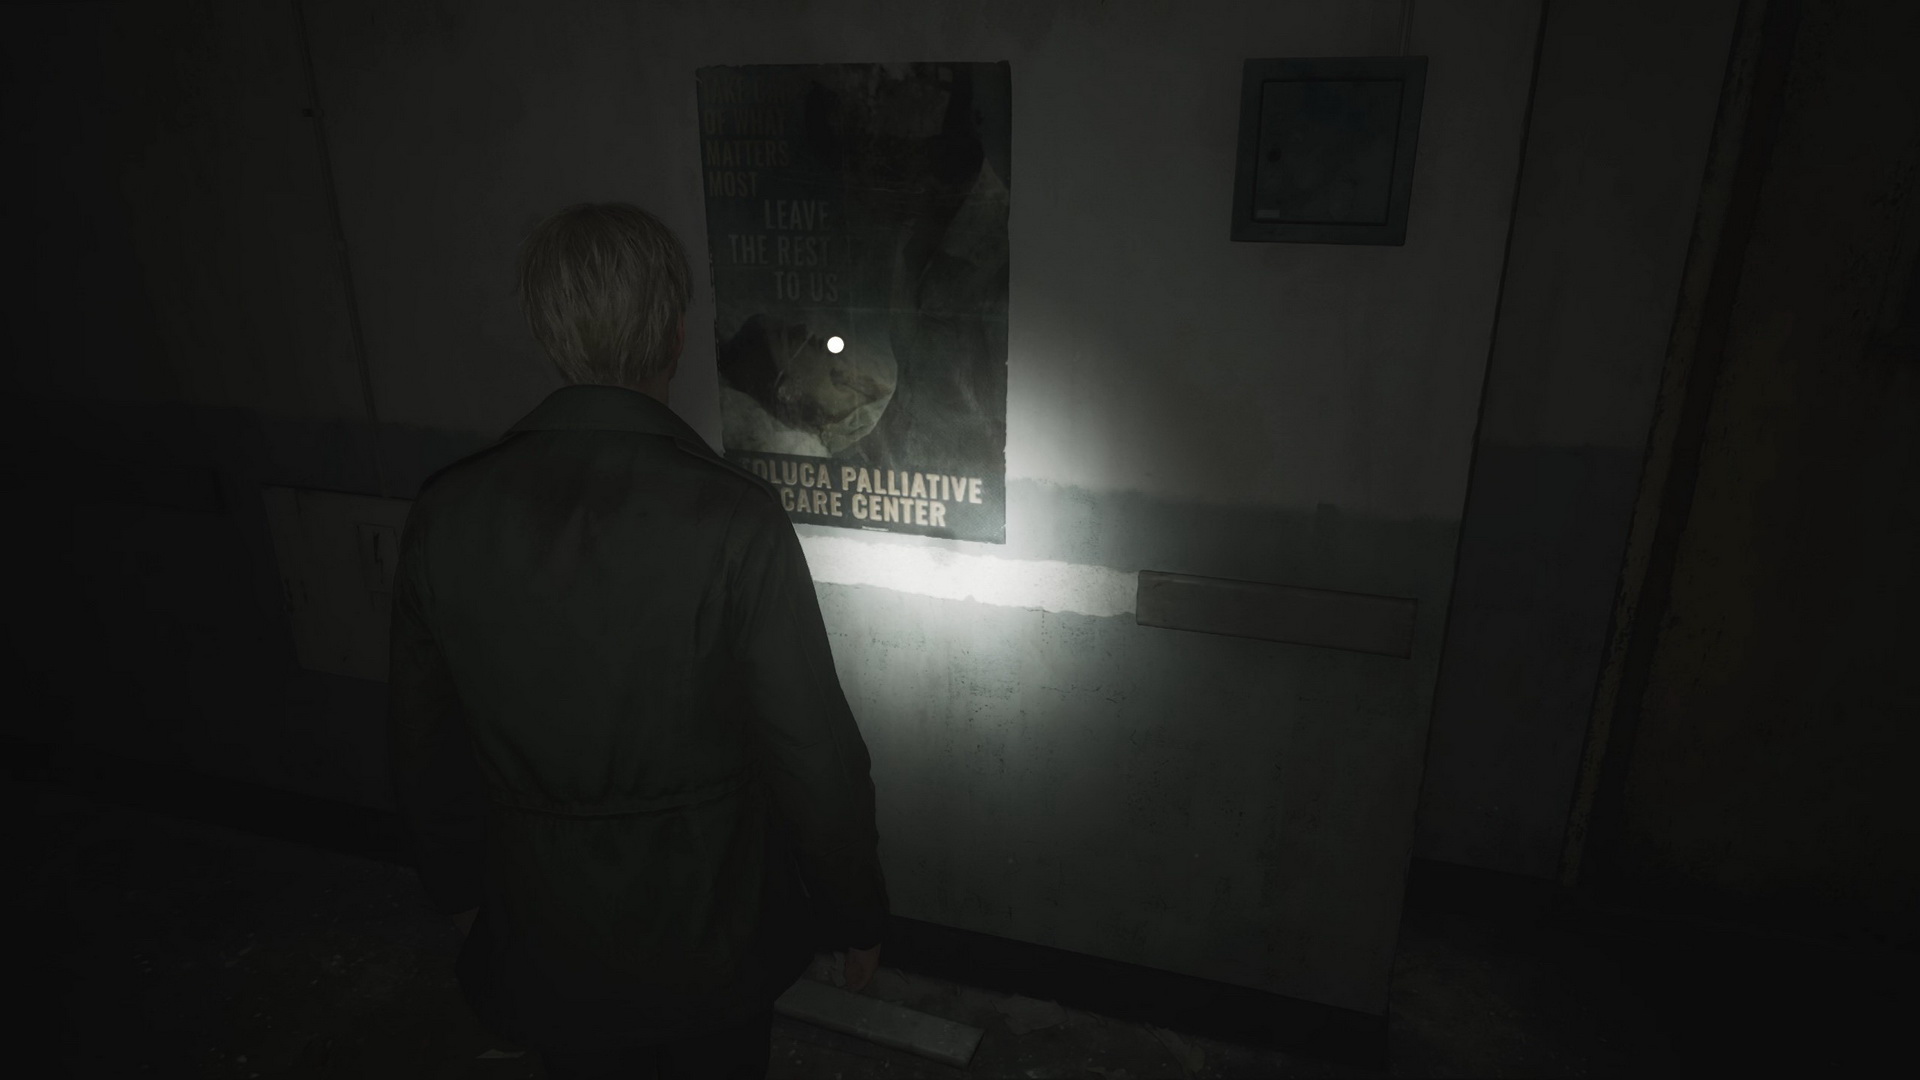
The Key Locker Note collected earlier gives us a clue as to where to look for the code. Examination Room 3 is on the same floor, just around the corner. On your way there, you can check a wall poster.
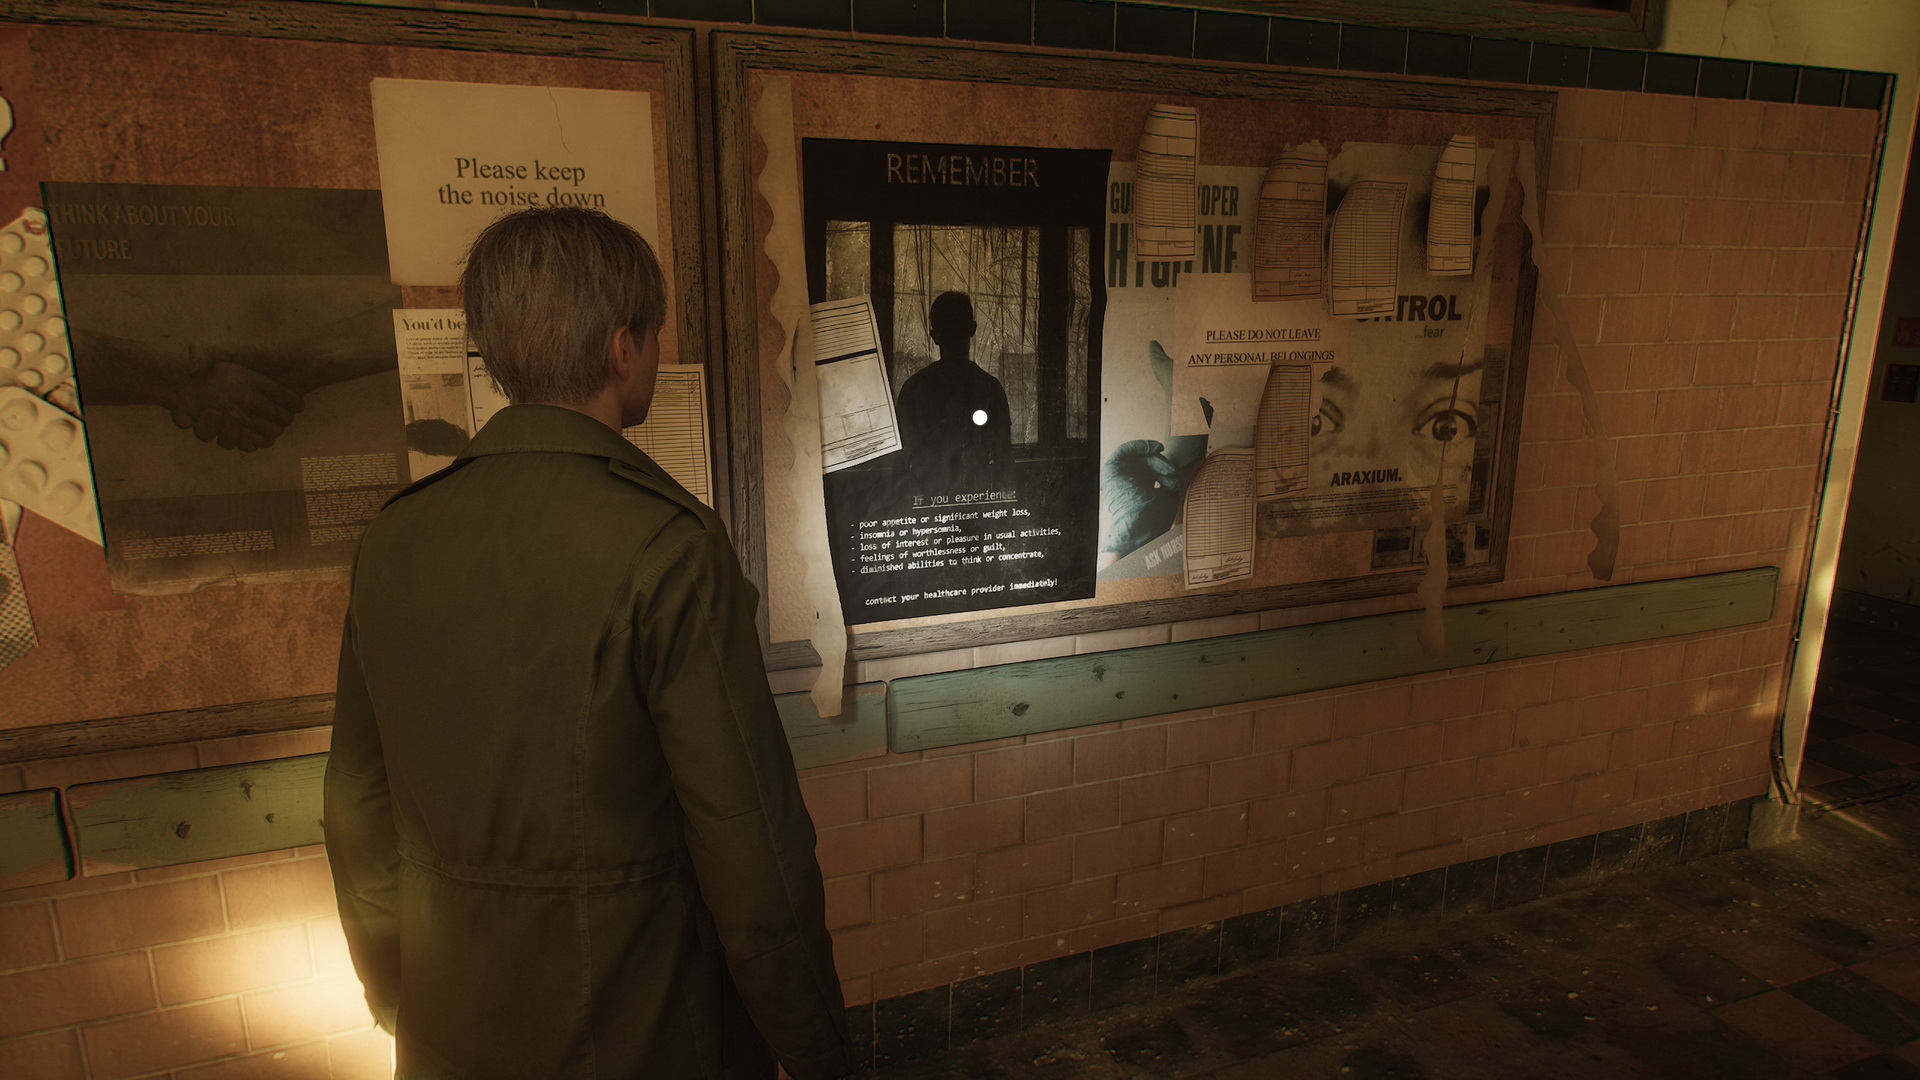 |
 |
Go to the room and smash the glass to break into. There's a Health Drink in the glass cabinet and a Syringe in the first aid kit on a gurney in the middle. Move to the space between the two examination rooms and find Memo #26: Nurse's Memo inside the desk's drawer.
 |
 |
In Examination Room 2, Shotgun Shells are on a window sill. Return to the main lobby area to solve the puzzle and unlock the key locker.
Puzzle: Reception Office Padlock
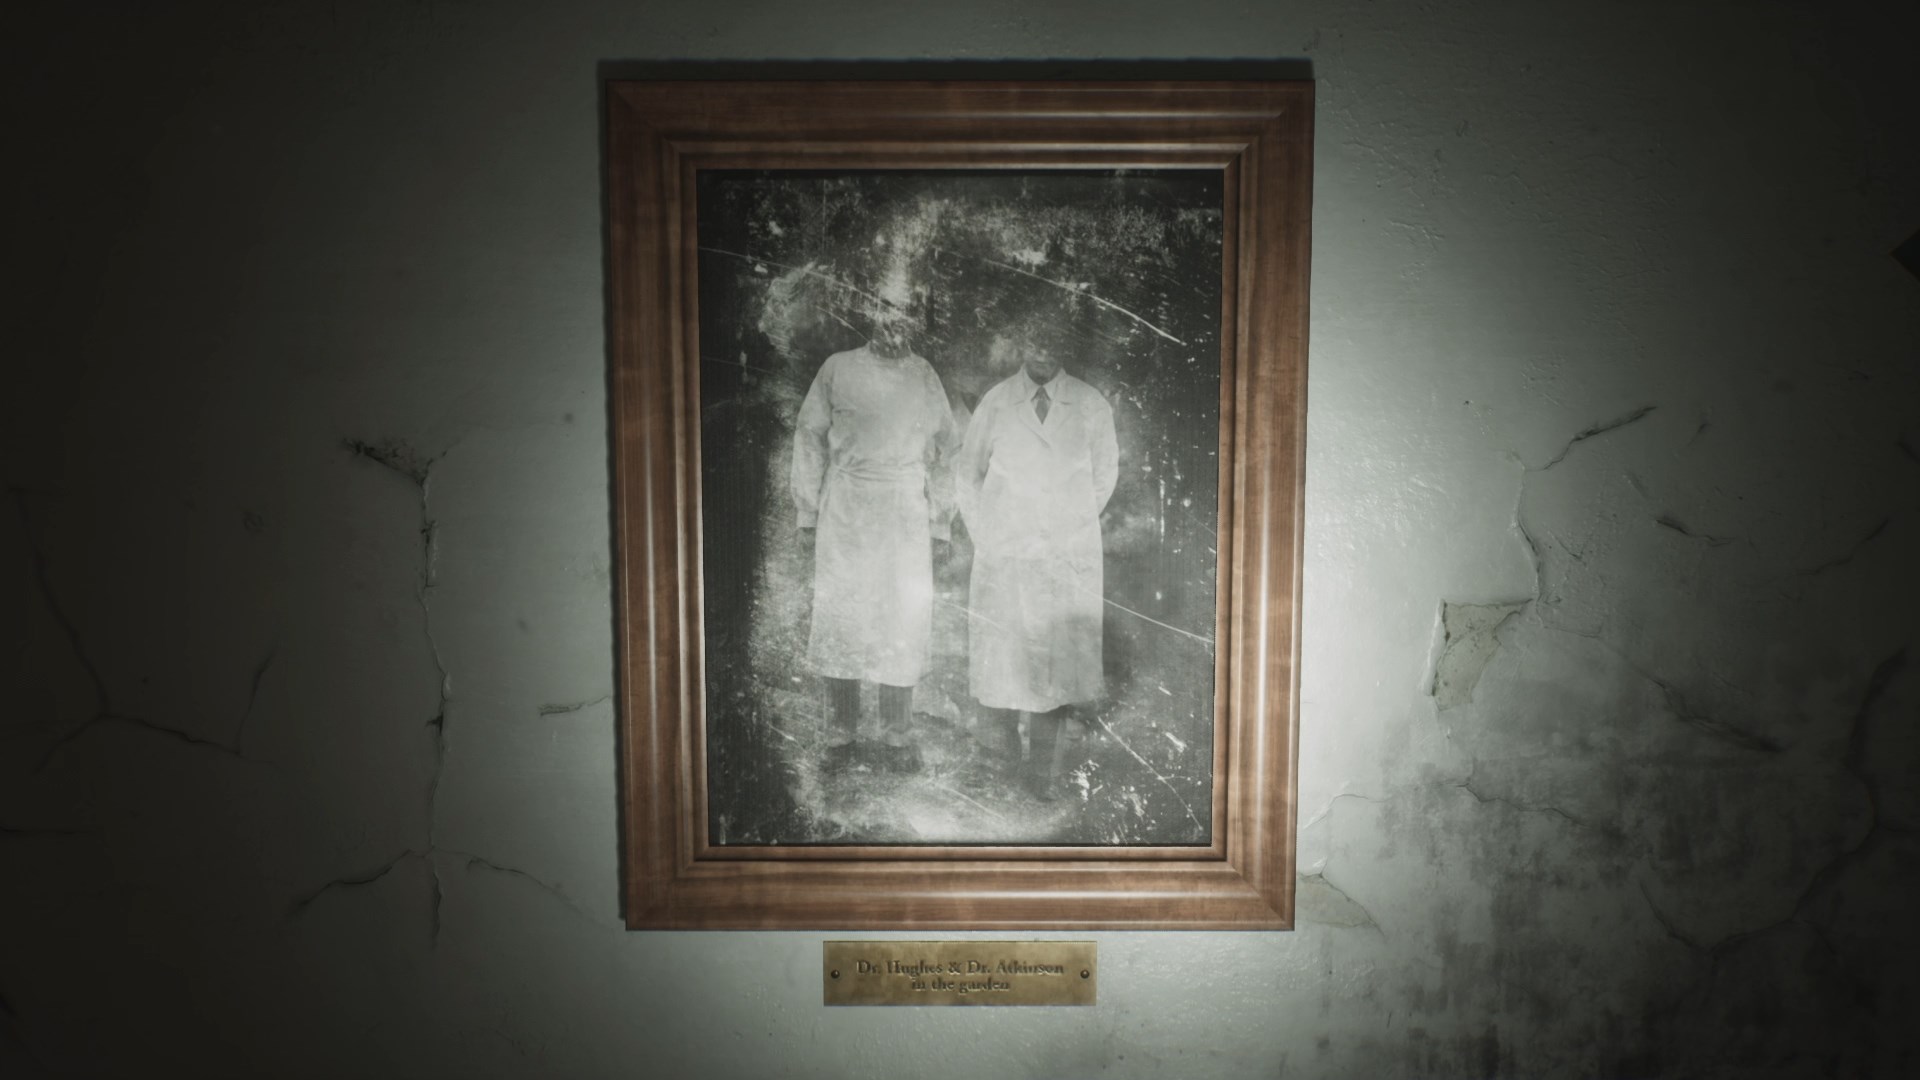
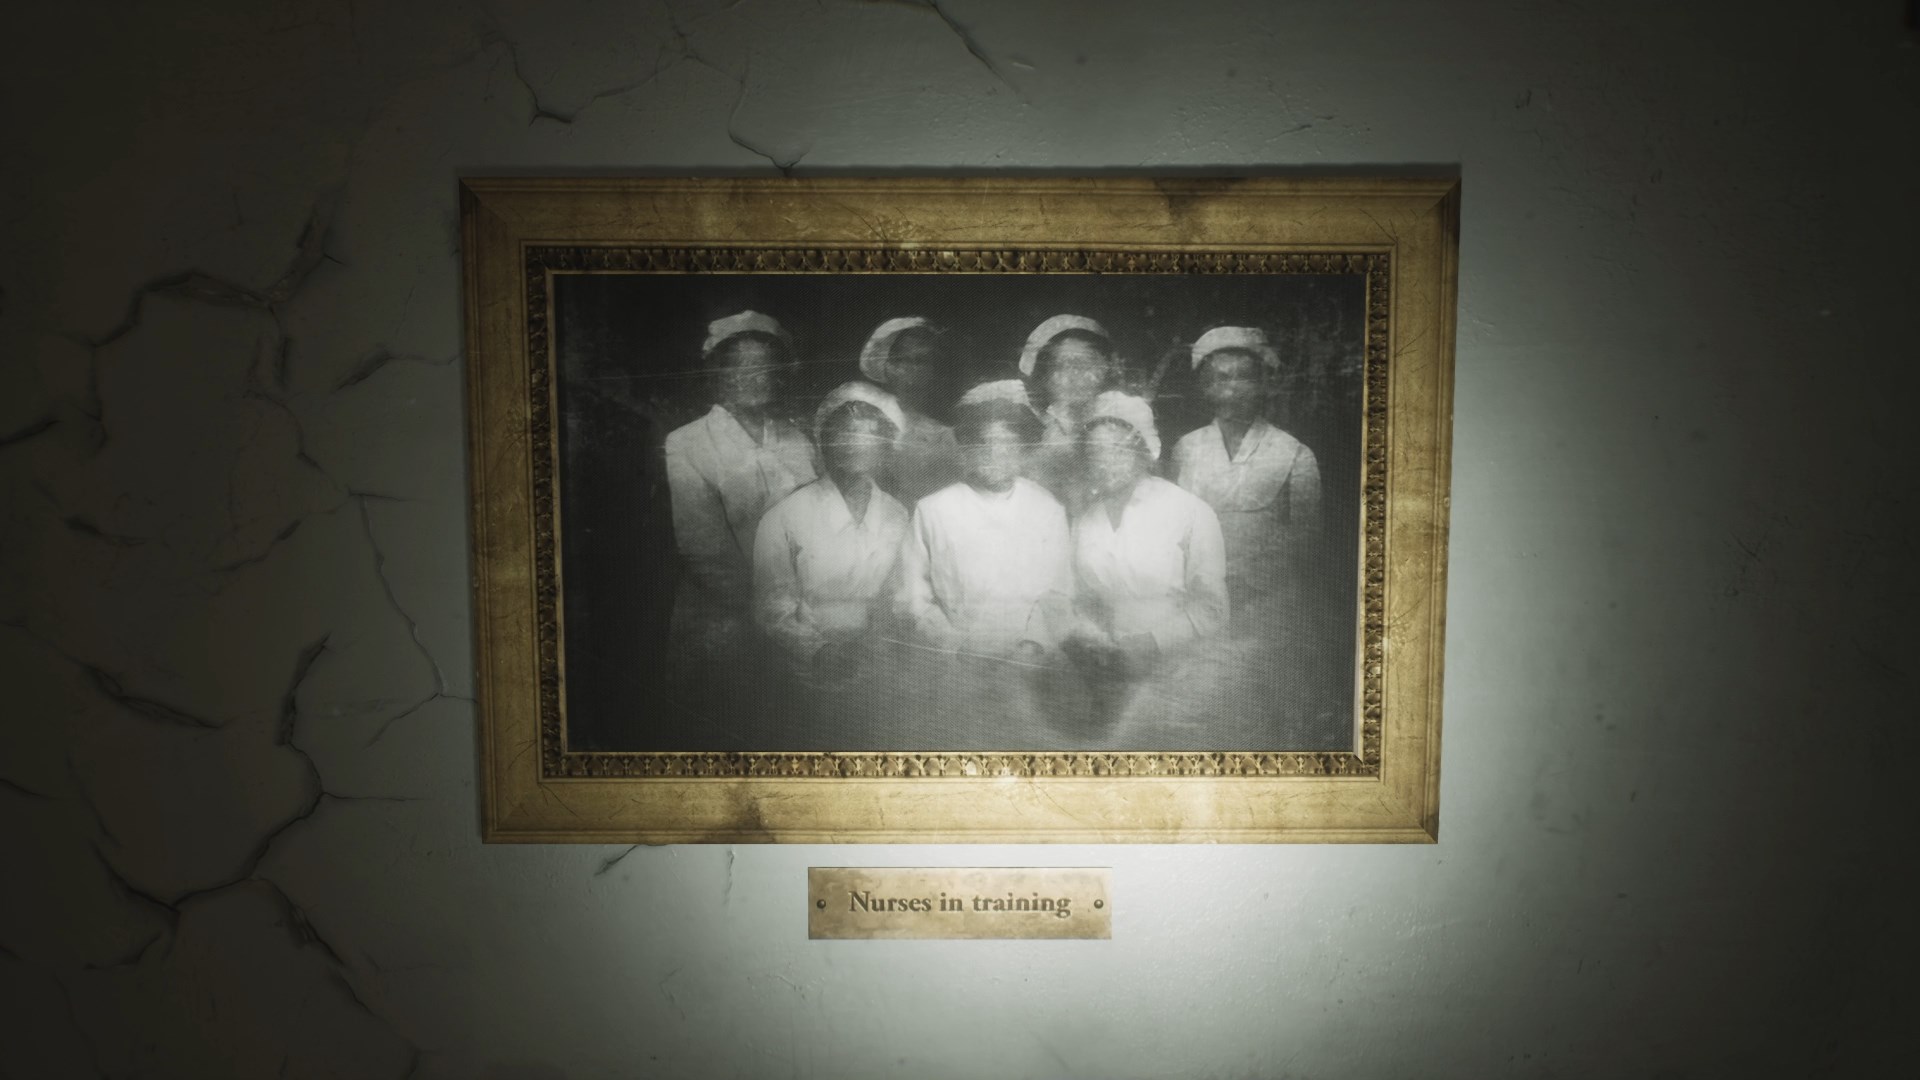
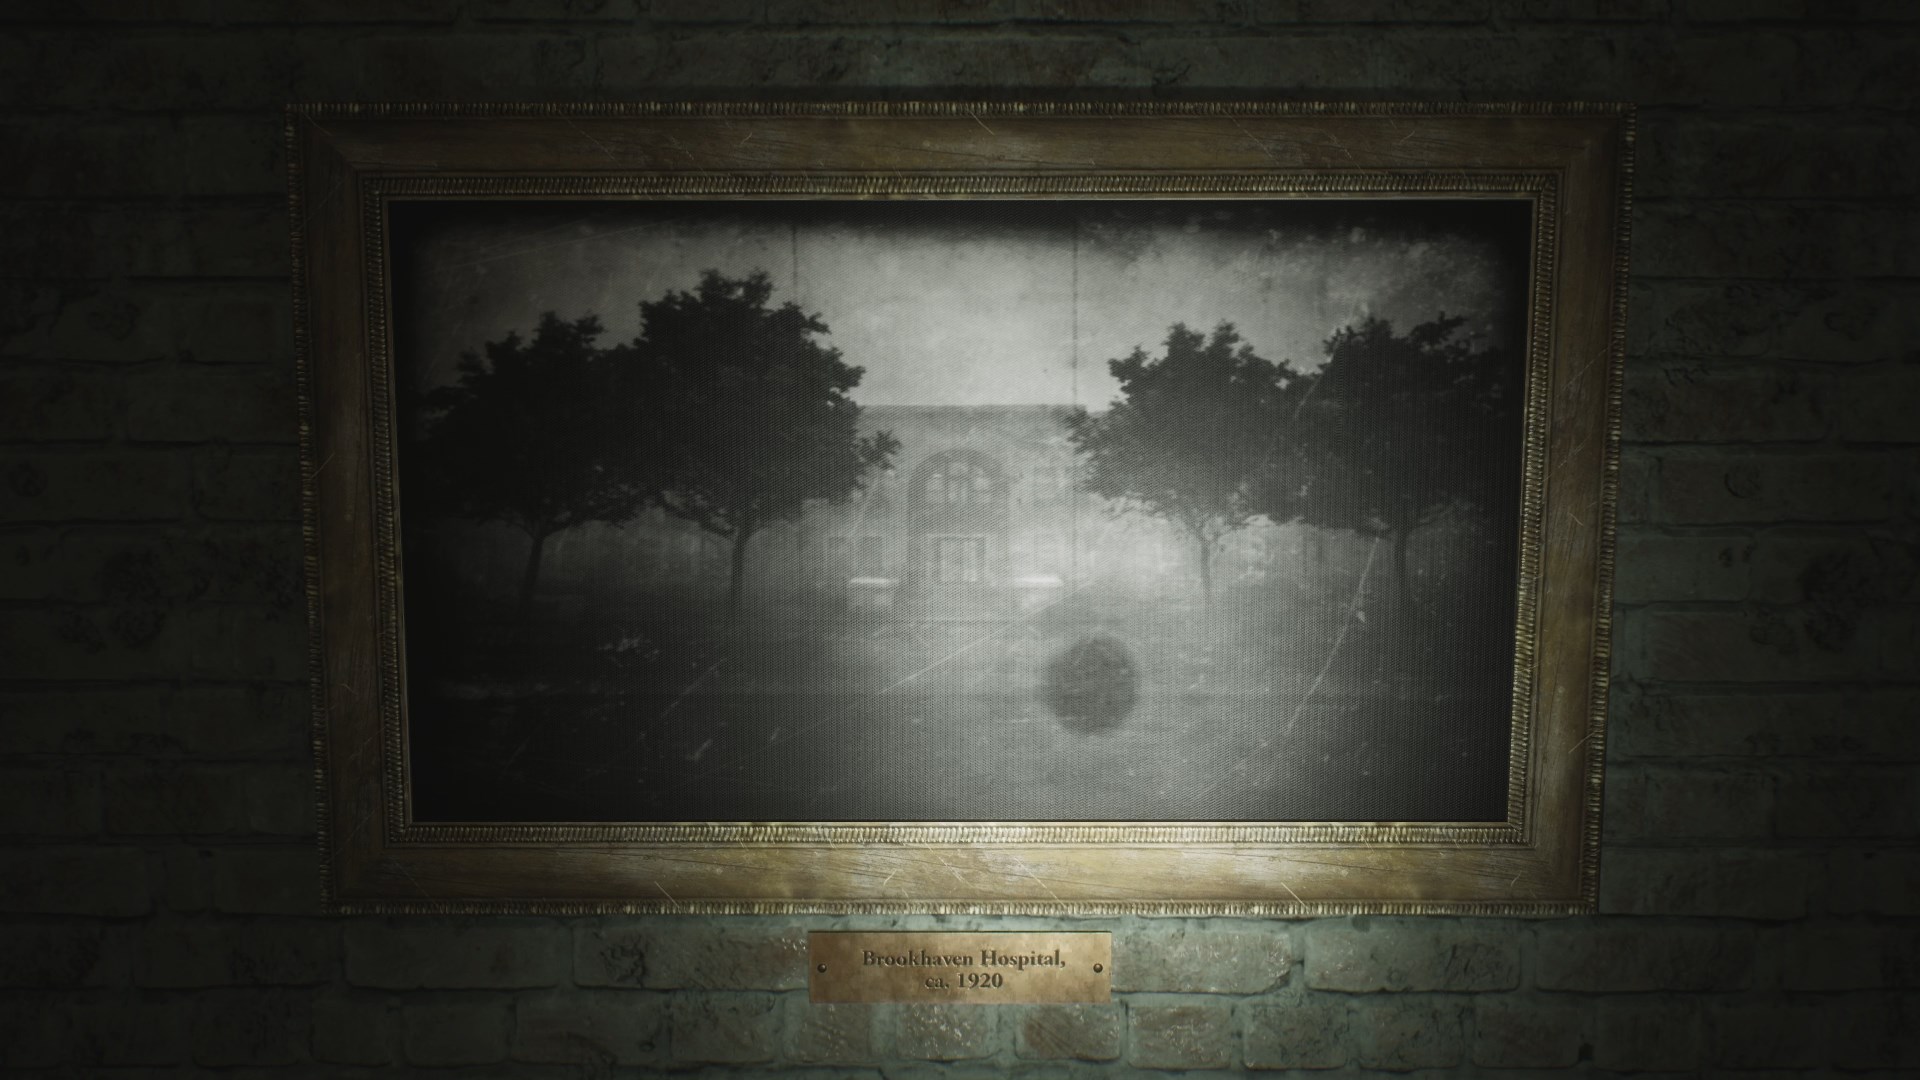
The Nurse's Memo's text will be different on different riddle levels, but the logic will be the same. You will have to go back to the entrance lobby of the hospital, inspect the three photos hanged on the walls in that area and count the objects in them to get the padlock combination: doctors, nurses and trees:
|
Note: You can skip collecting the memos and simply enter the right code to open the locker, as it will be always the same for the corresponding riddle difficulty.
Light
On light riddle difficulty, the Nurse's Memo is very simple:
The combination for the keys locker is:
2
8
The total number of the nurses in the lobby photo.
Return to the entrance lobby and inspect the photo of the nurses in the corridor. There are seven nurses in this picture, so the complete combination for the key locker padlock will be 287 on light difficulty.
Standard
On standard riddle difficulty, the Nurse's Memo will tell you:
I wrote it down for you in a way you should finally be able to remember. Once you're in the lobby, just look around. Now remember:
Nurses. Doctors. Trees.
Return to the entrance lobby and inspect all three photos on the walls. Simply count the objects in the same order. There are seven nurses, two doctors and four trees in front of the hospital, so the final combination for standard difficulty is 724.
Hard
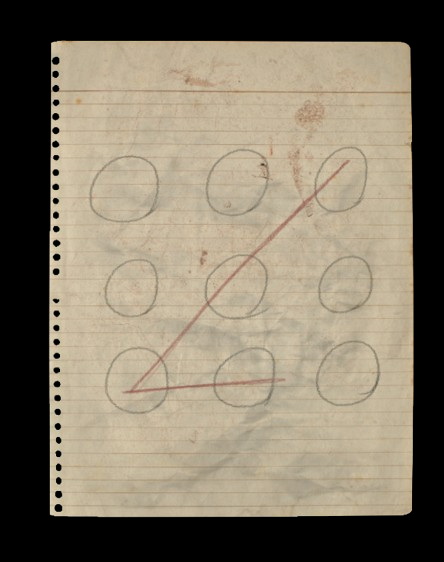
On hard riddle difficulty, things get a little complicated as the memo is more cryptic:
If the second were as high as the number of nurses, it’d still be one short. With two of them dead and one just a fraud.
The third would chop the firewood in half.
The first was singular.
Let's start at the end. The first digit of the code is singular, that is, 1.
The second digit is the count of the nurses – 7 plus 1 = 8 (the number would be one short if it would be the same). Now we have to remove two dead persons and one fraud giving us 8 – 3 = 5.
The third digit is half the number of the trees: 4 / 2 = 2.
The final combination for hard difficulty is 152.
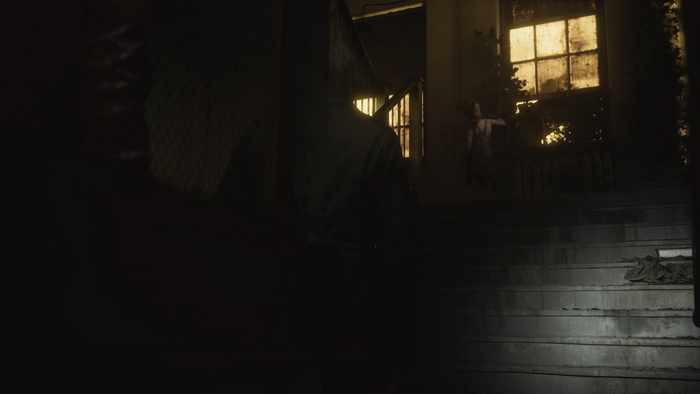
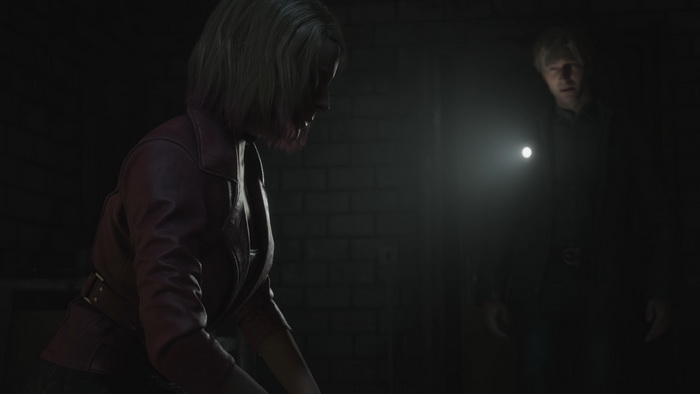
Opening the key locker will grant you the 42 Basement Key. Head to the stairs, where you will bump into Laura once again. The girl locks the second-floor door, so we cannot follow her.
Go downstairs to the basement level.
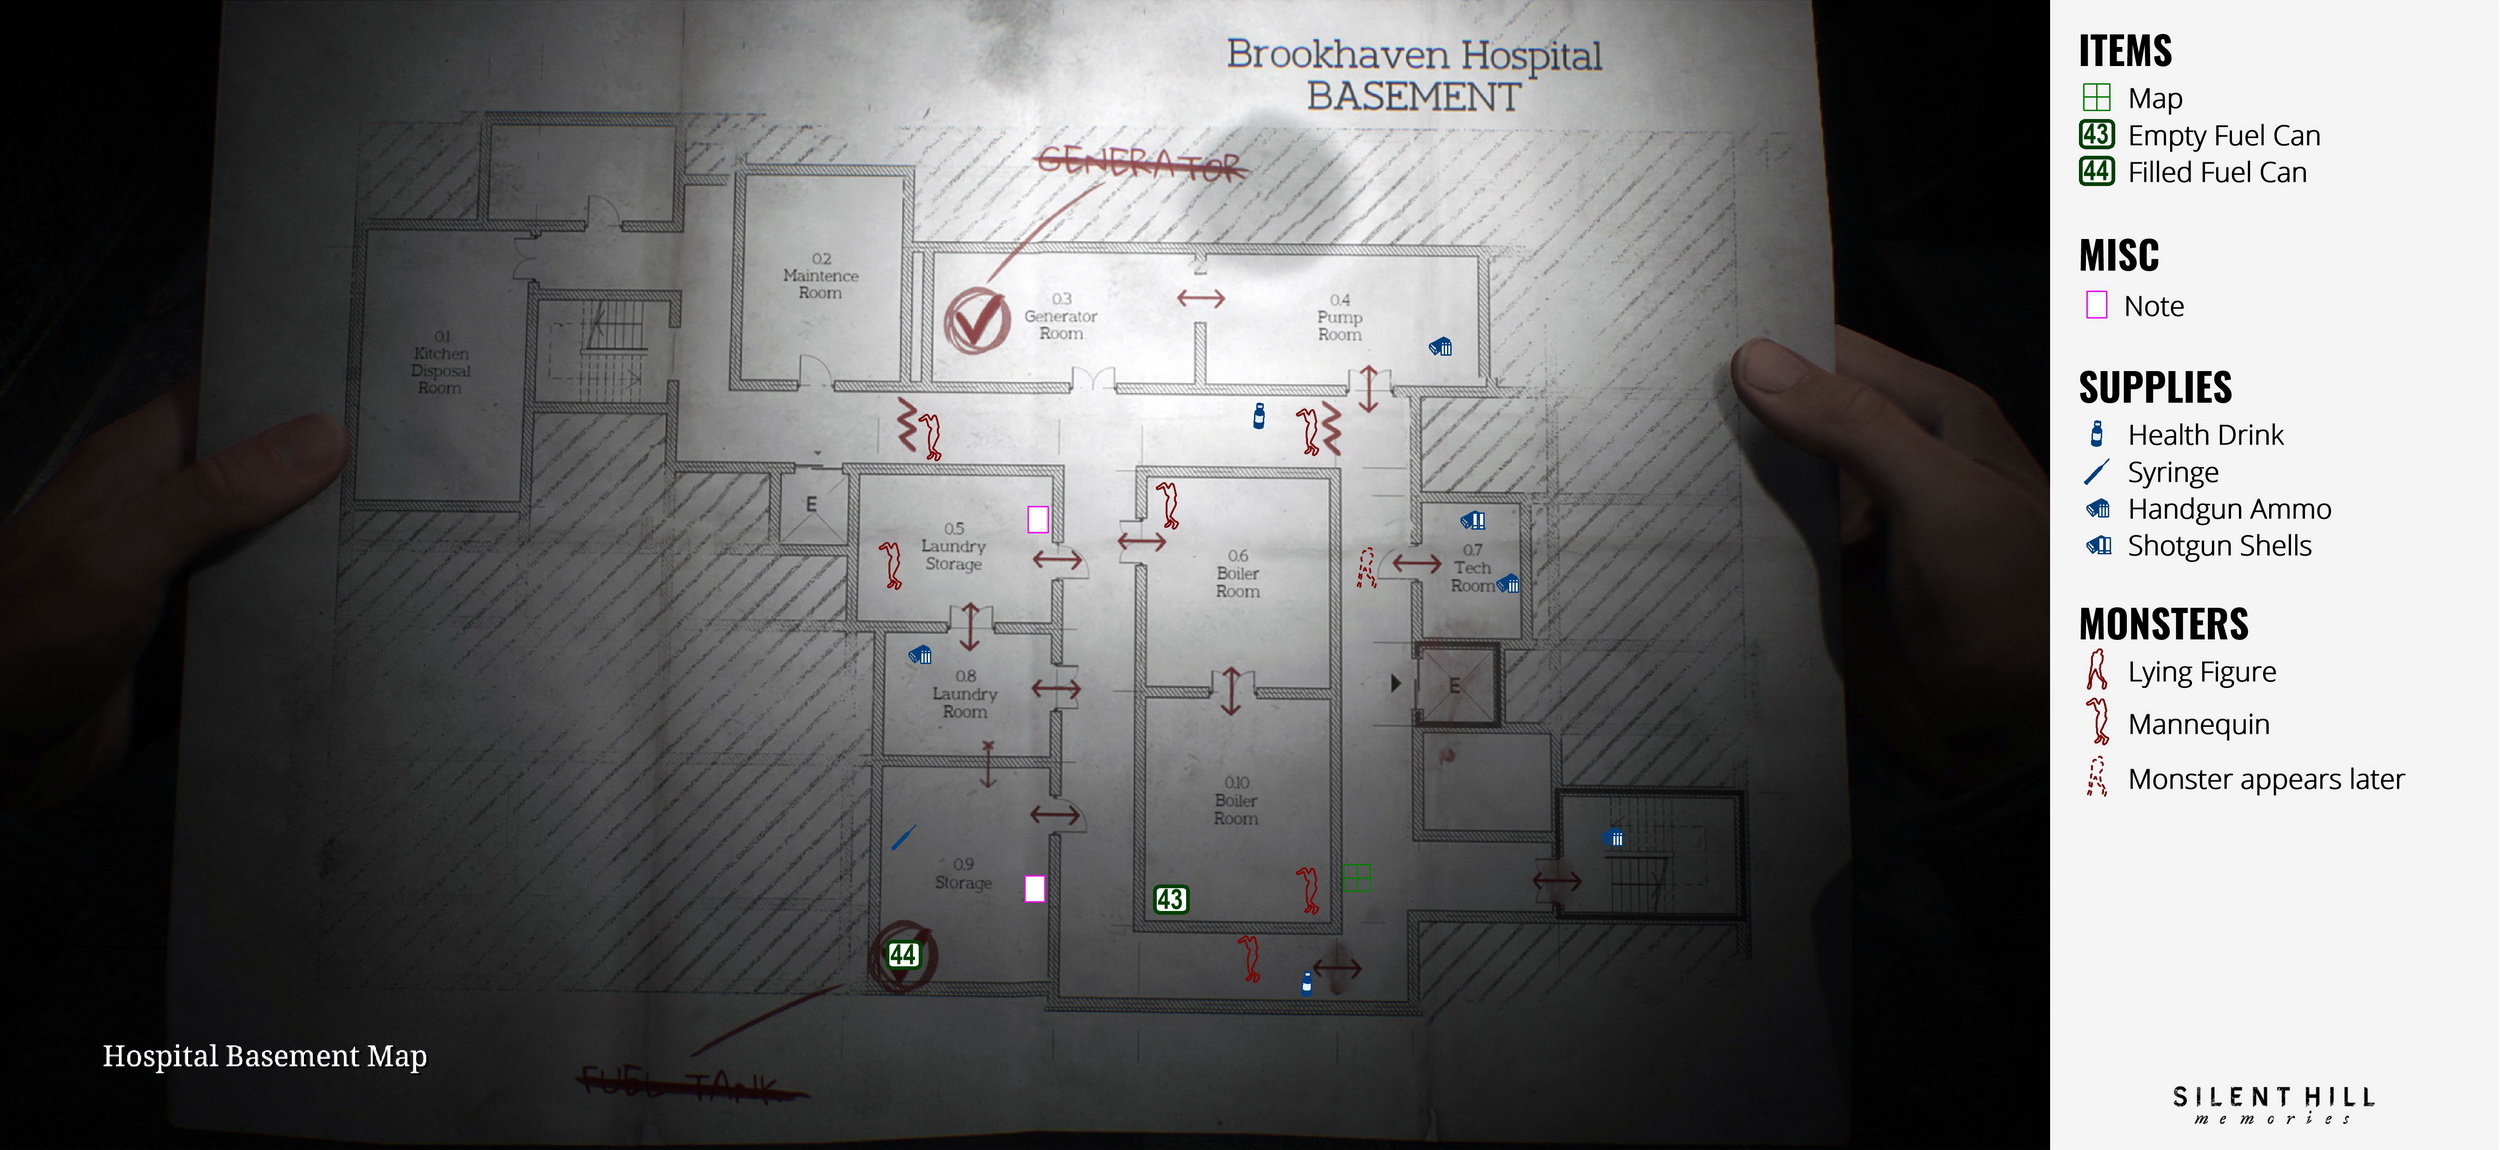
Basement
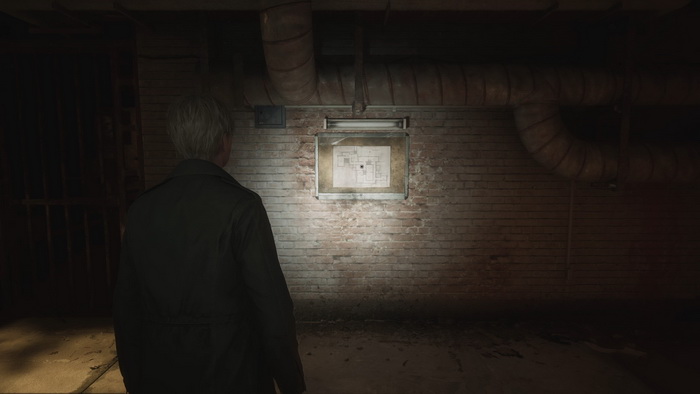
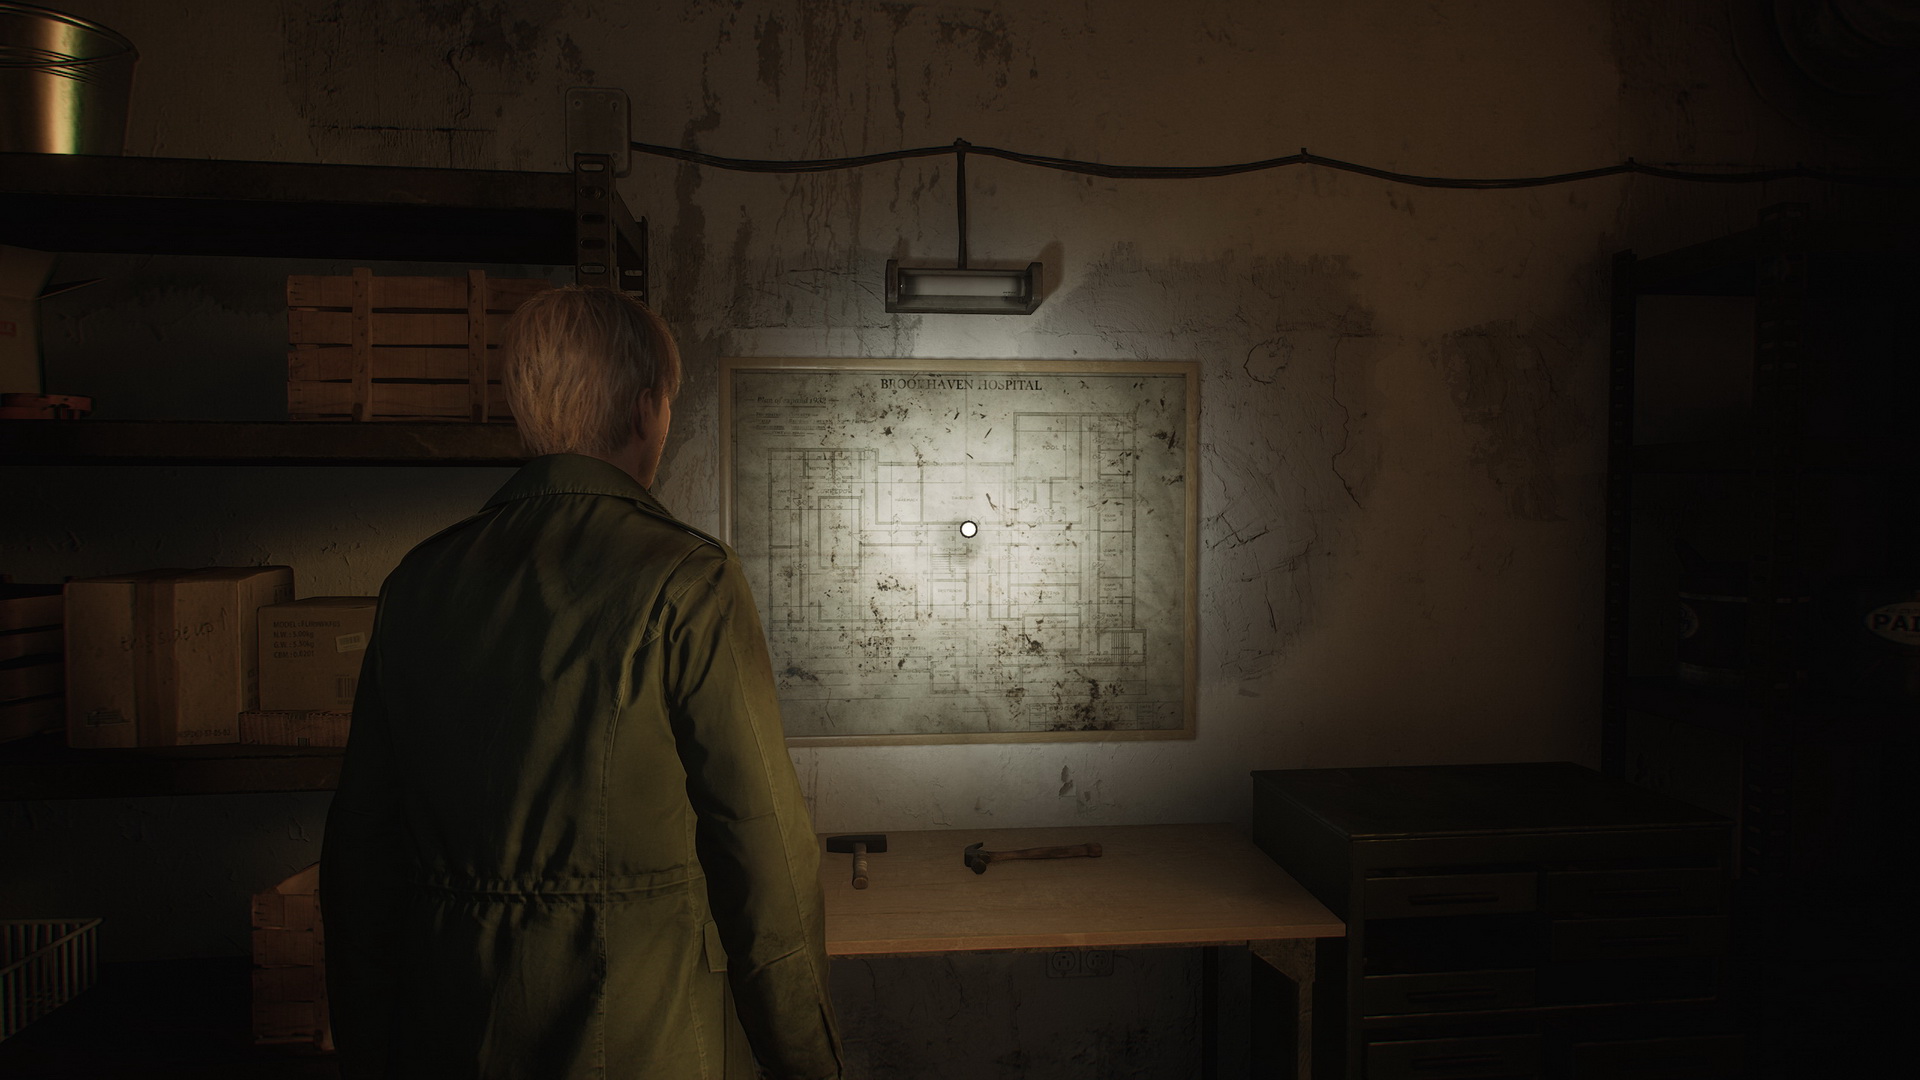
Grab Handgun Ammo from the right nightstand under the stairs and use the Basement Key to access the area. Then, take the Hospital Basement Map from the wallboard directly ahead.
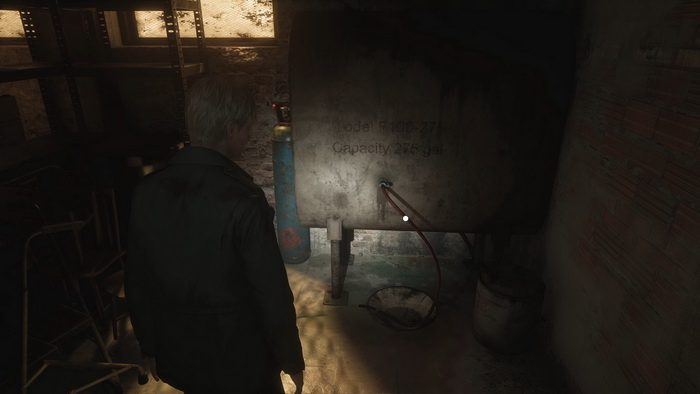
Head to the Pump Room and grab more Handgun Ammo from the right tank. Proceed to the Generator Room to locate the non-working generator. We will need to power it up to make the elevator function.
Starting the Generator
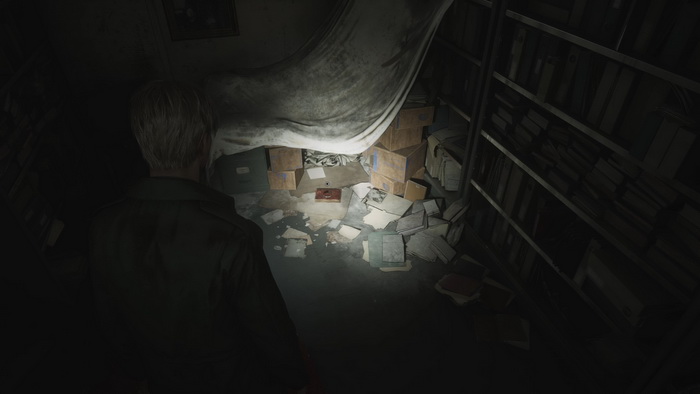
Exit the room and find a Health Drink in the green cabinet in a corridor to the left, guarded by a Mannequin hiding behind the cabinet. Another Mannequin appears from the Boiler Room area. An 43 Empty Fuel Can is found on the pallets in the back of the boiler room, and one more mannequin is nearby.
![]()
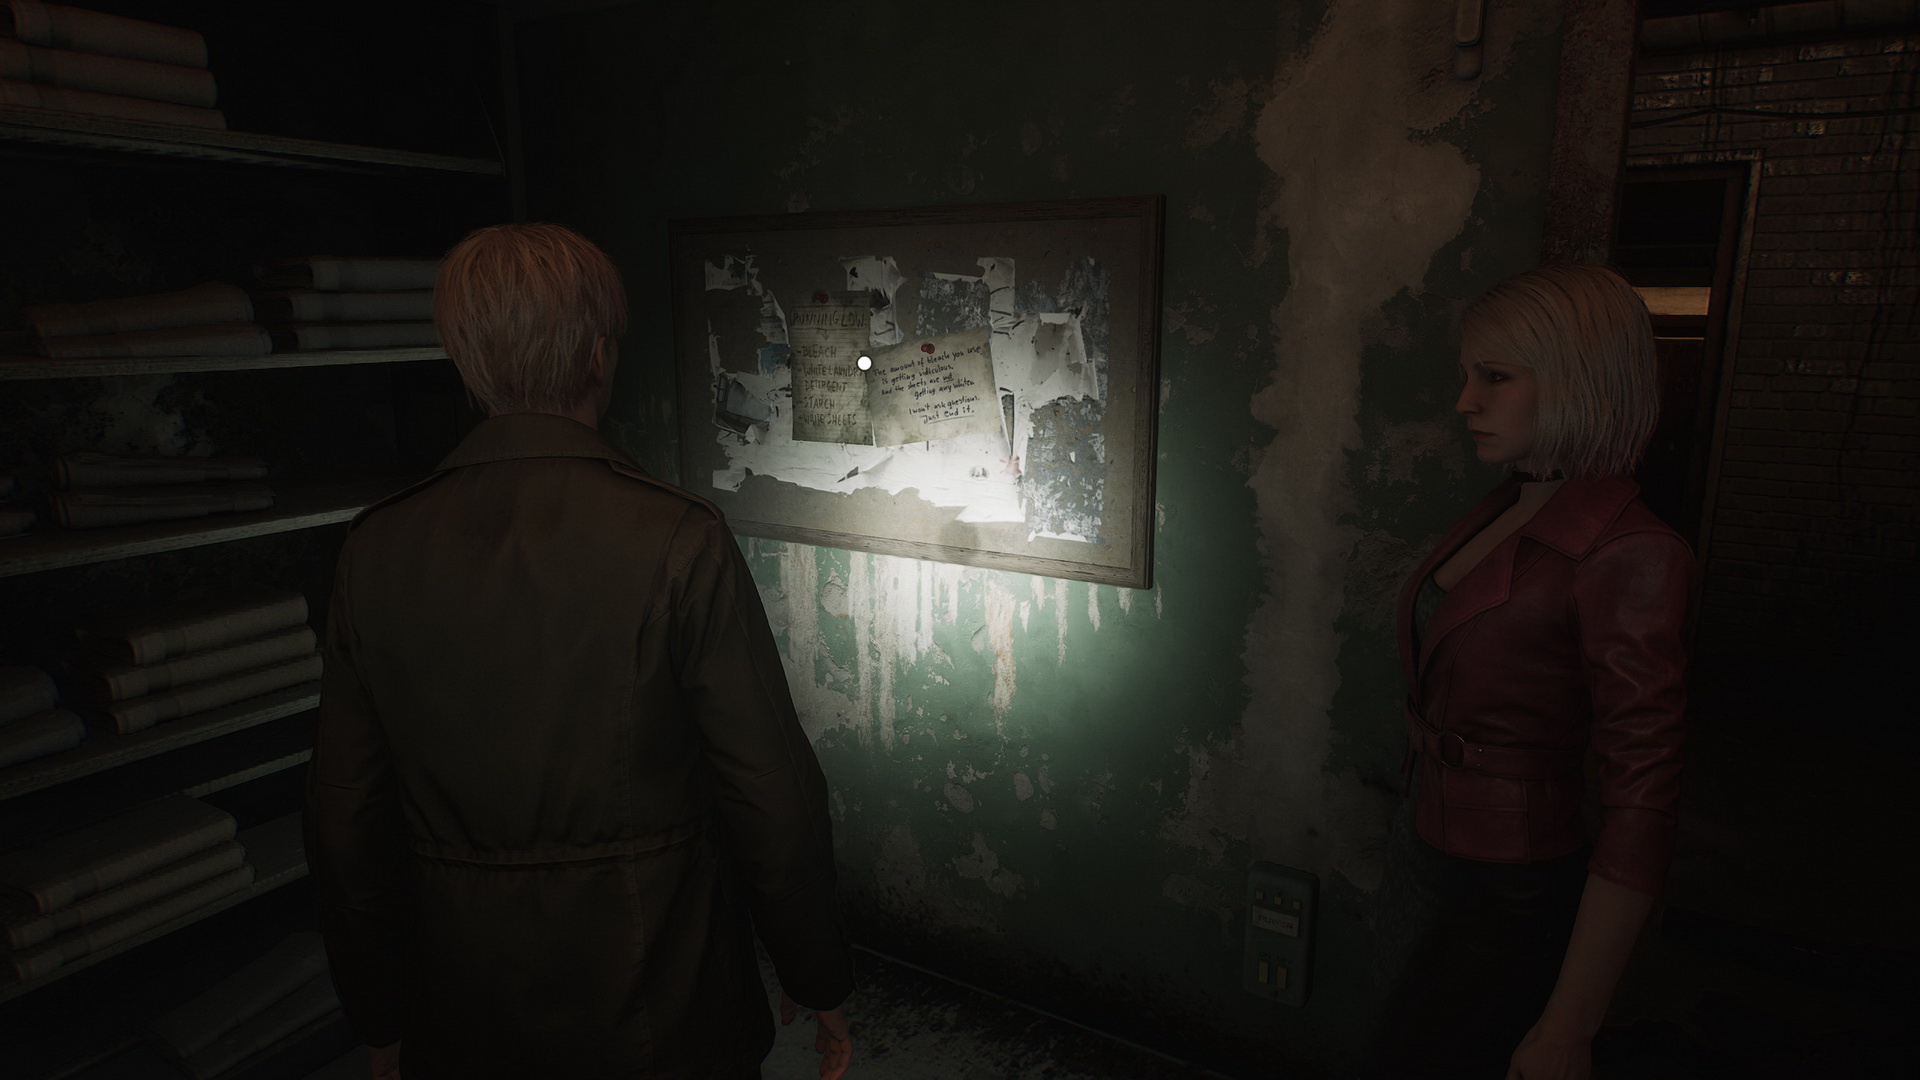
Go to the Laundry Storage. Another Mannequin can be here, and there's a note on the wall at the entrance.
 |
 |
In the Laundry Room, you can find Handgun Ammo in the locker. Grab a trolley in the Laundry Storage, and after you and Maria are safe, push it to the high window in the Laundry Room. Climb into the Storage and use the Empty Fuel Can on a tank to get a 44 Filled Fuel Can.
Also in the room are a Syringe in a first aid kit on the shelf, an old map of the hospital on the opposite wall and Handgun Ammo on a metal shelf next to it.
 |
 |
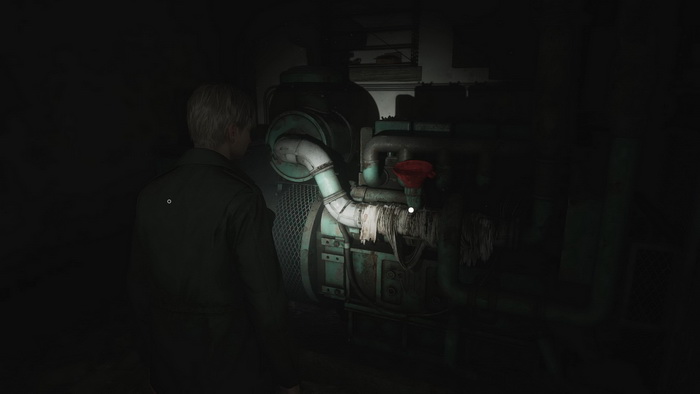
Exit the room through the door. A Mannequin is hiding behind the lockers in the south corridor. Get rid of him, grab Handgun Ammo from the nightstand and open the metal bar door for a shortcut. Return to the generator. Use the Filled Fuel Can on the generator and press the button to start it.
Proceed toward the elevator, and a Lying Figure will await you in the corridor crawling out of the Tech Room. Inside the Tech Room, you can find Shotgun Shells on a metal shelf and Handgun Ammo in the glass cabinet. After completing this level, enter the elevator and go to the second floor.
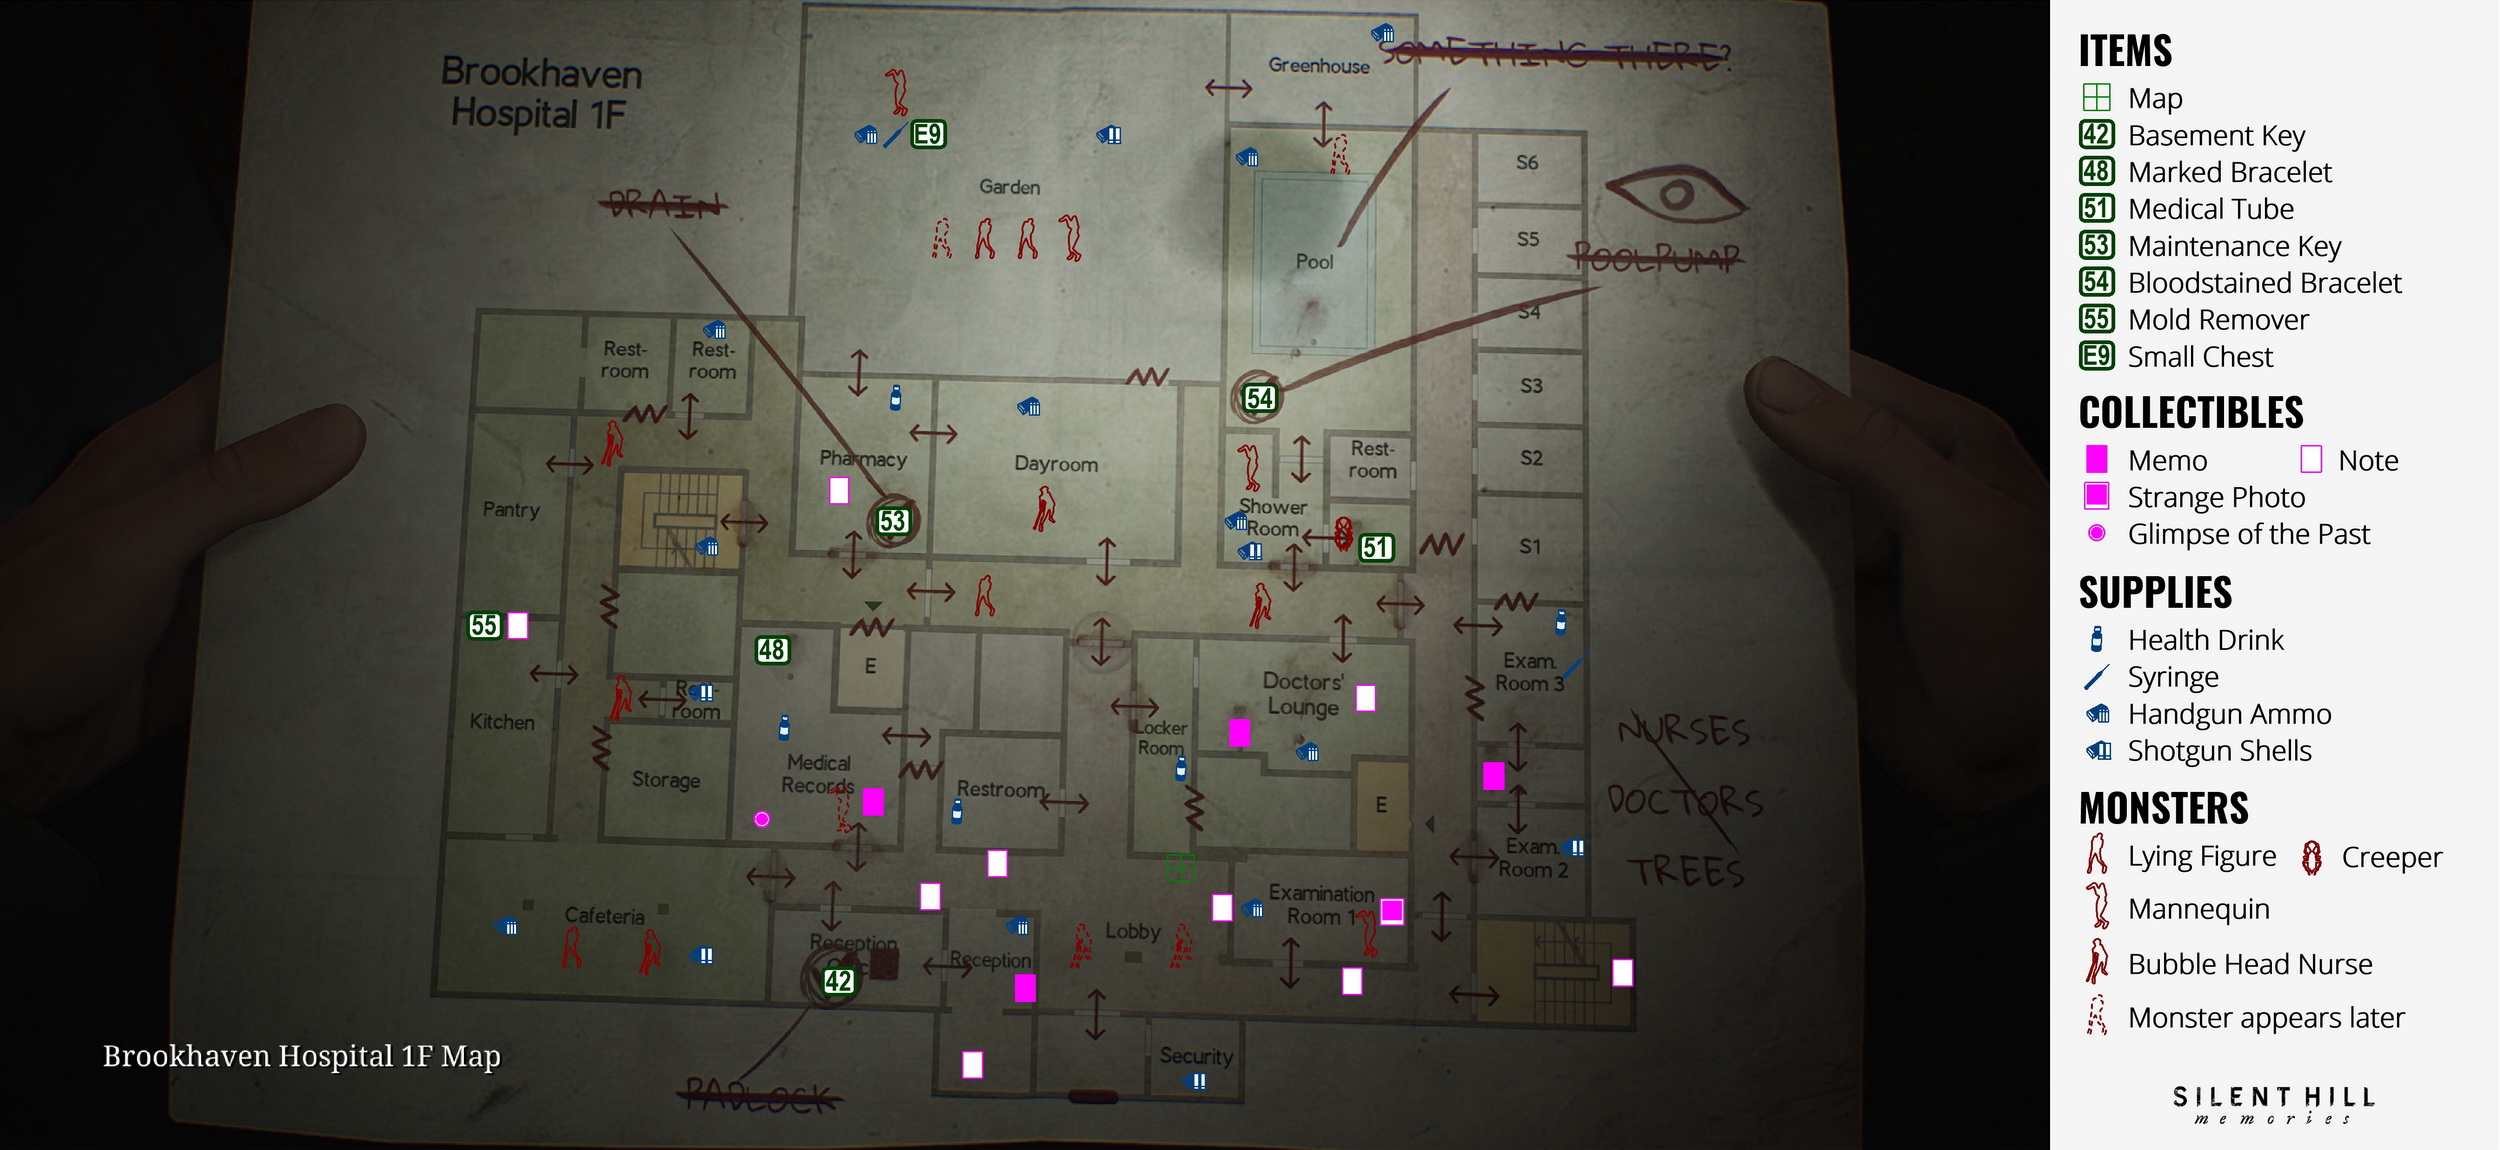
Exploring the Second Floor
Second Floor
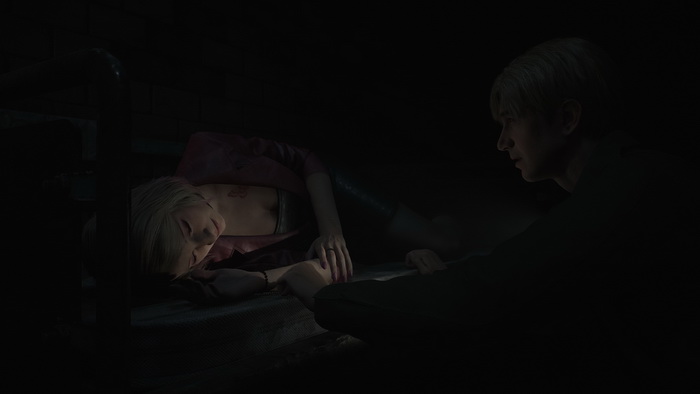
As soon as you reach the second floor, Maria will go to lie down and stay in Room C5. You can visit to check on her later if you wish to get points towards the "Maria" ending – see the Endings section for more information. You can interact with her several times immediately until she turns over to the wall and stops responding.
Across Room C5, there's a wall poster.
 |
 |
Room C3 has a Save Point and a Health Drink. Unlock the staircase for convenience, and check the Restroom for Handgun Ammo in front of a urinal. Room C2 has more Handgun Ammo in the nightstand's drawer by the right bed.
Proceed to the lobby in the northern part of the map. Here, you will be greeted by a new enemy type – Bubble Head Nurse (or simply the Nurse, as we will refer to later in the text). It is recommended to stagger her first with your handgun, aiming for the head or legs, and finish her off with a steel pipe. After the fight, approach the Nurses' Station and collect Memo #27: Staff Memo.
 |
 |
There's a Health Drink in a first aid cabinet on the northern wall. Use the ventilation opening to crawl into room L3. Prepare for a more challenging battle here as two Lying Figures and one Mannequin will meet you. After the fight, check the nightstand by the far wall for Shotgun Shells and the nightstand by the southeastern corner for Handgun Ammo.
Go to the Observation Room to listen to a strange radio message and collect Strange Photo #12: "Her drawings" on a desk across the room. There's also a Health Drink in a glass cabinet.
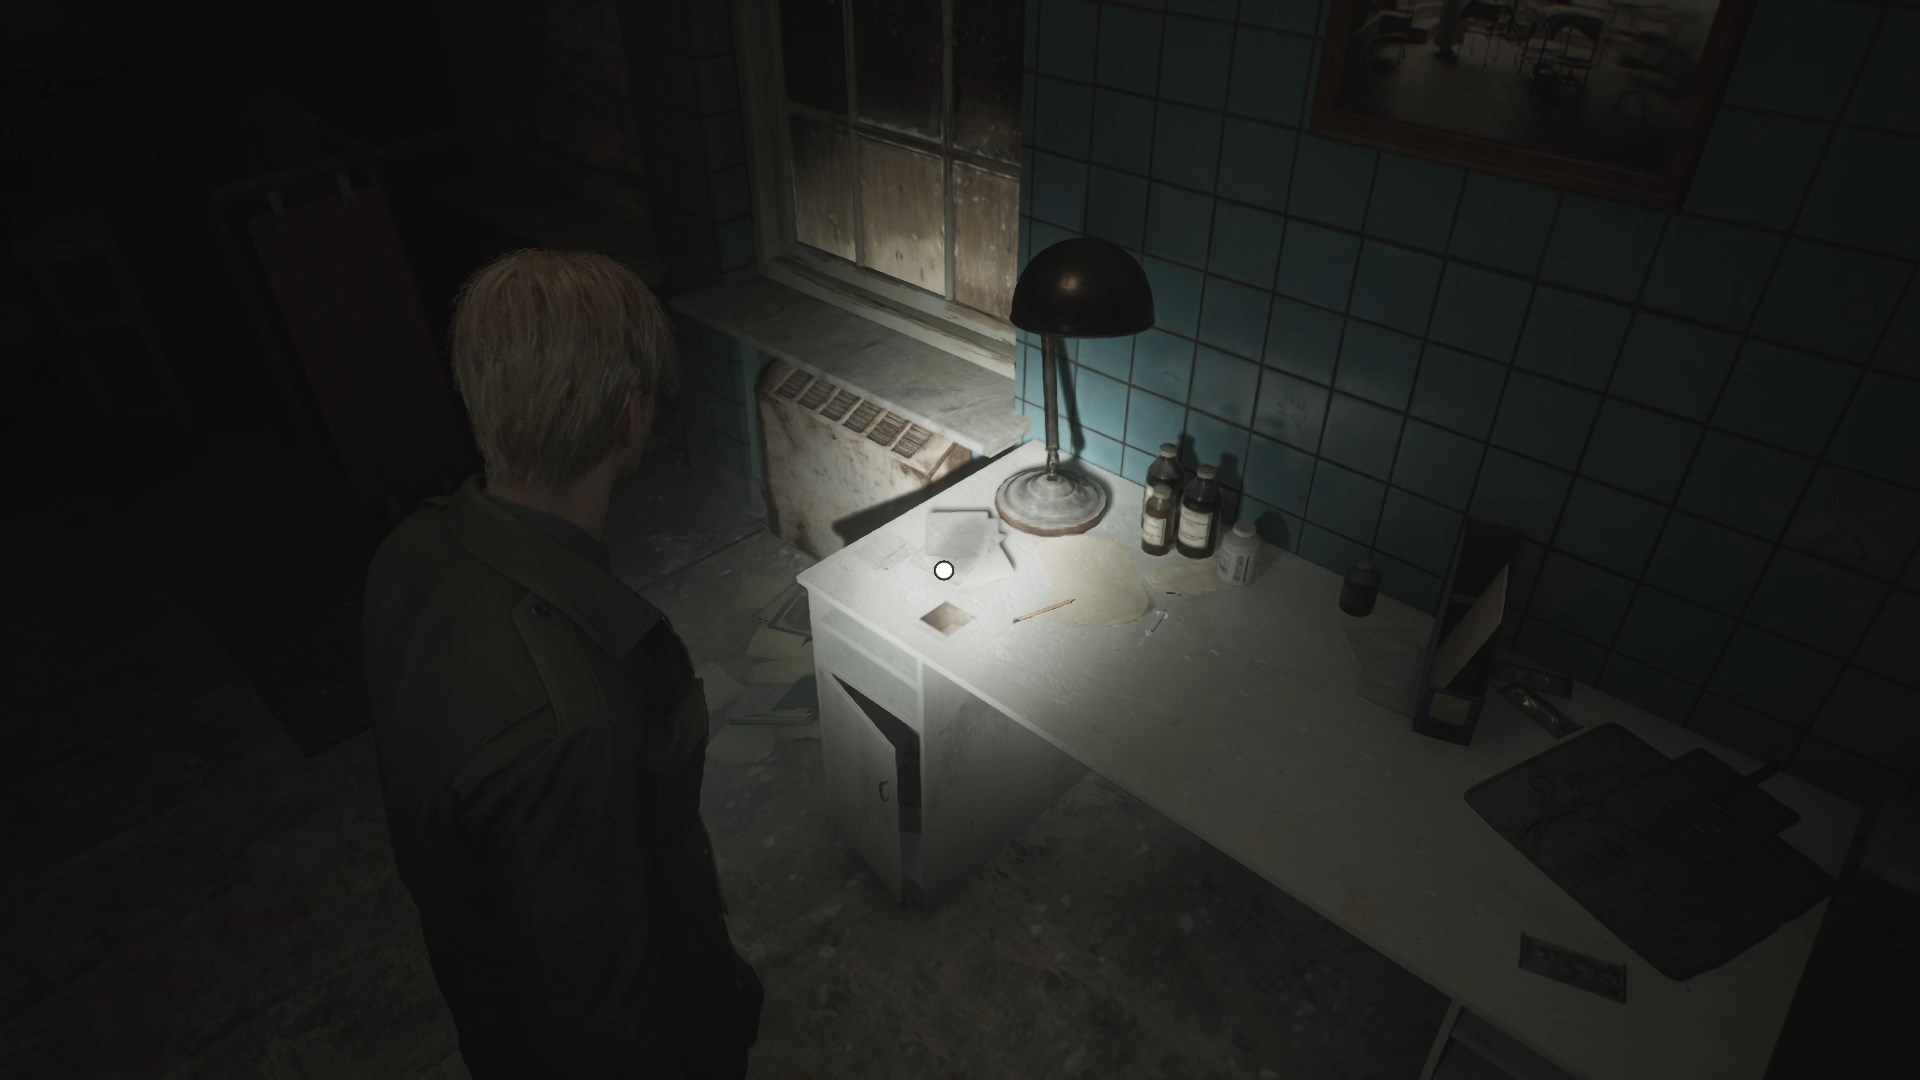 |
 |
Exit the room and return to the lobby. From here, go south and enter the Laundry Room to find Glimpse of the Past #11 as you interact with blue carbon paper thrown in the garbage bin.
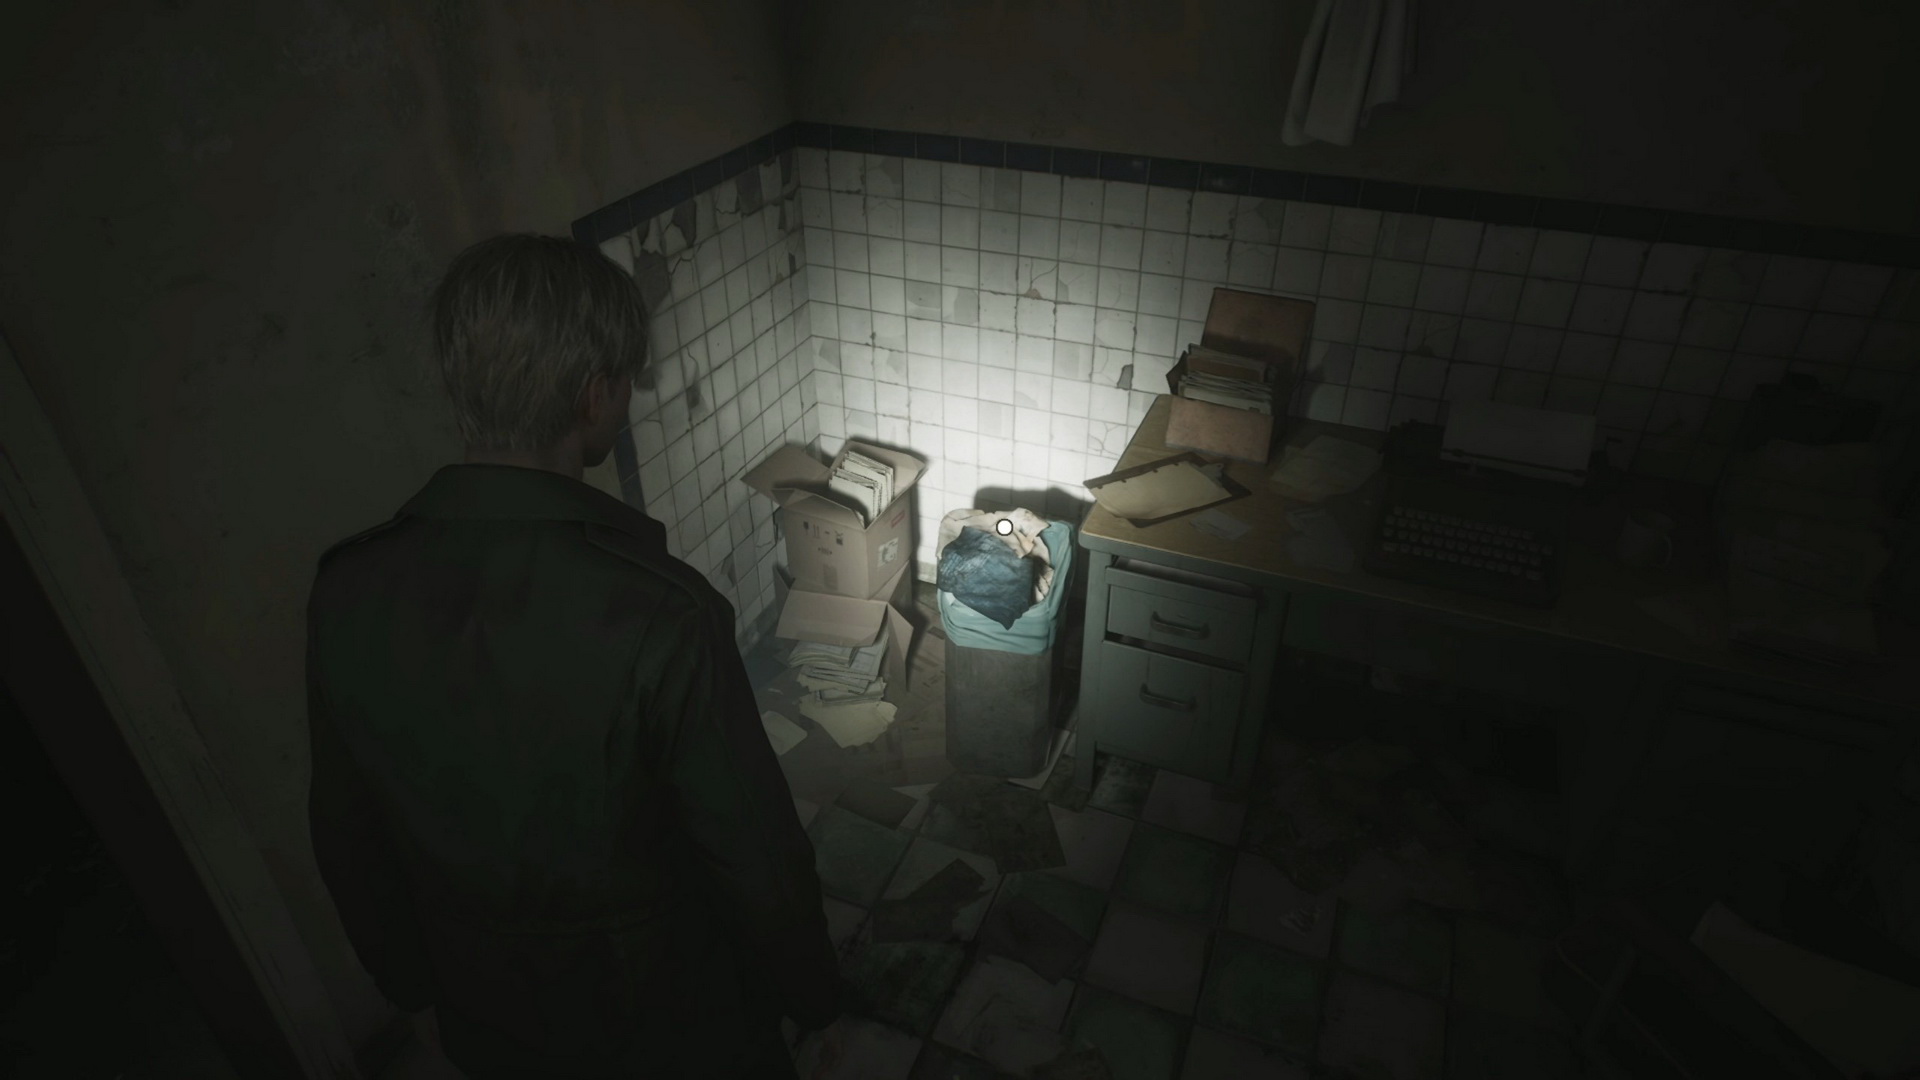 |
 |
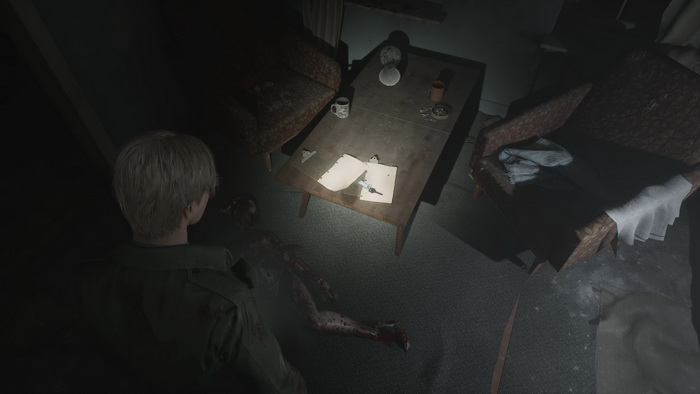
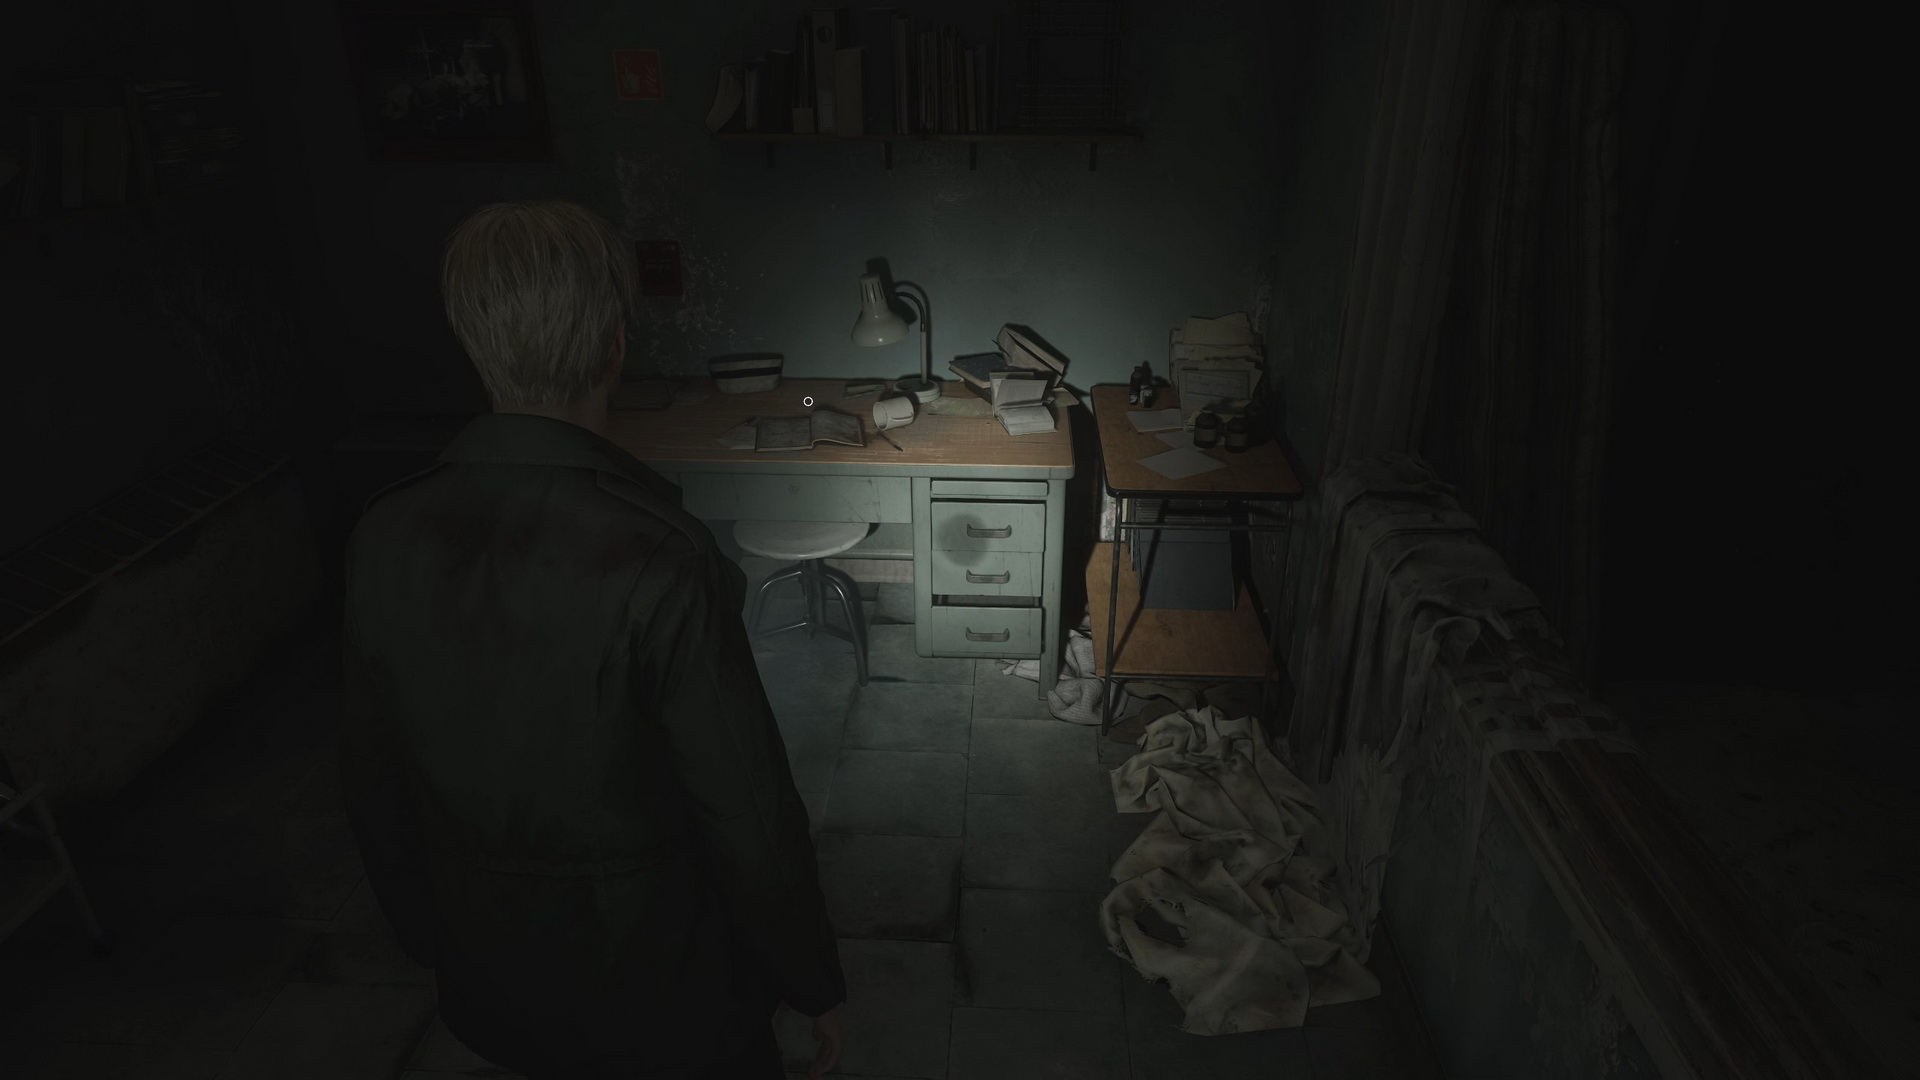
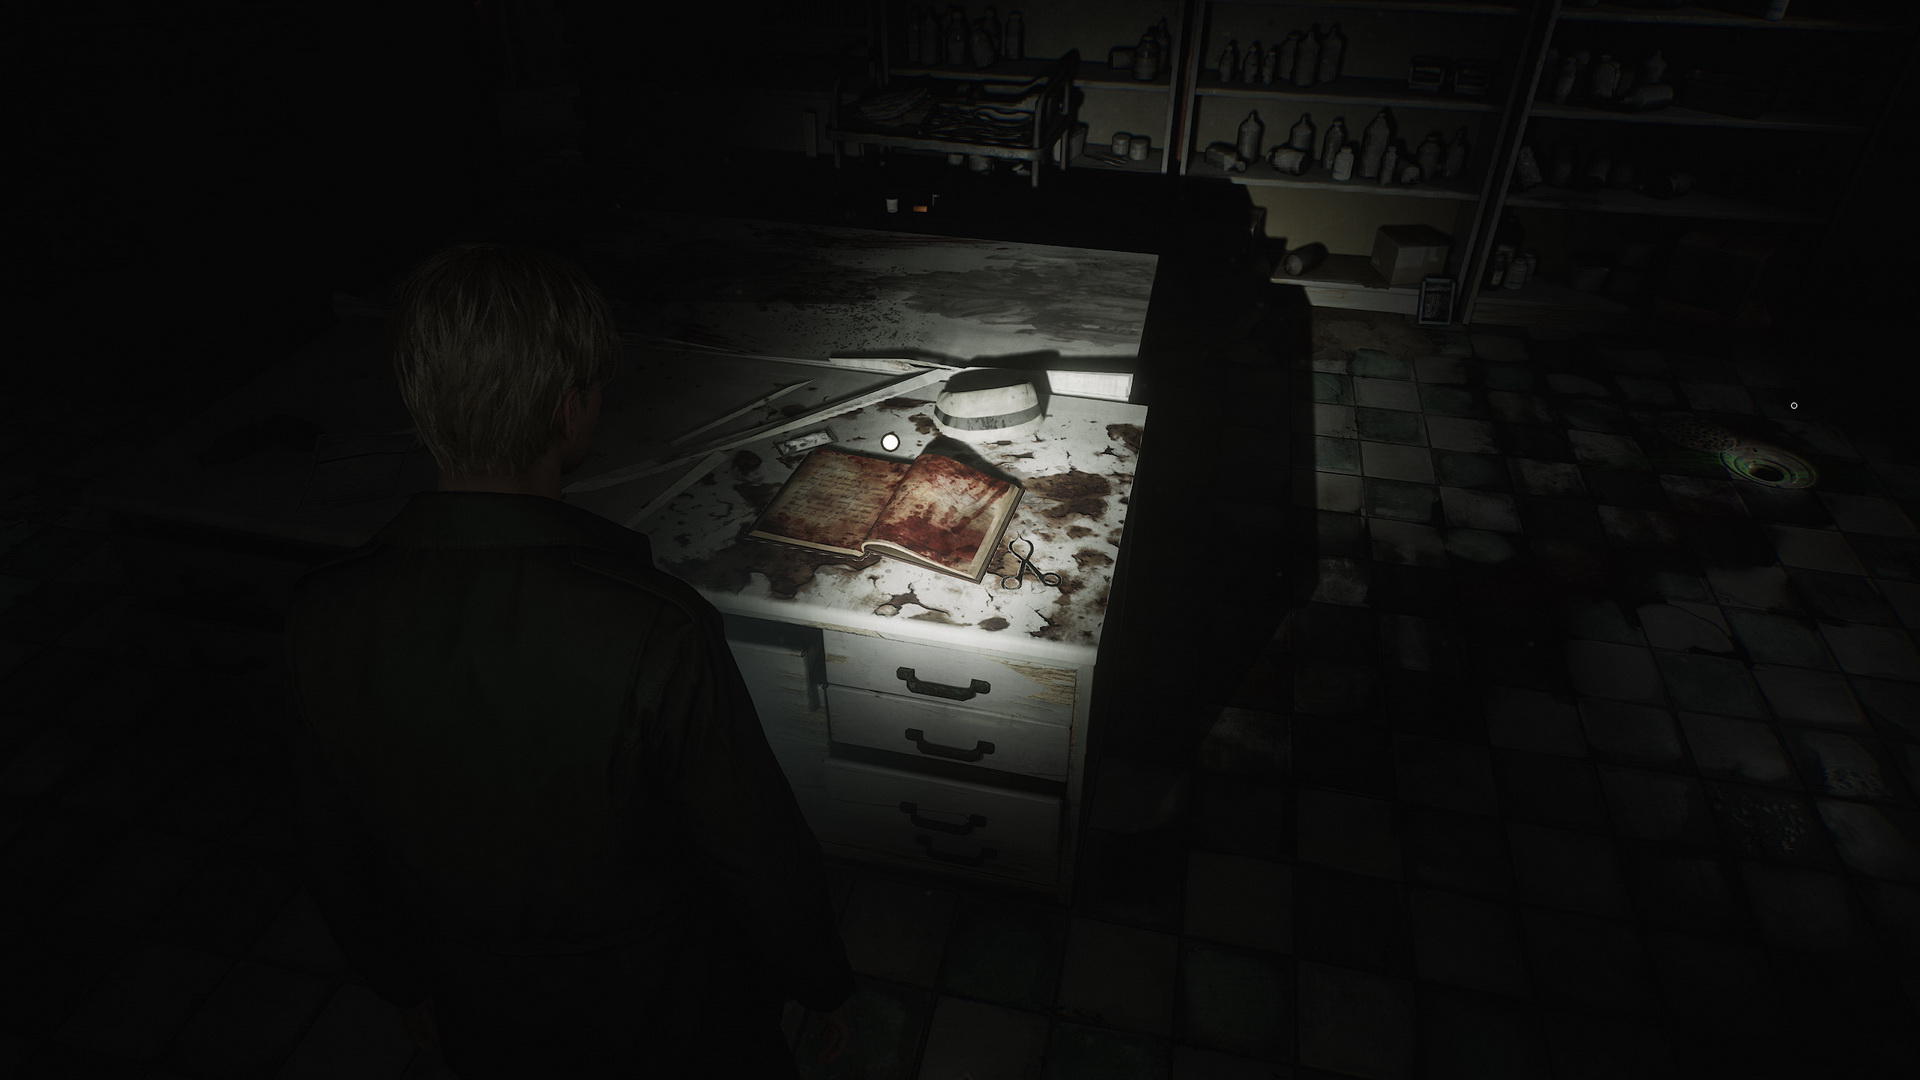
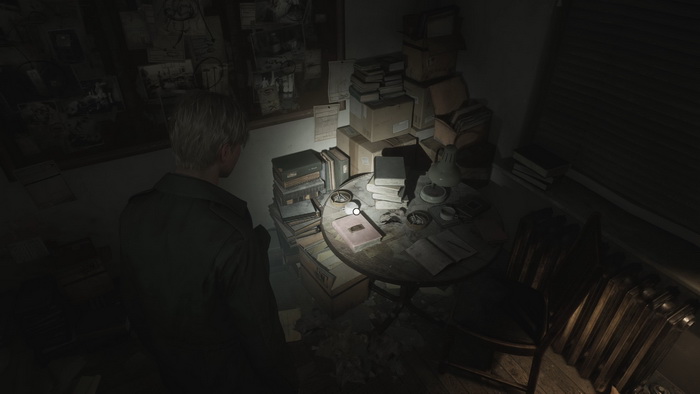
There are also Shotgun Shells on a linen basket in the room. Go to the Director's Office to find a hand holding a key on the desk, a tape recorder on a round table and a safe with a missing button behind the red curtains. The hand is grasping the key tightly, and to get to it, we will need to find three bracelets scattered around the hospital.

Memo #28: Evaluation Card, Patient #0050, Memo #29: Evaluation Card, Patient #0090 and Memo #30: Evaluation Card, Patient #0130 are on a cabinet next to the desk.
 |
 |
Finally, there's a Save Point in the back room. Go to the southeastern corridor and unlock the doors for convenience. Visit Room C1 to check a poster on the wall and find Memo #31: Interview Transcript behind it.
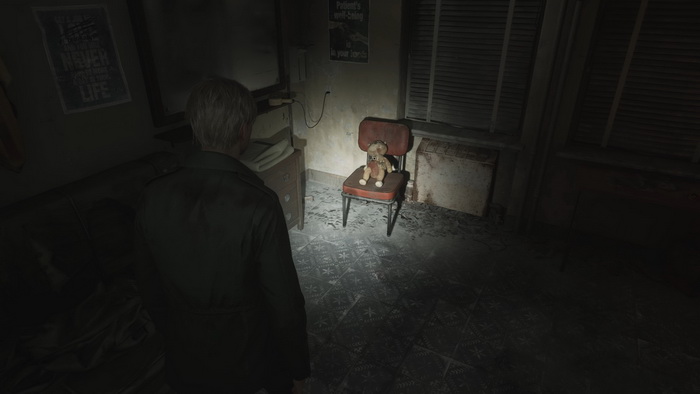
You can check the Shower Room for Handgun Ammo in a green locker guarded by a hiding Mannequin. Room L2 contains a Lying Figure, a Mannequin, more Handgun Ammo on a round stool, Shotgun Shells in a drawer and a Health Drink in a glass cabinet. Return to the corridor and go west. A single Nurse is walking here. In the Restroom, there's Handgun Ammo on the vanity. Room M5 has more Handgun Ammo in the left drawer. Continue down the corridor and visit Room M1 to find Shotgun Shells in the nightstand's drawer and Glimpse of the Past #12 – interact with the chains on the bed.
 |
 |
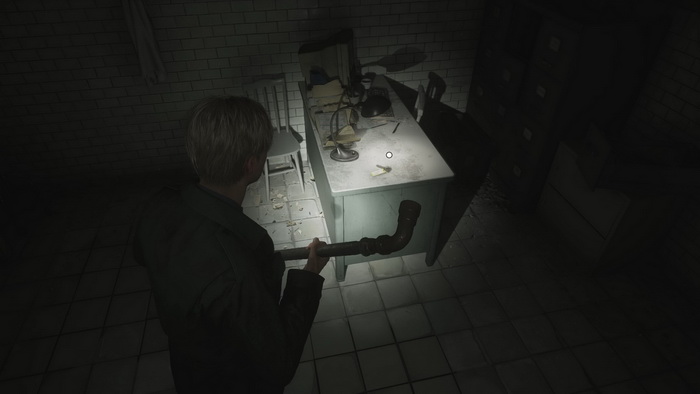
Go to the Women's Locker Room and inspect a teddy bear on a chair to get a 45 Bent Needle.
To the right are Shotgun Shells on the table and a 46 Shotgun in the open locker.
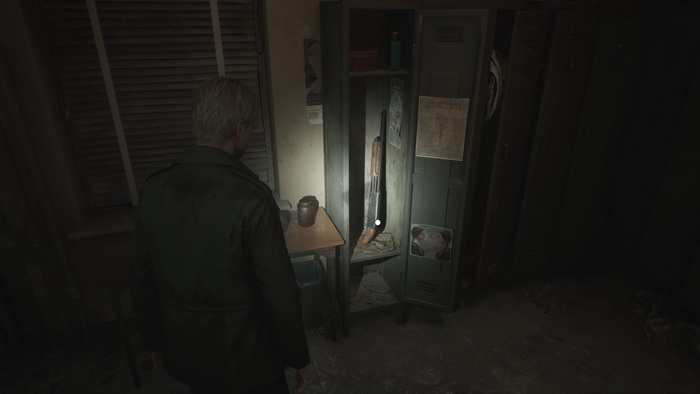
In the green locker, there's Handgun Ammo on a shelf and a Health Drink in a first aid kit on another table. Exit the room and head to the Nurses' Lounge. One Nurse is walking in the corridor, and another is lurking in the dark in the Lounge. You can try to approach her from the back without using the flashlight and perform a stealth kill, then find the 47 L1 Room Key on a coffee table.
You can return to the lobby and unlock the double doors for convenience. A previously defeated Nurse will come alive in this area.
Finding the First Bracelet
Using the key, go to Room L1. Find Handgun Ammo in the nightstand's drawer behind a trolley, then push the trolley to access the next room through a small window. Find a diary on a desk.
 |
 |
Jump through another window. On your way to the Utility Room, you can get more Handgun Ammo from a nightstand behind covered furniture. Get to the Utility Room and find a hole in the wall. Use it to drop yourself to the first floor.
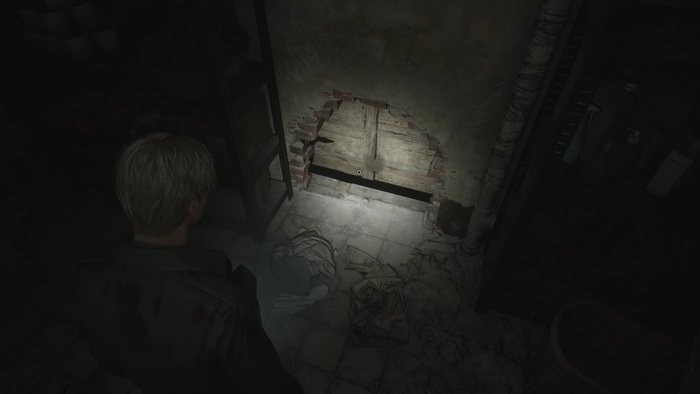
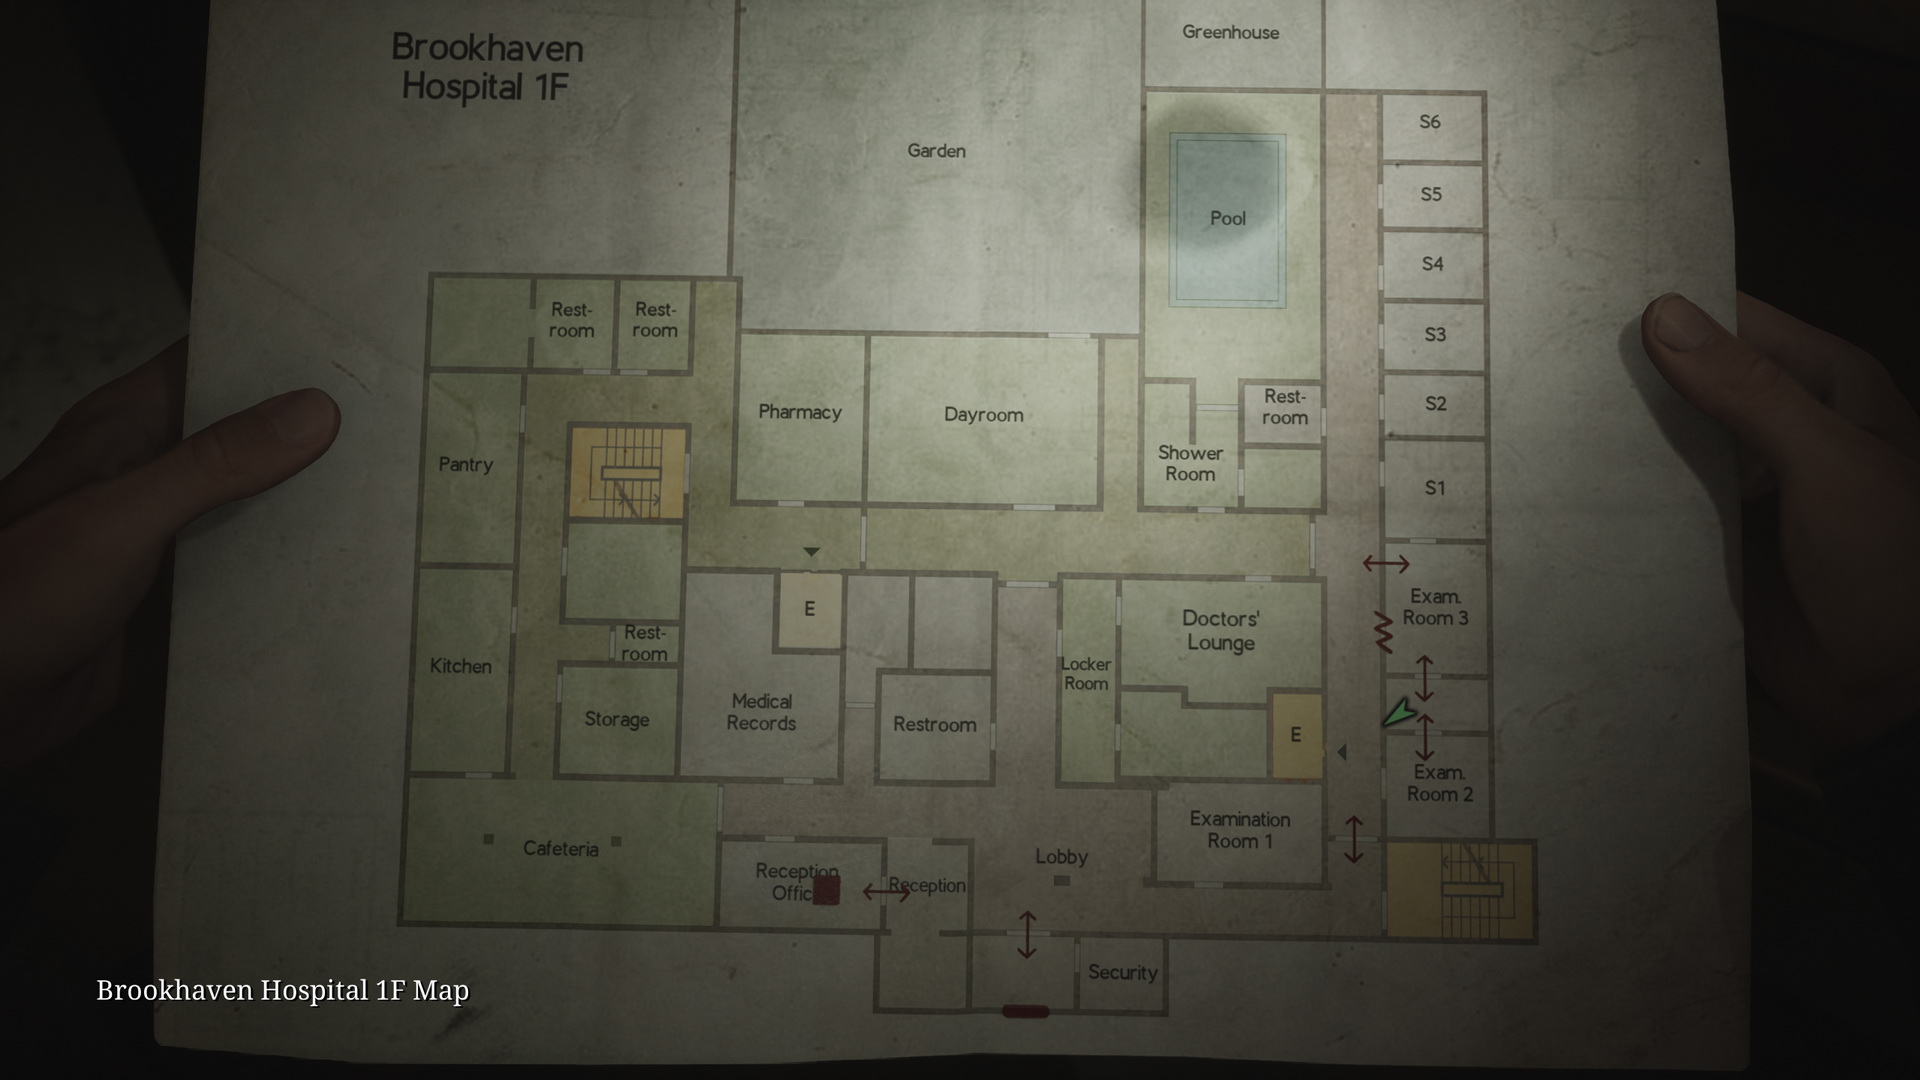
First Floor
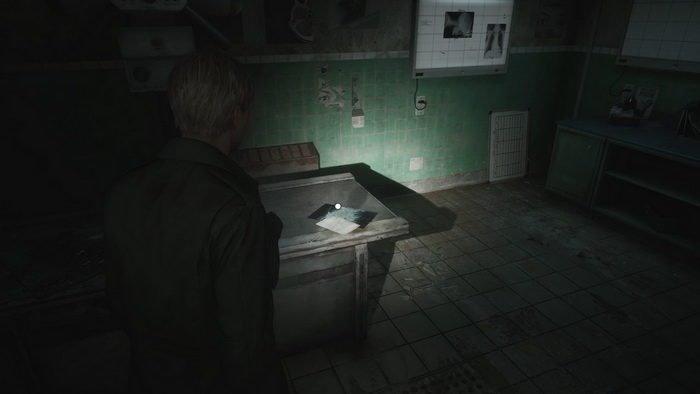
Crawl through an opening to find yourself in the Medical Records. Memo #32: Scribbled Note is lying on the ground to the left.
 |
 |
Interact with a typewriter on a desk for Glimpse of the Past #13.
 |
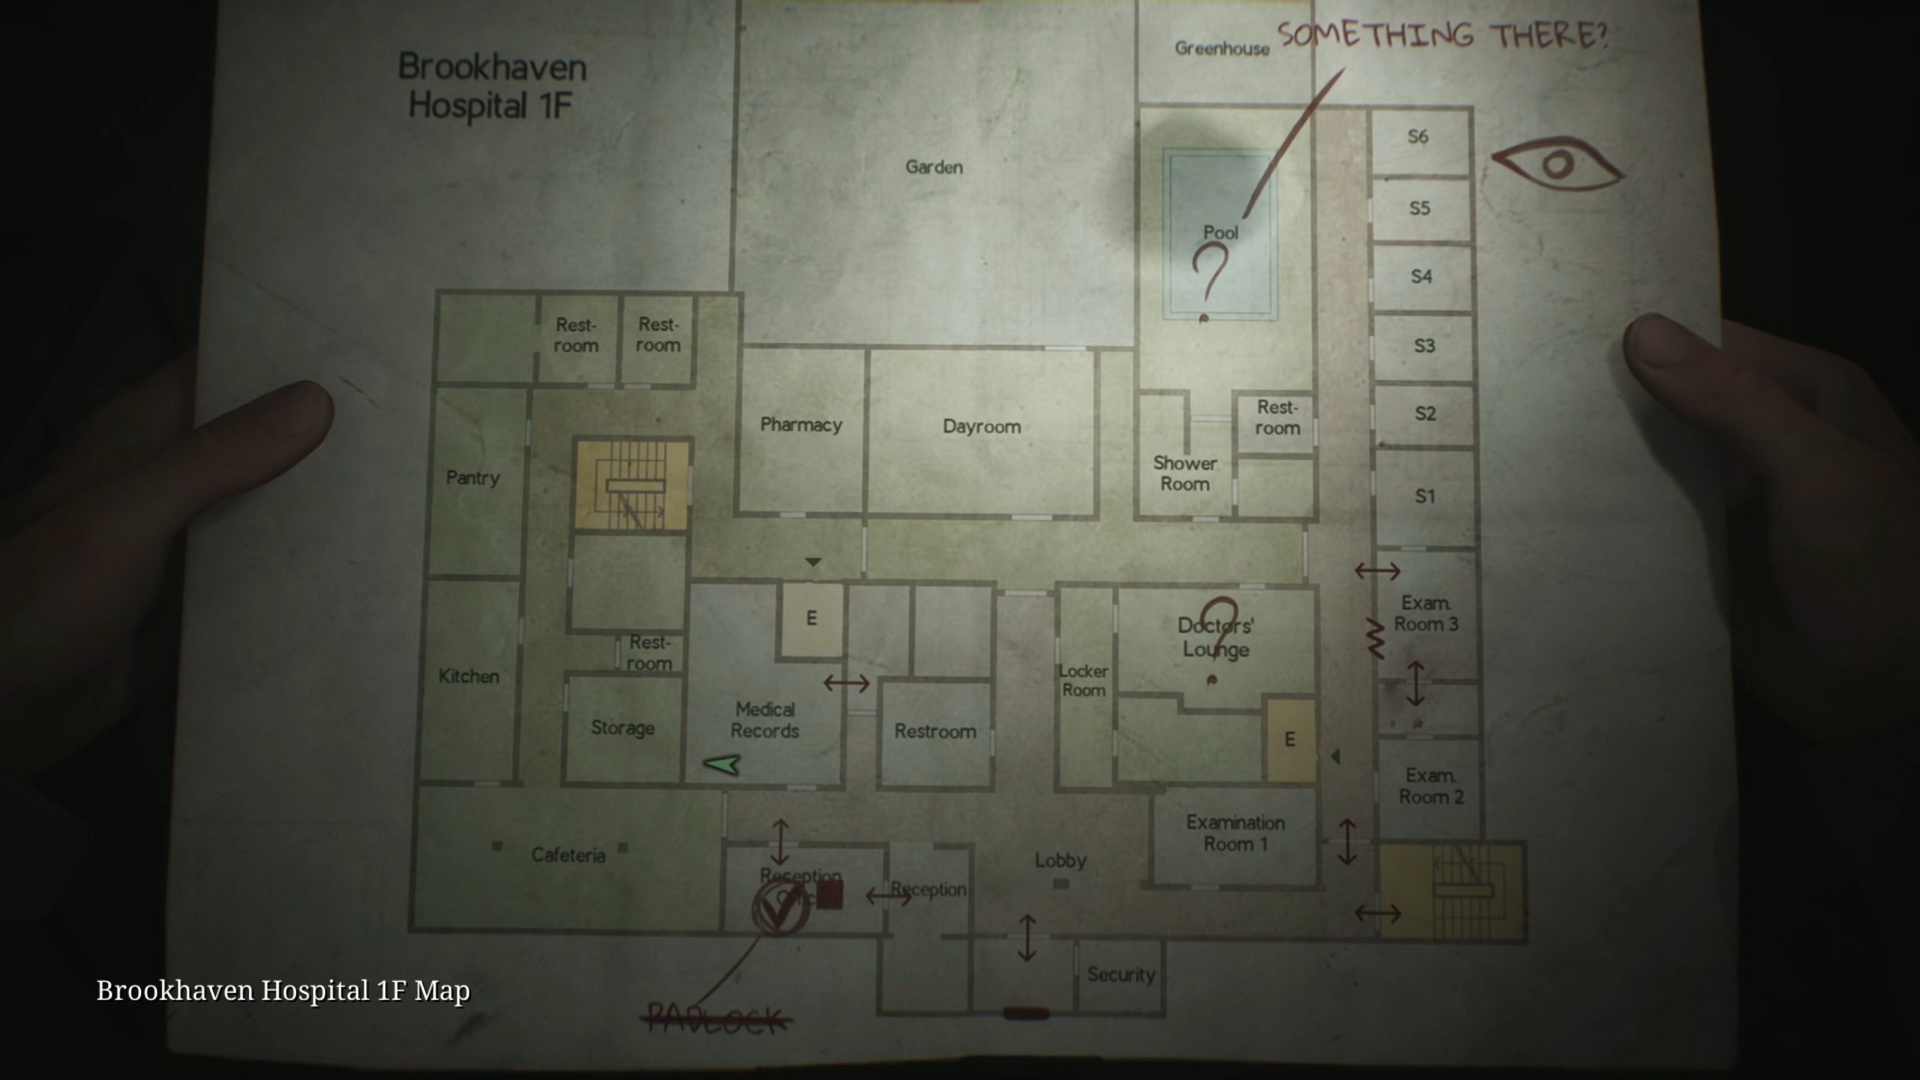 |
A Health Drink is in a first aid cabinet. Finally, the 48 Marked Bracelet is sitting on a red book in the corner of Medical Records.
After you get the item, a Mannequin will appear in the room. After the fight, exit the room and return to the second floor via a staircase or elevator.
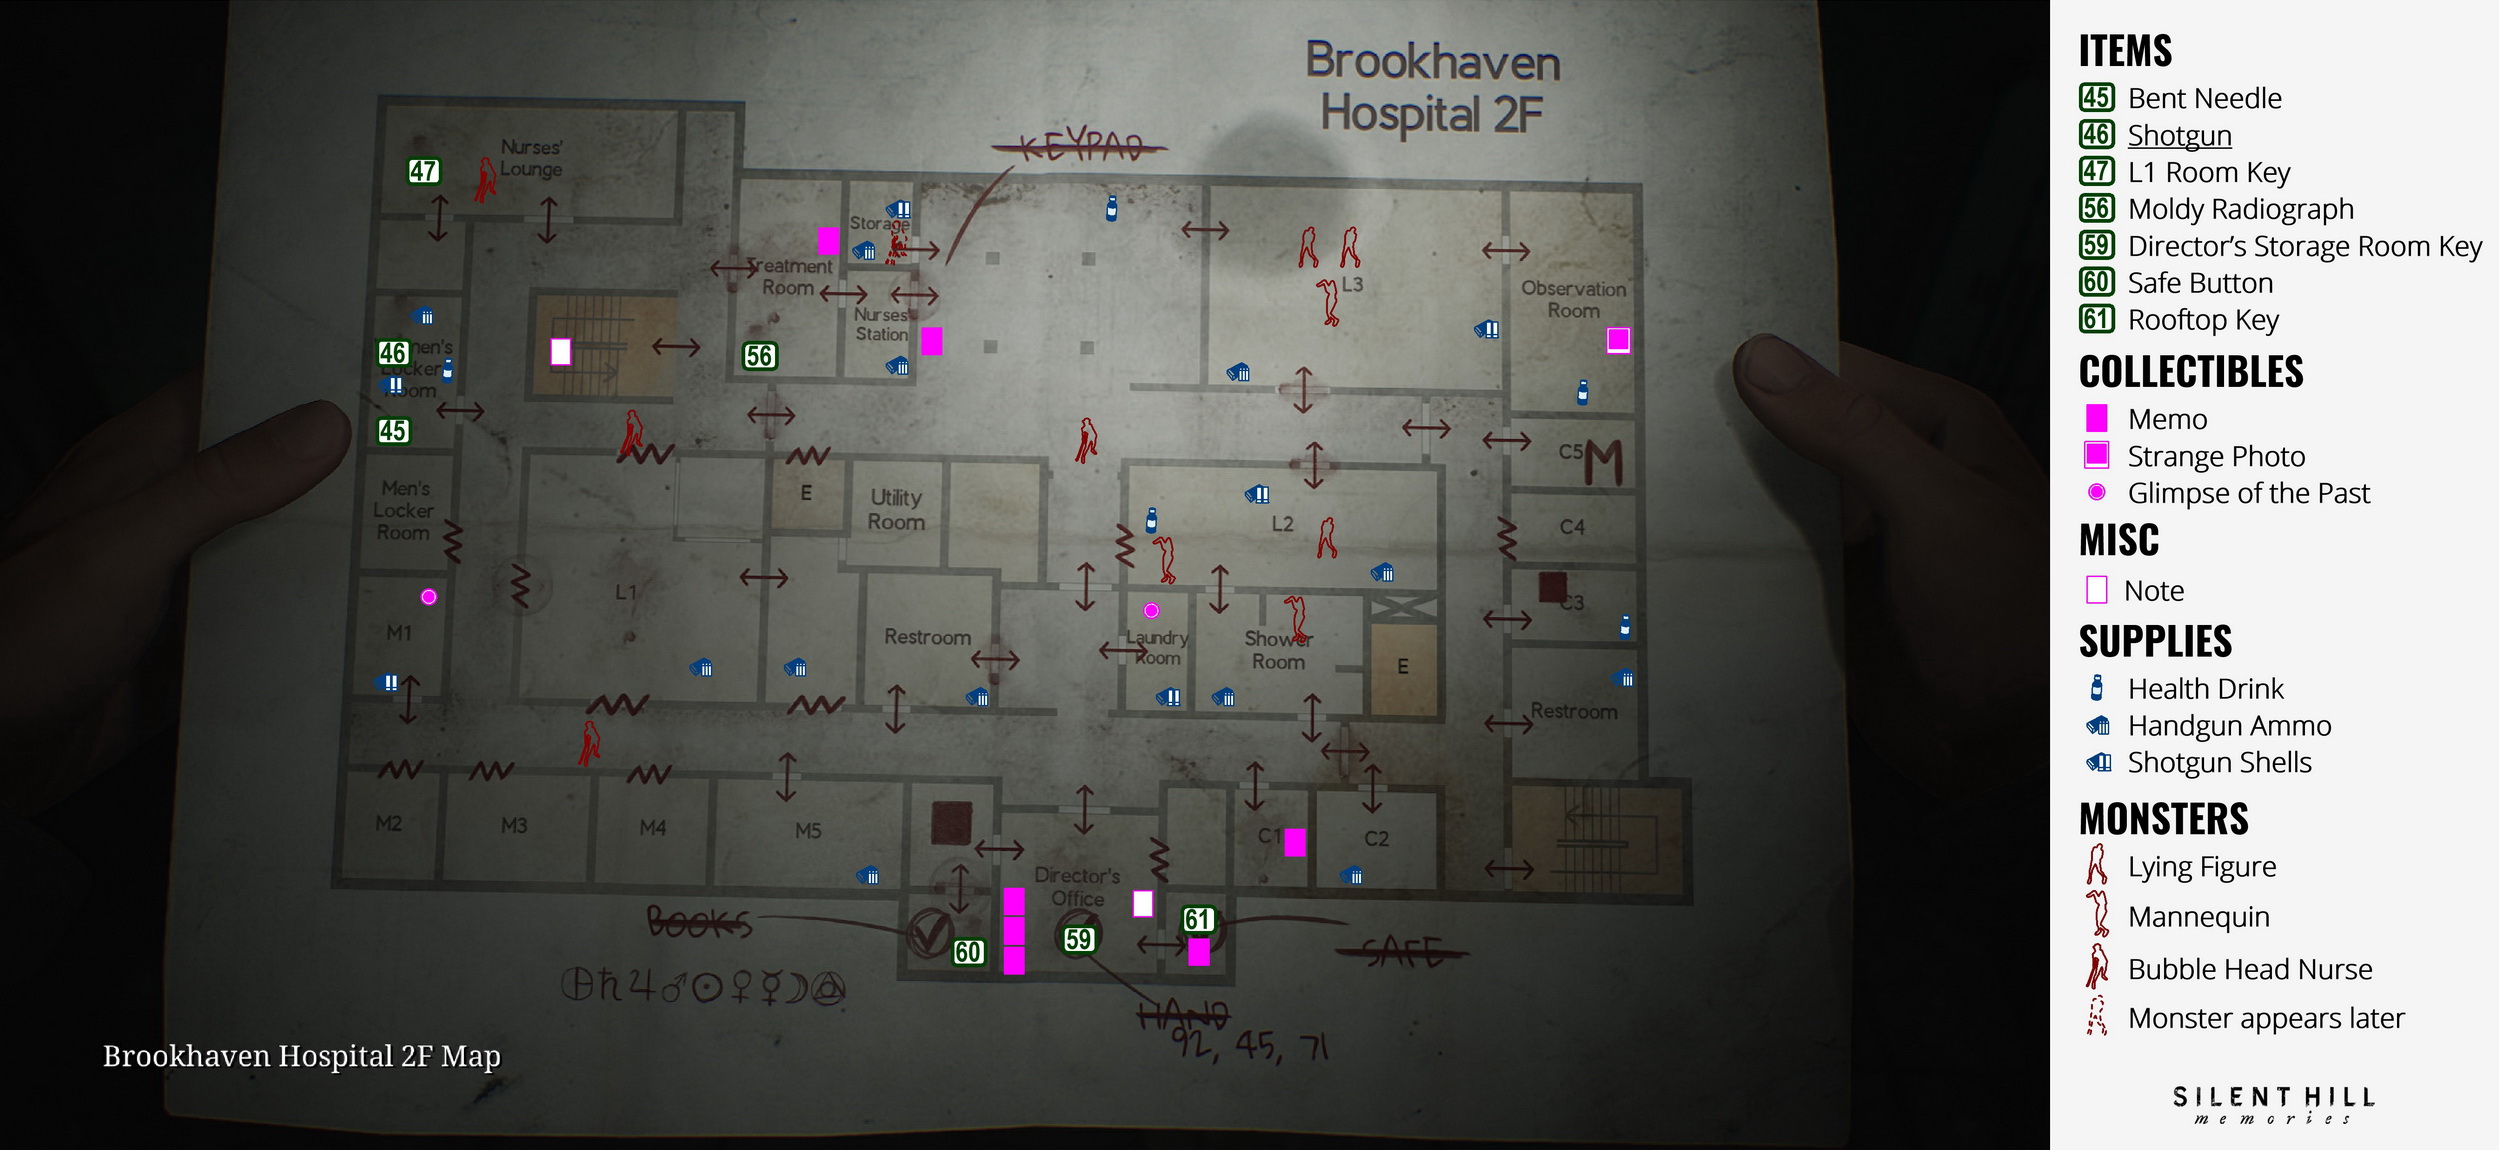
Exploring the Third Floor
Second Floor
You can visit Maria for additional cutscene now – this will contribute toward the "Maria" ending.
You will need to explore the third floor now. Go to the lobby, where the Storage will open up, revealing a Nurse. Inside the Storage, there's Handgun Ammo on a shelf and Shotgun Shells in a drawer. Take the stairs in the northwest to get to the third floor. You can check another Laura's drawing on the stair landing.
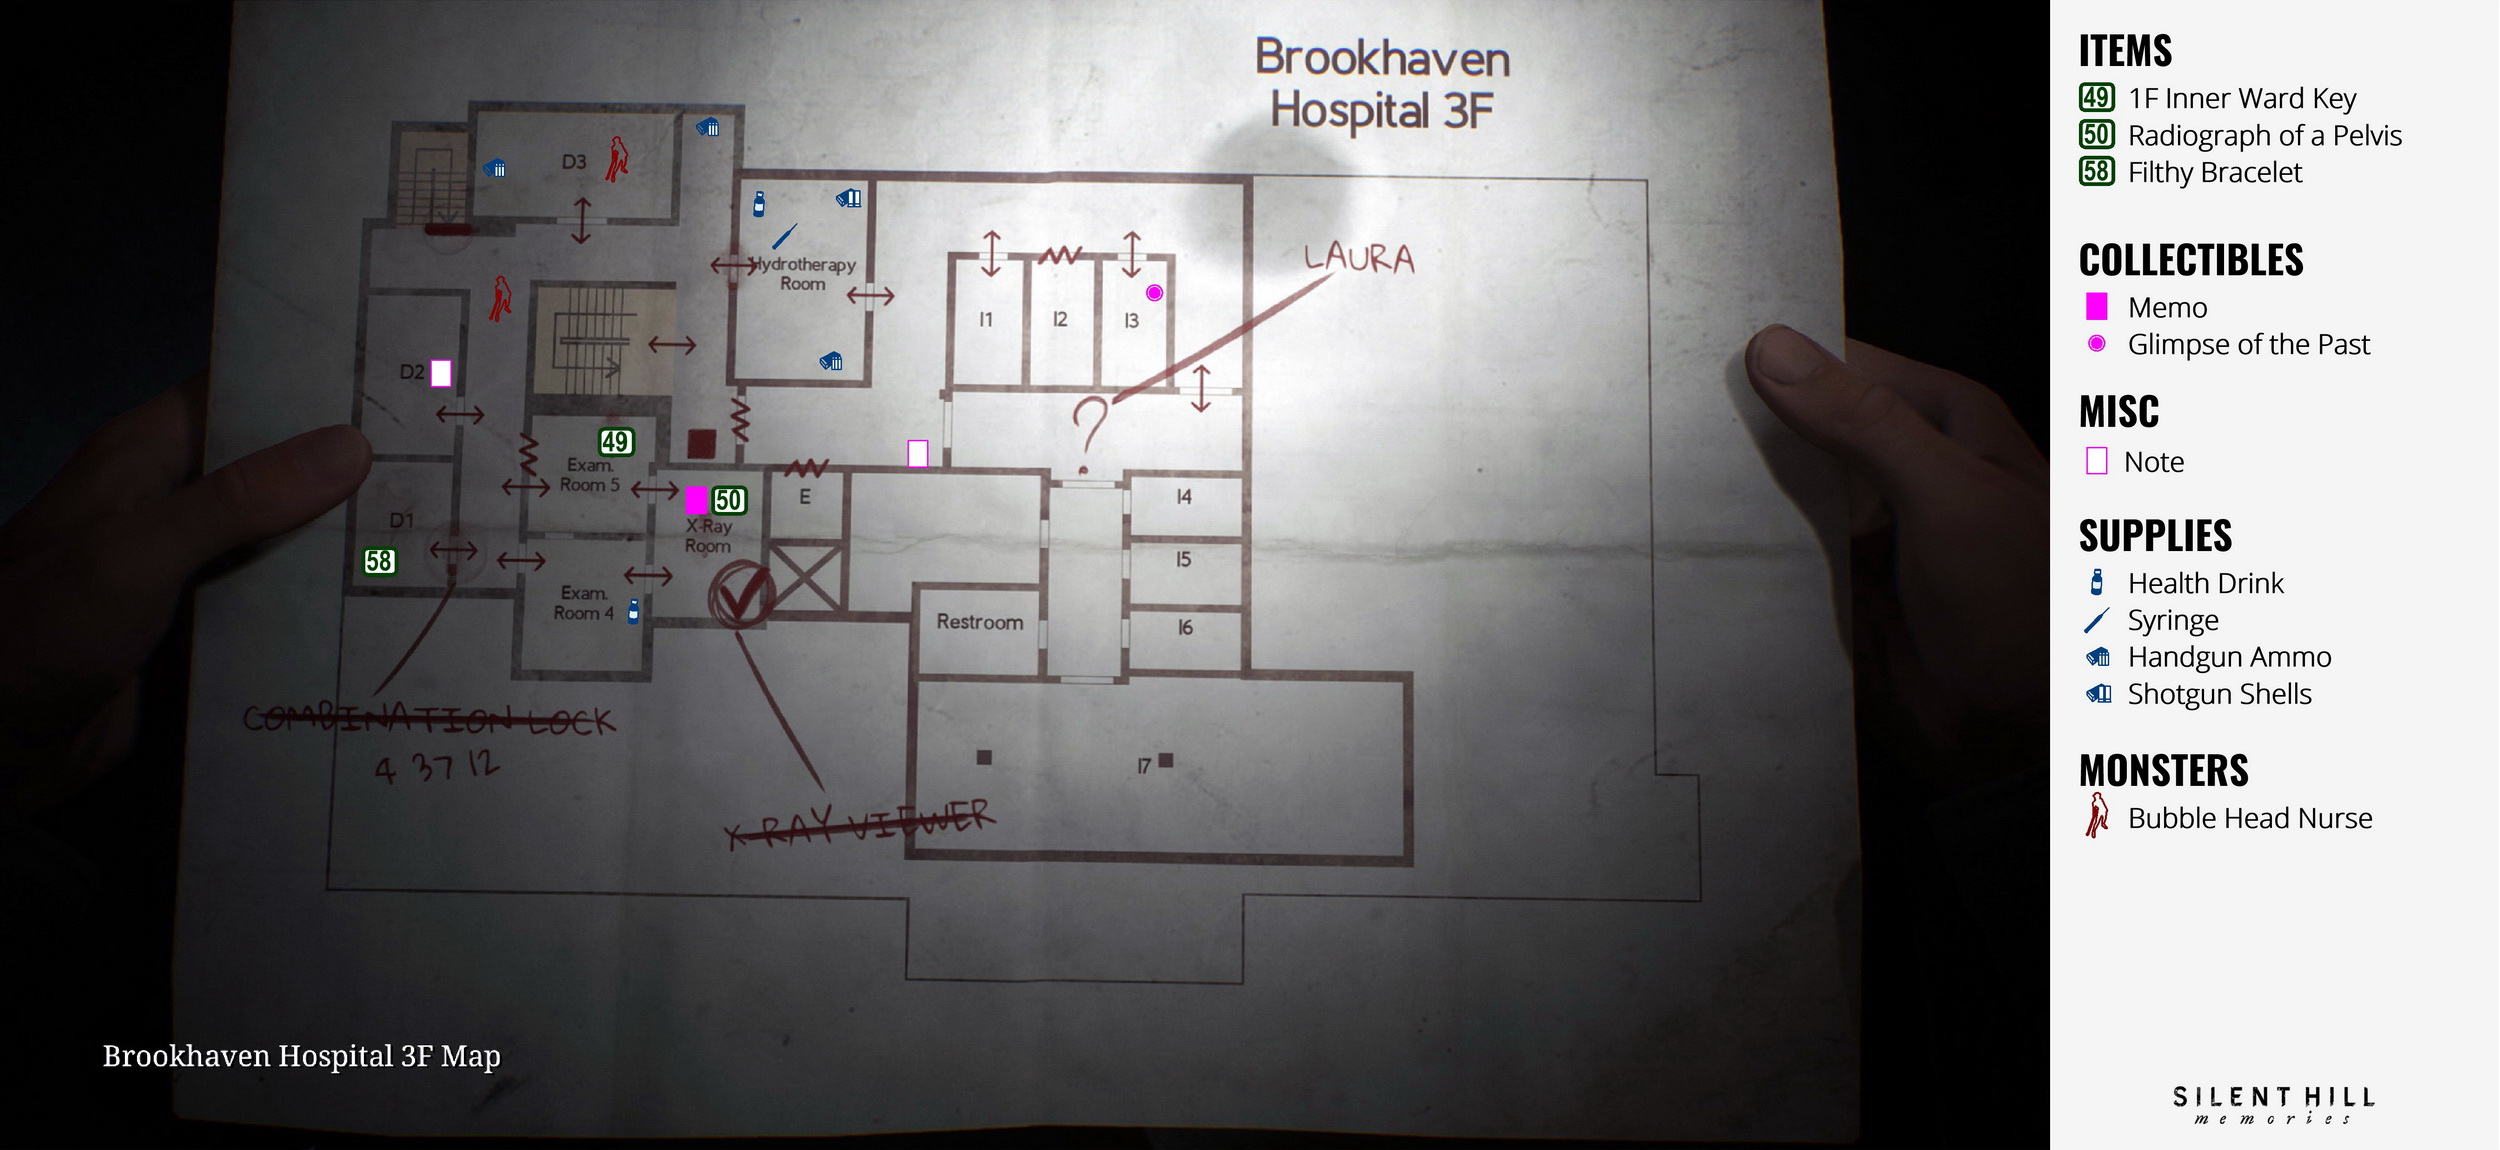
Third Floor
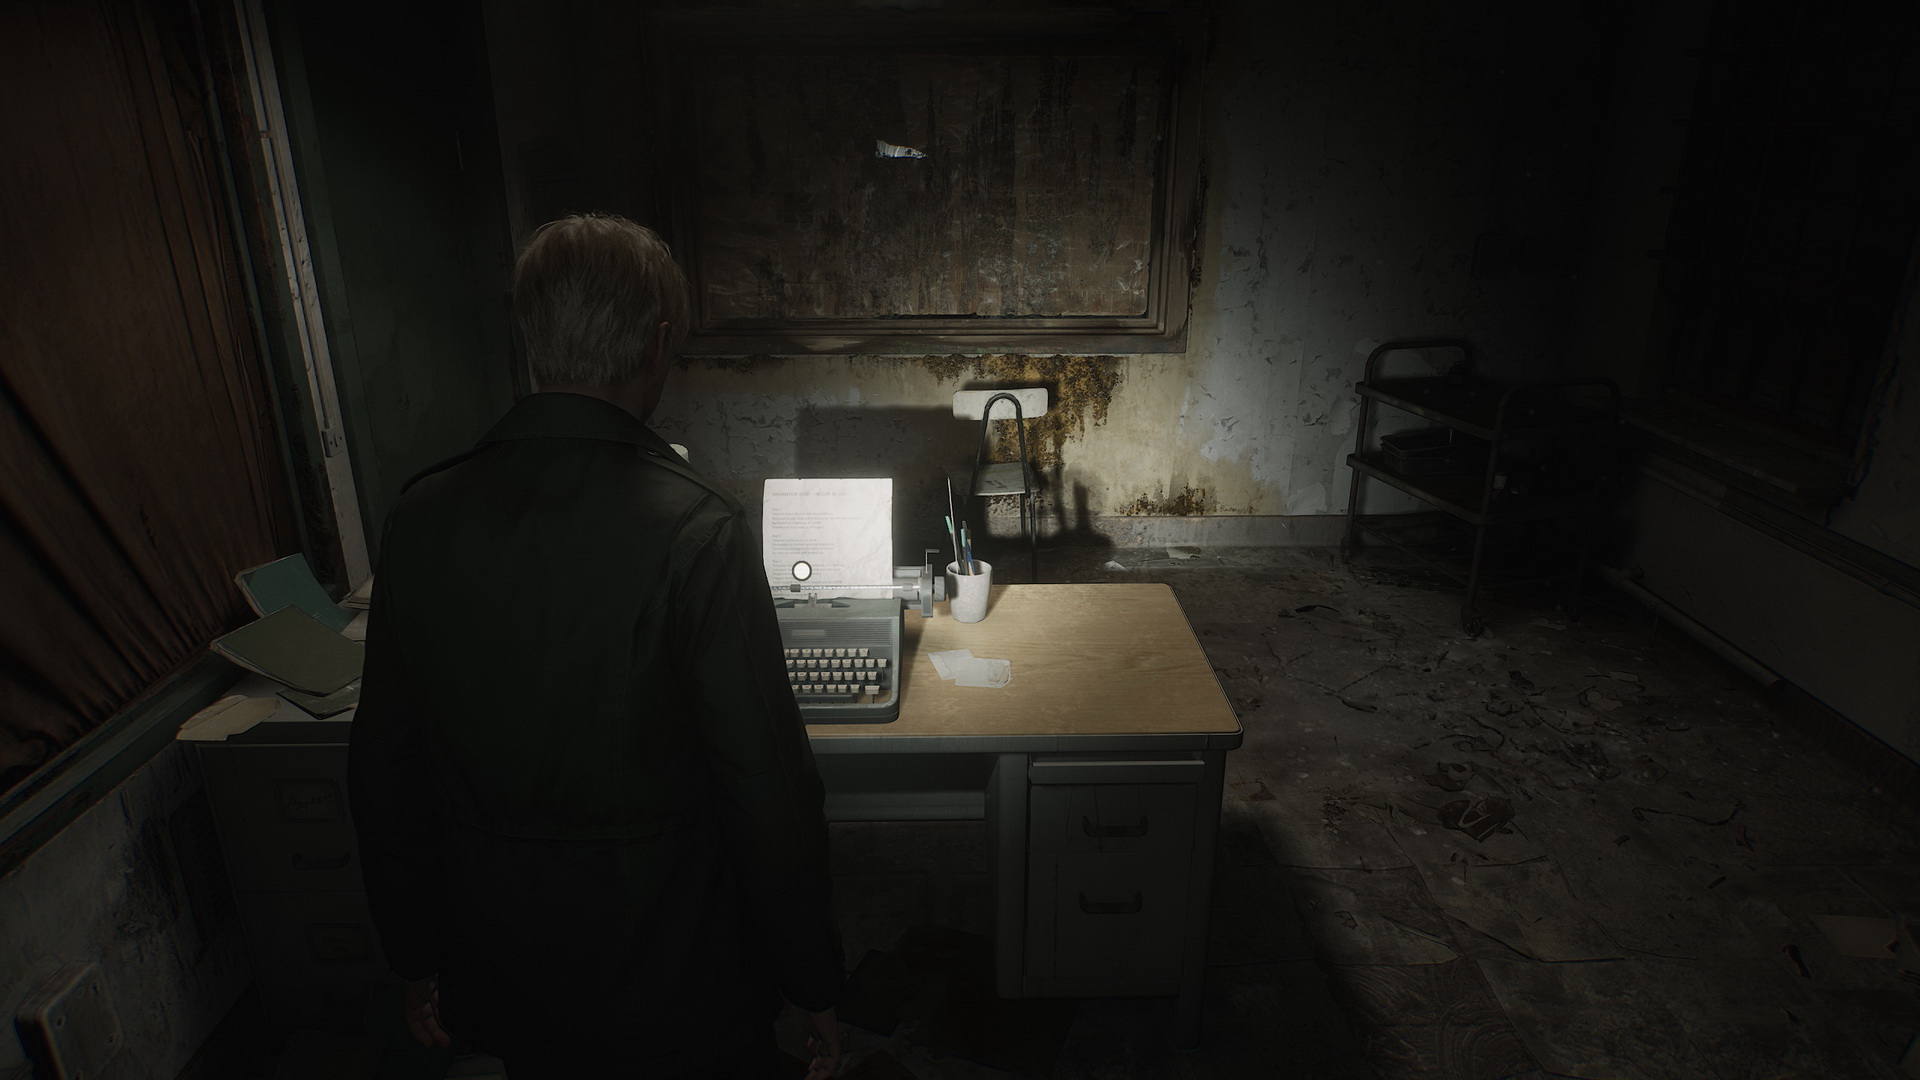
There's a Save Point at the end of the corridor. Checking through the door's vision panel will reveal Laura, who runs from James again. To the north, you will find Handgun Ammo in the nightstand's drawer by the window. There will be a Nurse in the west corridor, another Nurse in Room D3, and Handgun Ammo in the nightstand. In Room D2, you will find observation notes in the typewriter.
 |
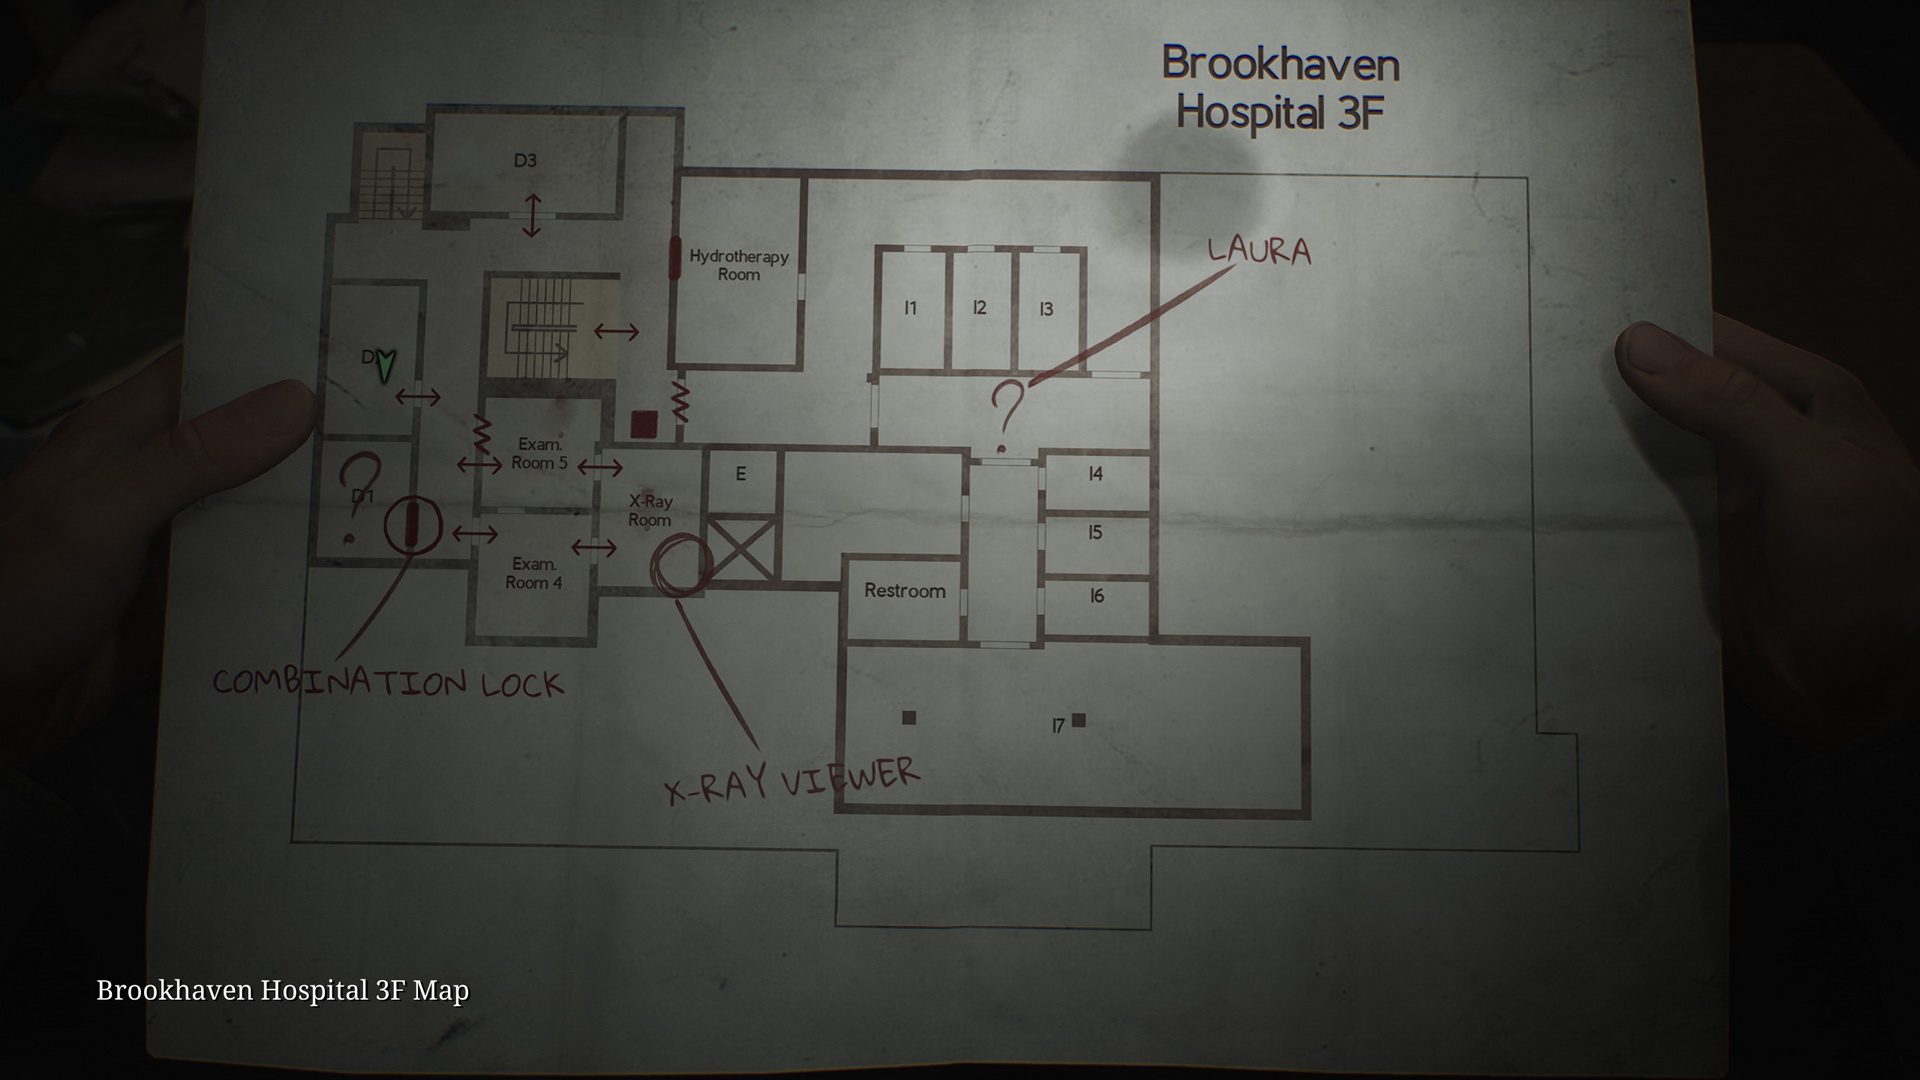 |
Room D1 is locked with a combination lock, and you will need to solve a puzzle to learn the code. Break the window to get inside Exam Room 5 and grab the 49 1F Inner Ward Key on the desk.
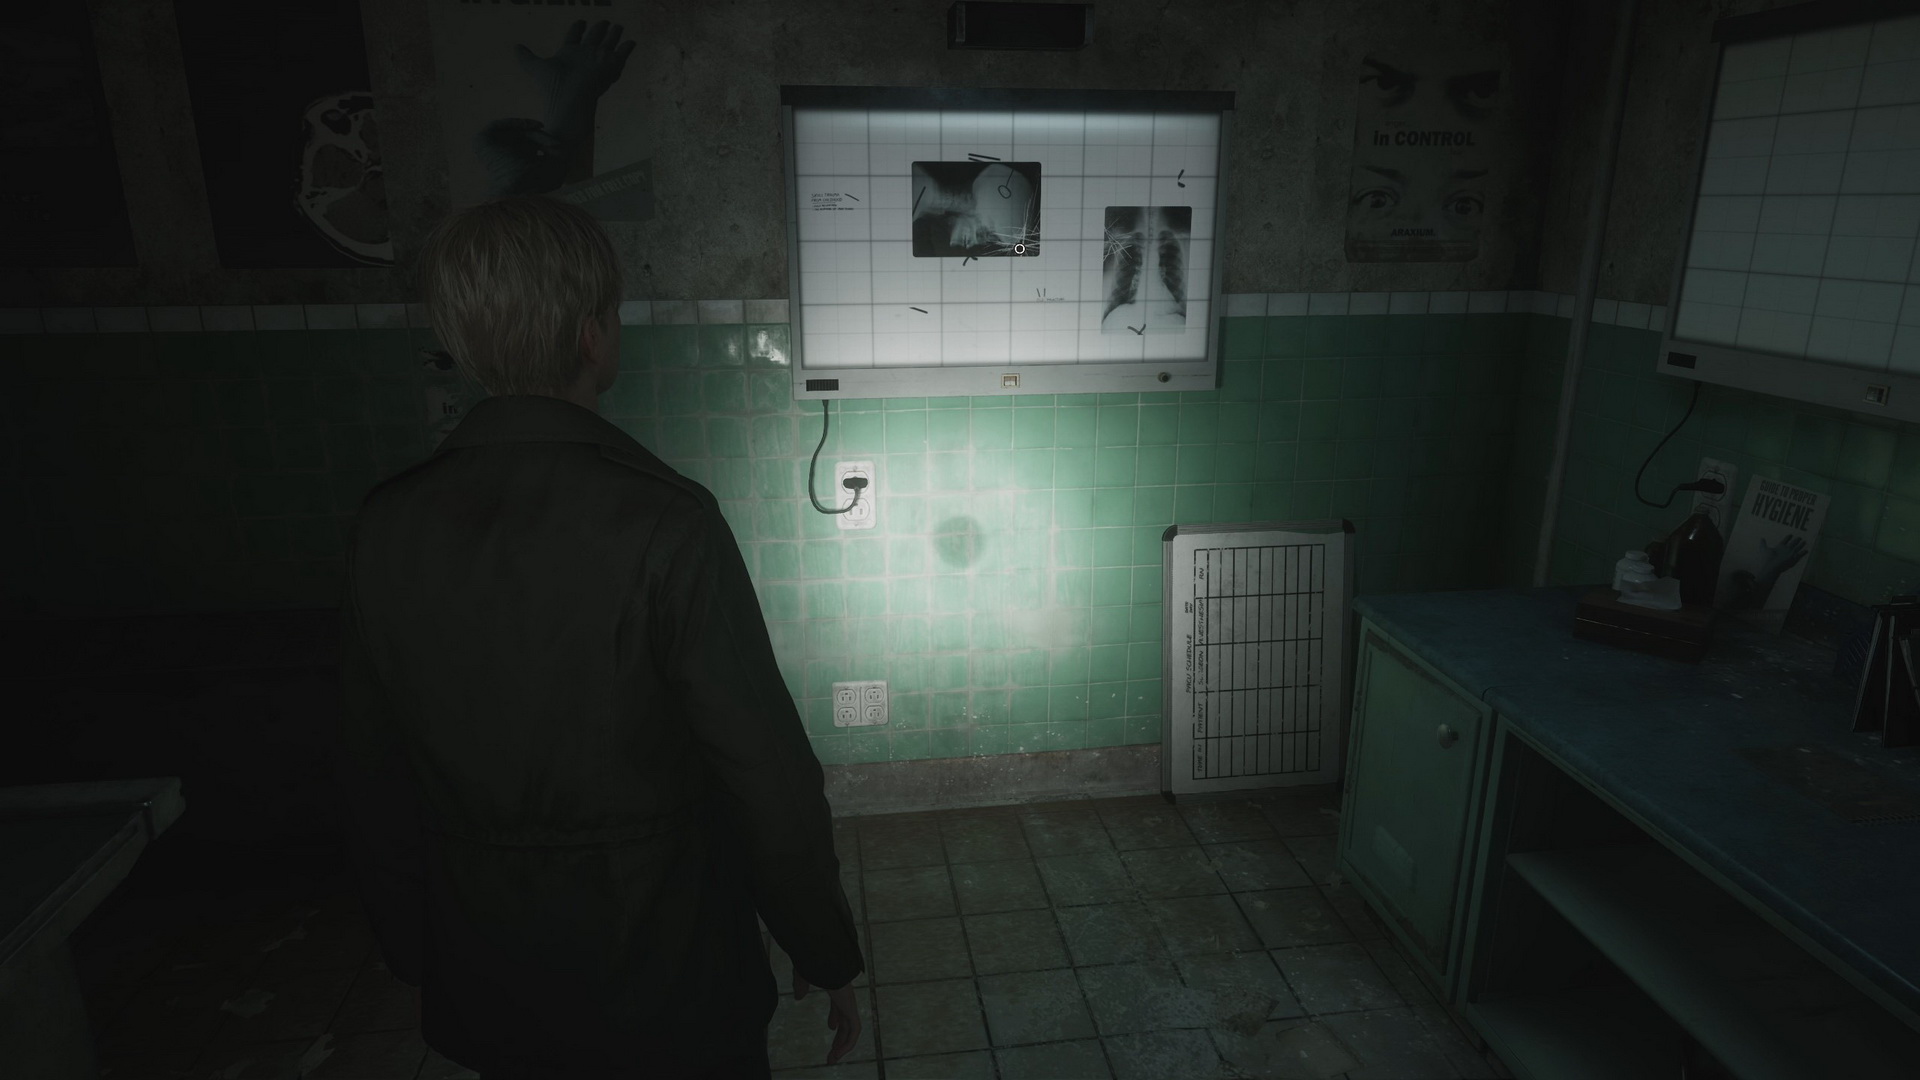
In the neighboring Exam Room 4, you will find a Health Drink inside a first aid cabinet. Proceed to the X-Ray Room. On an examination table, you will discover Memo #33: X-ray Memo and a 50 Radiograph of a Pelvis.
You can check the X-ray viewer in the room, but you won't have all the required items to solve the puzzle entirely. Let's go to the first floor to explore a new area. Then, go downstairs to the second floor and use the southeastern staircase to return to the first floor.
Finding the Second Bracelet
First Floor
Examination Room 1 will now be unlocked. Find Strange Photo #13: “At least she was there” inside the drawer in the back of the room. Beware of a Mannequin inside.
 |
 |
There's also Handgun Ammo in a glass cabinet in the same room. There are two Nurses in the main lobby now, so you might want to take the northern path to access the inner ward to avoid fighting. Use the 1F Inner Ward Key to access this restricted area. A Nurse and a Lying Figure are roaming in the corridor. Let's check the Doctors' Lounge mentioned in the Staff Memo. On a coffee table, you will find a doctor's note.
 |
 |
Inside the kitchen's drawer, there's Handgun Ammo. Memo #34: Keypad Combination Note is on the bulletin board.
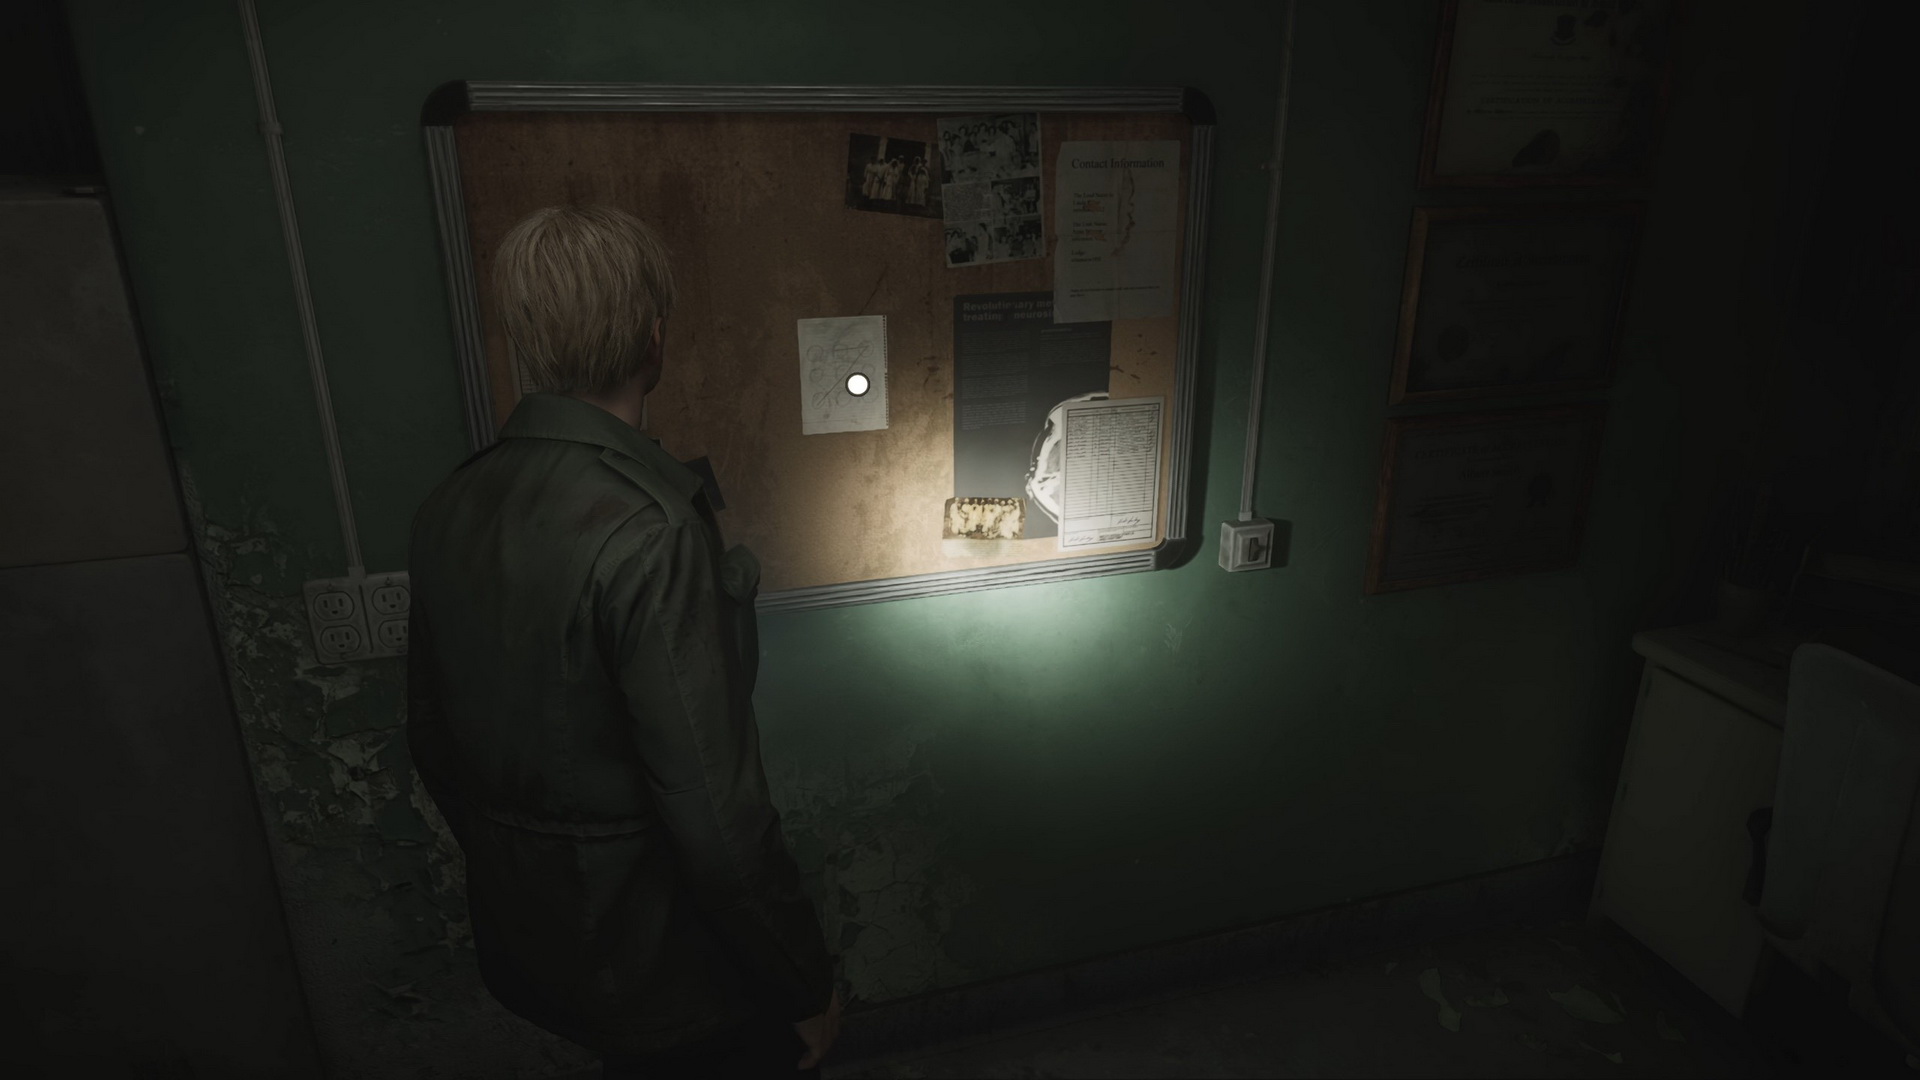 |
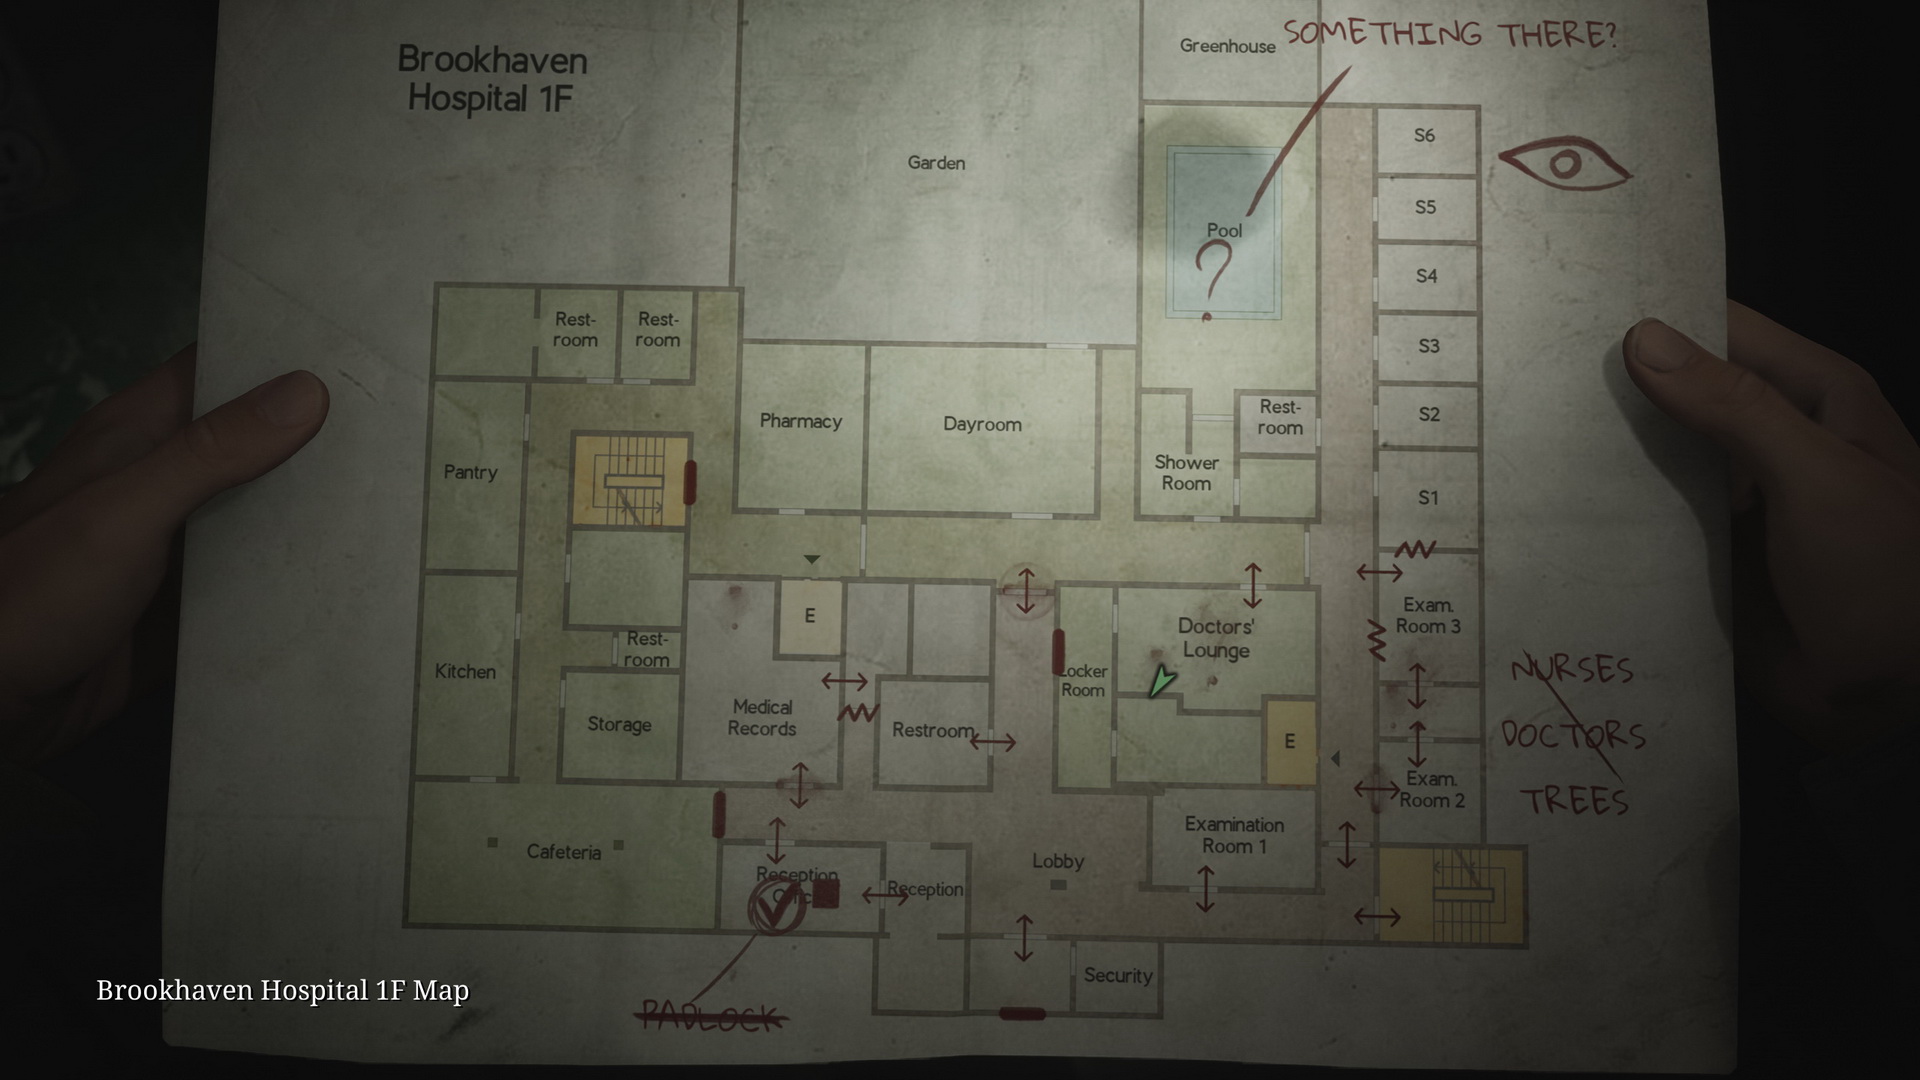 |
This note hints at the code for the Nurses' Station's door, but let's visit that later and explore the rest of the first floor first.
Note: You can skip visiting the Doctors' Lounge and collecting the memo, as the keypad code will always be the same. Simply enter the code for the corresponding riddle difficulty.
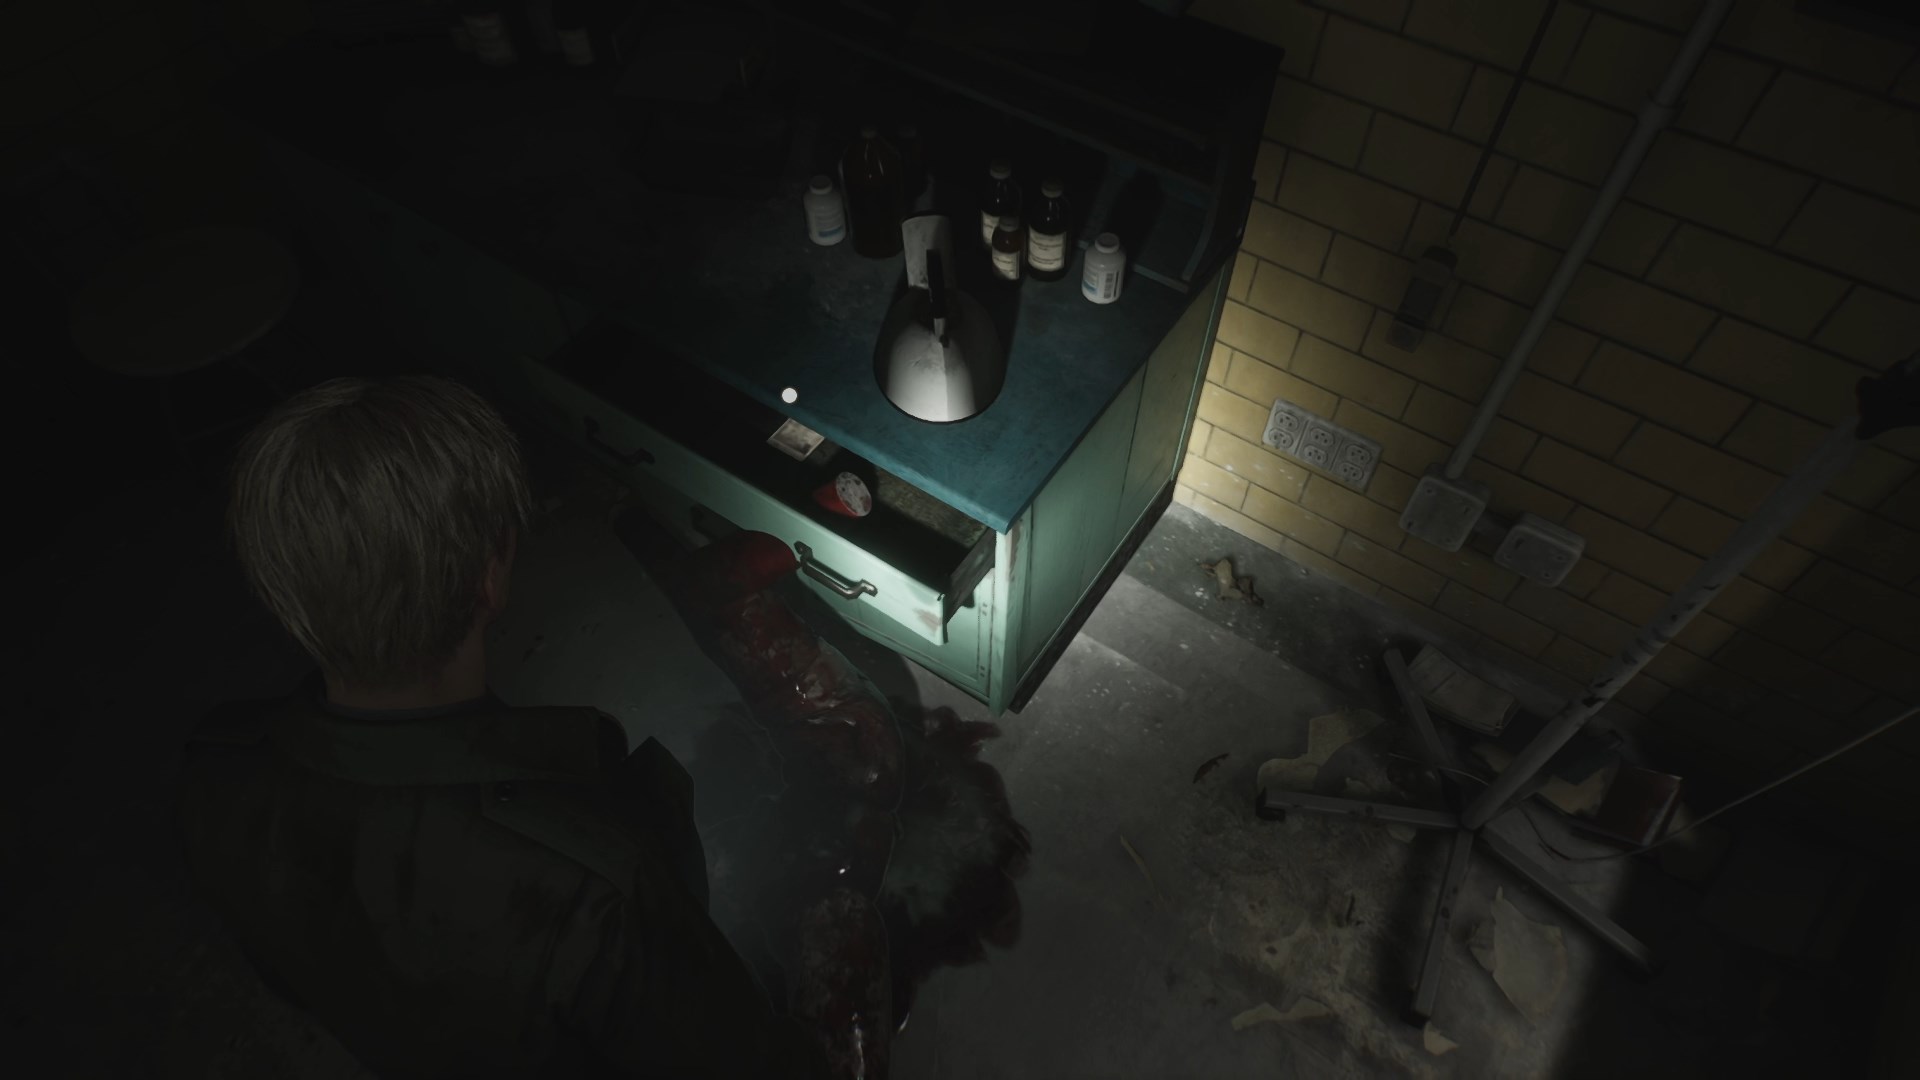
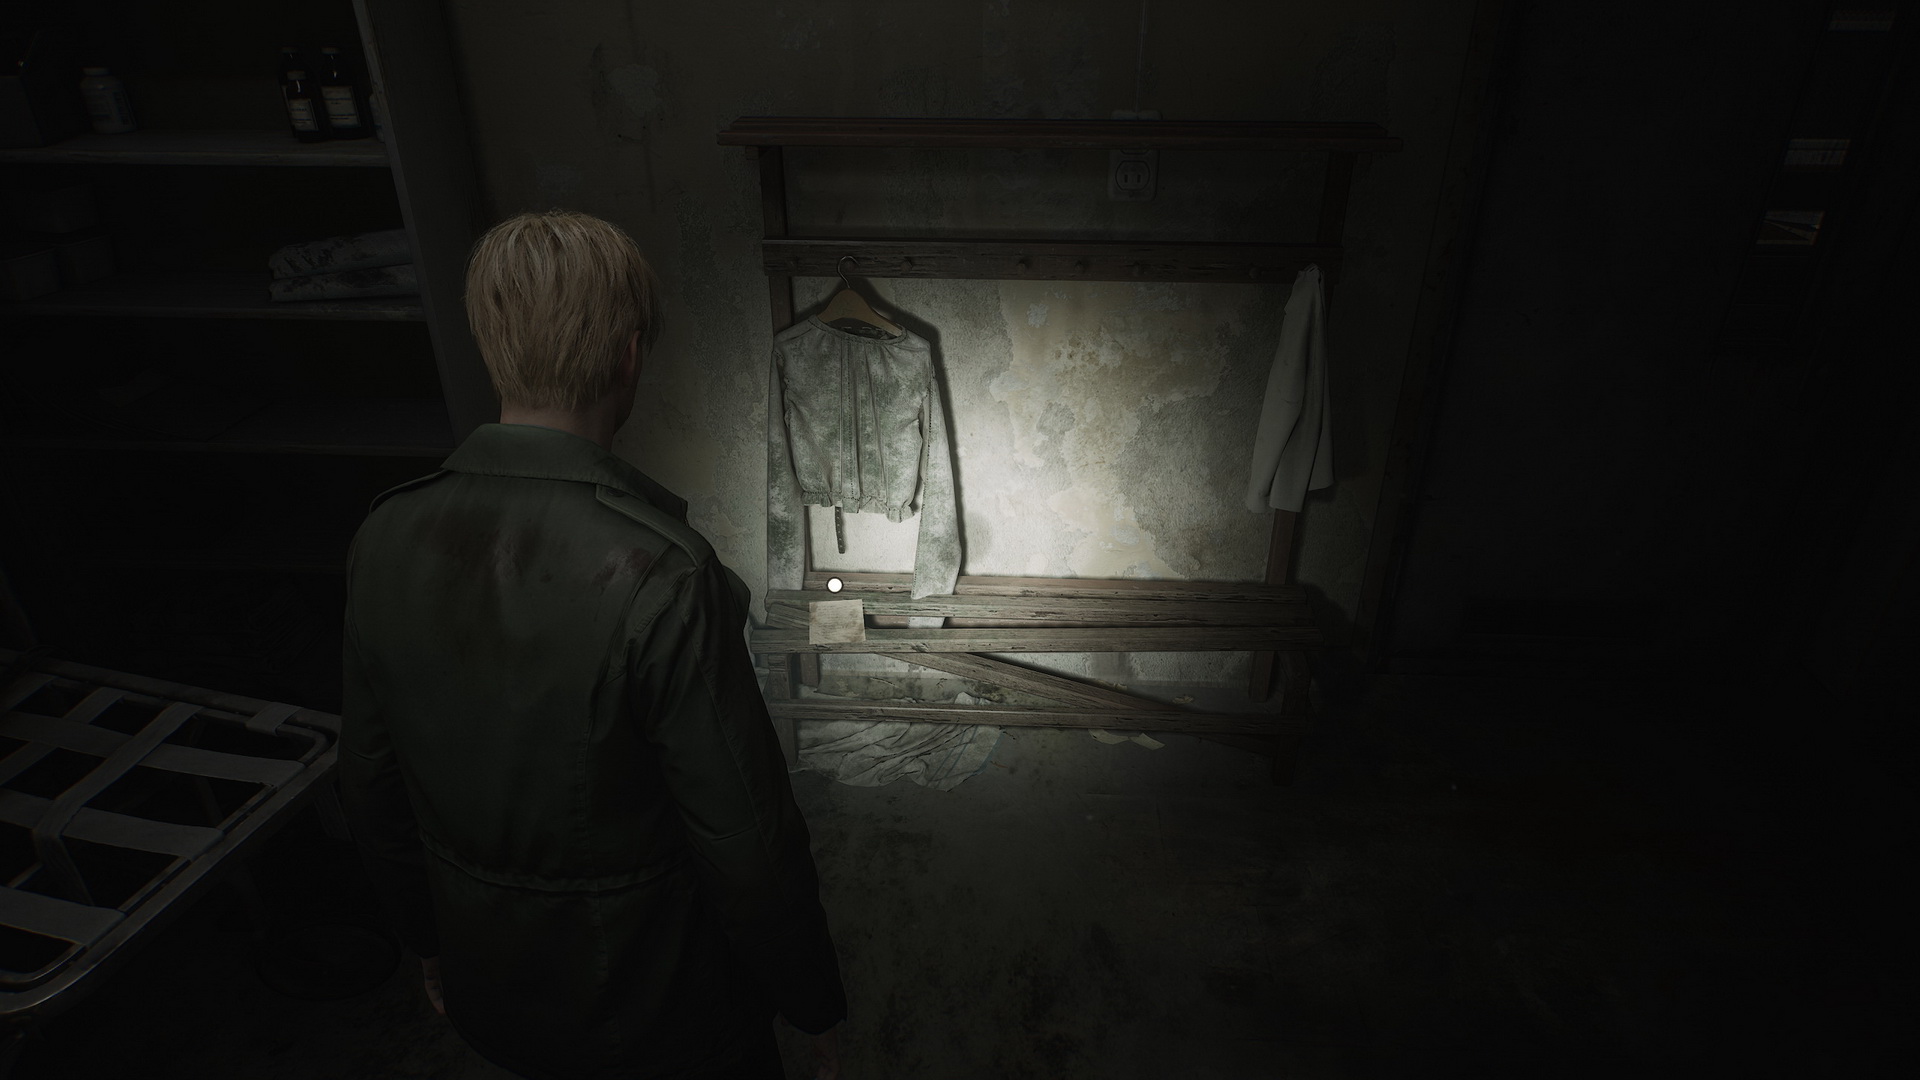
In the Locker Room next to the lounge, there's a Health Drink in a green locker. Go to the Dayroom. Inside, there will be a single Nurse and Handgun Ammo in a glass cabinet. Proceed to the Pharmacy. A Health Drink is in a glass cabinet. In the corner of the room, there's a floor drain with some green marks. There's an object trapped inside, but we cannot get it out yet. In the middle of the room, you can find a diary.
 |
 |
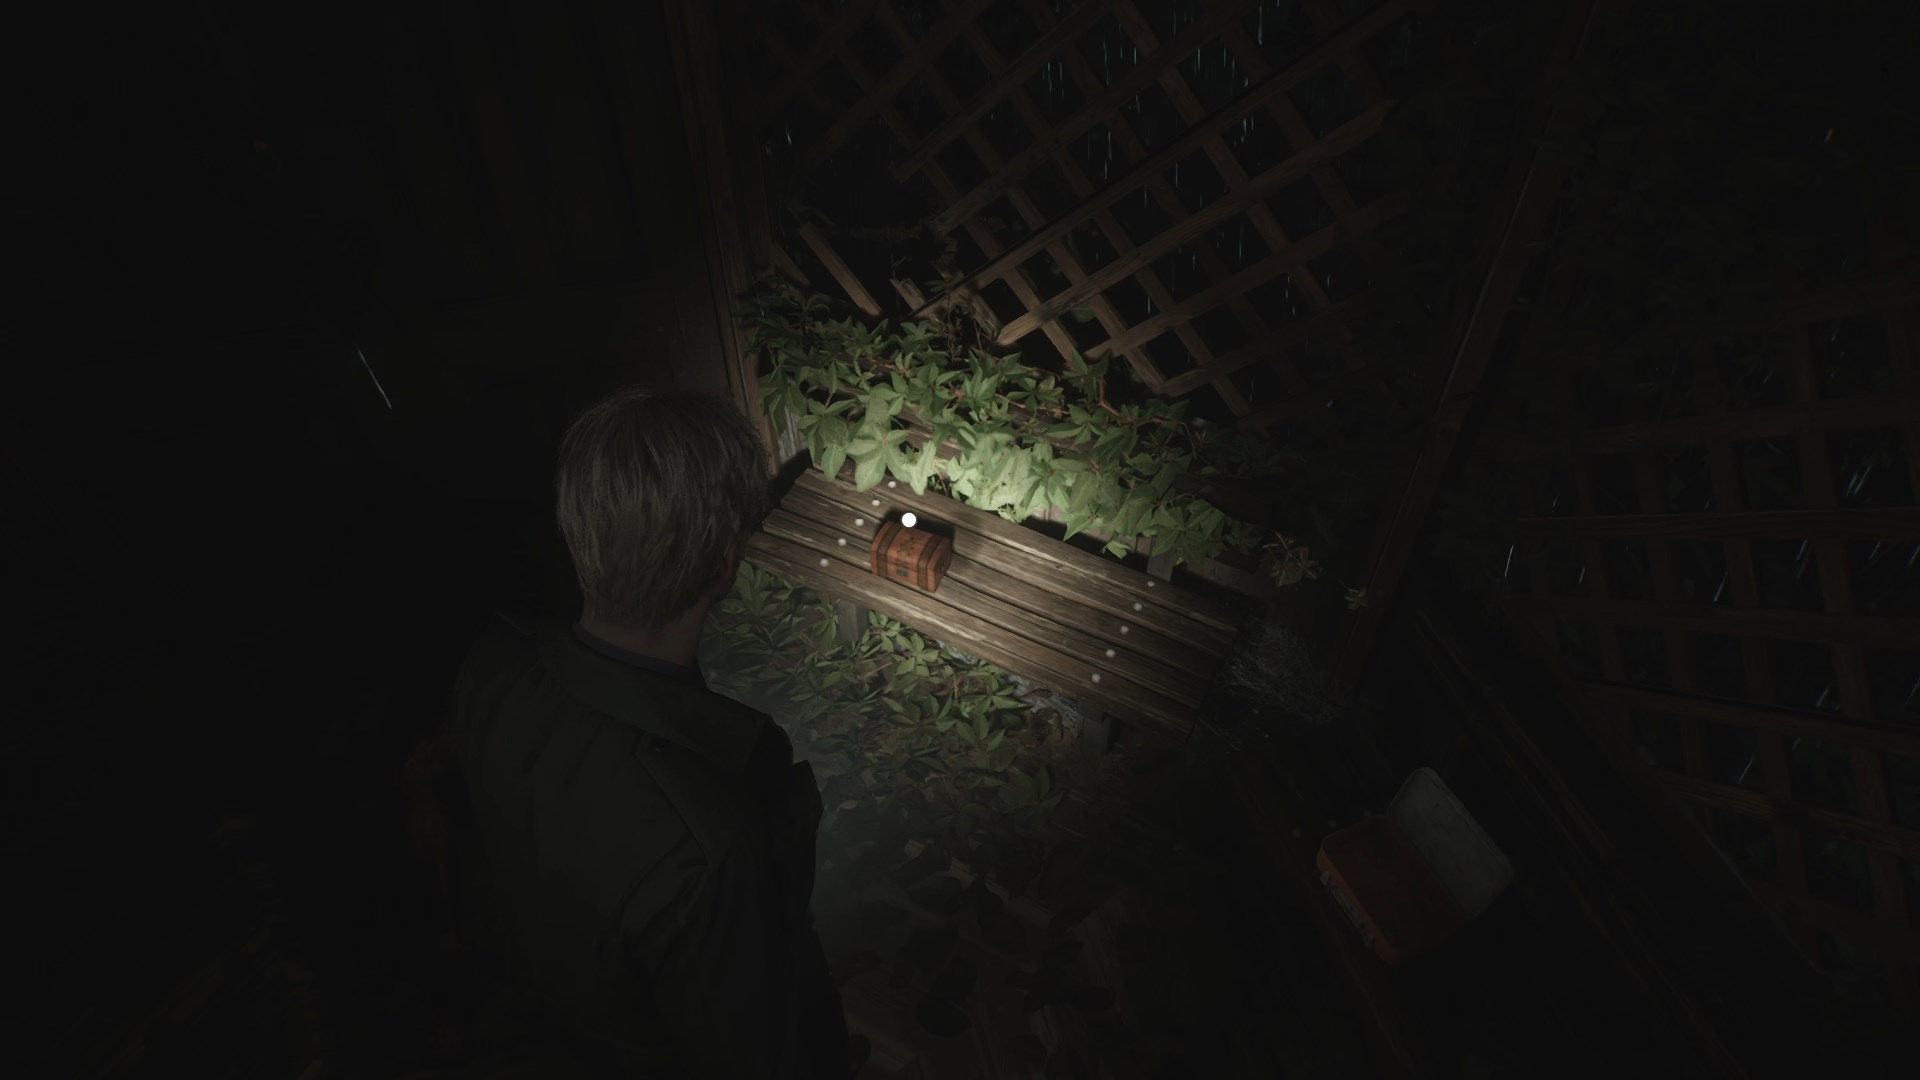
Unlock the door to the corridor for convenience and jump through the window into the garden. Three Lying Figures and a Mannequin are waiting for you here. Shotgun Shells are sitting on one of the wooden tables. Crawl into a gazebo in the garden's corner for additional supplies, but be careful of a Mannequin hiding inside. You can find Handgun Ammo and a Syringe in the gazebo in a first aid kit on the bench.
New Game+ Item: Small Chest |
Exit back to the garden – another Lying Figure will appear here. Move to the Greenhouse, where you can collect more Handgun Ammo from the drawer in the corner, and proceed into the Pool area. Another box of Handgun Ammo is on the bench to the right. You will find a closed hatch in the southwestern corner of the pool. Go to the Shower Room – a Creeper and a Mannequin are lurking here. Take Handgun Ammo from the bench and Shotgun Shells from the right locker. Collect a 51 Medical Tube sitting on a sink.
Combine the Medical Tube with the Bent Needle in your inventory to receive a 52 Medical Tube with Bent Needle attached. Return to the Pharmacy and use the combined item on the drain to get the 53 Maintenance Key.
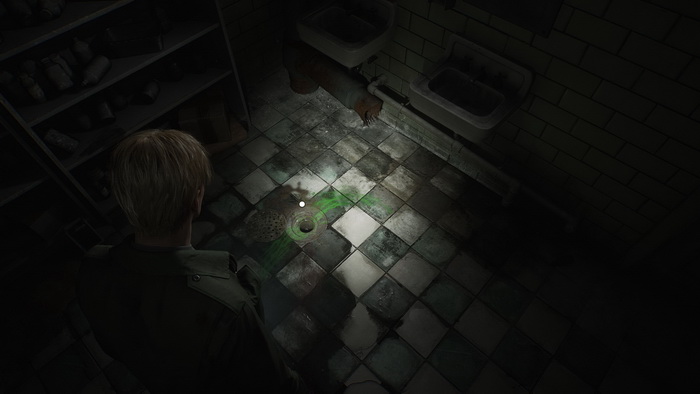
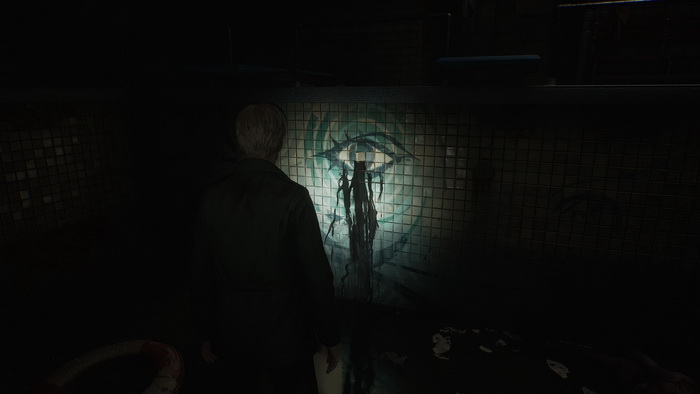
Return to the pool area and use the Maintenance Key on the trap door. Turn the valve to drain the pool. Step inside the drained pool and smash the wall with a crying eye symbol to discover a 54 Bloodstained Bracelet. A Lying Figure will crawl inside the room after you leave the basin.
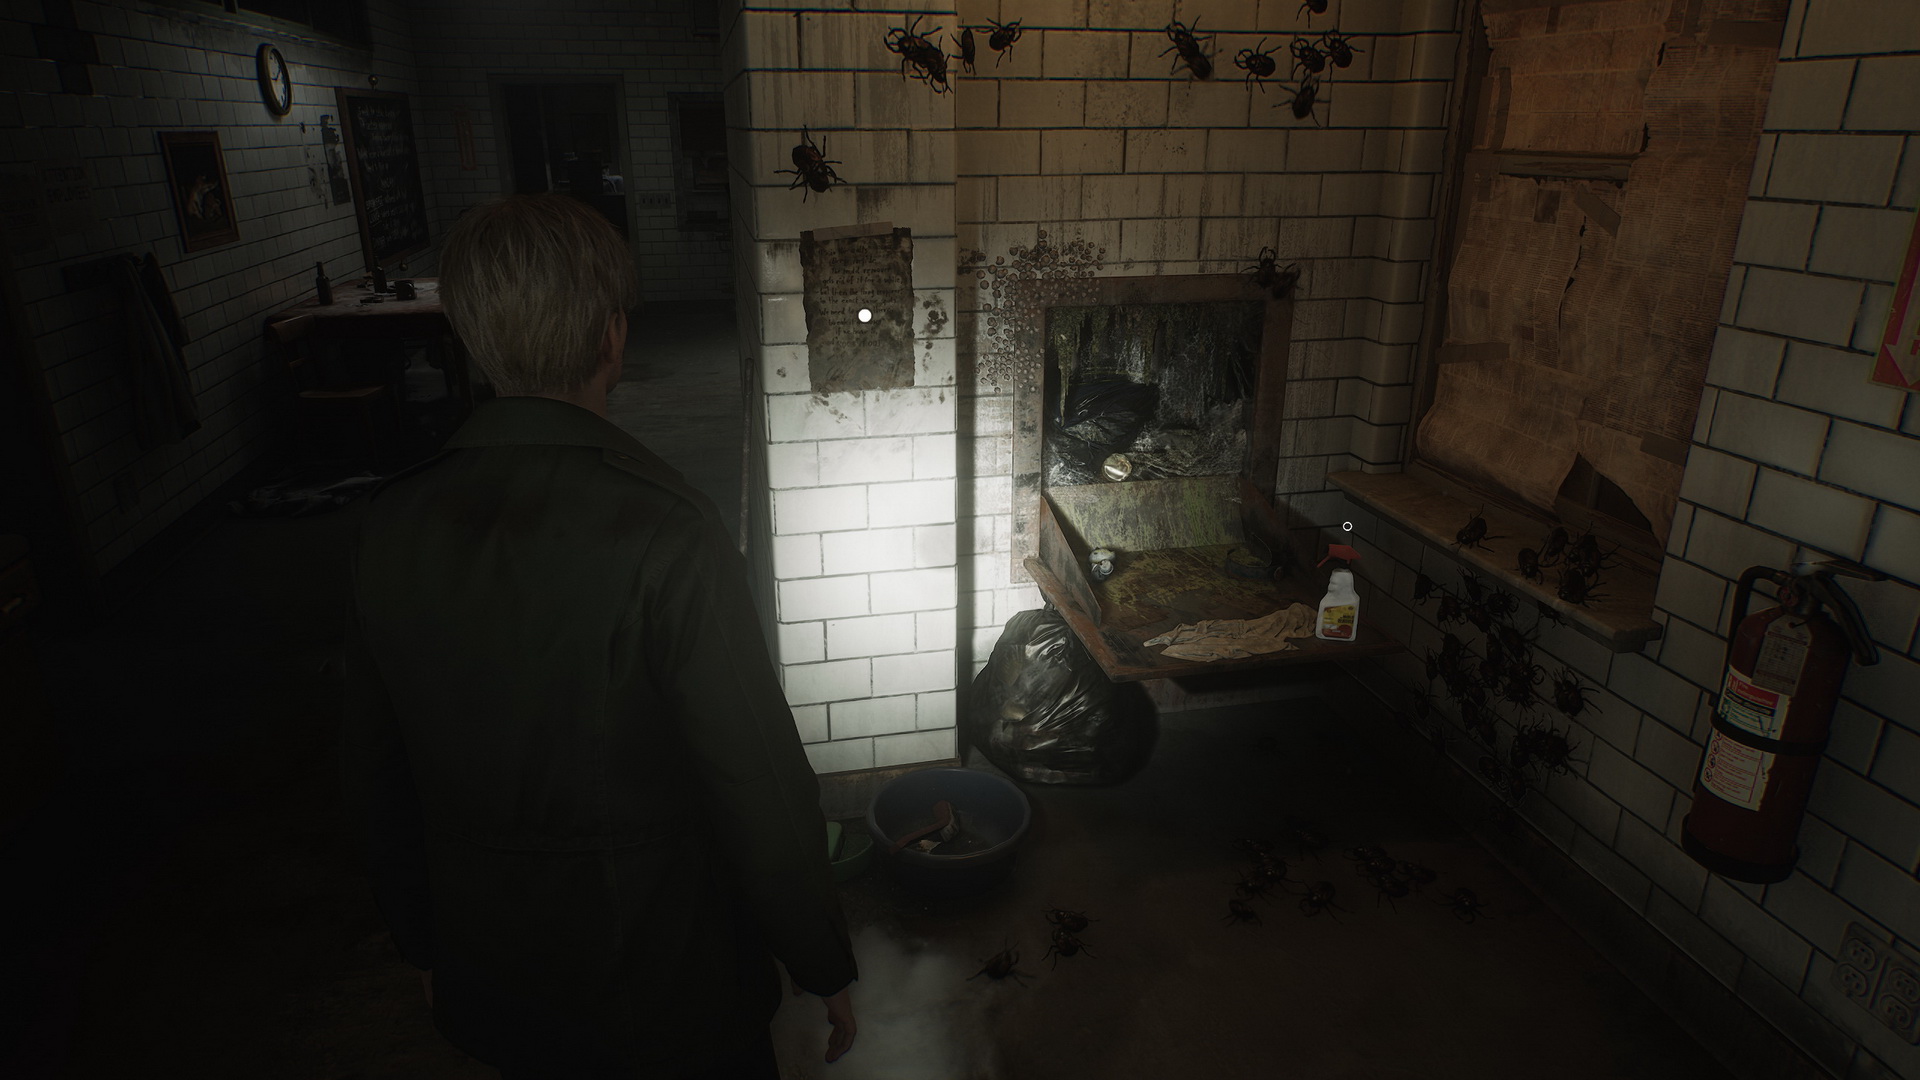
Let's explore the remaining west section of the floor. Unlock the door to the northwestern staircase and collect Handgun Ammo underneath the stairs. A Nurse is patroling the corridor in the area. Another Handgun Ammo is on the window sill in the right Restroom. One more Nurse is in the south corridor next to another Restroom, where you can find Shotgun Shells on a sink. Enter the Kitchen to find a 55 Mold Remover on the garbage chute's hatch beside a note.
 |
 |
The Cafeteria to the south has Handgun Ammo in the kitchen's drawer and Shotgun Shells on a chair in front of a TV guarded by a Nurse and a Lying Figure. We are done with this floor, so take the northwestern staircase to return to the second floor.
Unlocking the Nurses' Station
Second Floor
Approach the Nurses' Station to enter the door code.
Puzzle: Nurses' Station Keypad Code
Light/Standard
The Keypad Combination Note from the Doctors' Lounge provides a visual reference for the code. On light and standard difficulties, it looks like this:
The lines are drawn over a nine-circle grid representing the keypad buttons. The four buttons that are crossed are 3, 5, 7 and 8. The code is a simple sequence of these numbers starting from the top – 3578.
Hard
On hard difficulty, the Keypad Combination Note shows a game of tic-tac-toe:
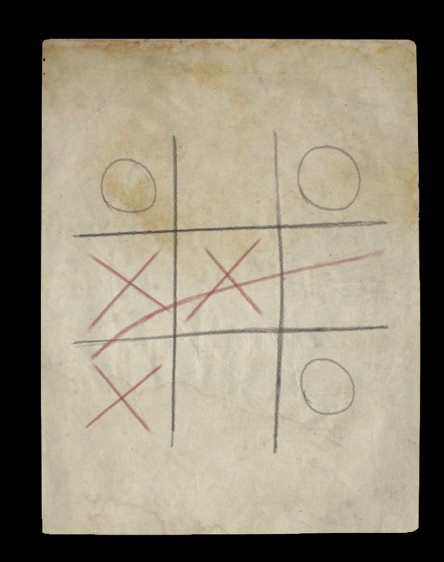
While looking more complicated, the logic is the same. Follow the line drawn over the Xs to get the code – 7456.
Inside, take Handgun Ammo from the desk's drawer. Proceed into the Treatment Room. Find Memo #35: Treatment Room Note on a bench.
 |
 |
Approach the bathtub and collect a 56 Moldy Radiograph.
Combine the Moldy Radiograph with the Mold Remover in your inventory to get the 57 Cleaned Up Radiograph. You have all the radiographs now, so we can get back to that X-ray viewer puzzle. Use the staircase to return to the third floor.
Note: You can skip collecting the radiographs and solving this puzzle entirely as the code for the Room D1 combination lock will always be the same.
Finding the Third Bracelet
Return to the X-Ray Room on the third floor to solve the puzzle.
Puzzle: X-Ray Viewer
Place the remaining radiographs onto the x-ray viewer.

To learn the hidden combination, you must move and rotate the radiographs to align with the markings on the viewer. On light and standard riddle difficulty, this task will not be very hard.
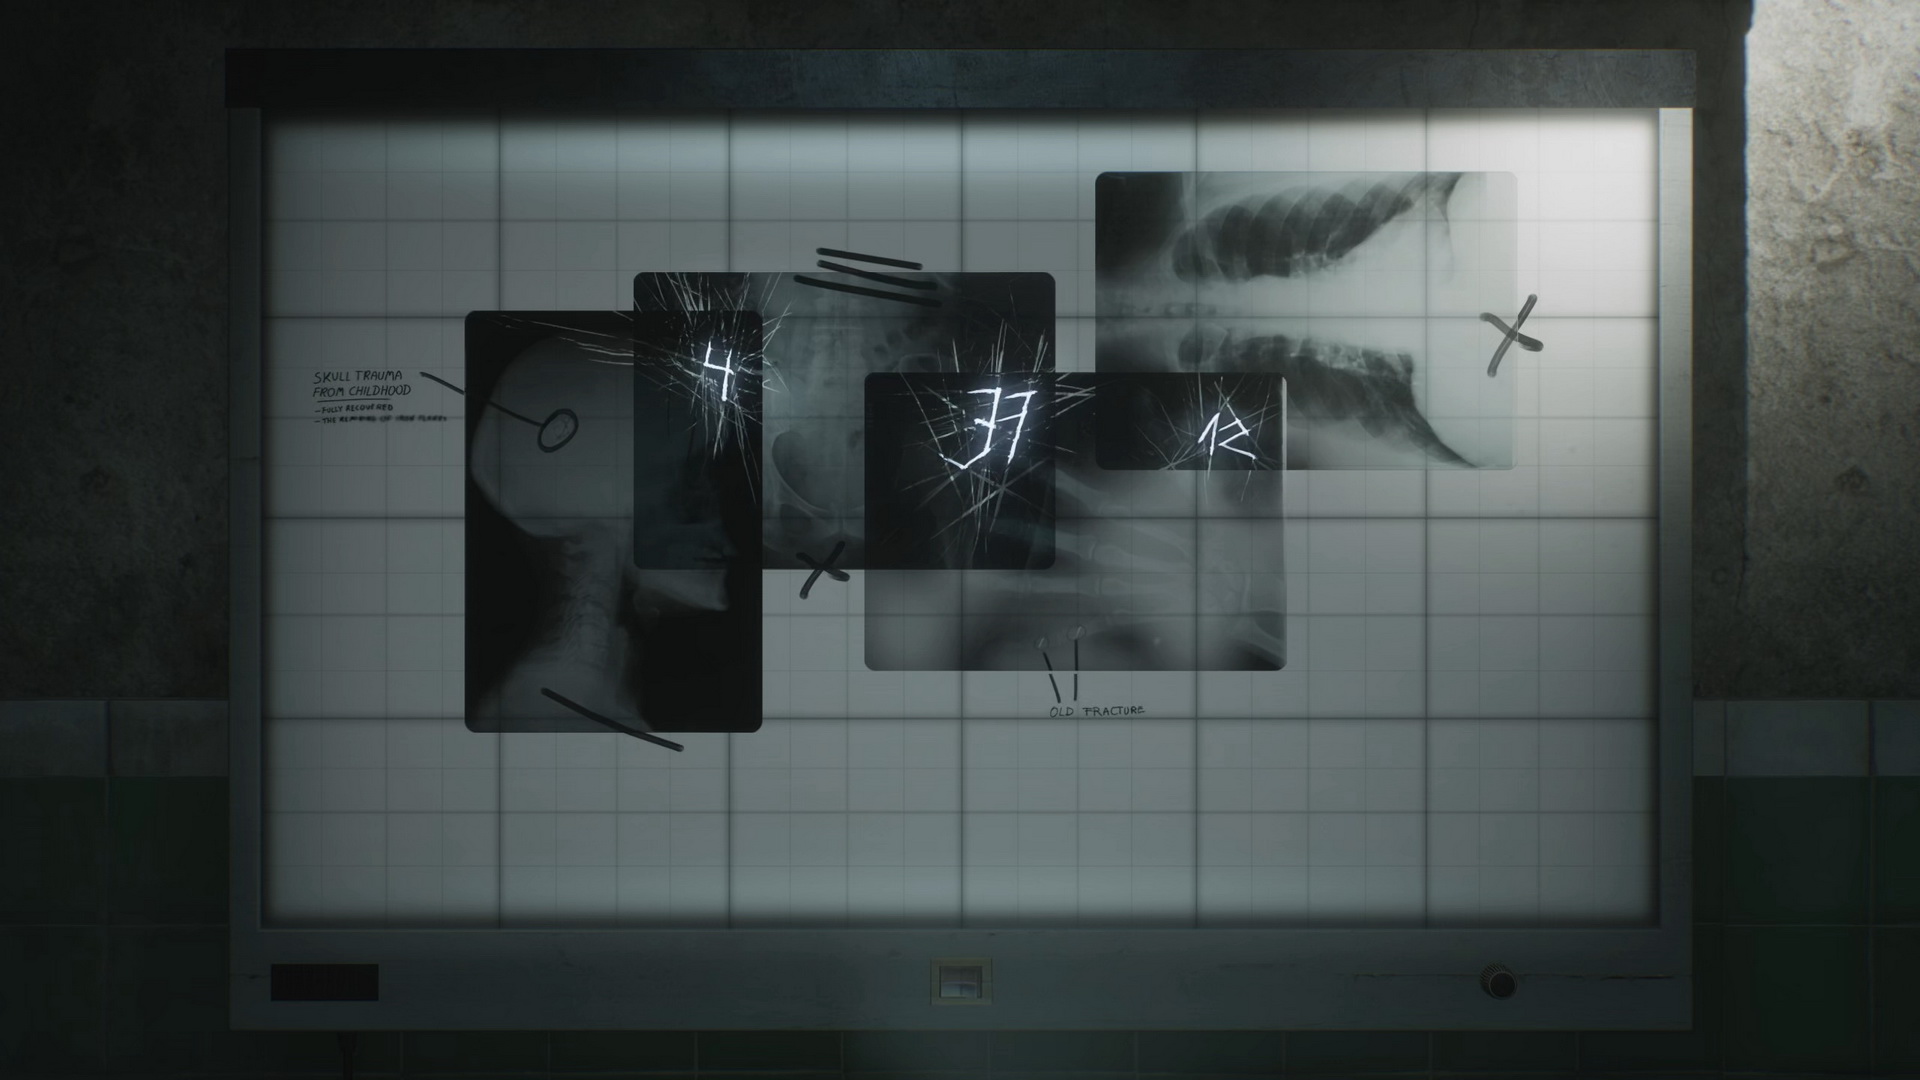
For hard riddle difficulty, there will be fewer markings to guide you, but the radiograph placement will be the same.
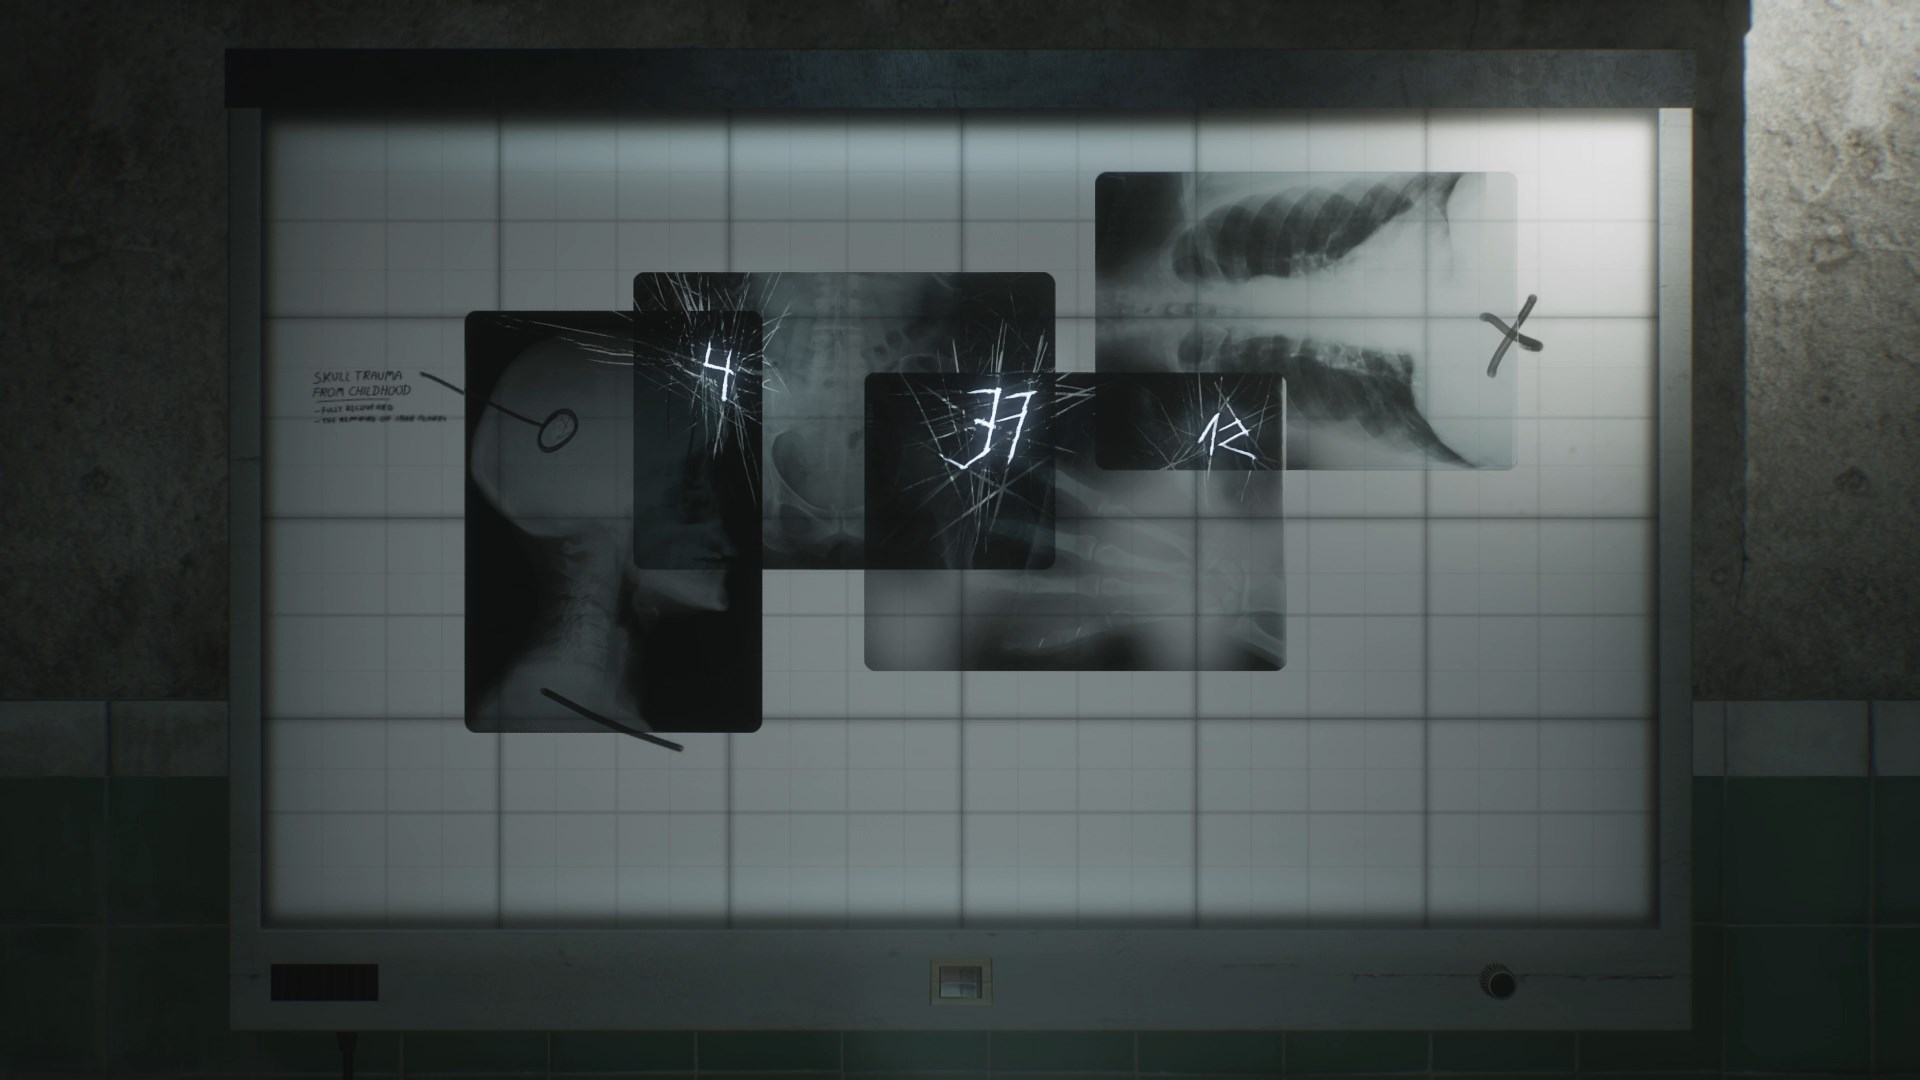
Correct arrangement of the radiographs will reveal the numbers 4, 37, 12. Use them to enter Room D1 on the same floor.
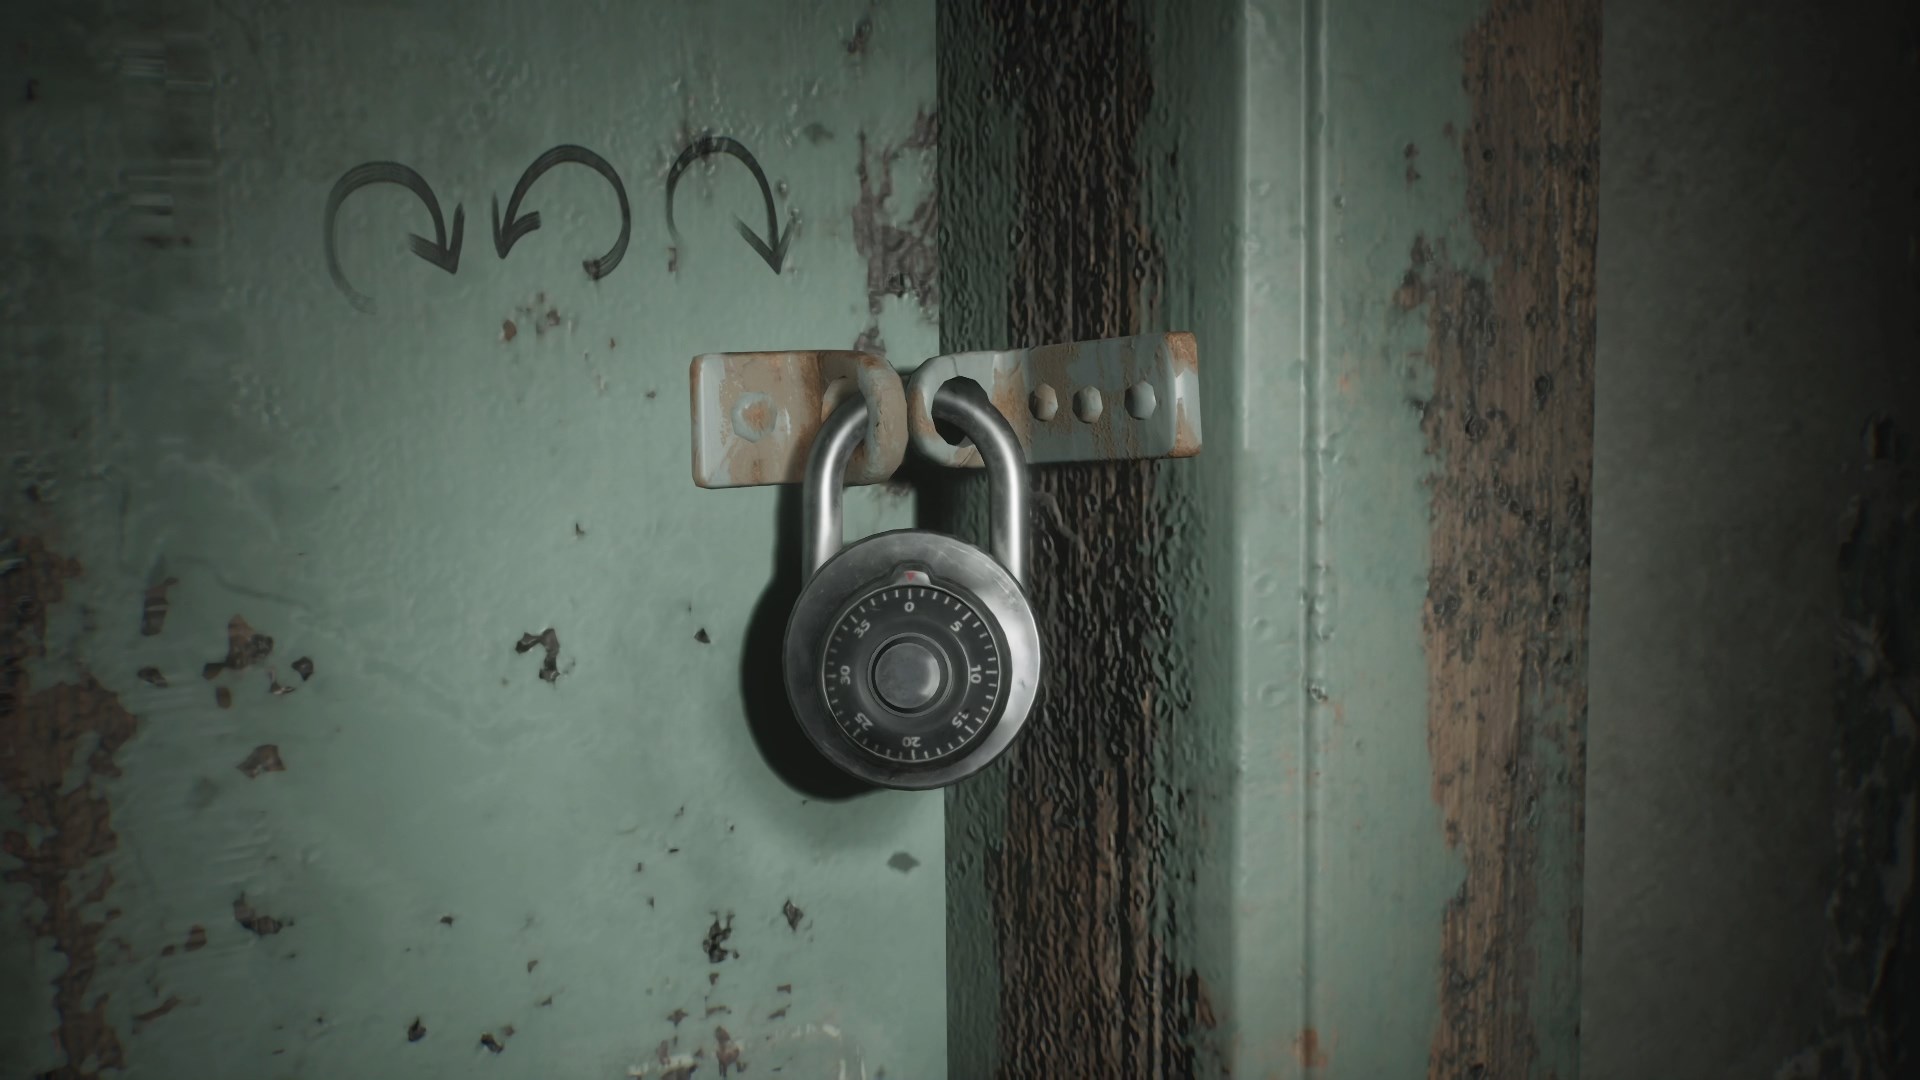
The marks on the door next to the combination lock will tell you which direction you should rotate it:
- Right to 4, left to 37, right to 12. Press the button to confirm.
Inside the room, you will find a 58 Filthy Bracelet on the bed.
Now, you have all three bracelets to solve the hand puzzle in the Director's Office.
Accessing the Roof
Second Floor
You can visit Room C5 one last time to learn that Maria is gone, although this visit doesn't add any point towards the "Maria" ending.
![]()
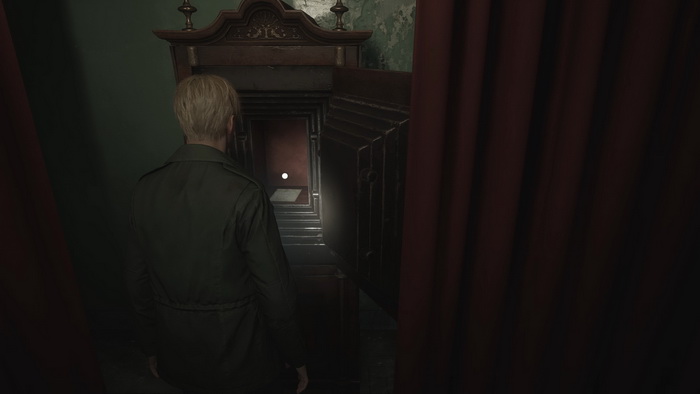
Return to the Director's Office on the second floor.
Puzzle: Director's Office Hand
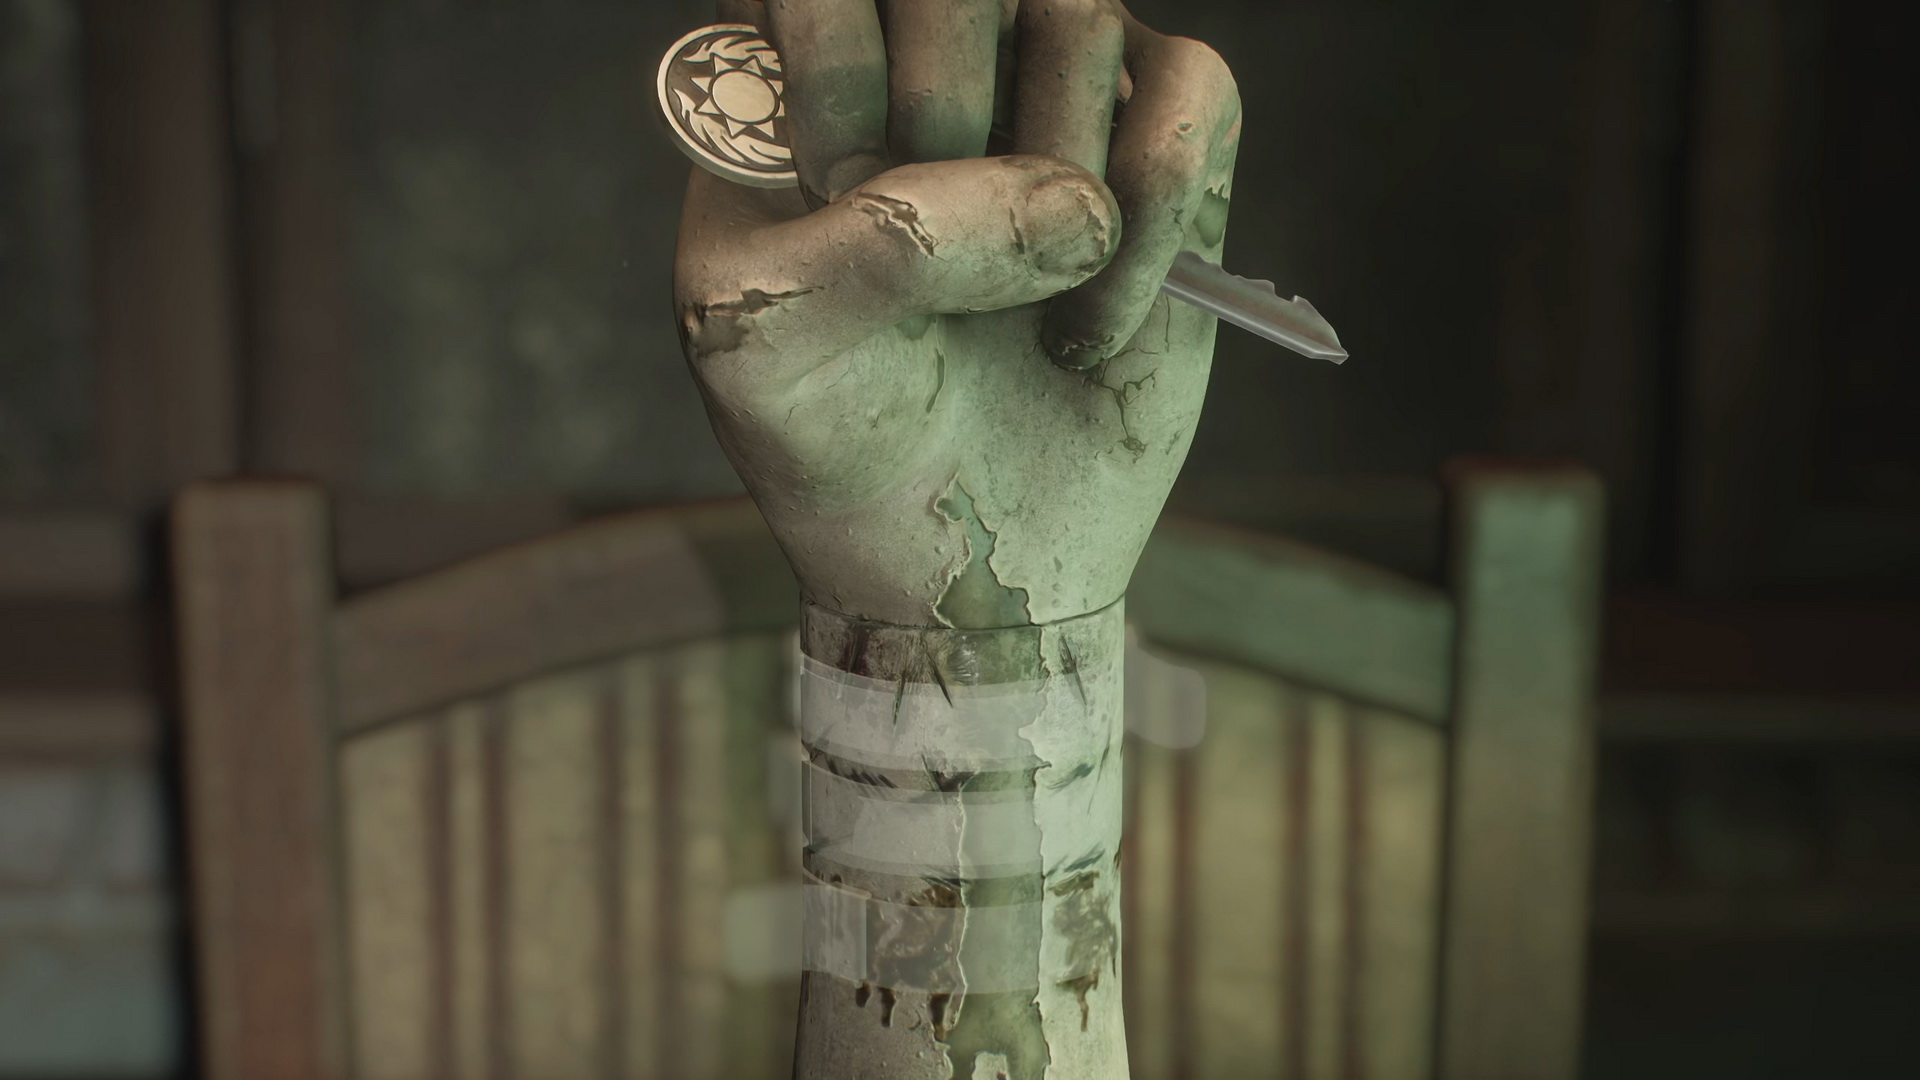
Looking closely, you will see that the stains on the hand differ in nature: blood, black marker stains and dirt. Place the bracelets on the hand and rotate them to match the background in the following order, top to bottom:
- Bloodstained Bracelet
- Marked Bracelet
- Filthy Bracelet
The resulting code is 92, 45, 71.
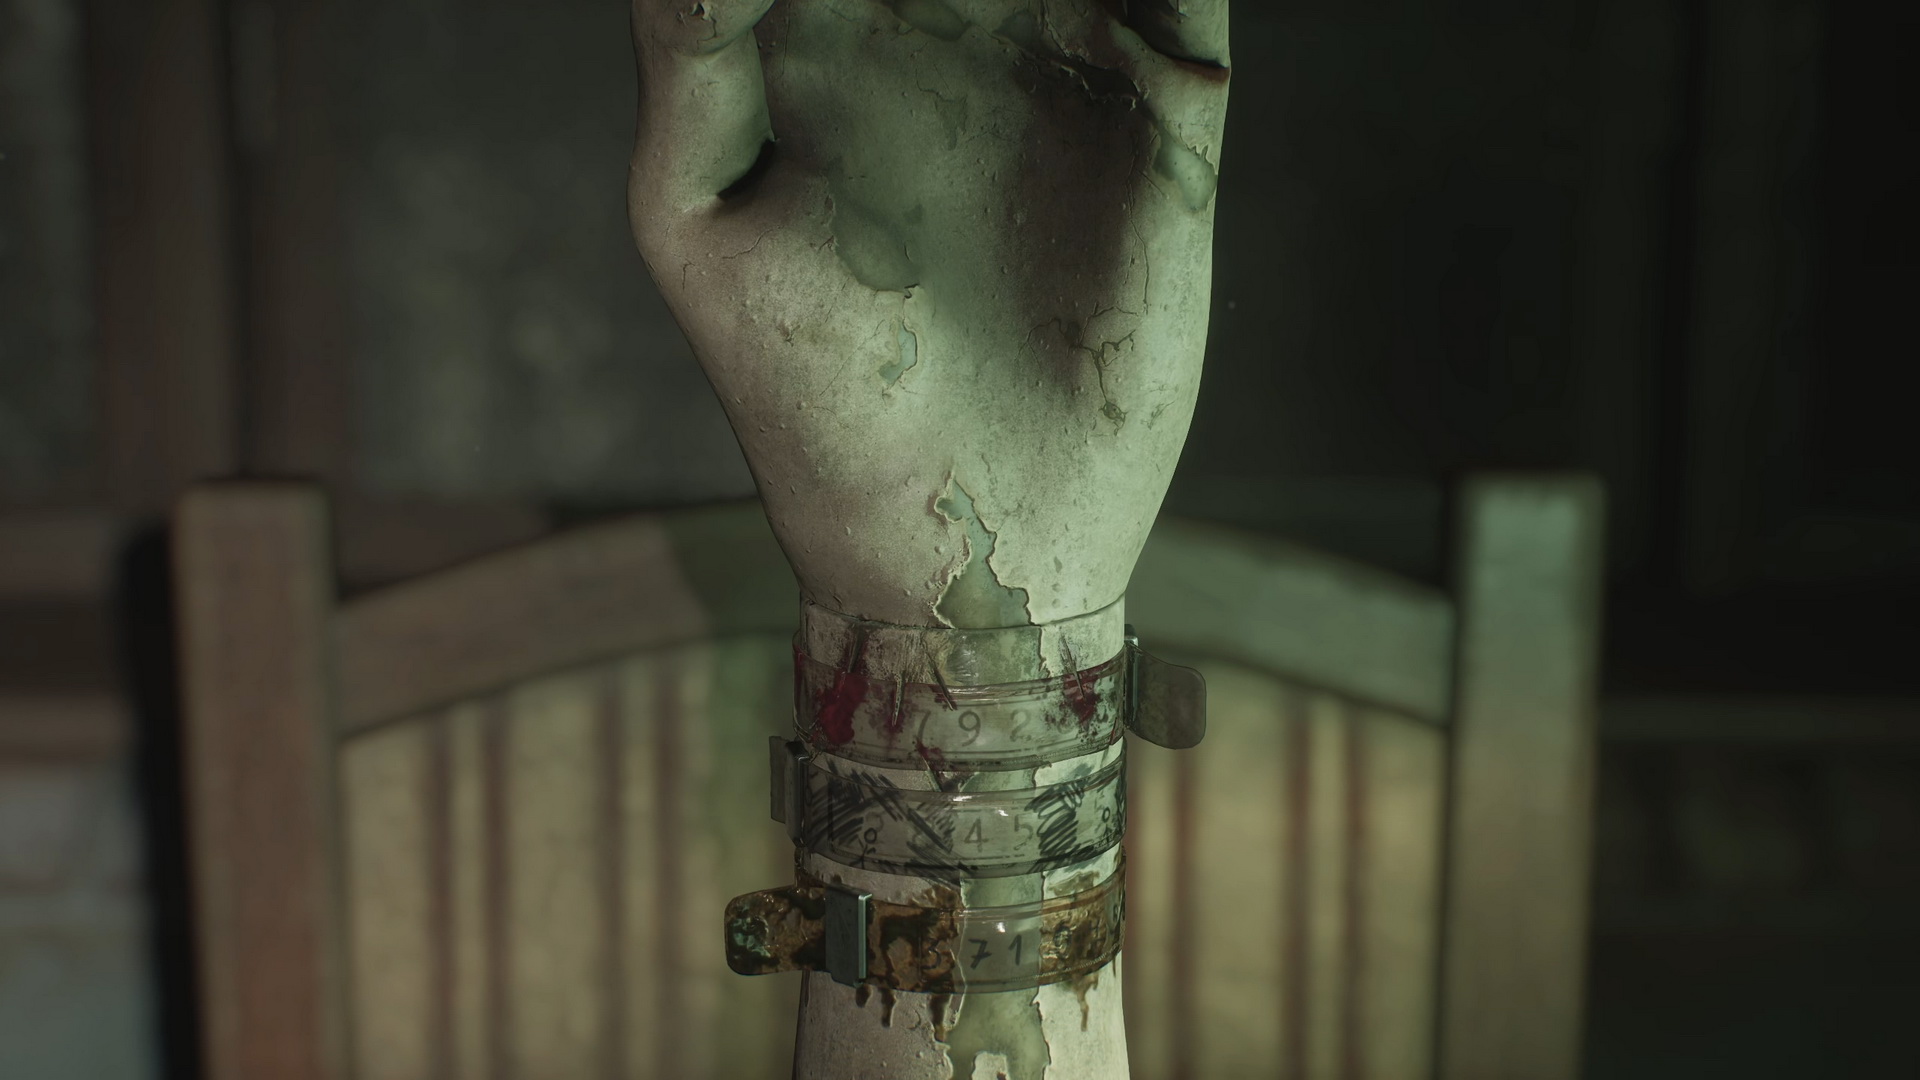
Once you place the bracelets correctly, you will get the 59 Director’s Storage Room Key. Use the key to access the storage room in the office. A missing 60 Safe Button is on the table inside the Director's Storage Room.
Let's solve the final puzzle on this level.
Puzzle: Director's Office Safe
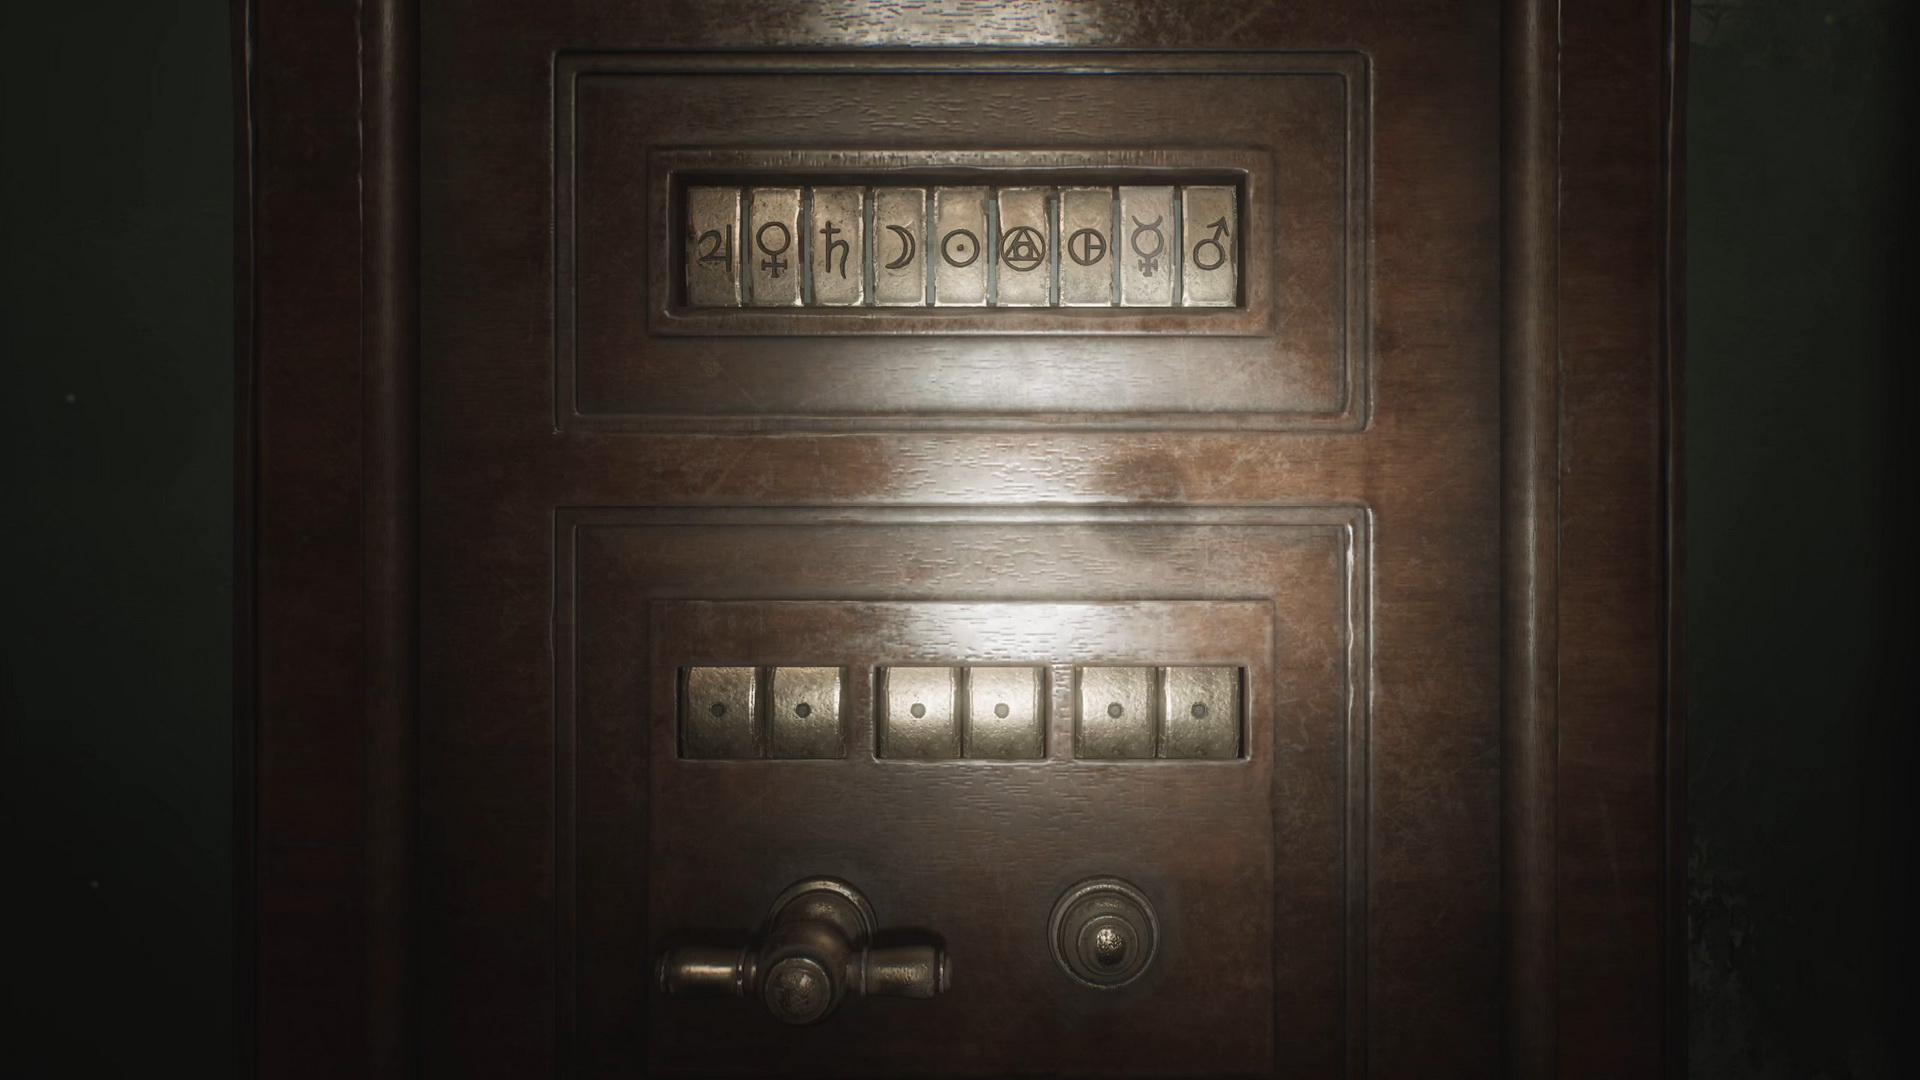
Rearrange the books in the Director's Office's storage to reconstruct the image of a lion and match astrological symbols with the numbers 1–9.
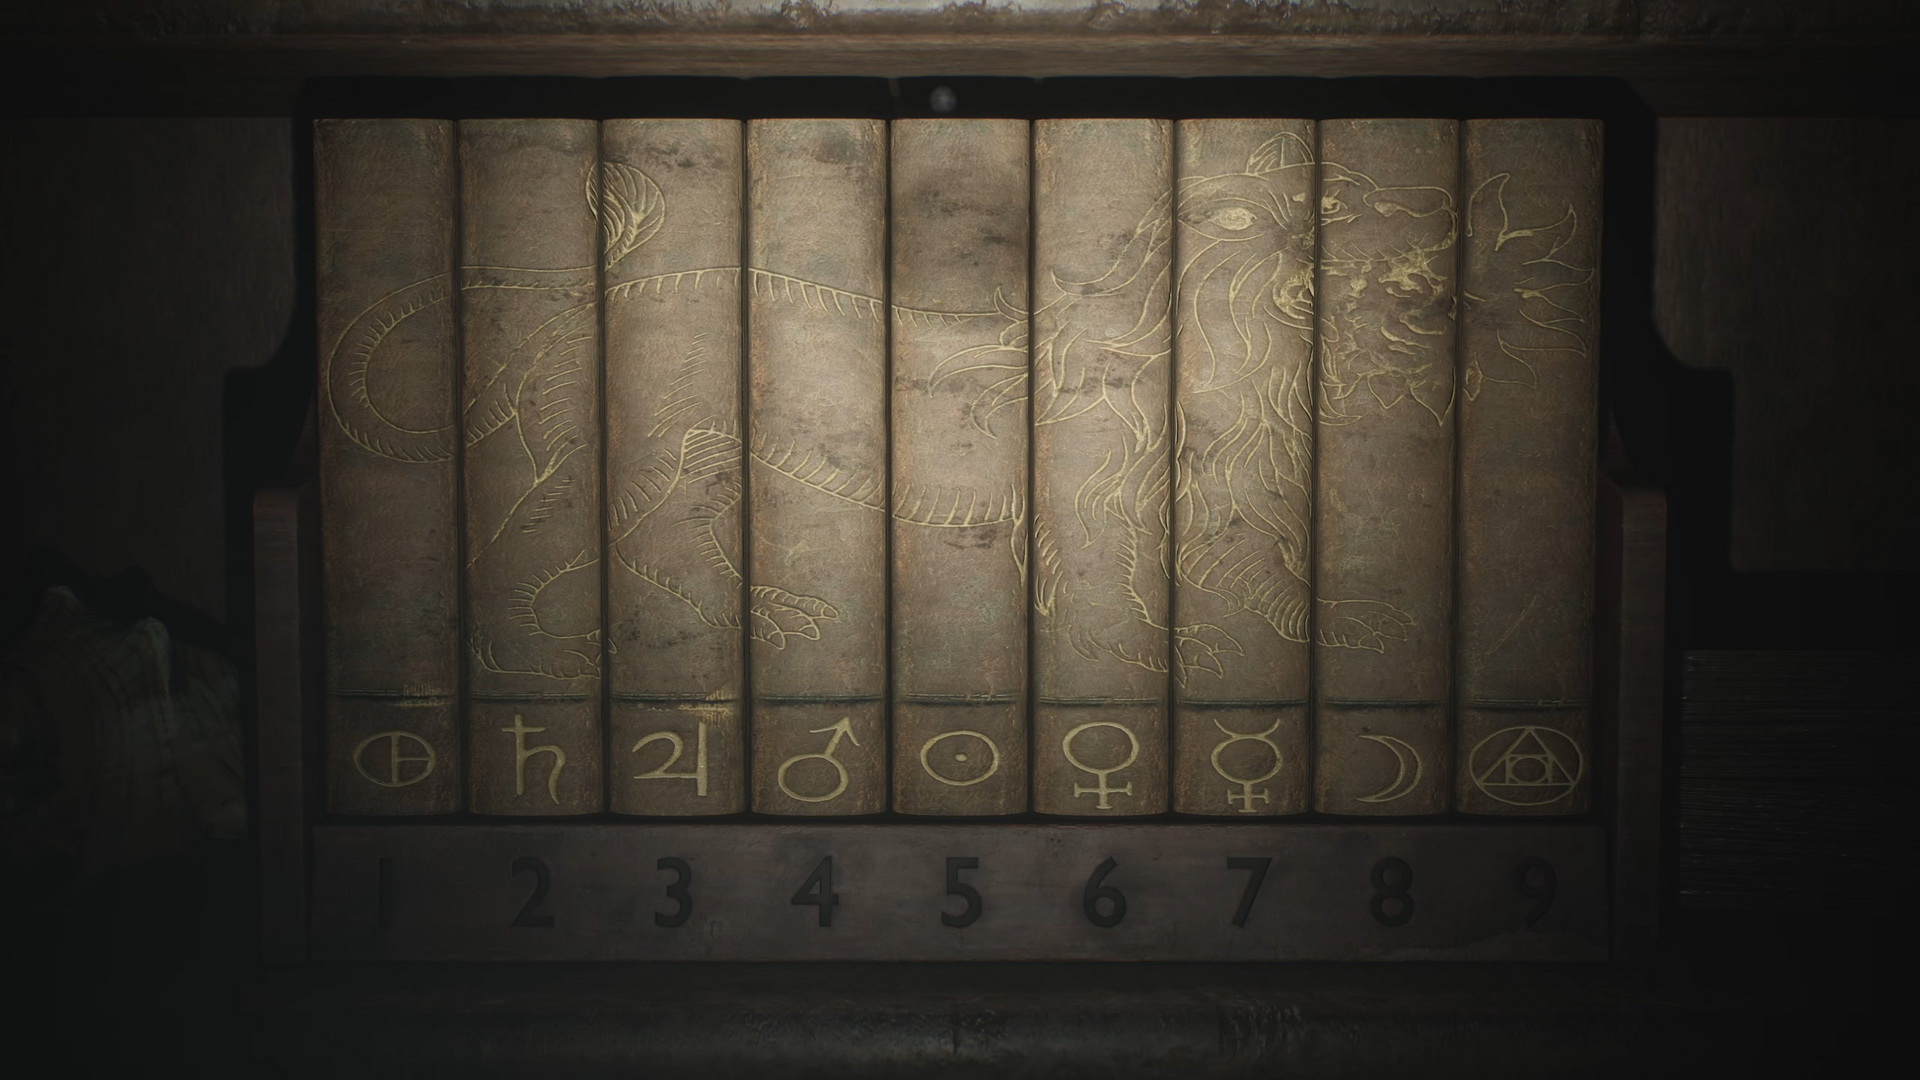
Now you know the cipher and can proceed to the safe. Insert the missing safe button. Remember the code you got after solving the hand puzzle: 92, 45, 71. You will need to enter the same code using the astrological symbols. Press the buttons in the following order from left to right:
- Sixth button
- Third button
- Ninth button
- Fifth button
- Eighth button
- Seventh button
See the image below for easy reference:
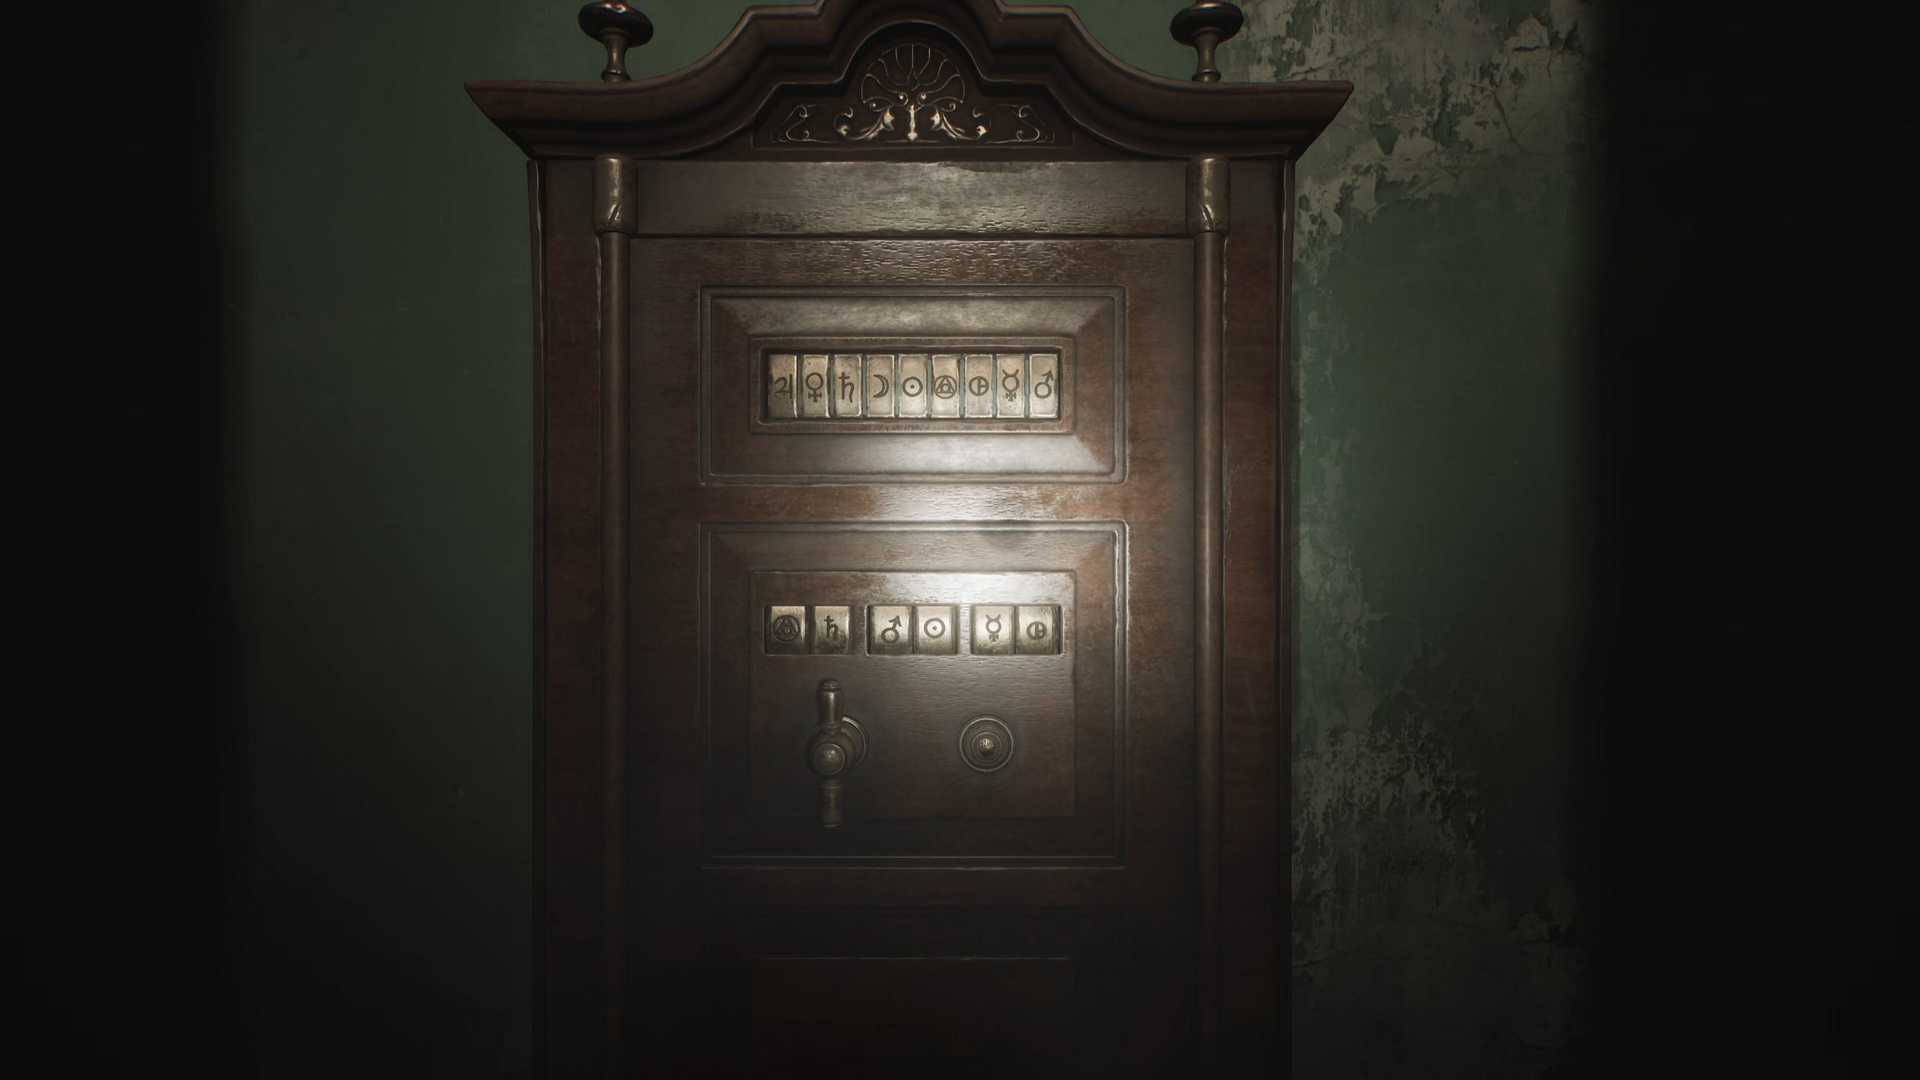
After solving the puzzle, you will get the 61 Rooftop Key. Also, collect Memo #36: Safe Note from the safe.
Take the northwestern staircase to the third floor and then find the stairs to the roof. Use the Rooftop Key to enter the roof.
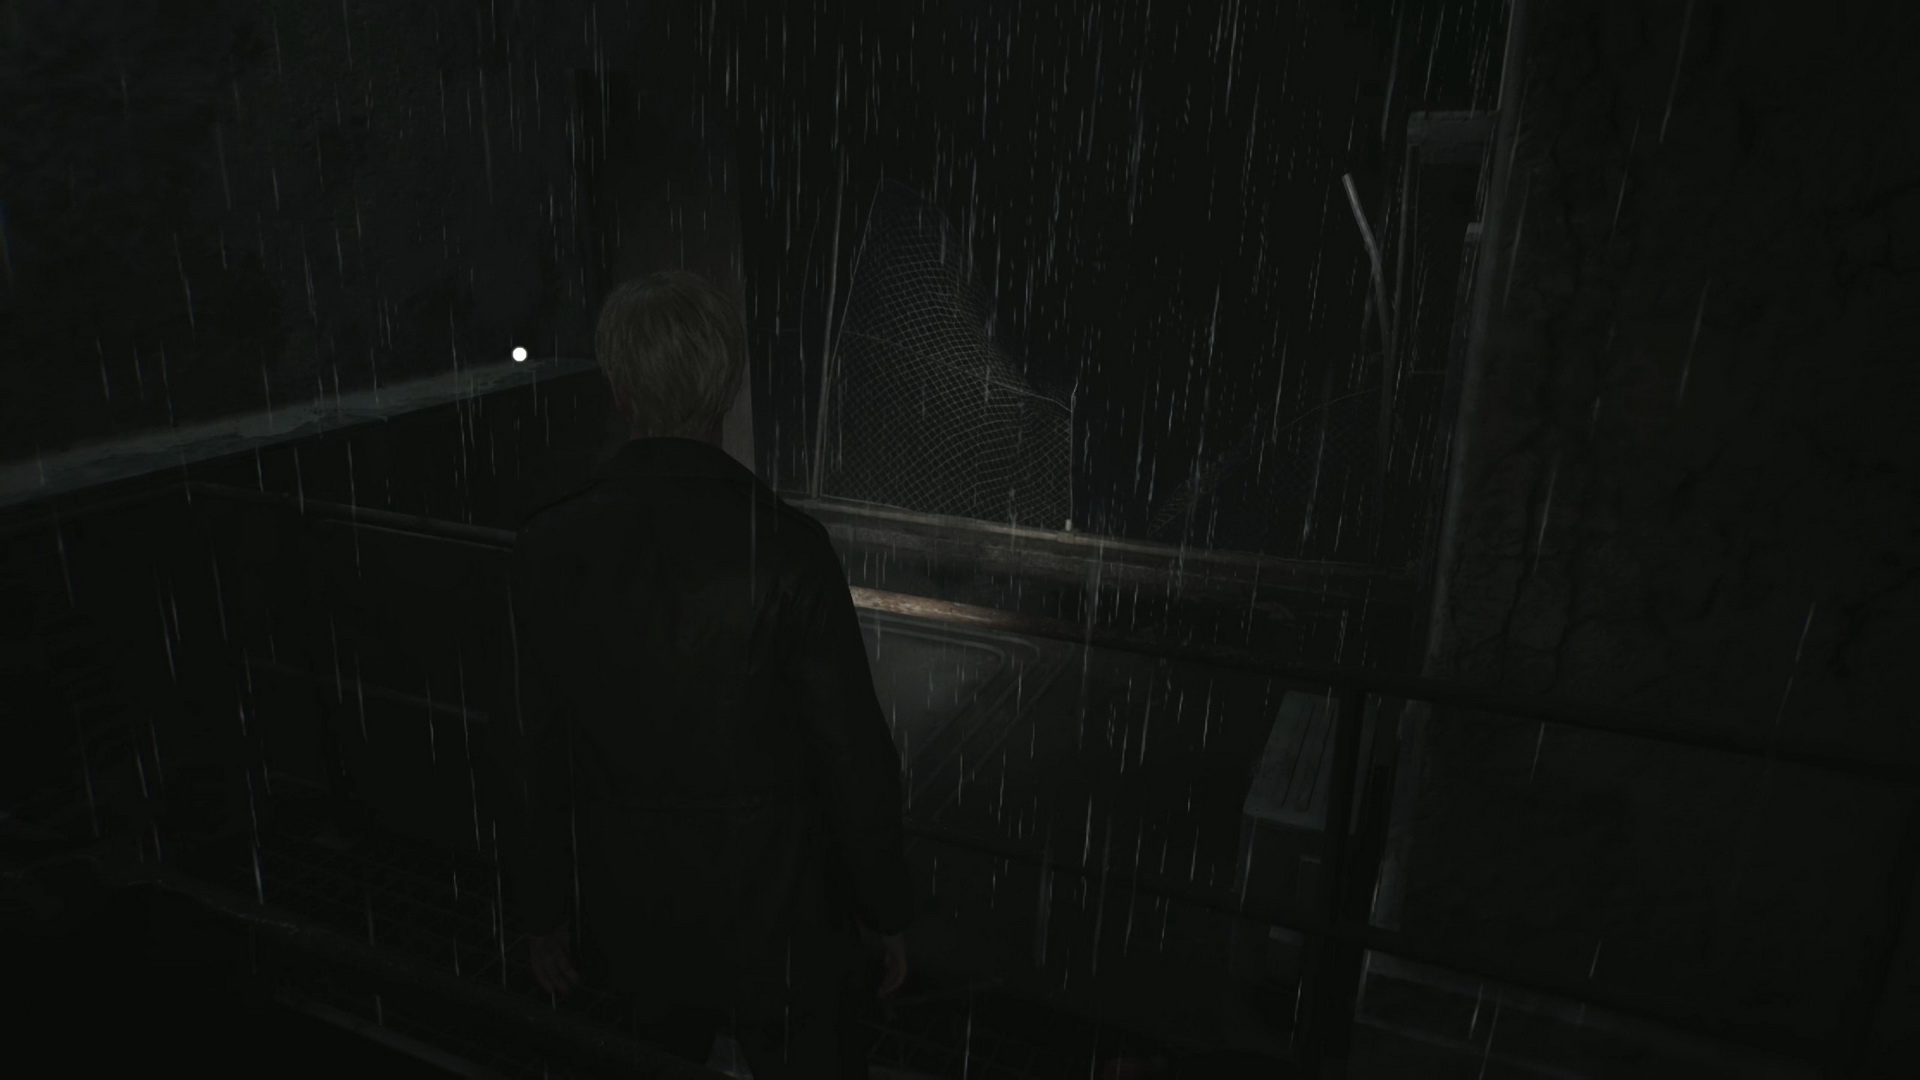
Rooftop
At the right end of a catwalk ahead, you can grab Shotgun Shells. Inspect a broken fence for Glimpse of the Past #14 at another catwalk.
 |
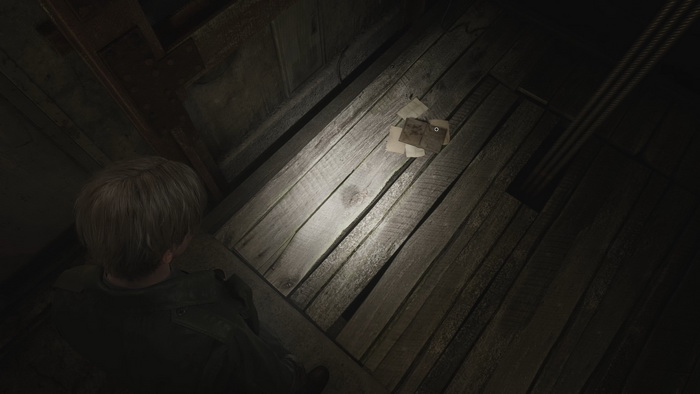
Approach a small room in the corner of the roof and find Memo #37: Page From A Diary on the floor.
After you've read the diary, try to exit the room, but you'll be attacked by Pyramid Head and thrown through the floor.
Third Floor
You will find yourself on the third floor next to the elevator. Another drawing of Laura is on a wall next to a window. Before moving forward, enter the Hydrotherapy Room to collect supplies: Handgun Ammo in the nightstand's drawer, a Syringe in a first aid kit on the desk, a Health Drink in a glass cabinet behind the desk and Shotgun Shells in a drawer in the corner. Return to the corridor and inspect a blood-stained wall behind the door inside Room I3 for Glimpse of the Past #15.
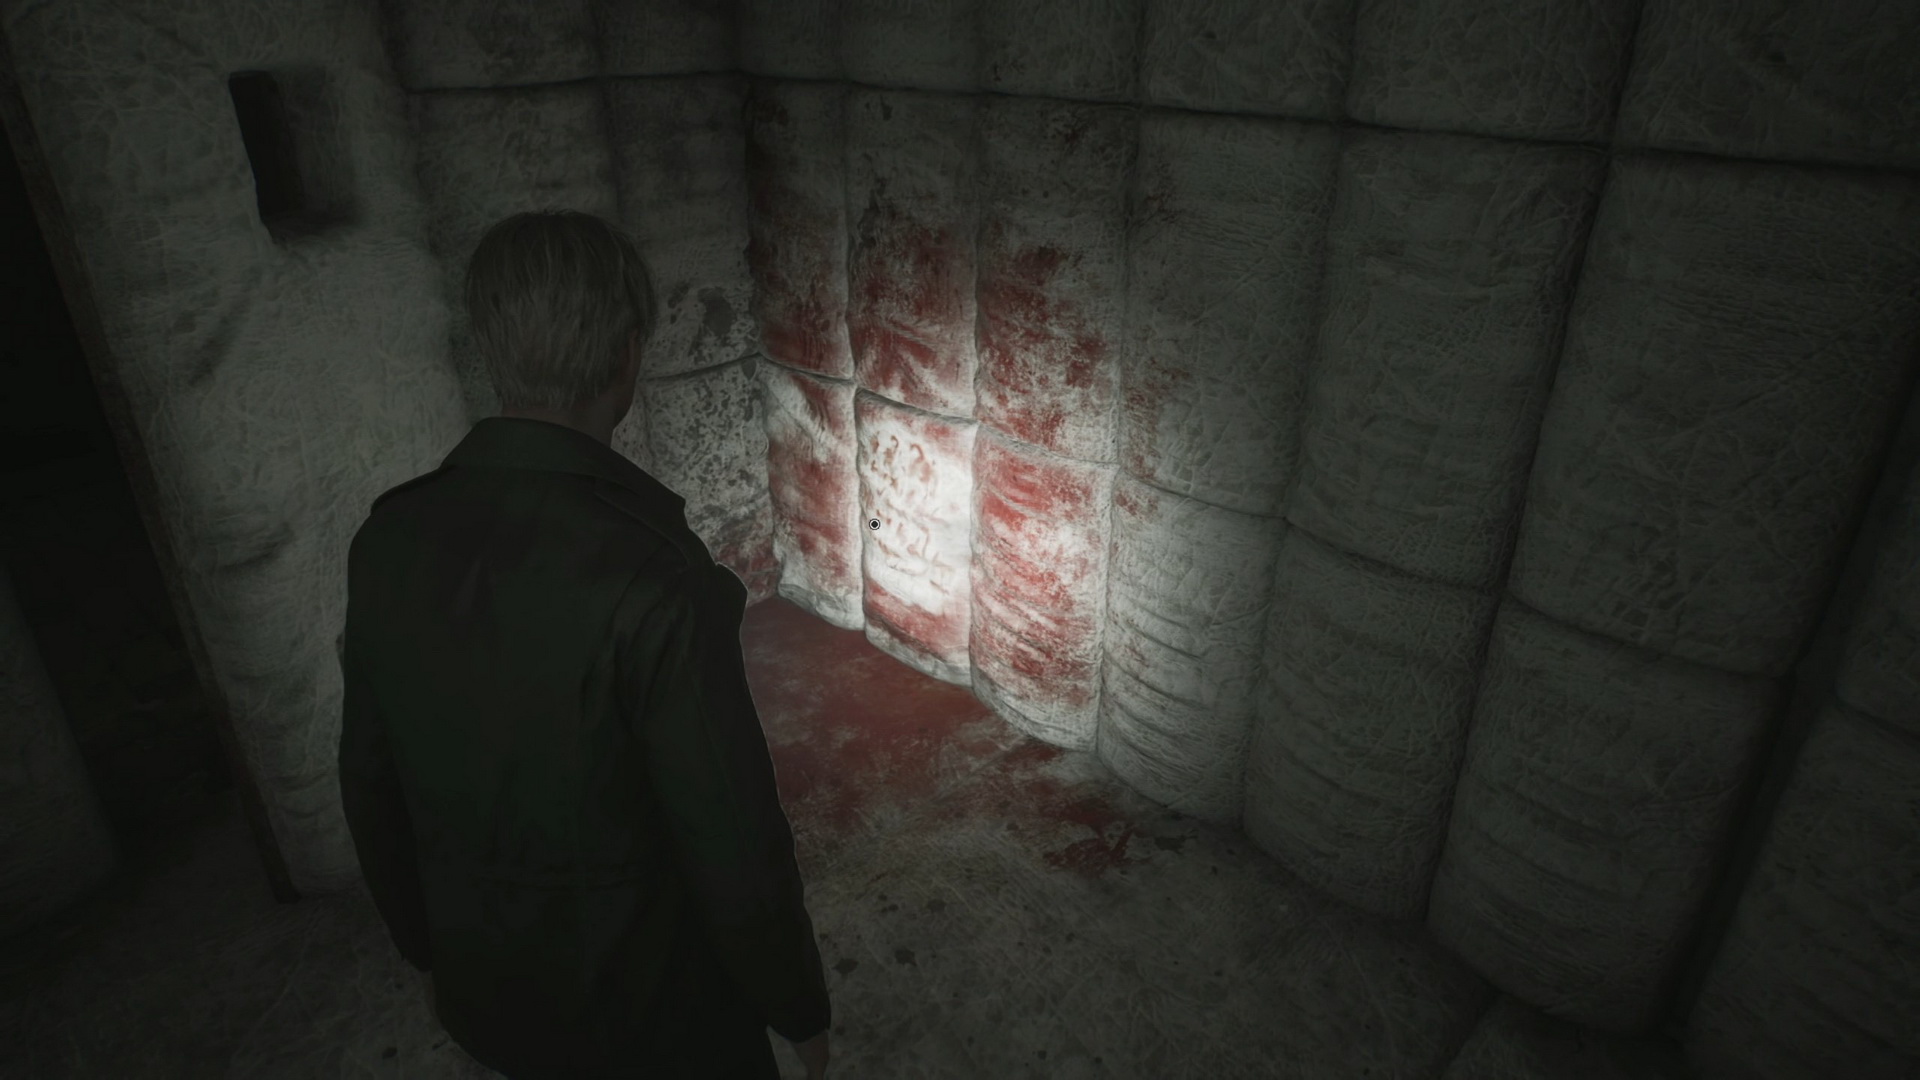 |
 |
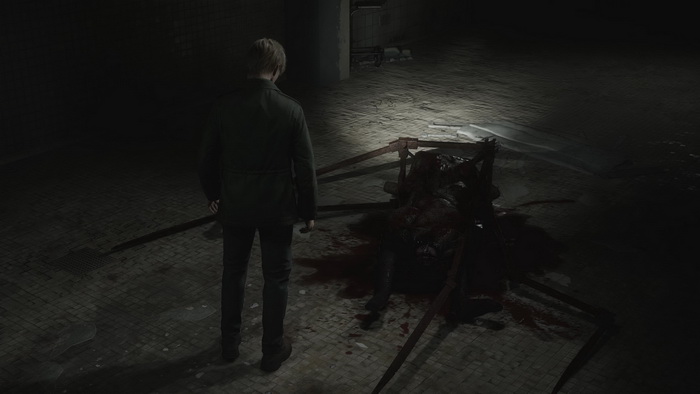
Move through the double doors to find Laura and prepare yourself for the next boss battle.
Boss: Flesh Lip
Laura locks James up in the end room, leaving you one-on-one with the Flesh Lip enemy that descends from the ceiling.
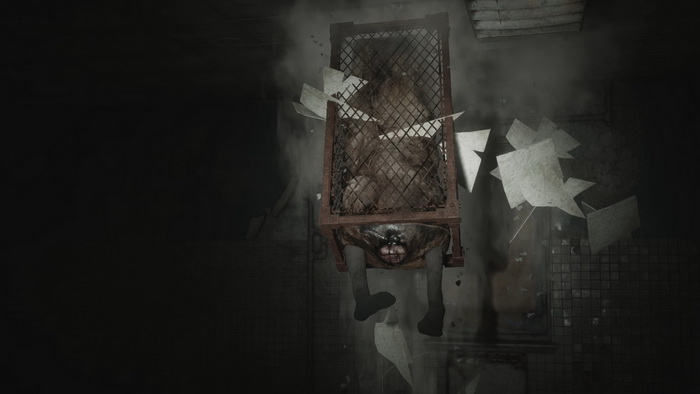
Phase One
Flesh Lip stays hidden above the ceiling during the first phase, breaking tiles to surprise James. The metallic cage around its body protects it from the bullets, so it's no use wasting them like that. Instead, move around the room, avoiding the enemy's attacks and aiming for the arm it uses to hang from the ceiling when it appears. When it drops down, staying motionless briefly allows you to approach the monster and use your steel pipe to attack the cage. You can also shoot the creature from a distance, but you must do it from the sides that are not protected by the metal plate. You can also aim for the creature's legs when it is hanging. Eventually, the cage will get broken, and the monster will transform into its following form.
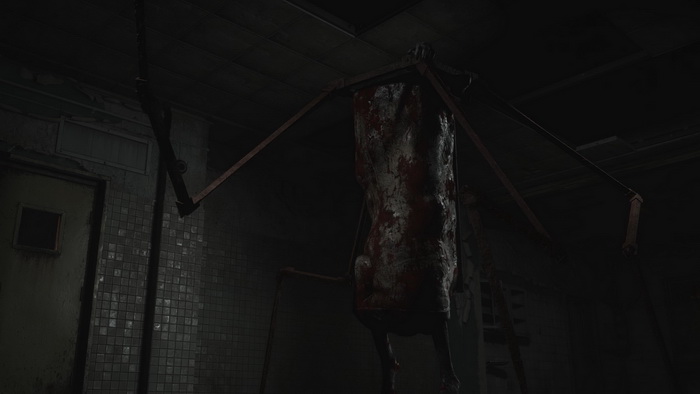
Phase Two
In the second phase, the monster stays on the ground, moving with great speed around the room and attacking with its mechanical arms in wide-reaching multi-hit or spinning attacks, so be sure to dodge a lot. It will occasionally use a sound wave attack to stun James briefly and retract to the ceiling for short periods. The best tactic here is to keep the distance, dodge its attacks, and use firearms to damage the creature. Avoid shooting in its back, protected by a metal plate. The shotgun will serve you well in this battle as it should take 10–12 shotgun blasts to defeat this foe on standard difficulty. Remember to collect supplies around the room to assist you if needed, as you won't be able to grab them after this fight.
After the boss fight, James is grabbed by another Flesh Lip and brought into an alternative version of the Hospital.
| 04. Western South Vale | 06. Otherworld Hospital |