Playing the Game
This section deals with all aspects of playing the game. If you're a newcomer or could use some tips, this is the right place for you. Take a look through the specific sections below to familiarize yourself with the game and improve your combat skills and strategies.
Note: This section was written with the Playstation 2 version in mind, thus you will see PS2 button inputs like "X" come up often. If playing on Xbox or PC, keep in mind your button inputs will be different. Also, other versions come with slightly different menus.
Contents
01. Menus
02. Game Basics
03. Combat Strategies
04. Items
05. Health System
06. Controls
07. Difficulty Settings
01. Menus
This section deals with the various menus in the game, including their functions and how to navigate them.
Main Menu

Opening Movie
Upon loading up the game, an opening movie that serves as a trailer or teaser will begin to play. It'll also play if you stay idle on the main menu for a while. Initially, there will only be dialogue at the beginning and end, with music playing through the rest of the movie, but completing the game will fill in all the dialogue at various parts of the movie. You may also notice a few scenes which aren't featured in the game itself, which are either deleted scenes or intended strictly for this opening.
New Game
Obviously this is how you start a New game, and initially it will be written in white like the rest of the main menu options. Once you beat the game at least once, it'll now be highlighted in yellow, indicating you will be able to carry over any unlockables into the next game, serving as a modern day New Game Plus equivalent. As long as your memory card that has a completed game file is inserted in the first slot, it'll automatically recognize it and have this option highlighted.
Load
Use this option to access the Load menu and view all your save files. If this option does not appear on the menu, you don't have any save files on your memory card. Once in the Load menu, your most recent save file will be highlighted, ready for you to select and load. You can also use the Continue option in the main menu to load the most recent save.
Continue
This option continues from your most recent save and is only available if you have a save on your memory card. To load an older save, use the Load function and locate it. If your latest save is a completed file, using this function will load your Ranking card (as will loading it manually). Use the yellow-highlighted New Game to continue your save file.
Option
Indeed called Option, this leads to the Options menu where you can change a bunch of different settings. Refer to the Options Menu below for more details about what can be changed.
Save/Load Menu
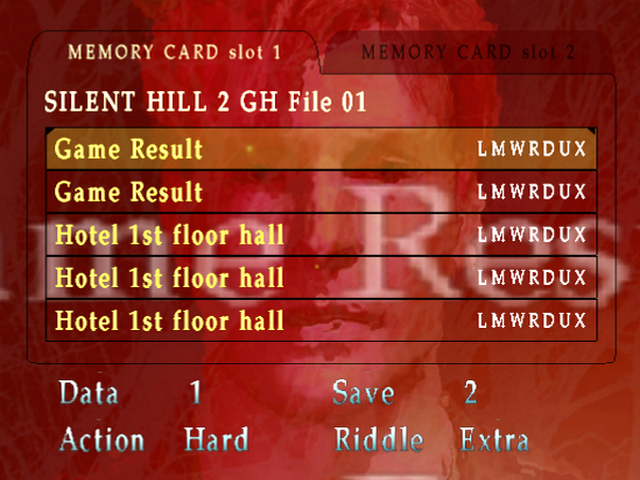
This is the red menu that is used to save and load your game, although technically they are two separate menus for saving and loading, respectively. Beyond that, they operate in the same manner. By using the left and right directional buttons you can toggle what display is shown on the right-hand side. Originally it shows play time of the current game, but toggling further you can view the total play time of your entire file and a list of each ending you have received in your save file. These endings are identified by single letters as follows:
- L - Leave
- M - Maria
- W - In Water
- R - Rebirth
- D - Dog
- U - UFO (Greatest Hits/Director's Cut version only)
- X - Born From A Wish (Greatest Hits/Director's Cut version only)
If you don't see the corresponding letter show up here, you have not received that ending in your current save file.
Saving and Loading
In order to save during the game you'll need to find a save point. These are red square sheets of paper found mostly on walls or tables throughout the game. Examine them to access the Save menu and save your game. To load, use the Load option from the main menu to access the Load menu and choose your file, or simply use the Continue option to load the most recent save file.
When playing subsequent playthroughs, always make sure your memory card is inserted and that New Game is highlighted in yellow before starting a New Game to continue your file. If you have multiple files, I suggest always loading your most recent Game Result save before starting a New Game to ensure you keep everything that you've unlocked in that file.
Options Menu

The normal Options menu where most standard settings can be changed. Refer to below for specific details.
| OPTION | SELECTIONS |
| Brightness Level | Level 0, Level 1, Level 2, Level 3, Level 4, Level 5, Level 6, Level 7 |
| Screen Position | X & Y Coordinates |
| Button Config | Type 1, Type 2, Type 3, Type 4, Type 5, Type 6 |
| Control Type | 3D Type, 2D Type |
| Vibration | Off, Soft, Normal, Hard |
| Auto Load | Off, On |
| Language | English, French, German, Italian, Spanish, Japanese |
| Subtitles | Off, On |
| Sound | Speaker, Headphone, Monaural |
| BGM Volume | ||||||||||||||| (1-15) |
| SE Volume | ||||||||||||||| (1-15) |
Extra Options

This "secret" menu is accessed by pressing L1 or R1 in the Options menu. The following is what can be changed.
| OPTION | SELECTIONS |
| Weapon Control | Normal, Switch |
| Map | Zoom In, Zoom Out |
| Blood Color | Normal, Green, Violet, Black |
| Walk/Run Control | Normal, Reverse |
| View Control | Normal, Switch |
| Bullet Adjust* | x1, x2, x3 |
| Noise Effect* | Off, On |
Note: The game must be completed once to unlock the Bullet Adjust and Noise Effect options, which are normally set to x1 and On by default. Rather than requiring multiple runs, Bullet Adjust x2 and x3 are unlocked once the option is available.
Inventory Menu
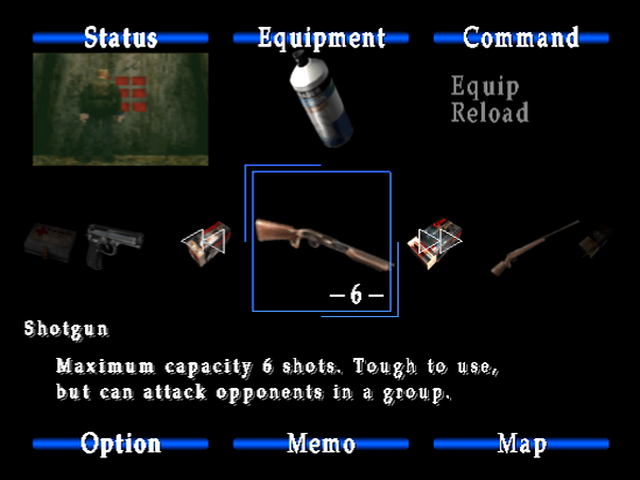
The Inventory menu is where you can view all the items in your possession during gameplay. It is accessed via the Start button and is an extremely helpful menu with many options. Here you can equip and reload weapons, examine, combine and use items, view your health status in the top left screen, use health items, and also visit the Options menu, Memo menu, and view your Map.
Status
The top left corner of the menu is an in-game screen that displays your current health status. Depending on your condition, it may be tinted with colour and show static, or simply look clear. Refer to the Health System section of Playing the Game below for more details on interpreting your health.
Equipment
The weapon you currently have equipped will sit under the Equipment title. If you don't have a weapon equipped, move the cursor over one and select "Equip" from the Command box in the top right.
Command
Use this menu to perform a number of actions for weapons and items. For weapons, equip, unequip and reload. For items, examine, combine and use them here once they are highlighted with the cursor.
Option
Select this to access the Options and Extra Options menus to change various settings. Refer to the Options menus above for what settings can be changed.
Memo
This option allows you to access the Memo menu for a full roster of all the memos you've found throughout the game for quick reference. Memos can be informative to read but also vital to solving puzzles or understanding where to go, so be sure to check through them in this menu whenever necessary. Refer to the Memos section for a full listing of every memo in the game. Keep in mind that not every note is a memo and James won't record if it it's on the more minor side. These additional notes, however, can also be found in the Memos section.
Map
Selecting this option displays the map of the area you're currently in, if you have it. The map is one of the most useful tools in the entire game and should be referenced very often to keep on top of your surroundings. It will tell you where you have and haven't been, pointing out unlocked, locked, or broken-locked doors, points of interest, save points, and so on. To avoid accessing the inventory first, simply press Triangle during gameplay to directly access the map. For more information, refer to "Using Maps" under Game Basics below.
02. Game Basics
This section explains the basics of the game, including general concepts and features to get you started.
Camera
This is a survival horror game and with that comes many untraditional camera angles. Unlike the fixed cameras of Resident Evil, the Silent Hill games give you a little more control. In most areas you can hold the L2 button to focus the camera so that it looks ahead of James, allowing you to see things a little more clearly. You won't always have this option since certain areas are more crafted to prevent you from seeing things – remember that sometimes the greatest fear is what you cannot see – but most of the time L2 will be a huge friend of yours. Additionally, keep an eye out for camera shifts which may point out certain items or environmental details.
Using Maps
Ah, the map – such an invaluable tool. Throughout the game you'll usually find a map for each area you visit. Maps are usually found at the entrance or close by, offering you a chance to get a sense of your surroundings early on. For one area without an official map, James will draw his own as you advance through the area, keeping your Flashlight on so that he can see and keep it updated.
The map truly is your best friend, guiding you on your journey as James marks everything down as he goes. Using a red marker, locked doors are solid lines, unlocked doors are arrows on both sides of a door, inaccessible doorways or blocked off roads or paths are squiggly lines, while save points are filled-in red squares and other points of interest are question marks, circles or underlined locations. As for James, he is represented by the green arrow, pointing towards the direction he faces.
To quickly check your map while playing the game, press Triangle. In dark areas, the Flashlight must be on for James to be able to see it (or find a bright spot under a light). Don't ever be ashamed if you're checking your map countless times in any area, as it's an extremely helpful tool to get your bearings and understand where to go next. It's also extremely helpful for anyone using the walkthrough, as I'll often refer to compass directions for where to go, which is more universal than left and right.
Using the Radio and Flashlight
In Silent Hill 2, you will receive a Radio and Flashlight whether you like it or not, but both are also extremely invaluable tools. The Radio will emit static to warn you of nearby enemy threats, becoming louder the closer they are. This can also attract enemies so you may consider turning it off in the Inventory menu if you wish to sneak around.
The Flashlight is also a vital tool that you will absolutely need to see and use items in dark locations. Along with your Radio it can also attract enemy attention, so feel free to turn it off to lower your profile. Rather than using the Inventory menu option, toggle the Flashlight on and off by pressing the Circle button during gameplay. If you can't seem to pick up an item, make sure your Flashlight is turned on.
Game Concepts
Below we'll go over several principles and concepts regularly involved in playing the game.
Running
Yeah, you may not feel so tough running away all the time, but it's truly the most logical solution a lot of the time, especially in larger, more open environments like the streets of Silent Hill. The less often you're in combat, the less you're likely to take damage. If you get a sense that you can get by an enemy without engaging them, take the opportunity to do so.
Ammo Conservation
This is a very important aspect of all survival horror, where you don't want to go around Rambo style, shooting everything in sight. Compared to other games in the genre there is actually a fair bit of ammo in this game, so you don't need to get too crazy with, but try to avoid using ammo in cases where you can just run past an enemy or there's nothing else to be gained from killing it. Further, be sure to kick enemies when they fall to the ground to finish them off, rather than wasting further ammo or letting them get back up.
Melee Weapons
Although firearms are easier and generally more fun to use, melee weapons deliver a moderate amount of damage and will never run out of ammo or break. If you're ever running a little low on ammo, consider switching to a melee weapon at least for a while to stock back up. The best overall melee weapon in the game is the Steep Pipe, with moderate power and good range. The Wooden Plank is quite weak with more limited range, and the Great Knife while extremely powerful is very slow and hard to use. The unlockable Chainsaw is also powerful but a bit slow to use.
Searching Areas
A very common theme of Silent Hill 2 is searching for items, including key items, weapons and supplies. You'll need to keep a sharp eye to find certain items since they may not be right in your face for you to see, and they don't quite flash either. Be sure to check every door you come across to see if there are any items inside, and pay attention to where James' head is facing since he will stare down items when they're nearby. Do keep in mind he also stares at Maria and enemies, so don't get too hung up on that.
Checking Doors
While many doors will always be unlocked and accessible, you will come across many that will either be locked or have a broken lock. Locked implies it can be unlocked either through finding and using the key, or finding another path and unlocking from the other side. Broken locks imply you will not be able to pass through at any point. These doors are denoted by red squiggly lines on James' map after checking, while locked doors are solid red lines, usually with an arrow indicating which side they're locked from. Additionally, some doors without broken locks just simply won't open due to being blocked or jammed and are denoted the same way.
Memos
Memos are normally known as small notes, usually reminders, but they play a much larger role than that in Silent Hill. Any relevant document or note found in the game will be recorded by James, including puzzle riddles and interesting newspaper articles. After collecting them, you can view your memos by choosing the Memo option in your inventory. Refer to the Memos section for all memos found in the game in addition to smaller notes.
Codes
On your journey you'll find several codes that you'll need for keypads and other types of locks. Once you find codes in memos, they'll always be available for you to reference in the Memo section of your inventory. Even so, a small notepad and pen can be helpful to jot down codes as you'll be finding them fairly regularly.
Nightmare Areas
In certain areas of the game you will go through transformations to the Otherworld, which change the appearance of the area around you, sometimes including the creatures. You'll also encounter many more enemies in Nightmare areas and they tend to be more aggressive and stronger than normal, and they also tend to respawn more often. Although the layout of Nightmare areas is generally the same, the state of certain areas can be completely different, including different doors unlocked, locked, and inaccessible, as well as new and different areas that didn't exist in the normal world. At the same time, new items are found around these Nightmare areas.
Soft Reset
Soft reset is a function used to reset the game to the main menu rather than being forced to reset the console entirely. To do this during gameplay, press and hold Start + Select + L1 + R1 all at the same time. This way you can quickly load a previous save or start a new game if you weren't happy with your current session.
03. Combat Strategies
This section is all about the battlefield, including fighting strategies and general tips. For full details on strategies and recommended weapons for each individual enemy, refer to the Enemies section corresponding to the appropriate scenario.
Targeting Enemies
Silent Hill 2 utilizes an auto-aim or lock-on targeting system. When near and enemy, hold R2 to aim at them and raise your weapon (firearm or melee). Then you'll be able to press or hold X to swing or fire. If too far from an enemy, your weapon will still raise but you won't be locked on. Additionally, you can change Weapon Control to reverse so that you can press R2 to raise your weapon and press it again to lower it after done shooting or swinging, but I recommend keeping this the default.
Shooting/Fighting Enemies
This is fairly standard, however how quickly you are able to get in consecutive bullets or swings will affect how quickly enemies will go down. Sometimes an inopportune reload will turn a three hit kill into five or six hits, and even halting fire for even a second can up the amount of bullets or swings required to down the enemy. To kill enemies the most efficiently with the Handgun, always hold X to fire bullets continuously until they have dropped, and be sure to reload in the inventory after each kill or two, or at least be aware of your clip's ammo count.
Fighting Multiple Enemies
You will often traverse hallways and rooms with multiple enemies and even enemy types moving at their own pace all around you, so it'll be important to manage them accordingly. The Handgun works best for the three most standard enemies (Lying Figure, Mannequin, Nurse), providing moderate power but also movement will firing that helps distance you from enemies behind while preventing an enemy ahead from attacking.
Sometimes things will be too much for the Handgun to properly manage, so don't hesitate to pull out the Shotgun for a quick kill or two and settle things down before switching back. And always stay on top of your clip capacity, counting off as you fire and regularly reloading in your inventory to prevent any surprise reloads in front of enemies.
Kicking Enemies
Kicking is a crucial part of Silent Hill 2's combat. Once you beat down an enemy with a melee weapon or knock it down with bullets, most of the time you will need to kick it to kill it for good. Otherwise it may just get right back up again and keep attacking you. It is usually possible to keep firing at an enemy while it's on the ground to kill it, but it can also just as well get back up during this and it's really a waste of ammo anyway, so be sure to kick every enemy you knock down. Sometimes enemies may die before a kick is necessary, but if the radio is still emitting static, go for the kick.
Pushing Enemies
This is a fairly unique and more subtle feature to Silent Hill 2. Normally in most games when you run into an enemy, they act as a brick wall and completely impede your progress, preventing you from slipping by between them and a wall or some other object. But in Silent Hill 2, running into an enemy will slightly push them in whichever direction you're going. If you wish to slip past an enemy in a narrow corridor, run at the gap between them and the wall and you should start to push your way through.
This is mostly effective on Lying Figures and especially Mannequins, which aren't very aggressive enemies, so you can often get by without taking damage if quick enough. You're more likely to take damage with Nurses, but this can still be a helpful escape strategy, especially if you're surrounded by multiple enemies, which we'll go into more detail below.
Surrounded
Yeah, you've gone and done it – you are completely surrounded. What next? There are a few methods at your disposal here, depending on the enemies and what weapons you have. One very popular method is to bust out the Shotgun if you have it and blast away at whatever's on one side. With such a wide blast, it's not rare that you'll knock down two or three enemies at the same time, creating a hole you can escape from.
Without ammo and late in the game, a swipe from the Great Knife can also accomplish something similar, although it is fairly slow and not as reliable. That leaves another great option which is always available to you – just push your way out. Focus on any potential small gap between two enemies or an enemy and a wall and run at it. Slowly but surely James should begin pushing the enemy slightly out of the way, creating an escape. Even if there are two enemies close to each other and there's only a small gap, you'll be surprised at how effective this method can be.
Escaping Grapple Attacks
Certain enemies have grab attacks which hold your character in place as you take damage. The longer these enemies hold you like this, the more damage will be inflicted. To escape these attacks more quickly, mash the shoulder and directional buttons on your controller. That includes the D-pad arrows plus L1, R1, L2 and R2.
Switching Walk/Run Control
Normally the analog stick will make your character walk ahead, and to run you must hold the Square button as well. This is rather redundant and can be changed in the Extra Options menu. You will be running for the majority of the game, with no real use of specifically walking. So if you wish to run without holding Square, which I highly recommend, press L1 or R1 in the Options menu to access the Extra Options. There, change Walk/Run Control to Reverse. Further, if you ever do wish to walk for whatever reason, hold Square while moving to do so.
Strafing
With 3D Control (tank controls), the player has the ability to strafe and sidestep left and right with L1 and R1. With normal Walk/Run Control, the character will sidestep in the direction pressed, while holding Square and L1 or R1 will strafe at a rate of speed equal to running. Be sure to switch Walk/Run Control so that you can avoid holding Square not only to run but also to strafe instead of sidestep without Square.
Experiment with strafing while playing to get a good feel for it and you may realize how helpful it can be in escaping close quarter encounters. Further, while you can't strafe while shooting, you can sidestep. So do keep that in mind to stay out of danger when in rooms with multiple enemies or while being approached.
Reloading
Badly timed reloads can really throw you off and help enemies deliver a good smacking. This is especially the case in boss fights where you'll be using a lot of ammo at once. To combat this, take note of how many bullets your weapon can hold in each clip, regularly count as you fire in your head, and enter your inventory to manually reload whenever necessary. Find the weapon you're currently using or its ammo and select the "Reload" option in the right-hand Command box. If playing on Beginner you may not have to worry about this as your guns will always automatically reload when you lower them.
Fighting Bosses
In Silent Hill 2 you will encounter and fight several unique bosses, all requiring different approaches. Firearms will almost always be your preferred method of combatting bosses, so do your best to conserve ammo during regularly gameplay and build up a good stock of ammo to give you a better chance in boss fights. Quick coordination is also very important, so get a good sense of character movement and be sure to experiment with strafing to maneuver around bosses efficiently.
04. Items
Throughout your journey in Silent Hill you will find and use many items. This section covers all the different ways you can do so.
Finding Items
Finding items in Silent Hill 2 is generally no problem, but if you're not comprehensive you may just miss that one key item you need to advance. All it takes is to miss one small room, an item in a far corner, or having your Flashlight off to miss an item you normally might've seen. Plus even if you see an item in the dark you won't be able to grab it if the Flashlight is off. Do always remain attentive and further, take note of things such as suggestive camera angles or changes and that your character will also turn their head towards any nearby items (as well as enemies and Maria for James, so learn to discount these moments).
Using Items
Normally this should be common sense, but there's different ways to use certain items. Some items like keys will be used automatically upon checking doors, while other items will require use from your inventory, and some absolutely must be combined with others first. Refer to below for for specific details.
Keys
Around half of the key items you'll find will be keys, so you'll get used to dealing with them very quickly. Door keys are the most common and simply require walking up to the door where used and pressing X to unlock it, upon which it will have no more use and leave your inventory. As for other keys such as for padlocks, you must use these keys from your inventory while standing in front of the corresponding goal. Sometimes when an area requires two keys you can save time by combining them in your inventory and then using them, but this is not mandatory. For more details, view Combining Items below.
Other Key Items
This includes any item crucial to advancing that isn't a key, such as a square plate, a ring, a coin, and so on. Unlike most keys, these items must be used from your inventory while standing in front where you want to use them. When using multiple items in one spot, combining and then using them will save time (and is required on rare occasion), but isn't always necessary. Read Combining Items below for more details.
Combining Items
Combining items is a new feature in Silent Hill 2 and can be used in two different ways. One is literally combining items together to make some form of mixture with them all, and the other is simply to use multiple items at the same with without actually merging them (such as using two keys together for the same box). While the latter is not required where applicable, it does save you from monotonous menu navigation. While being a good time saver, combining multiple items together will actually be compulsory on two occasions during the game, so it's important to understand how to do it.
First, stand in front of your target and enter your inventory. Find the first item you plan to use, select it and choose "Combine" in the Command prompt. You'll see a small green icon of the item in the bottom right indicating it being ready for a combination. You can now use the second item if it's a two item combination, or combine the second and use the third if using three items. Note that you can also combine the final item and add its icon too, but it's not necessary. Once all but the final item are combined, simply use the final item to close the loop.
Examining Items
Certain items in your inventory will have an additional "Examine" option, which allows you to look more closely at it. Sometimes that includes a close-up image or sometimes James may describe additional details that may clue you in to where to use it. So if you acquire an item you're not quite sure about, check if it has the Examine option to learn more information.
05. Health System
This section deals with all things health-related, including the health status display, health supplies and healing.
Health Status
In the top left corner of the Inventory menu is a small real time screenshot that displays your health status. It can be tinted a certain colour and contain static to indicate your current status. Refer to below for what it all means.
- Green Tint: Excellent Clear:
- Good Clear with minor static: Okay
- Clear with major static: Bad
- Faint Red Tint with static: Very Bad
- Colourful Red Tint with static: Close to Death
Additionally, your controller will serve as a warning by vibrating once you reach red status.
Health Supplies
Over the course of the game you will find different types of health items to recover your status. Health Drinks are the most common and are found in high frequency, while First-Aid Kits are still quite common and Ampoules are very rare. These items recover a quarter, half, and your full health, respectively. Refer to the Weapons and Supplies section for each scenario for more details on these items.
Recovering Health
After taking enough damage from enemies, play it safe and recover your health from your inventory. For the most part you can take quite a beating before you're truly under the threat of death, but do stay on top of it by checking the status screen in your inventory, and do pay attention to your controller if it's vibrating – it serves as a warning that your health is getting low, and the stronger you feel it the closer you are to death.
To recover health, enter your inventory and scroll to your health items (Health Drink, First-Aid Kit, Ampoule). Select the one appropriate for your current status and "Use" it from the Command prompt, using more than one if needed. For heavier wounds, consider using a combination of First-Aid Kits and Health Drinks for efficiency. Also keep in mind that each time you enter and exit your inventory, the screen will fade in and out while the action is still going on, so do be sure to escape from enemies first before entering your inventory to prevent any surprise hits while you can't quite see your character yet.
06. Controls
Refer to the tables below for a full list of controls and functions, while below we'll go into detail about control types and other control options that can be adjusted.
PS2 Controls
| CONTROL | FUNCTION |
| D-Pad | Menu navigation |
| Left Analog Stick | Character movement, Menu navigation |
| START | Open inventory, Skip scene |
| SELECT | Pause game |
| X | Accept, Examine, Attack, Stomp or Kick |
| Square | Run, Guard |
| Circle | Cancel, Exit menu/puzzle, Toggle Flashlight ON/OFF |
| Triangle | Cancel, Quick Map |
| L1 | Sidestep left |
| R1 | Sidestep right |
| R2 | Ready weapon |
| L2 | Position camera behind character |
| L2 + Right Analog Stick | Look in all forward directions |
| L1 + R1 | Turn 180 degrees |
| Start + Select + L1 + R1 | Soft Reset |
PC Controls
| KEYBOARD | FUNCTION |
| Left (arrow) | Turn Left |
| Right (arrow) | Turn Right |
| Up (arrow) | Move Forwards |
| Down (arrow) | Move Backwards |
| A | Step Left |
| D | Step Right |
| Space | Action |
| ESC | Cancel |
| P | Skip/Pause |
| Left Shift | Run/Guard |
| S | Search Mode |
| I | Inventory |
| L | Light On/Off |
| M | Map |
| H | Use Health |
| F | Aim Lock |
| E | Next Weapon |
| Q | Prev Weapon |
| R | Reload |
| ~ (tilde) | Un-Equip Weapon |
| F5 | Quick Save |
| F9 | Quick Load |
Control Type
There are two types of control in Silent Hill 2 that dictate how you control your character: 3D and 2D. Refer to below for a full description of both and set your desired style in the Options menu.
3D Type
3D is the default control type and also what's more widely known as tank controls. With this type, where your character is facing is always of prime importance to how you move around. Pushing the left analog stick forward will move your character in the direction they are facing, no matter where the camera itself is facing and regardless of any camera change. Holding left and right all the way will actually stop your character and turn them on the spot somewhat like a tank, but to actually turn you must keep forward momentum while slighting turning left or right, while holding down will back your character step backward.
To turn around or make very sharp turns, you must generally stop, turn your character and head in the new direction. However you can quickly turn your character around with a press of L1 and R1 at the same time while standing still. Use this to your advantage to speed things up when you want to change your direction. 3D default control type of Silent Hill 2 and I recommend you stick with it since the game is mostly built around it. But if you're finding it a bit too difficult to adapt to, try 2D, described below.
2D Type
2D works with a whole lot more freedom than 3D, allowing you to move your character instantly in whatever direction you push the analog stick, in correspondence to where the camera is currently facing. Because movement is now completely free, there is no need for strafing or quick turn options. Why would anyone not use this type of control instead? Because it is dependent on where the camera faces, and every time the angle changes you will have to change your directional input. This can become rather annoying and unsettling since there are a lot of camera angle changes and it can really throw you off, especially in moments of panic. Feel free to give it a try and see if it's for you, especially if tank controls are too foreign for you, but for most people I recommend just sticking with the default 3D control.
Extra Options
To access the Extra Options, first you must go to the Options menu and press either L1 or R1. It's somewhat hidden but not much of a secret as it's mentioned in the instruction booklet. In this menu you'll be able to adjust a whole bunch of control related options, along with a few extra features. Keep in mind a few of the extra features are only unlocked upon beating the game.
Weapon Control
Normally you must hold R2 to raise your weapon and press X to swing or fire. Switching this however, turns it to a toggle mode where you'll only need to press R2 to raise your weapon and press it again to lower it. I recommend leaving this one as is but if it interests you, go ahead and try it out.
Map
Here you can change how the map is displayed by default every time you open it up in-game. Normally it always starts zoomed in on your current location, however switching it to Zoomed Out will display the whole area upon opening your map, where you can then press X to manually zoom in. This is probably best left on the default Zoom In, since you'll mostly be using the map for your more immediate surroundings. You can always use the analog stick to move around the map and manual zoom out anyway.
Blood Color
Normally blood will be coloured in a natural red, but if you want to play around for kicks and giggles you can change it to green, violet or black right here. I'd suggest keeping red for your first playthrough to keep things serious and as intended, but feel free to have fun on additional runs. Violet especially looks quite nice.
Walk/Run Control
This is a very relevant control option as it affects whether you will be required to hold Square to run, and you will be running a hell of a lot. Normally you will only walk by moving the analog stick, while holding Square will let you run. But switched to Reverse, you will now run with the analog stick on its own, while also holding Square will now allow you to walk. I highly, highly recommend changing this to Reverse since it'll speed things up and avoid you having to hold Square for 90% or more of the game. This option also affects strafing/sidestepping. Normally you will sidestep with L1/R1 and hold Square while doing so to strafe. With Reverse, you will strafe with L1/R1 and must hold Square to sidestep, unless you're aiming in which you can only ever sidestep.
View Control
This option controls how the camera is positioned with L2. You'll normally have to hold L2 to center the camera behind your character and continue directing it ahead, since it will either return to where it was or find a new position aiming at your character rather than ahead. With this option switched, simply press L2 will keep the camera aiming ahead, while pressing it ahead will return to focusing on where you area. I'd probably just keep this at default and see how often you're using L2 and if it's worth it to you to change, but personally I don't mind just holding it in cases where I want to see ahead.
Bullet Adjust
The game must first be completed once to unlock this option, whereby you'll be able to adjust the bullet count to x2 or x3. This doubles or triples the amount of ammo you'll receive from every ammo pickup found in the game. Instead of 10 Handgun Bullets, you'll get 20 or 30. For Shotgun Shells it'll increase from 6 to 12 or 18, and Rifle Shells from 4 to 8 or 12. It's a great reward for beating the game as it'll allow you to more or less shelve melee weapons on later playthroughs, making the game easier in the process. It's also essentially required to achieve a 10-star ranking, giving you enough ammo to kill so many enemies by shooting.
Noise Effect
You may notice that during gameplay the screen looks quite grainy or "noisy" rather than clear and smooth, almost as if you're watching an old film. This is the Noise Effect set to on, providing a visual look similar to an old horror movie to help set the atmosphere. Once you beat the game once, you'll unlock the option to turn it off in this Extra Options menu. Honestly, while a cool little niche, even as a huge horror fan I have to say I much prefer the effect turned off cause the graphics look a lot better that way. If you like it, great, keep it on, but it can always be turned off here once unlocked.
07. Difficulty Settings
Before starting a new game in the main scenario of Silent Hill 2 you will be prompted to choose two different difficultly levels: Action Level and Riddle Level (or only Action Level in the sub scenario). Obviously tailoring your experience, refer to below for full details of what each difficulty level entails.
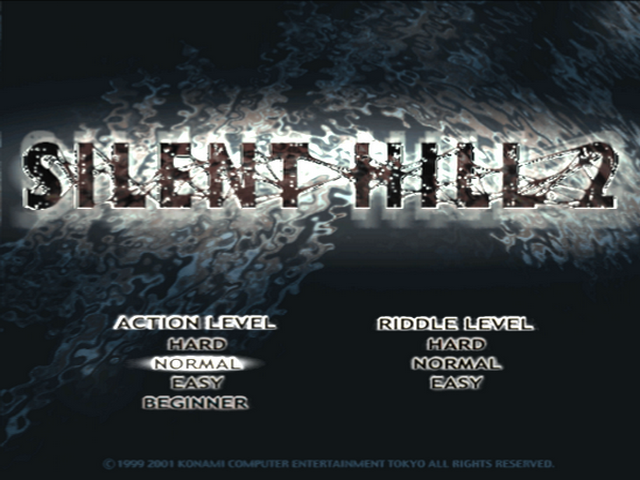
Action Level
Sets the difficulty level of combat and action, such as enemy speed, power, health and general aggression.
Beginner
This selection is only intended for those completely new or foreign to the survival horror genre. It is impossible to die outside of one special attack during the first boss fight and enemies will drop to the ground after only one or two hits from your weakest weapons, usually dying without a finishing kick. Enemies will not respawn, you will escape all grapple attacks without player interaction, and bosses will be very quick and simple exercises. Reloading is also done automatically whenever your guns are lowered, only ever requiring a reload if emptying a full clip all in one go. The D-pad or left analog stick is used to control the boat in the Toluca Lake boat stage.
Easy
A step up from Beginner but still player-friendly. Enemies fall to the ground after two or three hits and a finishing quick is usually required. Bosses are at half their usual strengths and speeds while enemies will respawn on a very limited basis. The player is responsible for escaping grapple attacks more quickly and must reload manually either in-game or the inventory. The D-pad or left analog stick is used to control the boat in the boat stage.
Normal
The way the game is meant to be played. Enemies fall to the ground after three or four hits and almost always require a finishing kick. Bosses are at their normal speeds and strengths while enemies tend to respawn in certain areas. The player must escape grapple attacks more quickly on their own and must reload manually in-game or in the inventory. The D-pad or left analog stick is used to control the boat stage.
Hard
The hardest difficulty option available. Enemies fall to the ground after four or five hits and almost always require a finishing quick. Bosses are at double their strengths and certain sub sections may require alternate strategies to successfully complete, while enemies regularly respawn and exist in higher numbers. The player is responsible for escaping grapple attacks more quickly and must reload manually either in-game or the inventory. The player will regularly trip and bump into walls while moving at full speed, and aiming will be slightly less accurate than normal. Both analog sticks are required to operate the boat in the boat stage.
Riddle Level
Sets the difficulty level of all puzzles and riddles, determining the amount of analysis required and clarity of clues given. Note that some puzzles will be the same on some levels (such as Easy/Normal or Hard/Extra), while others will be completely tailored per each of the four difficulties.
Easy
All puzzles are very simplified and straightforward. Solutions are regularly spelled out to you or are at least very clear, and sometimes puzzles are avoided by being giving the solution right from the start. A decent way to start and familiarize yourself with the puzzles if you find riddles intimidating, but shouldn't pose any real challenge.
Normal
Moderate puzzles with a share of difficulty in deciphering, but mostly fair and relatively clear. Not much outside knowledge is needed to decipher riddles but still helps. Some aspects may be extremely clear while others may require a deeper examination. Recommended for your first time through the game if you don't mind using your brain a bit.
Hard
Difficult puzzles that often require deeper thinking and an open mind. Certain aspects will be clear while others may be downright confusing. Knowledge of certain popular works will generally go a long way but can always be quickly researched if need be. Each riddle will likely require a few thorough readings to acquire a good understanding. Recommended for players who have have either already completed Normal, or are very eager for some mind-bending riddles. But be careful what you wish for.
Extra
Unlocked upon completing Easy, Normal and Hard Riddle Levels, puzzles are of extreme difficulty and riddles will require multiple reads and a very open mind to understand. Some parts will be clear while others will almost always be extremely confusing, vague or almost nonsensical. Deeper knowledge of certain fairy tales is a must, along with a general idea of other literature and concepts. Be sure to examine any items involved as they may offer subtle hints corresponding to their riddles. It'll be fairly common to have a good understanding of most of a riddle but be stumped by one or two parts, sometimes seemingly unaddressed at first glace.
Once unlocked, you will still never see the "Extra" option in the Riddle selection menu, however you will enter this level upon selecting "Hard". After saving the game you will see "Extra" Riddle Level listed in your save file if you met the requirements. Additionally, the next time you play on Hard it will be Hard, and then Extra after that, continuing to alternate in this fashion.
Suggested Action and Riddle Levels
For most newcomers to the Silent Hill series but those familiar with survival horror, obscure camera angle and tank controls, I'd recommend Normal and Normal since they're both quite reasonable. Those unfamiliar or not so comfortable with this game stay may want to consider Easy Action Level, while your Riddle Level depends on how intellectual you think you are. Most people should be okay on Normal, but riddles aren't quite your thing then Easy shouldn't provide any real speed bumps. Even those who have already played one or more Silent Hill games, I'd still suggest going with Normal and Normal, which feels most natural.
If you're a veteran of survival horror and enjoy a challenge, go ahead and try Hard Action Level because it's not too crazy, but do prepare for some alternate strategies to get past certain areas, and be sure to save often. Only if you intellectually-adept would I recommend Hard Riddle Level, but don't let me dissuade you if you're considering it. Just prepare for a deep analysis of most puzzles. As for Extra Riddle Level, by the time you actually unlock it you might as well give it a go and see how you manage, but don't expect it to be a smooth ride at all. But hey, that's what adventures are for.
| by Andrew Haffenden aka Conquerer (Silent Hill 2 FAQ/Walkthrough) |